YASKAWA ANTAIOS User manual

ANTAIOS
Evaluation Kit
User Guide
PAAE1000/1001 | Revision 1.03

PAAE1000/1001 Evaluation Kit Revision 1.03 2/28
Copyright © YASKAWA Europe GmbH, 2019
Liability Exclusion
We have tested the contents of this document regarding agreement with the hardware
and software described. Nevertheless, there may be deviations and we do not guarantee
complete agreement. The data in the document is tested periodically, however. Required
corrections are included in subsequent versions. We gratefully accept suggestions for
improvements.
Copyright
Copyright © YASKAWA Europe GmbH 2019. All Rights Reserved.
Unless permission has been expressly granted, passing on this document or copying it, or
using and sharing its content are not allowed. Offenders will be held liable. All rights re-
served, in the event a patent is granted or a utility model or design is registered.
This document is subject to changes without prior notice.

Table of Contents
PAAE1000/1001 Evaluation Kit Revision 1.03 3/28
Copyright © YASKAWA Europe GmbH, 2019
1Evaluation Kit Contents ..................................................................6
2Evaluation Board Overview ............................................................7
3Coreboard ........................................................................................9
3.1 Antaios ASIC (IC3)................................................................................................ 9
3.2 DDR2 SDRAM (IC4).............................................................................................. 9
3.3 JTAG Connector (X5)............................................................................................ 9
3.4 ETM Connector (X4).............................................................................................10
3.5 PortE - Debug Connector (X3)..............................................................................10
3.6 Test Pads.............................................................................................................11
4Mainboard ......................................................................................12
4.1 Power Supply.......................................................................................................12
4.2 Boot source select (X19)......................................................................................12
4.3 PortA - Quad SPI, NAND, SD/MMC .....................................................................12
4.4 PortB - Extension PCB connectors for Gigabit and external MII (X16, X17, X18) .13
4.5PortC –VPC, UART, CAN, PBM and GPIO(X55, X56).........................................14
4.6 PortD - Asynchronous External Interface (AEI), GPIOs, UART and TechIO.........15
4.7 I2C .......................................................................................................................15
4.8 UART 1/2 and USB to serial converter .................................................................16
4.9 SPI.......................................................................................................................16
4.10 Test pads and debug connectors X31, X30, X50..................................................17
4.11 Board to Board connectors (X27, X33).................................................................19
4.12 Boundary Scan (X22)...........................................................................................19
4.13 32MHz clock source.............................................................................................20
5Extension PCBs.............................................................................21
5.1 LP5480, ExtPHY_TI .............................................................................................21
5.2 LP5481, TechIO_Dv4...........................................................................................21
5.3 LP5482, SerialD...................................................................................................22
5.4 LP5483, GPHY.....................................................................................................23
5.5 LP5484, TechIO_Bv4...........................................................................................23
5.6 LP5485, ExtPHY_MC...........................................................................................23
5.7 LP5486, ExtPHY_BC............................................................................................24
5.8 LP5487, BroadR...................................................................................................24
5.9 Debug PCB LP5966C...........................................................................................25
6Order Information..........................................................................26
7Revision History ............................................................................27

List of Figures
PAAE1000/1001 Evaluation Kit Revision 1.03 4/28
Copyright © YASKAWA Europe GmbH, 2019
List of Figures
Figure 2-1 Mainboard.................................................................................................. 7
Figure 2-2 Coreboard.................................................................................................. 8
Figure 3-1 JTAG connector X5.................................................................................... 9
Figure 3-2 ETM connector X4 ....................................................................................10
Figure 3-3 PortE debug connector X3........................................................................11
Figure 4-1 24V DC connector X83 .............................................................................12
Figure 4-2 Bootsource selector X19...........................................................................12
Figure 4-3 QSPI CS selector X36...............................................................................13
Figure 4-4 MII interface of internal GMAC X16...........................................................13
Figure 4-5 External MII connectors X17 and X18.......................................................14
Figure 4-6 PortC box header X55 and X56 ................................................................15
Figure 4-7 I²C channel selector..................................................................................15
Figure 4-8 SPI0 CS selector.......................................................................................16
Figure 4-9 SPI master/slave selector..........................................................................17
Figure 4-10 PortA debug connector X30 and X31........................................................18
Figure 4-11 PortC debug connector X50......................................................................18
Figure 4-12 Board to board connectors X27 and X33...................................................19
Figure 4-13 Crystal oscillator Q1 as 32MHz clock source.............................................20
Figure 5-1 Extension PCB LP5480.............................................................................21
Figure 5-2 Extension PCB LP5481.............................................................................22
Figure 5-3 Extension PCB LP5482.............................................................................22
Figure 5-4 Extension PCB LP5483.............................................................................23
Figure 5-5 Extension PCB LP5484.............................................................................23
Figure 5-6 Extension PCB LP5485.............................................................................24
Figure 5-7 Extension PCB LP5486.............................................................................24
Figure 5-8 Debug PCB LP5966C...............................................................................25

List of Tables
PAAE1000/1001 Evaluation Kit Revision 1.03 5/28
Copyright © YASKAWA Europe GmbH, 2019
List of Tables
Table 3-1 Coreboard test pads..................................................................................11
Table 4-1 UART2 to connector configuration ............................................................16
Table 4-2 Test pads mainboard ................................................................................17
Table 6-1 Order Information......................................................................................26
Table 7-1 Revision history.........................................................................................27

Evaluation Kit Contents
PAAE1000/1001 Evaluation Kit Revision 1.03 6/28
Copyright © YASKAWA Europe GmbH, 2019
1 Evaluation Kit Contents
1x Evaluation board with extension PCBs
- 1x LP5483 (external GigaBit Phy)
- 1x LP5481 (technology IO)
1x Debug PCB LP5966
1x USB cable
2x Ribbon cable
1x DC connector

Evaluation Board Overview
PAAE1000/1001 Evaluation Kit Revision 1.03 7/28
Copyright © YASKAWA Europe GmbH, 2019
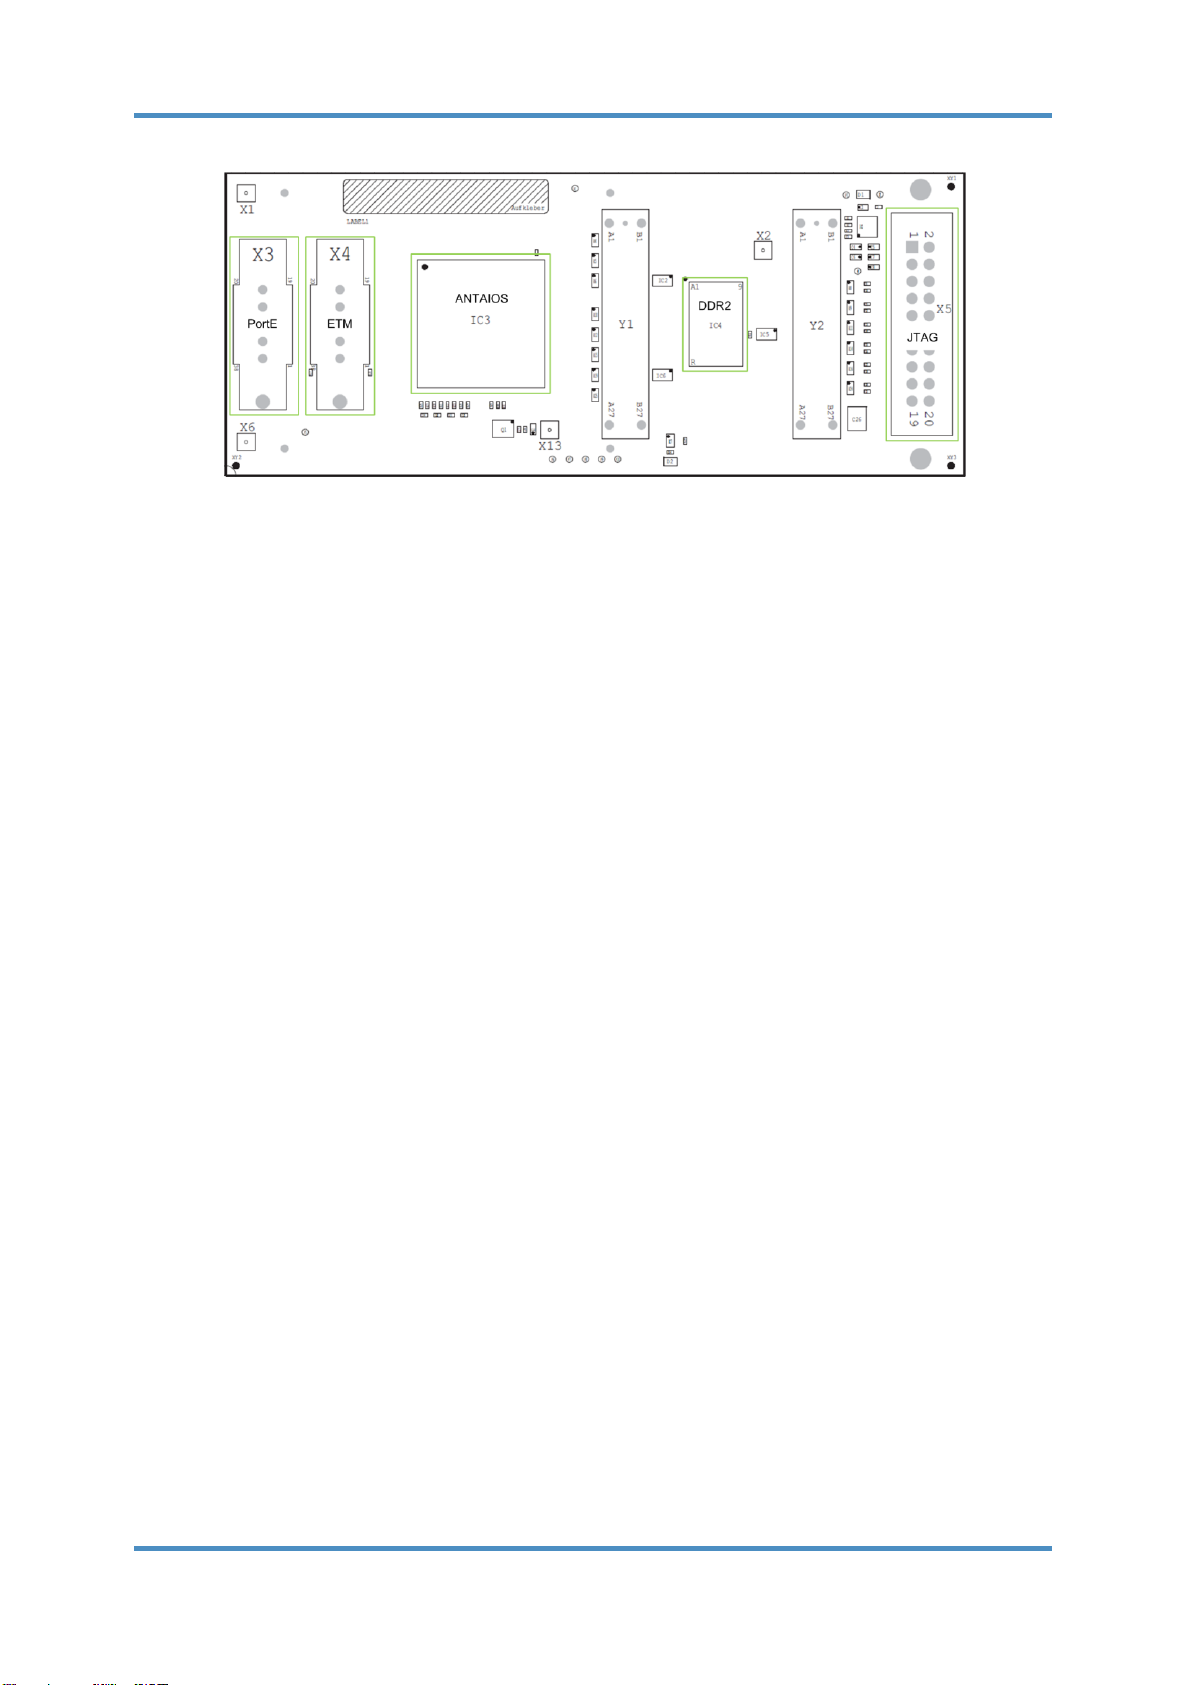
2 Evaluation Board Overview
The ANTAIOS evaluation board consists of two basic components:
- The “mainboard” with all external interfaces, switches, LEDs, jumpers and power
supply powered by 24V DC
- The “coreboard” with the ANTAIOS ASIC itself, DDR2 Ram and JTAG/ETM interface
Figure 2-1 Mainboard
PortC
PortB
Power
Switch
PortA
PortD
USB 2.0
SliceBus
BootSource
select:
RTGPIO
GPIO
GMAC
SPI
BootStrap
UART 1/2
USB Debug
UART1
Serial Physics
(SSI, RS485, CAN)
Reset
Power
measurement
Copper/
Fiber
Connectors
24V
+-
NAND
AEI
I²C
QSPI
Eth1Eth2
Evaluation Board Overview
PAAE1000/1001 Evaluation Kit Revision 1.03 8/28
Copyright © YASKAWA Europe GmbH, 2019
Figure 2-2 Coreboard
The coreboard is plugged onto the mainboard using the connectors X27 and X33.
To ensure the mechanical connection the coreboard is additionally fixed with two screws.
The functionality of the evaluation board can be extended by adding so called extension
PCBs. See chapter “5 - Extension PCBs” for more details.

Coreboard
PAAE1000/1001 Evaluation Kit Revision 1.03 9/28
Copyright © YASKAWA Europe GmbH, 2019
3 Coreboard
Antaios ASIC (IC3)3.1
LP5998: TFBGA380 15x15mm² with 0.65mm pitch.
LP5999: TFBGA385 19x19mm² with 0.80mm pitch.
DDR2 SDRAM (IC4)3.2
One Micron MT47H64M16NF-25E:M DDR 2 memory chip is assembled on the coreboard.
The usable memory is 64MByte of DDR2 SDRAM.
For debugging the DDR2 interface the contactless debug interface Keysight Soft Touch
E5394A is supported on connectors Y1 and Y2 but not assembled by default.
JTAG Connector (X5)3.3
The JTAG connector is used for connecting an in circuit debugger like “Power Debug” from
Lauterbach for on-chip debugging. The maximum JTAG frequency is 48MHz.
Figure 3-1 JTAG connector X5

Coreboard
PAAE1000/1001 Evaluation Kit Revision 1.03 10/28
Copyright © YASKAWA Europe GmbH, 2019
ETM Connector (X4)3.4
In conjunction with a trace device like “PowerTrace” from Lauterbach the ETM connector can
be used to trace the program and data flow. The trace clock frequency is 144MHz.
Figure 3-2 ETM connector X4
PortE - Debug Connector (X3)3.5
PortE of ANTAIOS can be used to extend the ETM trace width from 16 to 32 data lines.
Additionally 16 real time GPIOs or debug signals for Profibus Master, ARAC and PPU tracing
can be driven to X3 by configuring the PinController of ANTAIOS.

Coreboard
PAAE1000/1001 Evaluation Kit Revision 1.03 11/28
Copyright © YASKAWA Europe GmbH, 2019
Figure 3-3 PortE debug connector X3
Test Pads3.6
Table 3-1 Coreboard test pads
Pad
Description
P1
TEST3
P2
DDR_VREF
P3
PGOOD_VTT
P4
DDR_VTT
P5
TEST0
P6
1V2 ANTAIOS
P7
1V8 ANTAIOS
P8
GND
P9
1V8 DDR RAM
P10
3V3

Mainboard
PAAE1000/1001 Evaluation Kit Revision 1.03 12/28
Copyright © YASKAWA Europe GmbH, 2019
4 Mainboard
Power Supply4.1
The mainboard must be powered by a 24V DC supply voltage connected to X83.
Figure 4-1 24V DC connector X83
Depending on the extension PCBs used the evaluation board requires between 70mA and
220mA.
Boot source select (X19)4.2
ANTAIOS supports booting from QSPI flash, NAND flash, 16 bit parallel interface (AEI) and
I²C EEPROM. The boot source can be selected by setting appropriate jumpers to connector
X19:
Figure 4-2 Bootsource selector X19
PortA - Quad SPI, NAND, SD/MMC4.3
Depending on the PCB version of the mainboard either a QSPI flash and SD/MMC card slot
(LP5992A) or a NAND flash (LP5992C) is assembled.
On PCB version 5992A one Micron N25Q064A13EF640 (3.3V) 64Mb QSPI flash is
assembled on the mainboard. Jumper X36 selects if CS0 or CS1 of ANTAIOS QSPI
controller is driven to the QSPI flash.

Mainboard
PAAE1000/1001 Evaluation Kit Revision 1.03 13/28
Copyright © YASKAWA Europe GmbH, 2019
Figure 4-3 QSPI CS selector X36
On PCB version 5992C one Micron MT29F8G08ABACAH4 (3.3V) 8Gb NAND flash is
assembled on the mainboard.
PortB - Extension PCB connectors for Gigabit and4.4 external MII (X16, X17, X18)
The shared interfaces of ANTAIOS like external MII and GMII are accessible through various
extension PCBs connected to mictor connectors.
Using only X16 the internal gigabit MAC can be operated in 10/100Mbit mode.
Figure 4-4 MII interface of internal GMAC X16
If the GMAC should be operated in the 1000Mbit mode the user has to connect the extension
PCB LP5483. This extension PCB connects the additional GMII signals from PortB on X17 to
the Marvell 88E1119R gigabit PHY.

Mainboard
PAAE1000/1001 Evaluation Kit Revision 1.03 14/28
Copyright © YASKAWA Europe GmbH, 2019
PortB of ANTAIOS additionally features the both external MII signals from the RT Ethernet
switch. The 36 signals of PortB are connected to the mictor connectors X17 and X18:
Figure 4-5 External MII connectors X17 and X18
Please note that the TechIO and GPIO functions can’t be used with the extension PCB
version 5483A-V10. The TechIO functionality of PortB_v4 can be used by connecting the
TechIO extension PCB LP5484 to X17 and X18.
If the internal PHYs of ANTAIOS are not used up to three 10/100Mbit PHYs can be
connected to X16, X17 and X18. The external PHY1 interrupt is connected to GPIO(6),
external PHY2 interrupt is connected to GPIO(7).
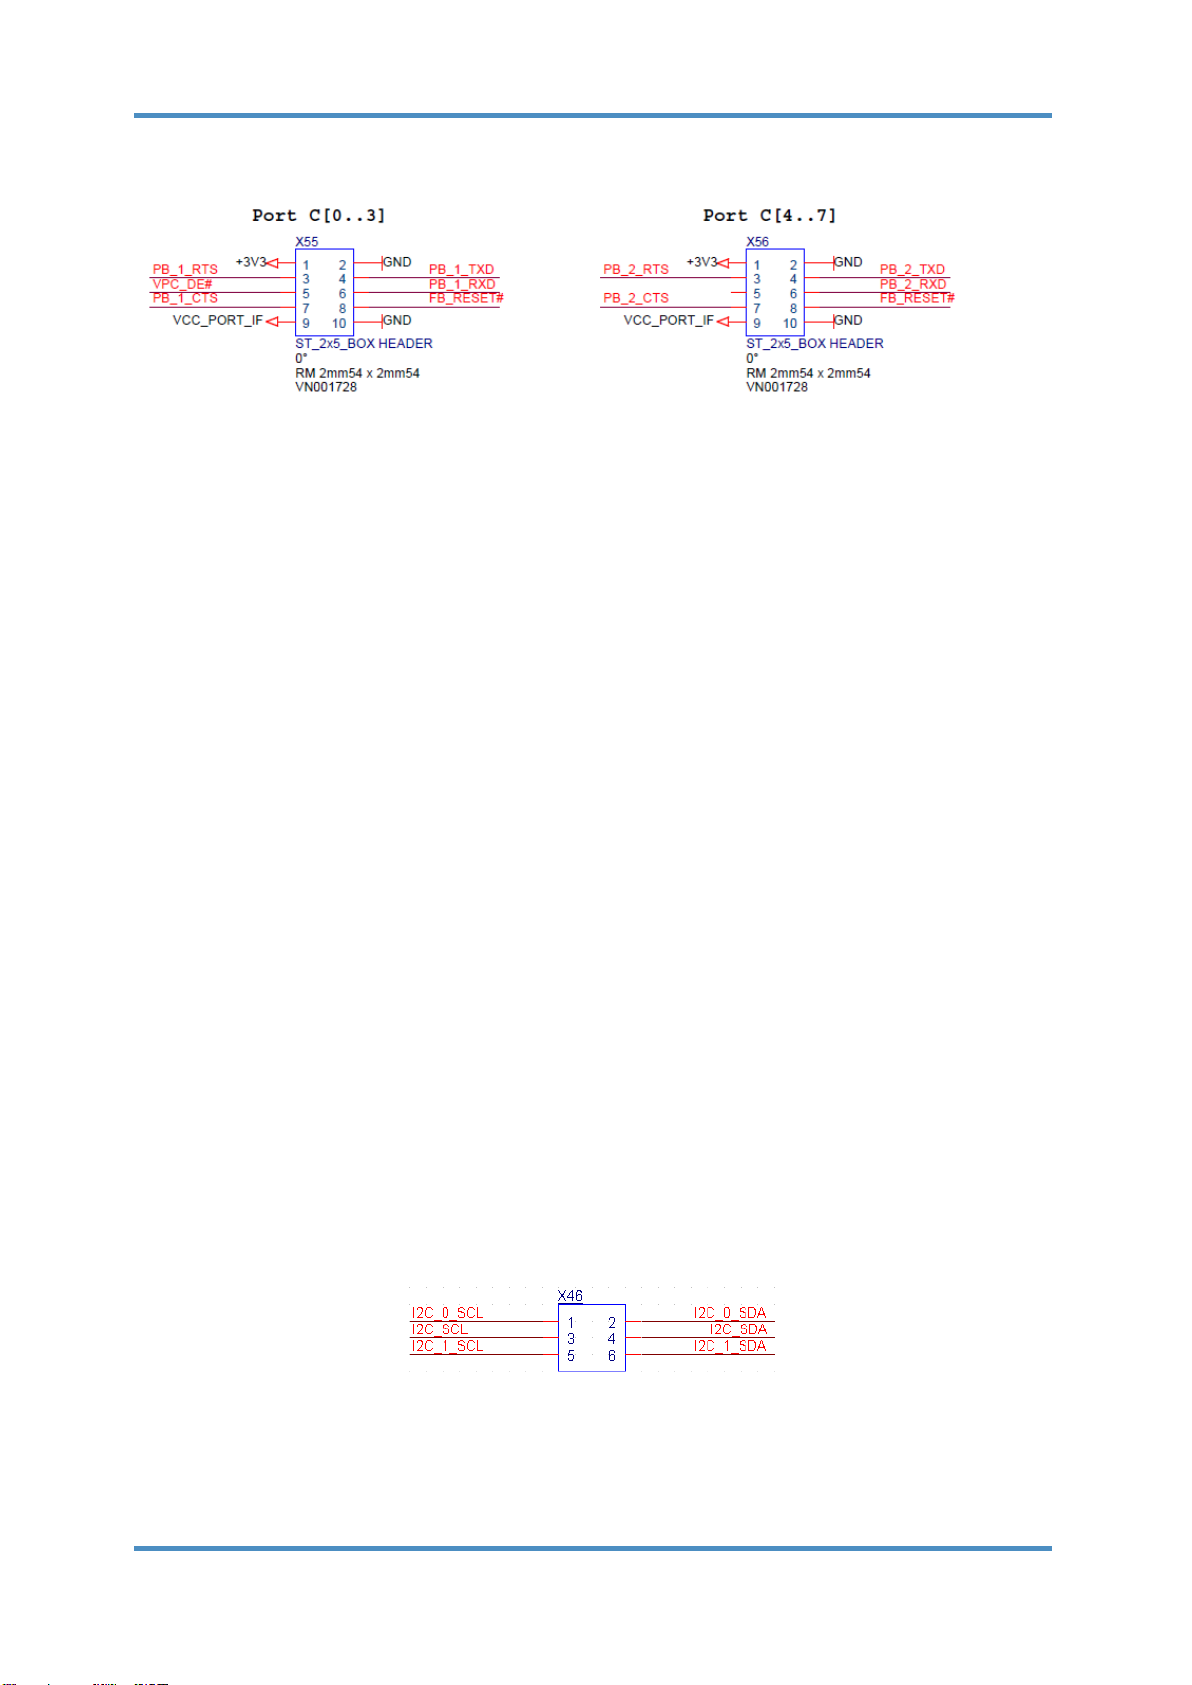
PortC –VPC, UART, CAN, PBM and GPIO(X55, X56)4.5
The eight data lines of PortC (VPC, UART2, CAN1/2, PBM1/2 and GPIOs) are driven to two
2x5 pin headers and can be connected to the appropriate physics and SubD connectors via
ribbon cable.
Mainboard
PAAE1000/1001 Evaluation Kit Revision 1.03 15/28
Copyright © YASKAWA Europe GmbH, 2019
Figure 4-6 PortC box header X55 and X56
PortD - Asynchronous External Interface (AEI),4.6 GPIOs, UART and TechIO
PortD of ANTAIOS can be used as asynchronous external interface (AEI) in master and
slave mode, digital inputs and outputs with technology functionality and GPIOs and UART2.
All signals of PortD are driven to the mictor connectors X24 and X25. There are two special
extension PCBs for PortD available which allow the usage of the TechIO or GPIO/UART2
functionality of PortD.
If no extension PCB is connected to X24 and X25 ANTAIOS can access an address range of
up to 2Mbyte using the asynchronous external interface (AEI) and two chip selects CS0 and
CS1.
CS0: Used in master mode to connect to slave board (e.g. another Antaios evaluation board)
with the two mictor connectors of PortD.
CS1: connected to two Cypress CY14B108N-BA25XI 512k x 16 nvSRAM chips.
Note that the nvSRAM is not available as soon as any extension PCB is connected to PortD.
I2C4.7
ANTAIOS features two I²C channels, I2C_1 is shared with GPIO 4/5 and I2C_2 is placed on
PortC. Two I²C devices are assembled on the mainboard, one CAT24WC64 64kb EEPROM
and a RTC (RTC-8564JE). The user has to choose which I²C channel should be used to
access the I²C bus (I2C_SDA, I2C_SCL) of the mainboard by setting jumper X46:
Figure 4-7 I²C channel selector
To enable write accesses to the CAT24WC64 64kb EEPROM the user has to shorten jumper
X45.

Mainboard
PAAE1000/1001 Evaluation Kit Revision 1.03 16/28
Copyright © YASKAWA Europe GmbH, 2019
UART 1/2 and USB to serial converter4.8
The two serial interfaces UART1 and UART2 can be routed to a 1000kbps RS-232
transceiver (SP3232EU) or a dual USB to serial UART converter IC (FT2232D).
The USB to serial UART converter allows serial communication with UART 1/2 over USB
without the need of a serial interface on the PC. The FT2232D requires USB drivers
available free from http://www.ftdichip.com which are used to make the FT2232D appear as
two virtual COM ports on the host PC. This allows the user to communicate with the USB
interface via a standard PC serial emulation port (for example TTY).
Note: UART1 is mapped to the virtual COM port with the higher number and UART2 to the
one with the lower number.
Jumper X72 selects if UART1 uses the SUBD or USB debug connector.
When X72 is left open, UART1 is driven to the SUBD connector X79.
If X72 is shortened the communication is done using the USB debug connector X81.
As UART2 is shared via the PinController users can choose to use UART2 either on PortC or
PortD (extension PCB LP5482A-V10 needed) by connecting the headers according to the
following table. No additional jumper settings are needed.
Table 4-1 UART2 to connector configuration
UART2 on
to connector
connect with ribbon cable
PortC
SubD (X78)
X55 ↔ X68
Debug USB (X81)
X55 ↔ X69
PortD
SubD (X78)
X8(LP5482A-V10) ↔ X68
Debug USB (X81)
X8(LP5482A-V10) ↔ X69
SPI4.9
The Single SPI channel is directly connected to a 2x5pin box header and can be used in
master or slave mode, e.g. for connecting two ANTAIOS evaluation boards with a ribbon
cable.
As the SPI controller offers two chip selects the user can choose if SPI_CS#0 or SPI_CS#1
should be driven to the box header by setting jumper X43:
Figure 4-8 SPI0 CS selector

Mainboard
PAAE1000/1001 Evaluation Kit Revision 1.03 17/28
Copyright © YASKAWA Europe GmbH, 2019
To use the SPI channel in slave mode the user has to shortcut jumper X49:
Figure 4-9 SPI master/slave selector
Test pads and debug connectors X31, X30, X504.10
Table 4-2 Test pads mainboard
Pad
Description
P1
TX2-
P2
TX2+
P3
TX1-
P4
TX1+
P5
RX2+
P6
RX2-
P7
RX1+
P8
RX1-
P9
Slicebus NDLI
P10
GND
P11
Slicebus ALARM
P12
GND
P13
Slicebus MDLO
P14
GND
P15
32MHz ASIC clock soucre
P16
Power Analog0
P17
Power Cout
P18
Power Run#
P19
Power Boost
P20
EN_3V3
P21
PG_3V3
P22
I2C SCL
P23
I2C SDA
P24
EN_1V2
P25
EN_1V8
P26
Powergood 3V3
P27
Powergood 1V8
P28
Powergood 1V2
P29
Powergood VCC
P30
I_Shunt
Mainboard
PAAE1000/1001 Evaluation Kit Revision 1.03 18/28
Copyright © YASKAWA Europe GmbH, 2019
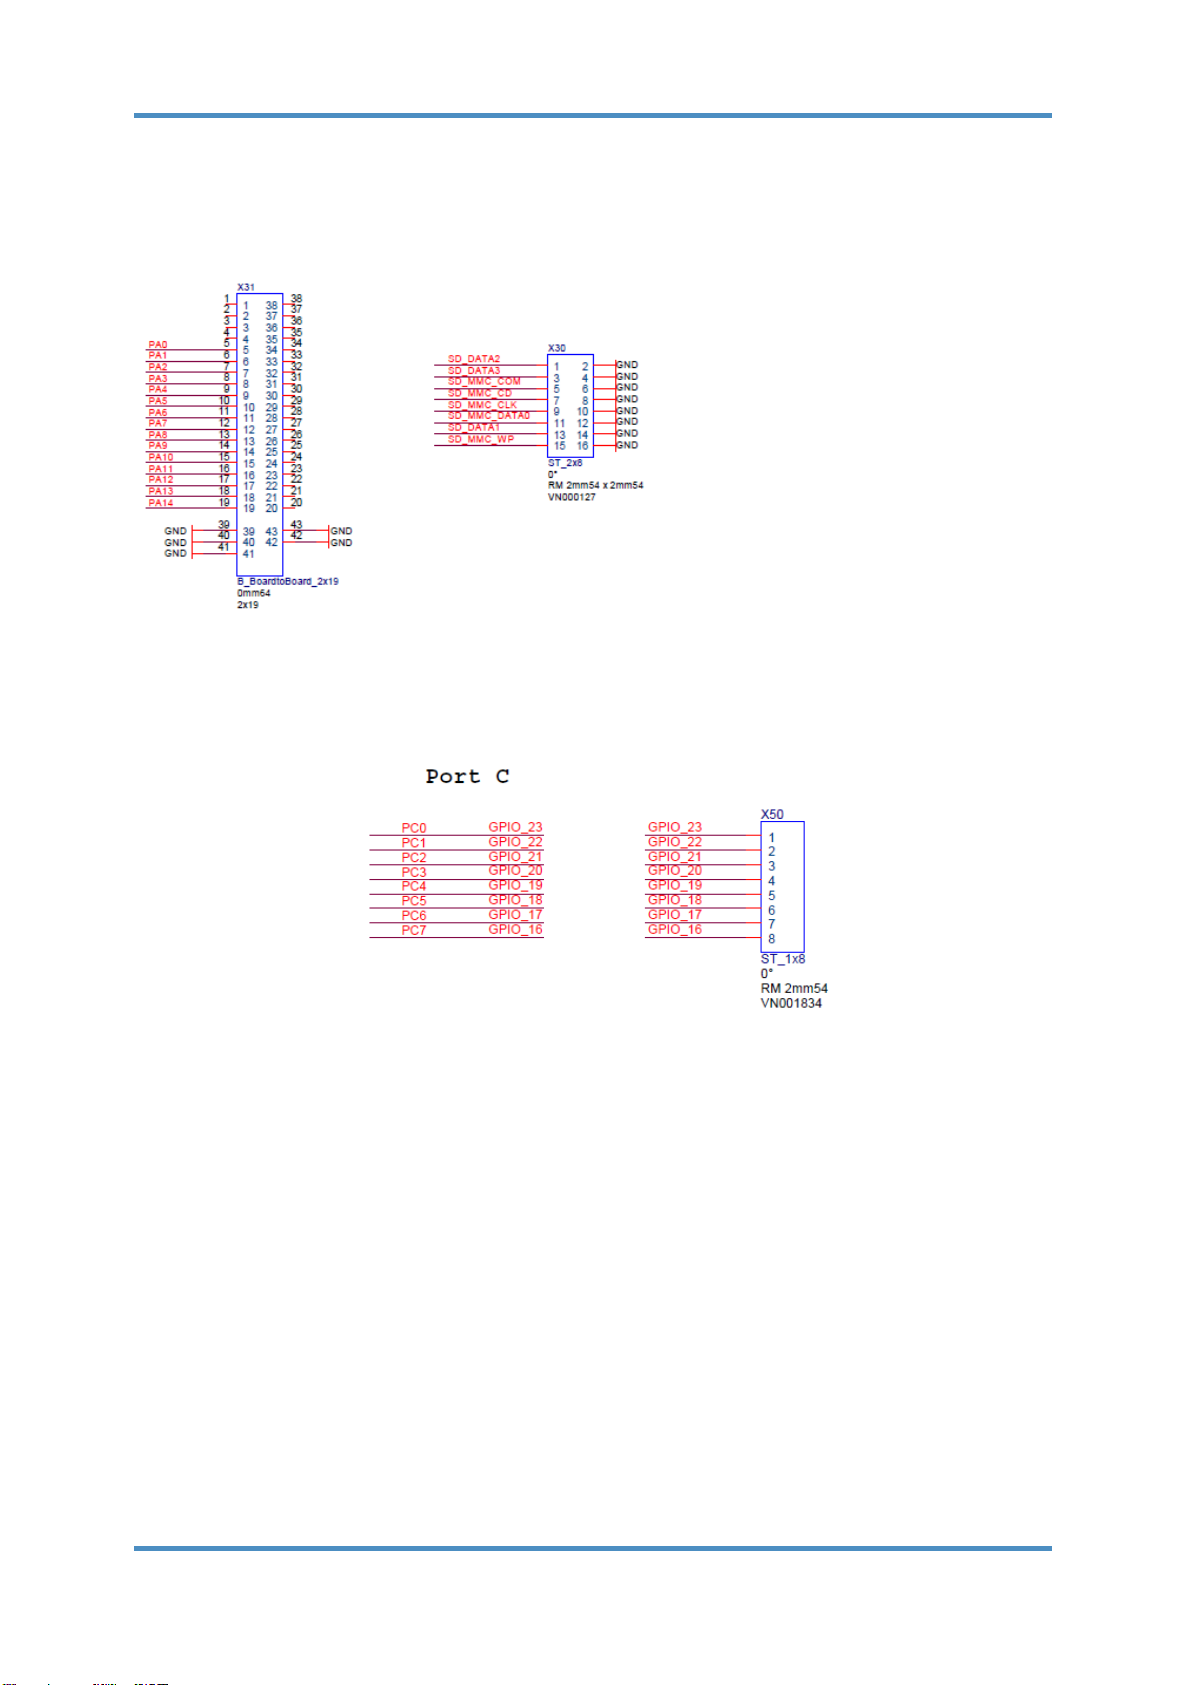
All 15 signals of PortA are driven to debug connector X31, the SD card signals are
additionally connected to X30:
Figure 4-10 PortA debug connector X30 and X31
All eight signals of PortC are driven to 1x8 pin header X50:
Figure 4-11 PortC debug connector X50

Mainboard
PAAE1000/1001 Evaluation Kit Revision 1.03 19/28
Copyright © YASKAWA Europe GmbH, 2019
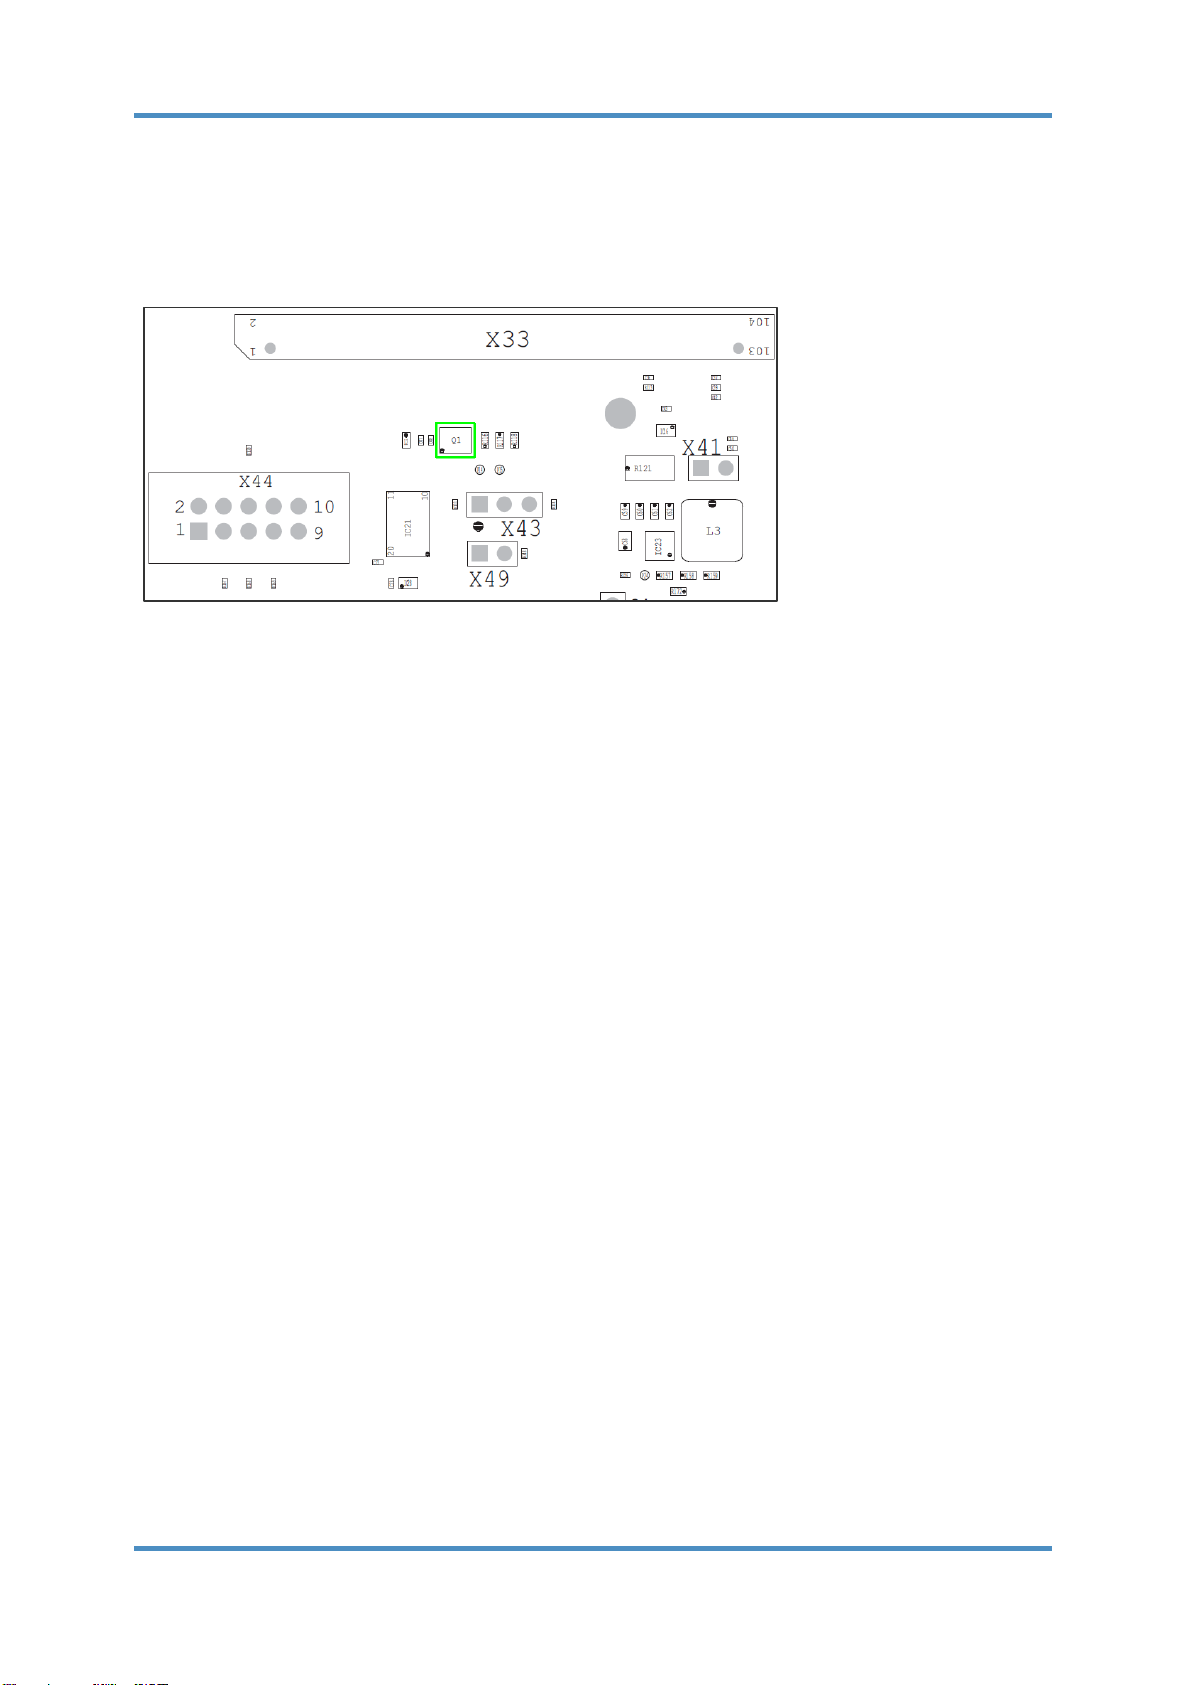
Board to Board connectors (X27, X33)4.11
The ANTAIOS coreboard is connected to the board to board connectors X27 and X33 and
must be secured with two screws.
Figure 4-12 Board to board connectors X27 and X33
Boundary Scan (X22)4.12
Placing a jumper on X22 activates the boundary scan mode of ANTAIOS.
For normal operation leave X22 open.
Mainboard
PAAE1000/1001 Evaluation Kit Revision 1.03 20/28
Copyright © YASKAWA Europe GmbH, 2019
32MHz clock source4.13
The evaluation board mainboard PCBs LP5992A up to version V11 use a programmable
crystal oscillator as 32MHz clock source for the ANTAIOS asic.
Figure 4-13 Crystal oscillator Q1 as 32MHz clock source
Please note that the use of programmable crystal oscillators will induce a considerable long-
term jitter. For production devices a fixed frequency crystal oscillator should be used to
reduce the long term jitter to a minimum.
See ANT1000_ANT1001_Datasheet.pdf for more details about jitter.
This manual suits for next models
2
Table of contents


