ENEN
The scooter in its basic equipment is designed for riding
during daylight in areas meant for sport and recreation. For
roads with car traic or for riding in the dark, you need to
provide your scooter with safety features (lights, reflectors,
etc.) in accordance with the regulations valid in your country.
Pay attention to traic and general safety regulations and use
protective accessories (helmets, knee and elbow pads, good
Before each ride, always check good function of the brakes
and the overall technical condition of the scooter. Donot
exceed the maximum loading capacity of the scooter
(as specified on the front side). The scooter is designed for
one rider only! Do not overload the scooter, it is not intended
for jumping or acrobatic riding.
All the speed-limiting mechanisms (brake pads or discs, rims,
and tires etc.) can become warm when used. For this reason,
it is not recommend able to touch them before cooling o!
To park the scooter, use the kick-stand! Beware that its
loading capacity is approximately 15kg. Donot step on
the footboard when the scooter is parked.
When riding, always grip the handlebar with both hands. While
pushing o with one foot, place the other foot on the footboard
of the scooter. Regularly exchange feet. In order to brake, press
the brake levers on the handlebars. Usually you would use the
right lever which controls the rear brake. The front brake should
only be used to supplement the stopping power of the rear
brake. Never squeeze the front brake without also squeezing
the rear brake with equal or greater force.
violent braking may cause injury.
Correct and regular maintenance increases safety and
lengthens the life span of your scooter. Regularly inspect screw
connections, quick releases, pressure in tires and lubricate the
moveable parts (wheels, bearings, handlebars bearings, cables,
brake parts etc.). Make sure that no lubricant gets on the rims
or brake pads. Grease reduces their eect!
If this situation occurs, it is necessary to remove the grease
from all the parts, using asolvent and/or degreaser.
Inspect the tires for cuts, nicks and deformities. Replace tires
that show excessive wear and damage with an equivalent tire.
Inspect the self-locking nuts. If they get loose freely, exchange
Check the spokes for defects. Irregular strain or looseness in
spokes can cause their cracking or can make the wheel wobble.
Keep your scooter clean, use soft cloth moistened with water.
It should be stored inside, on adry and shaded place. Donot
expose the scooter to high humidity or extreme temperatures
over along period of time. Before the winter, prepare it against
corrosion and inflate the tires to its maximal value as specified
on the side of the tire. The producer does not cover damage
caused solely by neglected maintenance, non-adequate
adaptation, or inappropriate treatment and storage.
The product complies with the corresponding EU standards
(ČSN EN 14619) and received quality and safely certifications
from a leading Czech testing lab – Engineering Test Institute
(Strojírenský zkušební ústav, s.p.).
Producer: EU INTREA – PIKO, s.r.o., Sasanková 2657/2, 106 00
Praha 10, Česká republika, www.yedoo.eu
The content, extend and duration of the warranty conforms to
the valid legal code in the respective country of the purchase
The buyer of the new Yedoo scooter (product) can apply the
warranty during the period of 36 months from the purchase.
The warranty commences on the day of the sale to the end user
and is automatically extended when the product is taken into
repair during warranty period.
The warranty must be filled out with the retailer, where
the product was purchased (see bellow). When applying the
warranty, we recommend presenting the filled out sheet bellow,
the receipt and a complete and cleaned product. The seller
will give a written confirmation to the buyer regarding the
acceptance of the product into the warranty process.
The product must be assembled following the instructions of
the manual. The products shall only be used for the purposes,
which it was designed for. The product must be stored and
maintained in the ways in accordance with the Instruction
manual. The warranty does not cover damage caused by
common wear and tear is not covered by this warranty. The
producer does not cover damage caused by incorrect assembly
or by use in contradiction with the Instruction manual.
Serial number of the frame:
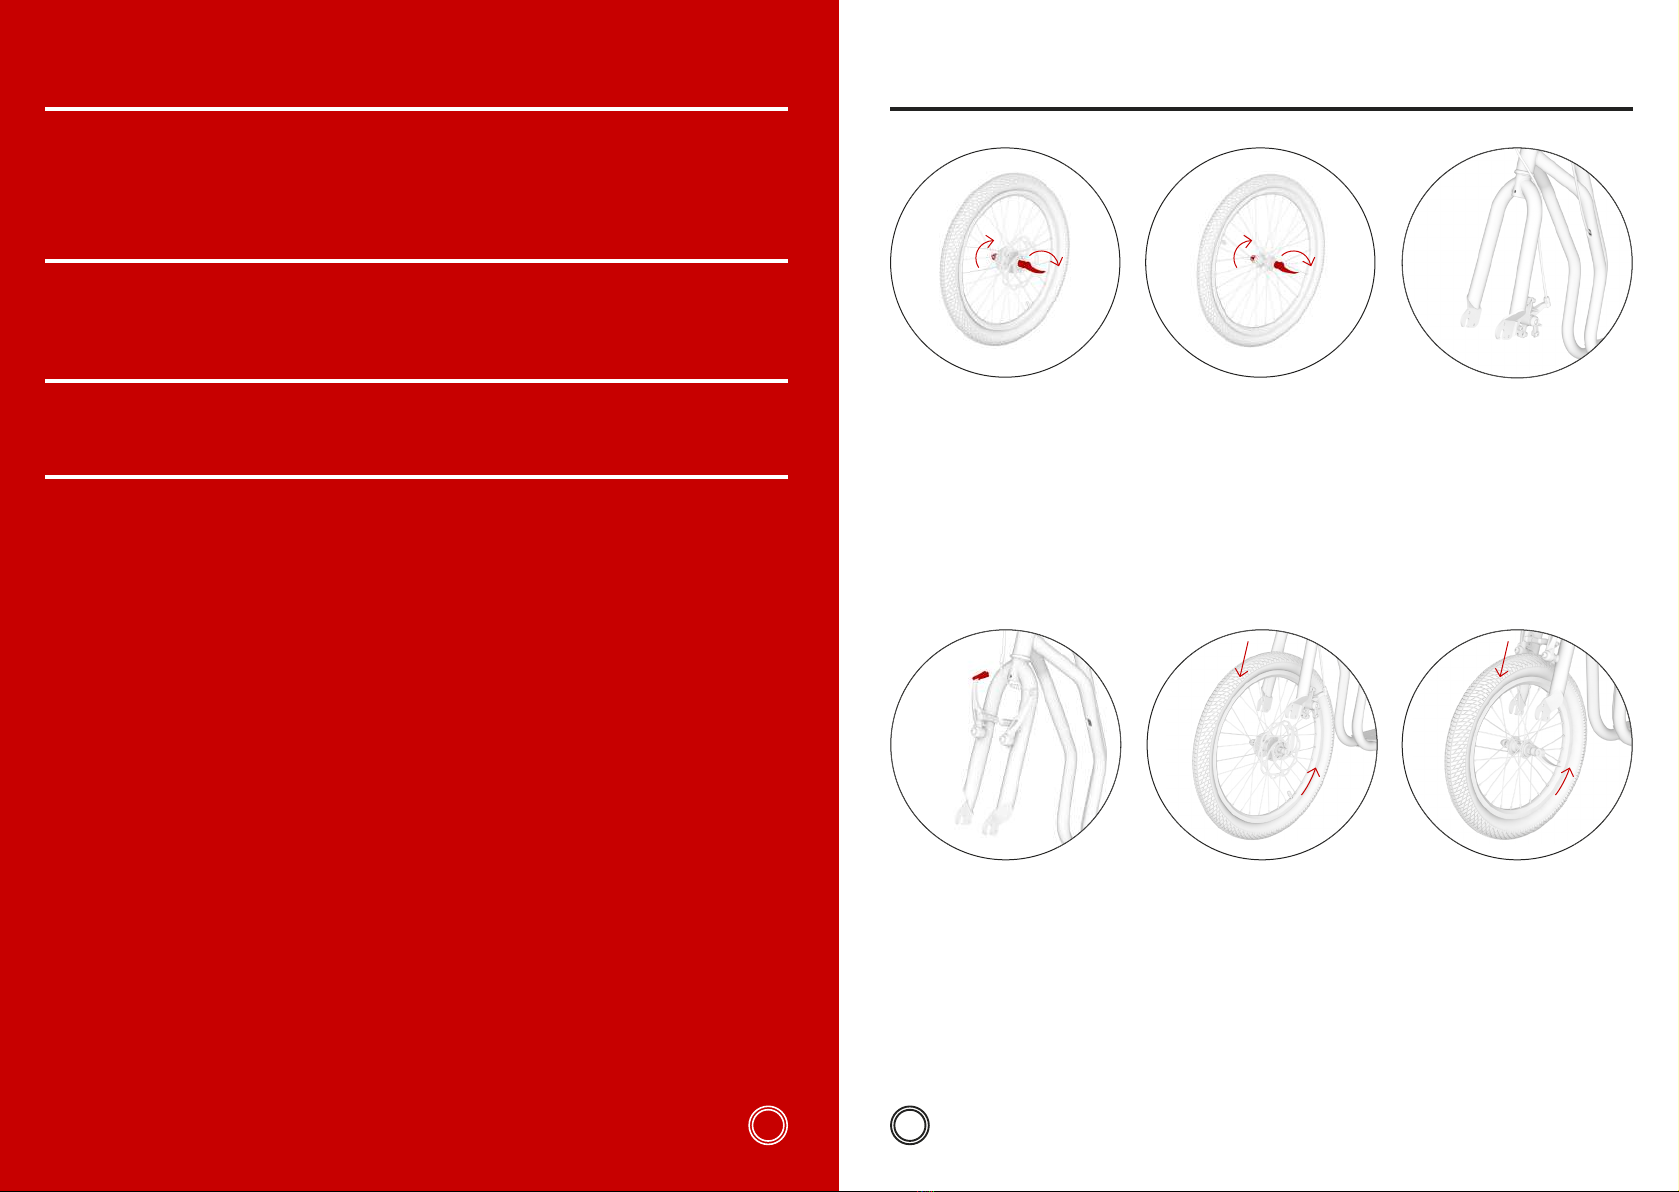
6.b
When braking, check that the brake
pads of both wheels fit tightly on the
rim sides. If not, you can adjust their
position via ascrew that connects them
1
Check that the pads make enough
space (1–2 mm) after releasing the brake
levers. The distance can be adjusted by
tightening or loosening the brake cable
2
In case the brake pad is touching the
wheel when turning, symmetrically
adjust the distance of brake arms by
3
6.a
1 1
3 3
2
7.b7.a
Fasten the end of the brake cable in
the lock and secure with the cable tie,
6.b
Adjustment of brakes
On both wheels, check that the discs
are not touching the brake pads when
the wheel is turning. If yes, loosen the
1
position of both brake pads so that they
are parallel to the disc on their whole
length. Then tighten the screws again.
The distance between the pads and the
disc should be minimal. You can adjust
it with the adjusting roller (
2
regulates the tension of the brake cable.
If this is not enough, tighten or even
loosen the brake cable at the anchor
3
6.a
2
1 1
3
4 Nm