Yellowtec iXm User manual

iXm Getting Started.
Yellowtec 10
-
2009.
Page
1
of
6
Congratulations to iX
m
,
the
powerful
and easy to use
reporter
m
ic
ro
phone
with built
-
in
recorder.
Before you start
recording
for the first time
,
you
will
need to
charge the internal Li
-
Ion
accumulator battery to 100% capacity and to insert the S
D card.
Preparation
C
harging iXm
Connect the device to a USB
-
Port
of your PC
or a
n
USB
-
Charger
by
plugging
-
in the USB
cable
.
i
Xm
will indicate the charging
process
by a slow
ly
yellow
blinking
B
AT indicator
.
T
he
device
need
no
t be
switched
on.
When
the
BAT indicator
stops blinking
,
the internal Li
-
Ion
a
ccumulator
b
attery
is
full.
SD Memory
Card
Insert the SD
m
emory
c
ard
into the device as shown on
the picture
below
. Push
it
to the
bottom and release it. The card
sha
ll snap in.
If you
want to remove the card
,
press
it
down
again
to release
it
.
Getting Started

iXm Getting Started.
Yellowtec 10
-
2009.
Page
2
of
6
Switch on
Press and hold
the Stop button on the playback keypad and the Record button on the record
keypad simultaneously for about 1 second.
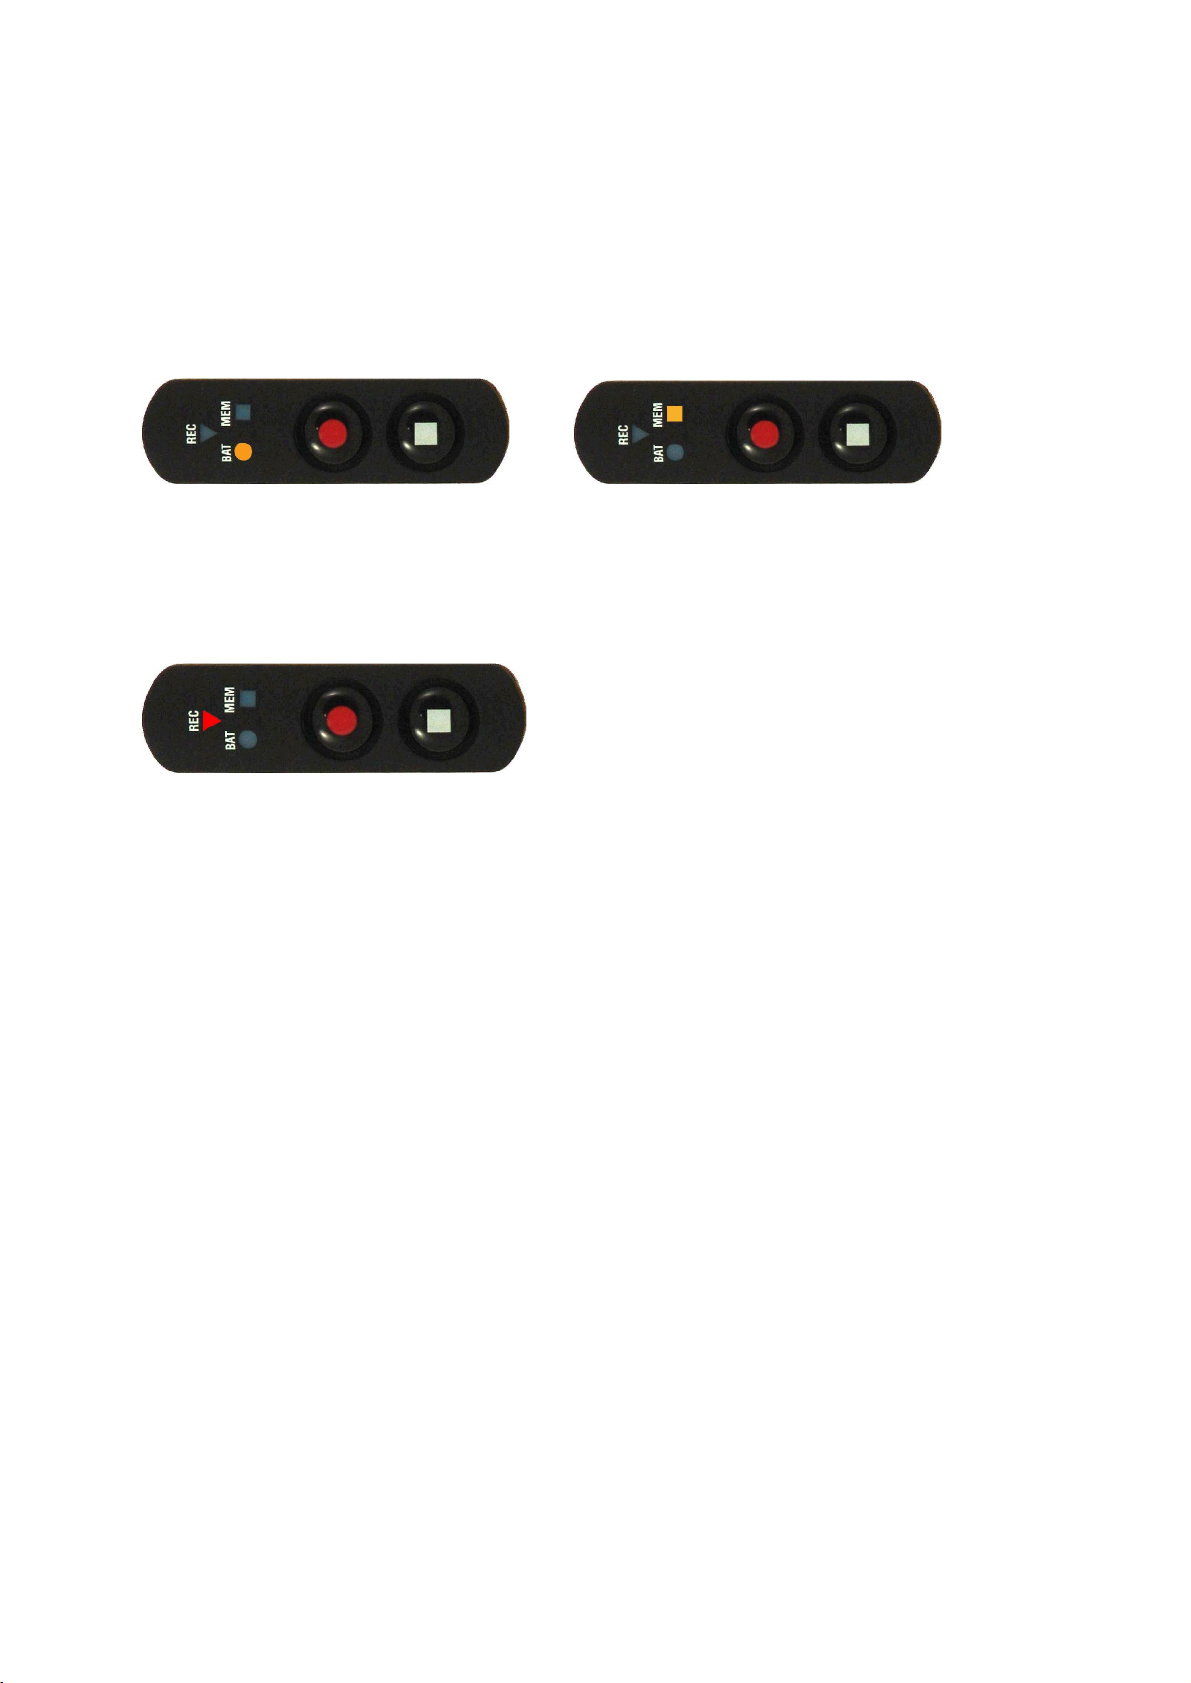
Record Keypad
Playback Keypad
iX
m
will start
booting
.
The boot process is
indicat
ed by a fast
green
blinking
REC
i
ndicator
.
When
booting
is com
pleted
,
iX
m will perform a
memory check
indica
ted by a fast red
blinking M
EM
indicator
.
No
te
:
a
successful
ly completed
memory check will cause
the
MEM i
ndicator
to
stop blinking.
I
f the
M
EM
LED
does not
stop
blinking
after a few seconds, the SD
m
emory
c
ard is not
read
correctly
.
Please make
sure that the
c
ard is inserted properly.
The
d
evice is now
ready f
or record
indicated by a
red
flashing
REC
indicator
every
2
seconds.
Switch off
Press and hold
the Stop buttons on record and playback keypad simultaneously. The device
will switch off immediately. All indicators will shut off.
Record Keypad
Playback Keypad
iXm Getting Started.
Yellowtec 10
-
2009.
Page
3
of
6
Record
S
tatus check
Press
the
Stop
button on the record keypad
shortly.
The BAT indicator will blink up to 5 times
followed by the MEM indicator.
Each blink stands for one hour operation
time
with respect to
remaining power
and respectively
free memory
.
S
tart
R
ecording
While the device
is ready
to record,
you can start a record
ing
by
pressing the
Record
button.
The REC indicator will
light up red permane
ntly.
Set
ting
a Marker
Press the Record b
utton t
o set
a marker while you are recording.
The REC indicator will blink
twice indicating
the written marker.
Stop Recording
Press the Stop button on the r
ecord keypad t
o end
a record
ing
.
The
REC
indicator
will
blink
for another
moment
indicating that the d
evi
ce is
still
writing data to the SD memory c
ard.
Note:
the
memory
c
ard should not be removed
during the completion of a record file.
The
duration
of the final writing process
depends on the recording time and on the
set
pre
record
buffer
length.
The
dev
ice will indicate
ready for record
after th
e record file has been completed
.

iXm Getting Started.
Yellowtec 10
-
2009.
Page
4
of
6
Playback
In case you want to monitor record files, you will need
to
plug
-
in a headphone
with 3.5mm
jack in
to
iXm s
green
HP
socket
. The playback keypad does
allow
for
easy
navigation
through multiple audio files.
Press PLAY to play back the lastly recorded file. Press STOP to
end the playback.
Attention!
Please make
sure that the
headphone
level
is set to an appropriate value
in order
to avoid temporary or permanent ear
damage
. We
strictly
recommend
the use of
h
eadphone
s
with integrated volume knob
s
.
RWD
STOP
PLAY
FWD
Pressing
buttons
when
device is ready
to record
RWD
Moves
locator to previous file
STOP
Plays
message of
the current
locator position
PLAY
Starts playback of audio file
from locator position
FWD
Moves
locator to next file
Pressing buttons
when
device is playing back
RWD
Will jump to previous marker when
shortly pressed
RWD
Will cue
backward
when pressed and held
STOP
S
tops play
back
PLAY
No action (c
ontinues playback
)
FWD
Will jump to next marker when shortly pressed
FWD
Will cue
forward
when pressed and held
Pressing buttons when
device is
recording
will not cause any action.

iXm Getting Started.
Yellowtec 10
-
2009.
Page
5
of
6
PC connection
Connect the device to th
e PC
by plugging
-
in
the USB
-
Cable. The
BAT
indicator
will start
blinking
slowly
yellow
indicating that the internal Li
-
Ion
accumulator
b
attery
will
be charged.
Note
:
the physical
USB
connection does not
cause any data transfer between device and
PC. Ther
e are
two
different modes of
establishing
a data connection between device and
PC.
iXm
in
flash
mode
Press and hold RWD
and STOP
buttons
on the playback keypad to enter iXm
s
flash mode
indicated by a yellow
MEM LED. The device s memory (SD c
ard
)
can
n
ow
be accessed as
external flash memory
from the PC.
Press and hold RWD
and STOP buttons again t
o release
iXm s flash mode until the
MEM
indicator switches off
.
iXm
in setup mode
Press and hold FWD
and STOP buttons on the playback keypad to
enter iXm s setup m
ode
indicated by a red MEM LED. This mode will be
used for configuration of
iXm or
to
obtain
status information
running
admin and
respectively
use
r
software that both
belong to iXm s
scope of delivery
.
Press and hold FWD
a
nd STOP buttons again to release iXm s setup mode until the
MEM
indicator switches off.
Note
:t
he device will perform a memory check ind
icated by red blinking MEM LED
when
releasing
flash or setup mode
.
iXm Getting Started.
Yellowtec 10
-
2009.
Page
6
of
6
Software
& Driver
Copy
all
files from CD
to a
fo
lder
of your choice.
You will be asked for a
driver
when
establishing a data
connection
between device and PC for the first time
. Type in
the path of
the driver folder and follow the installation process.
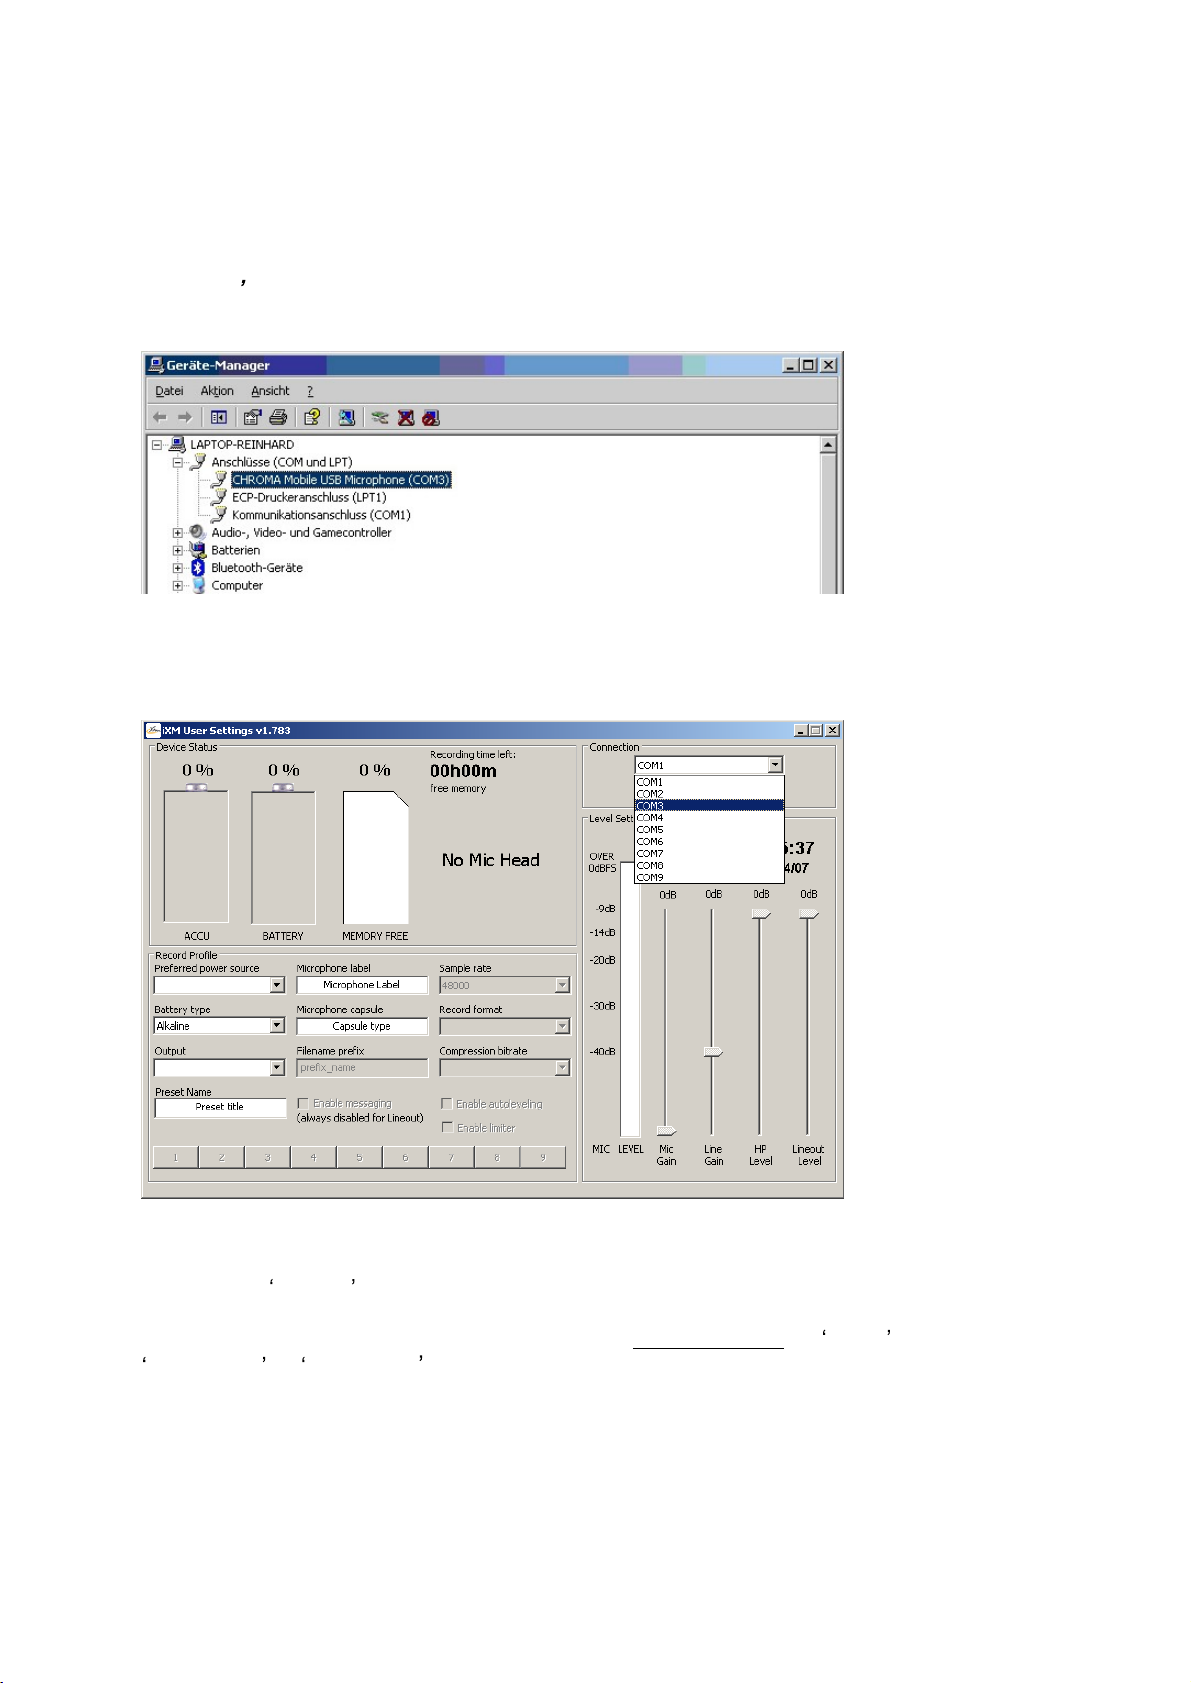
After completion you will need to c
heck
Windows
de
vice manager
to obtain the COM port
. A picture
similar
to
the
following
will
appear:
You will
now need
to set the appropriate COM port
in the user and
admin software to allow
for a
data
connection between software and device.
The
user
software w
ill connect with your device once you have selected
the right
COM
port
and pressed
connect
.
The user software does n
o
t require a
password.
The
admin software
will
require a password. The
initial password
for
admin
and
superadmin
is
:
qwe123asd
.
Other manuals for iXm
4
Table of contents
Other Yellowtec Microphone manuals


