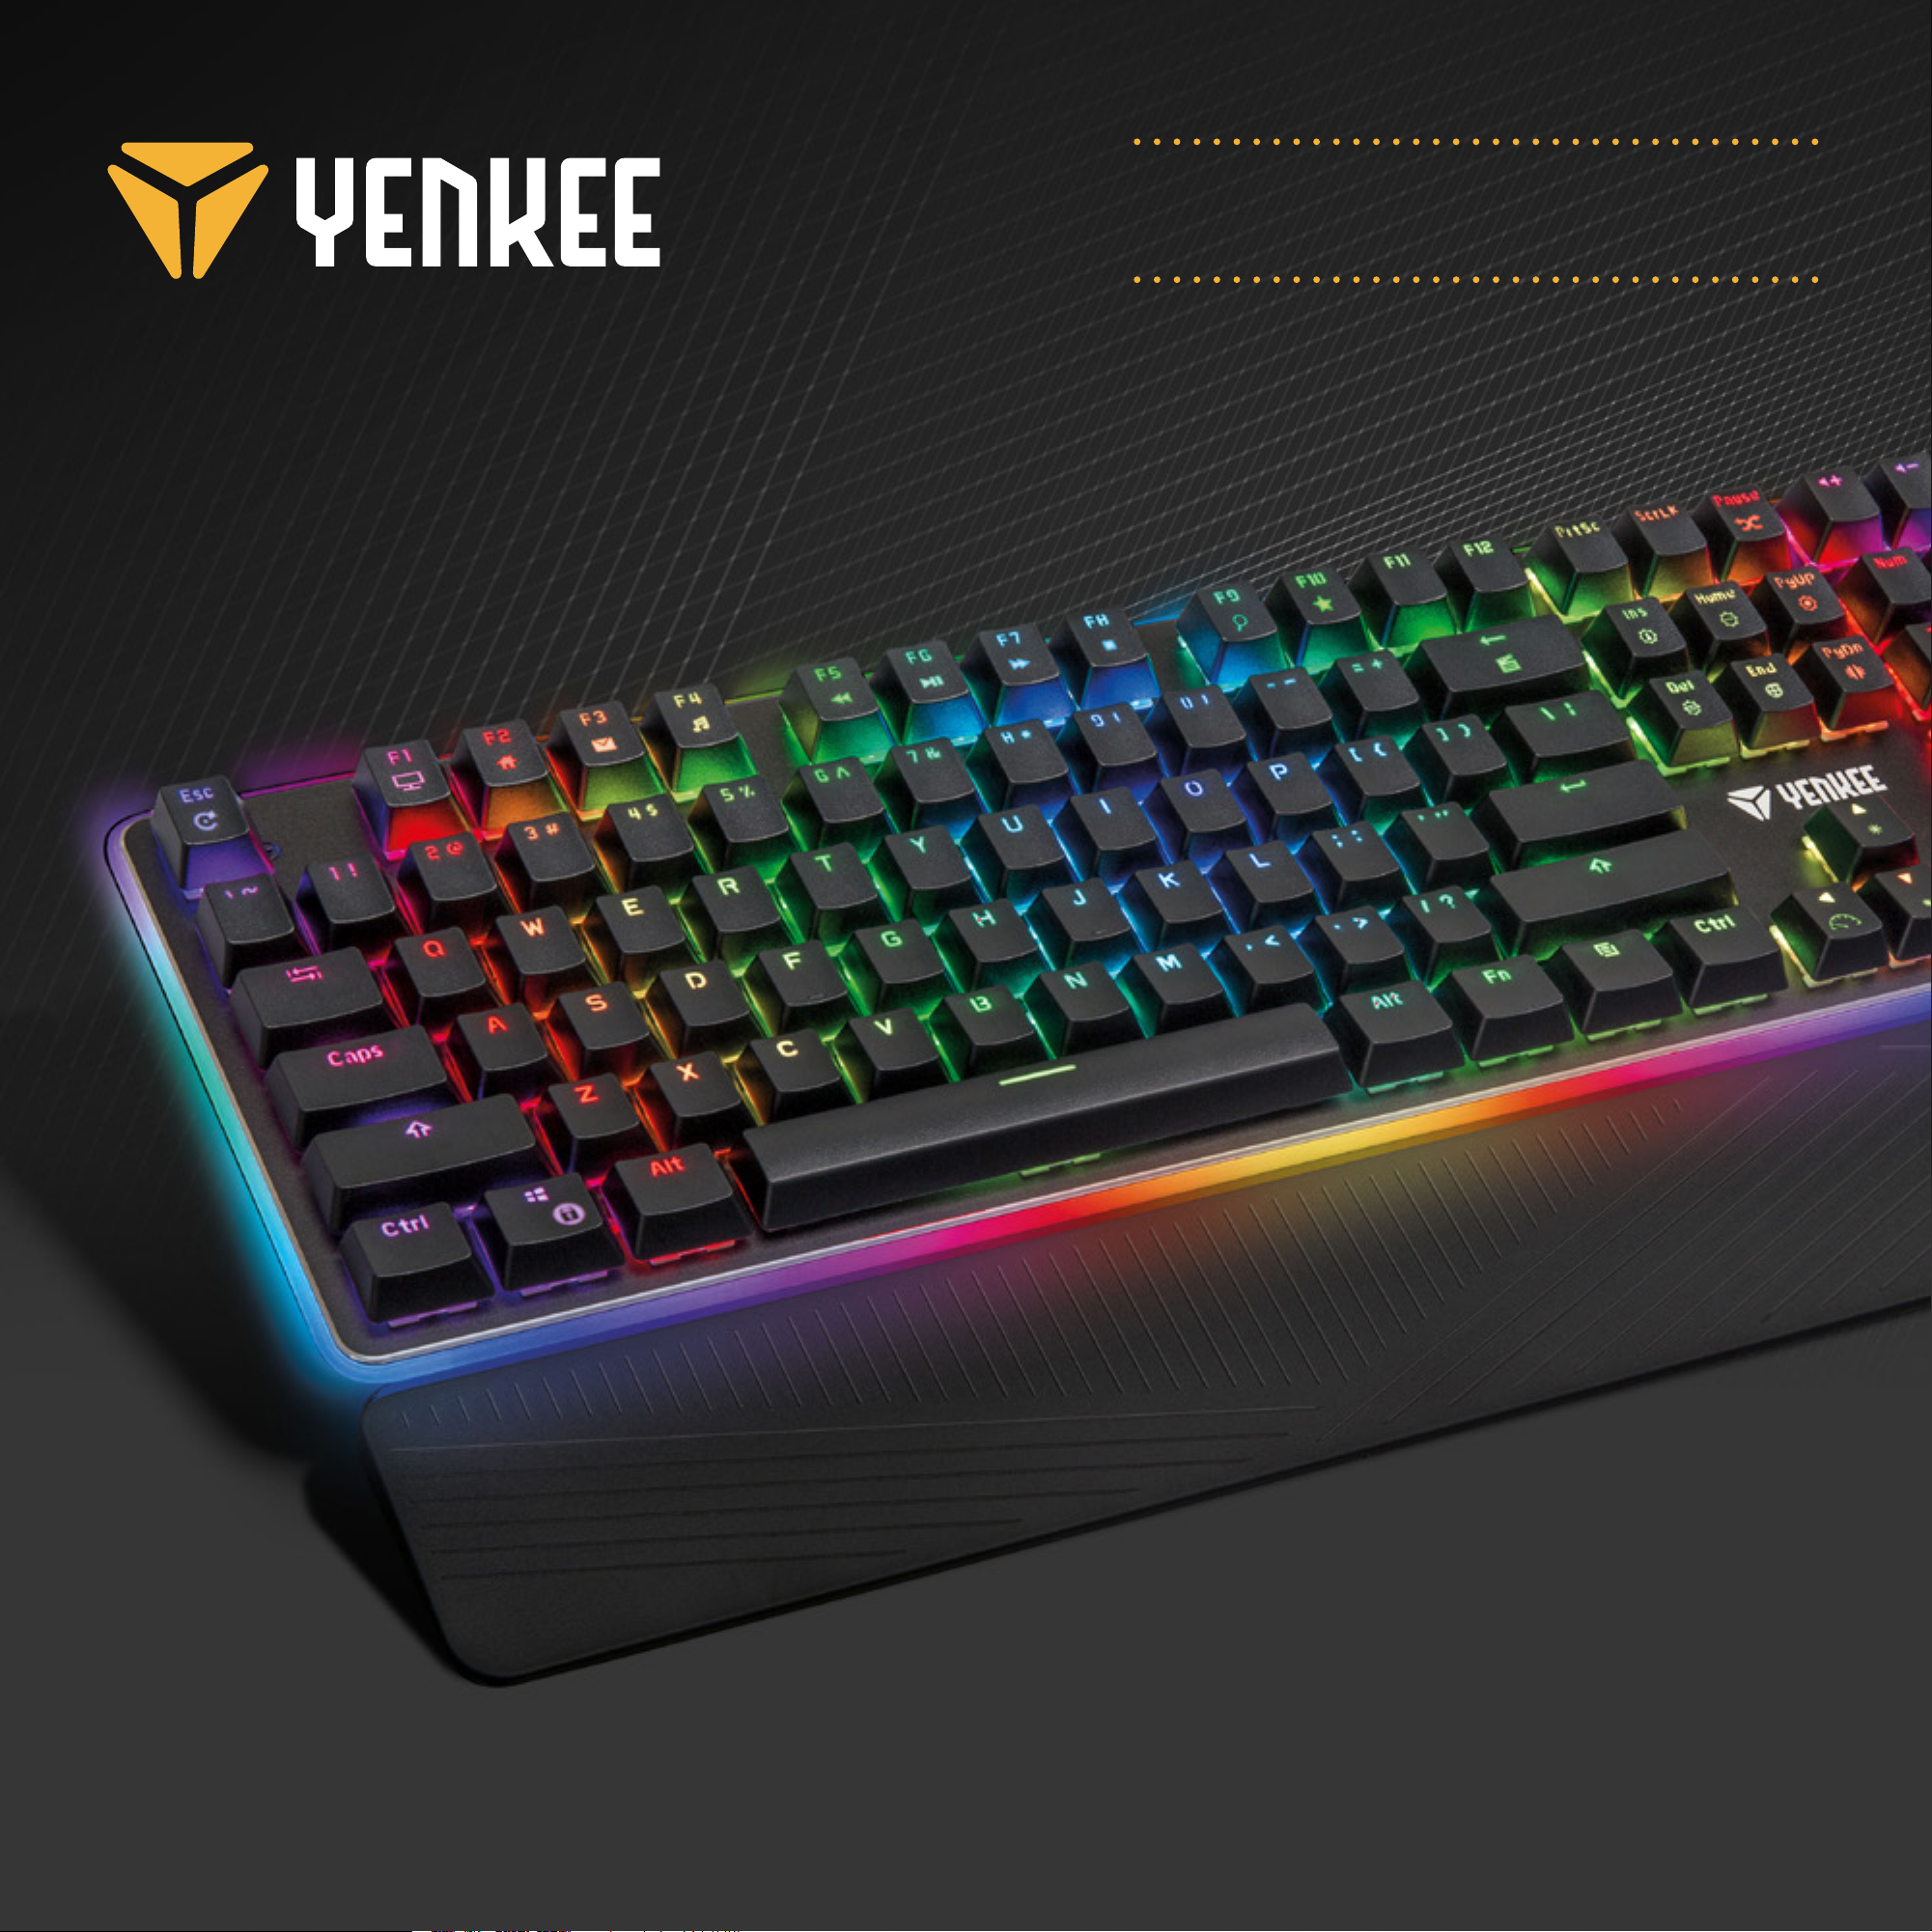
Yenkee YKL 3400 User manual

Mechanical Gaming RGB keyboard

EN Mechanical Gaming RGB keyboard USER´S MANUAL
CZ Herní mechanická RGB klávesnice NÁVOD K OBSLUZE
SK Herná mechanická RGB klávesnica NÁVOD NA OBSLUHU
PL Mechaniczna klawiatura do gier RGB INSTRUKCJA OBSŁUGI
HU Mechanikus RGB játék billentyűzetk HASZNÁLATI ÚTMUTATÓ
RS Mehanička RGB tastatura za igranje UPUTSTVO ZA UPOTREBU
HR Mehanička RGB tipkovnica za igre KORISNIČKI PRIRUČNIK
ΕΛ Μηχανικό πληκτρολόγιο RGB Gaming ΕΓΧΕΙΡΙΔΙΟ ΧΡΗΣΤΗ
YKL 3400

USER´S MANUAL
EN
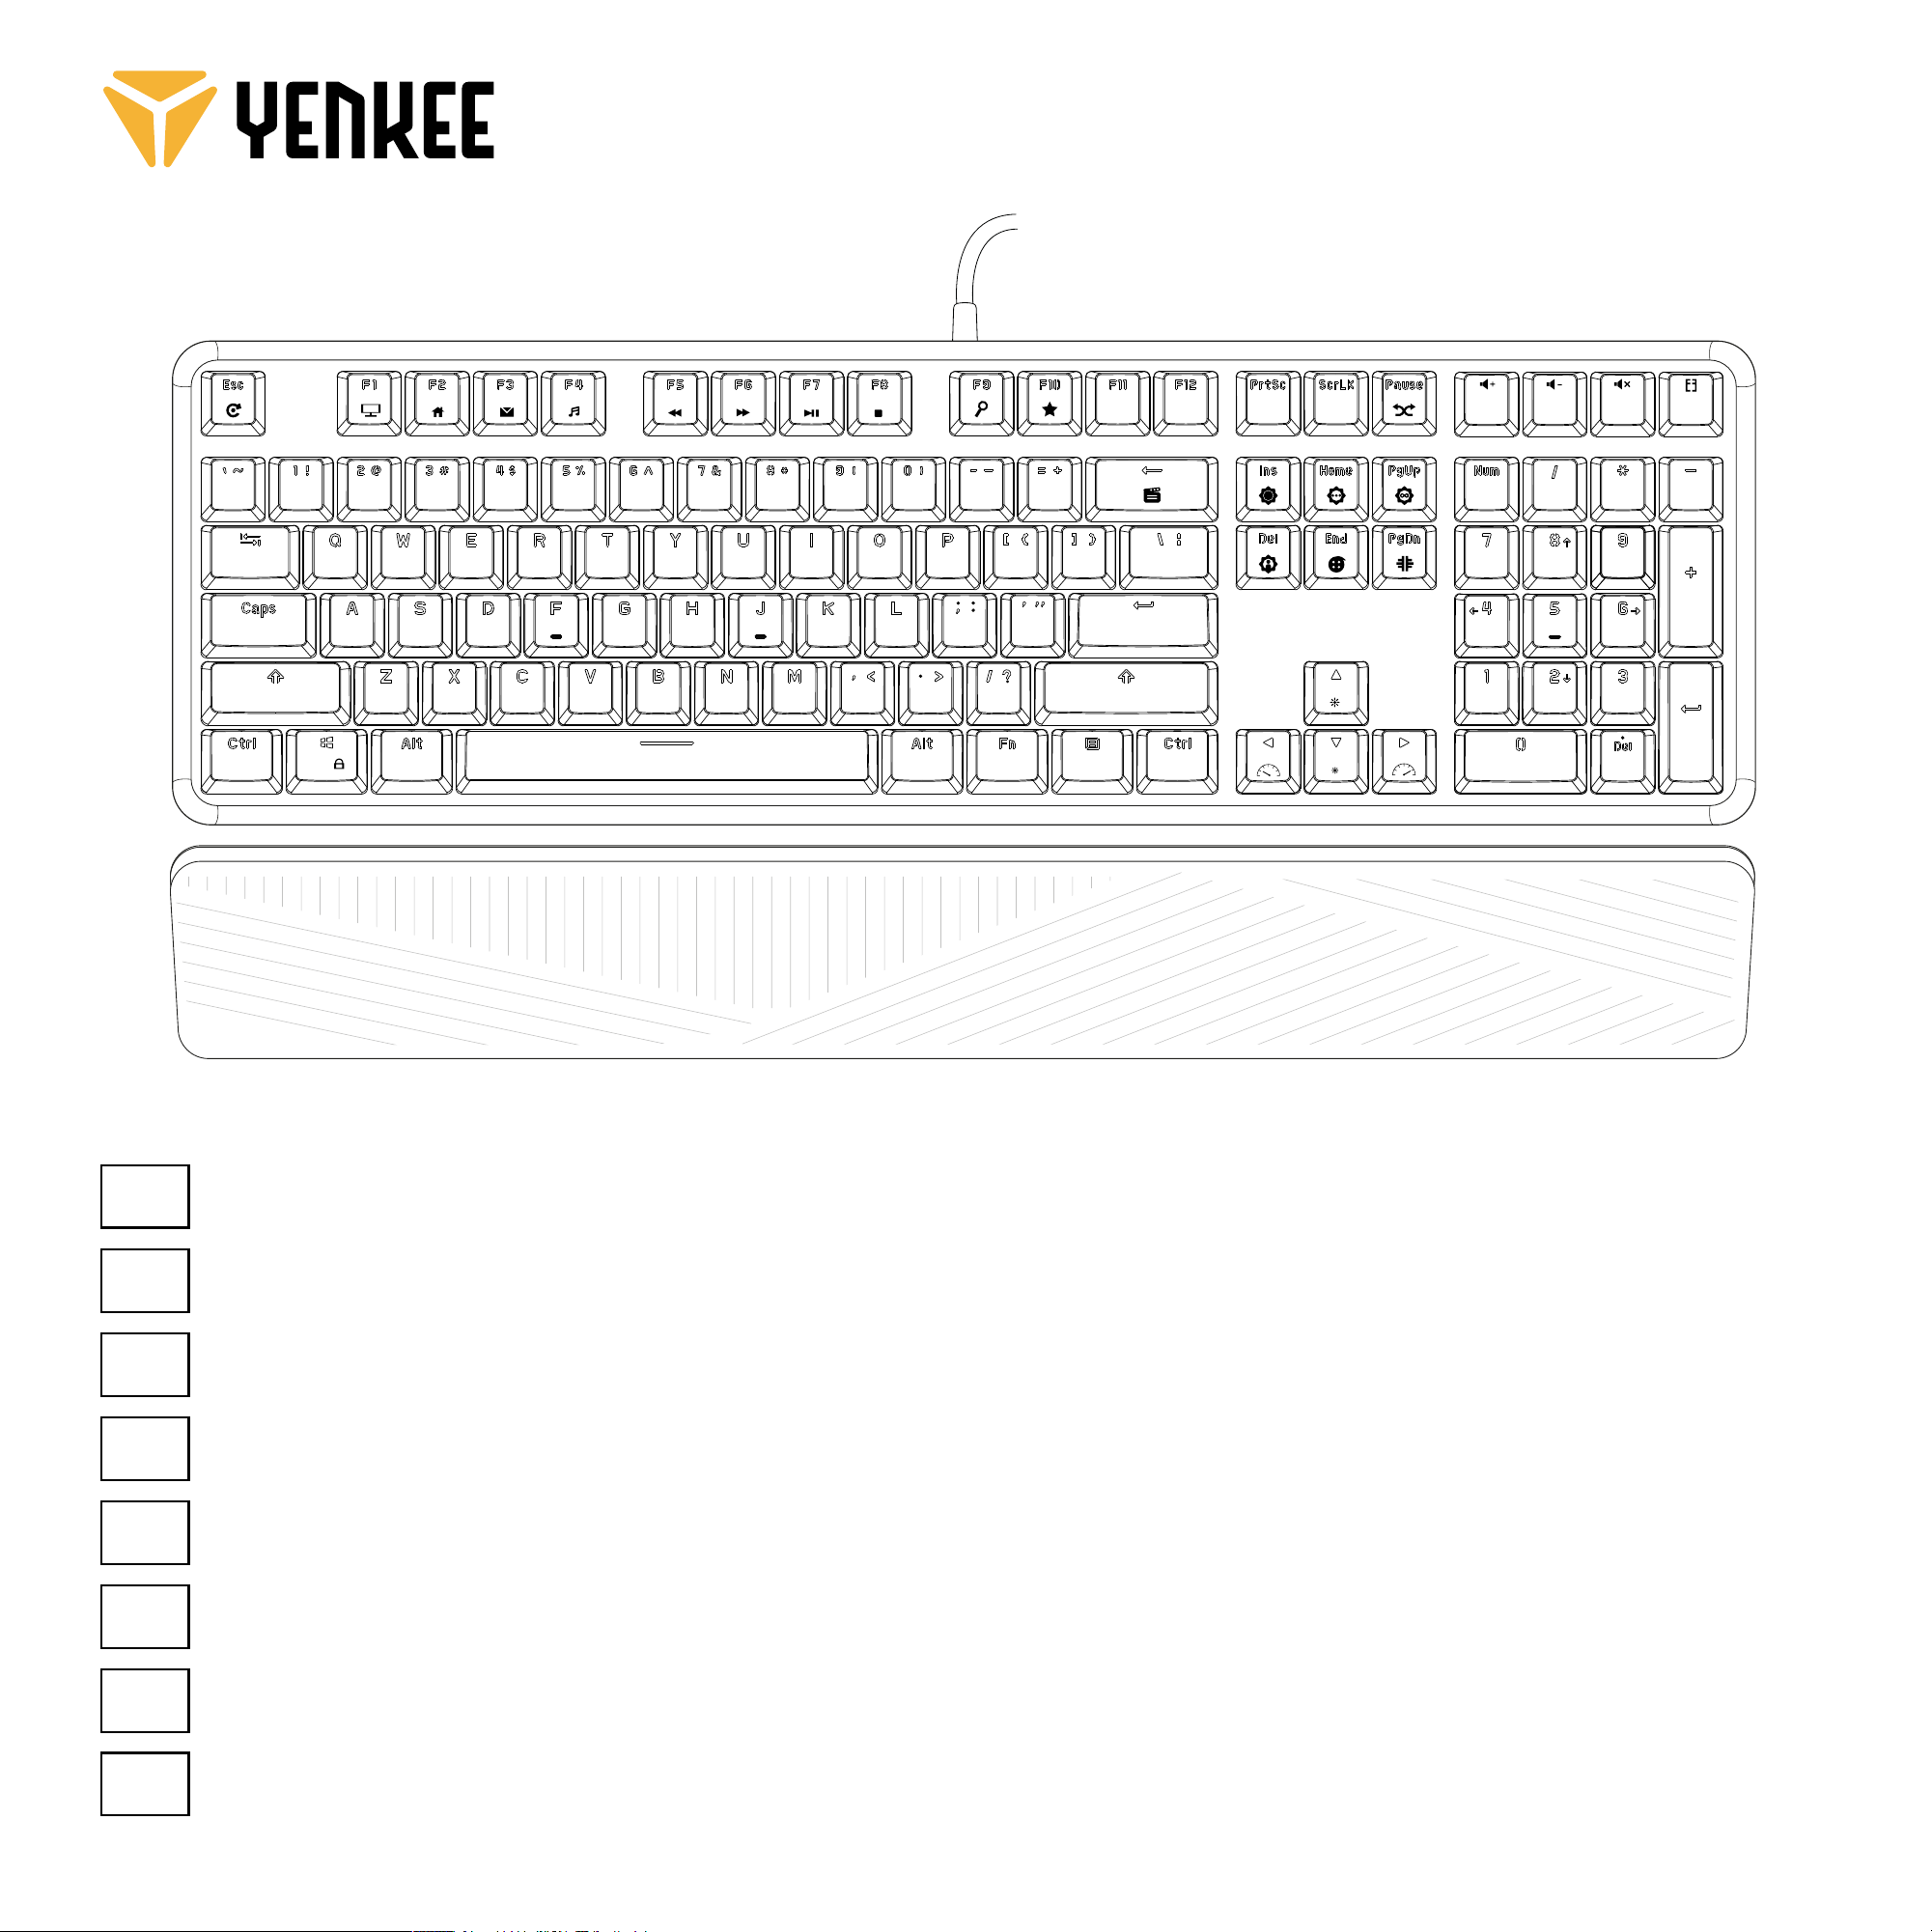
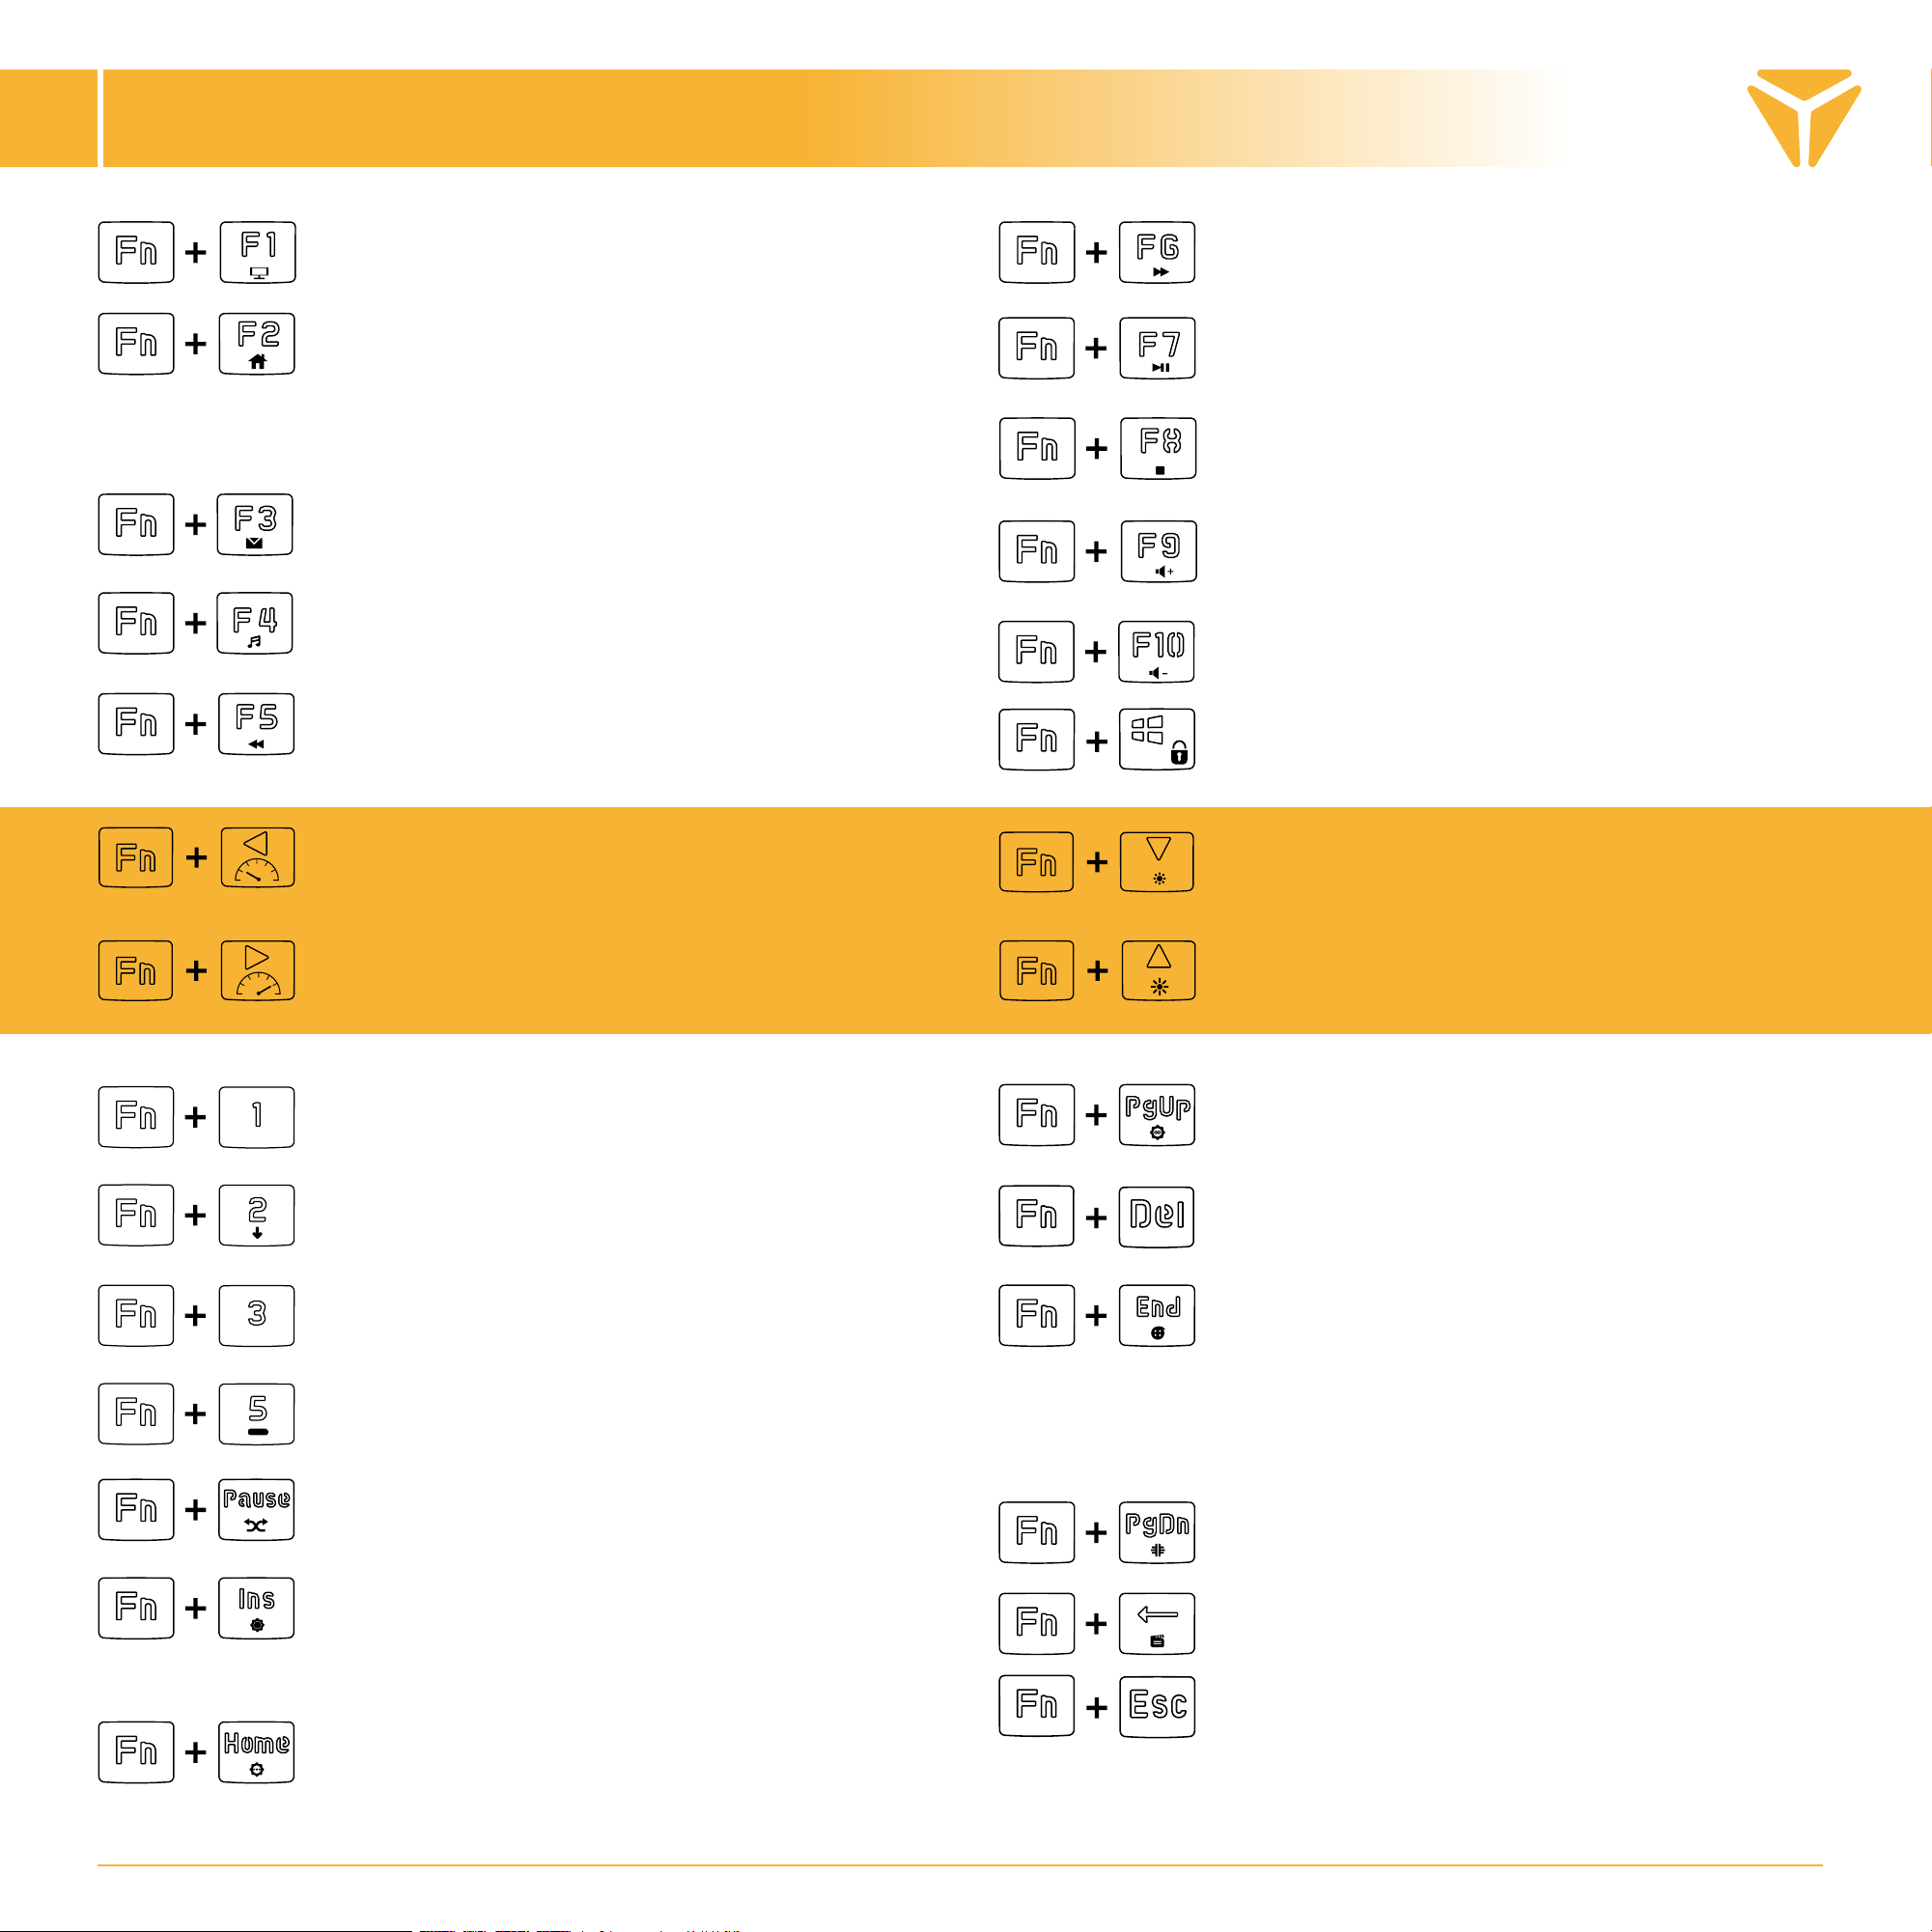
Activates the gaming lock of the Windows Key.
Opens the “My Computer” window.
Opens your default web browser. If it
is already running or if you are already
working in it, a new tab will open when
you press this shortcut.
Runs your default e-mail client in the
computer.
Runs the default music player in your
operating system.
Switches to the previous audio/video
track.
Starts/pauses the currently playing
audio/video track.
Switches to the next audio/video
track.
Stops the currently playing audio/
video track.
Opens the search window in the
operating system.
Displays the favorites in the web
browser.
Slows down the animation of the effect
of the circumferential RGB bar (5levels).
Decreases the brightness of the
circumferential RGB bar (5levels + off).
Speeds up the animation of the effect
of the circumferential RGB bar (5levels).
Increases the brightness of the
circumferential RGB bar (5levels + off).
Changes the colour/direction of the
backlight of the circumferential RGB bar.
Reactive effects of the keyboard backlight.
The backlight reacts to and changes according
to the presses of the button (5effects).
Breathing effects of the backlight. Effects that
light up and down slowly and change colour.
Changes the colour of the current
effect to one of eight solid colours.
Changes the current effect to one of
11 rainbowlike and colour animations.
Starts browsing through five profiles for in-
dividual setting of the layout of the button
backlight. The currently selected profile is
indicated by backlighting the button within
the range of 1 to 5 above the letter area.
Changes the backlight effect of the
circumferential RGB bar (6effects).
Starts recording a custom user backlight.
Factory reset of the whole keyboard.
Hold the shortcut for three seconds.
A successful restart is indicated by
three flashes of the keyboard.
Slows down the animation of the
current effect (3levels).
Speeds up the animation of the
current effect (3levels).
Decreases the keyboard backlight
(5levels).
Increases the keyboard backlight
(5levels).

Defining a custom backlight
EN
Before your start recording a custom backlight, you need to choose the profile to save the layout under. To do so,
press the keyboard shortcut .When this shortcut is pressed, the keyboard will start browsing through all
the five backlight profiles offered. The keyboard indicates the chosen profile by backlighting one of the five buttons
that can be used to save the backlight in combination with the buttons. These are the buttons within the range
of to which are found above the letter area (these buttons can be lit on in combination with Scroll Lock,
Num Lock and Caps Lock in the case that the respective buttons are active).
Once you select the button to save the backlight under, simply press the keyboard shortcut ,
This will start recording the backlight into the keyboard’s memory, which will be indicated by white flashes of the
, , . When the button is pressed, it will light up with red colour. You can choose other primary
colours by pressing it repeatedly. There are 8 of them and another level is the state when the backlight is turned off.
Once you are happy with your keyboard layout, press the , combination again. This will store your layout
into the keyboard’s memory.
Now you can find your backlight under the respective keyboard shortcut ( + the button within the -
range which was lit on when you chose the profile to save the backlight under).

Setting up the keyboard using the control
EN
The main screen
Once the programme starts, you will see the main screen in the first of the 4 sections offered by the programme.
This section, called Customisation, can be used for reprogramming the whole keyboard. Simply select the button
you wish to reprogram and click on it with the left mouse button. In the menu that unfolds, choose the action which
is to be assigned to the button.
You can use the default button function, swap the function with another button, choose a mouse function or assign
a macro that you created. You can also choose a combination of two buttons or start of a programme or a specific
web page. Simply type the URL address. In the menu, you will also find multimedia functions for controlling media
and shortcuts that will ease up your work with the operating system. You can also deactivate a button.

Setting up the keyboard using the control
EN
The backlight screen
In the second section, you can completely adjust your backlight. The scrolling menu on the left side of the
window contains all the backlight effects offered by the keyboard. To show the menu, simply click on the arrow
next to the effect name, and choose the backlight effect you desire. All changes will be saved and applied
automatically. If you prefer a keyboard without distractions caused by the backlight, simply turn if off using the
slider at the top of the window.

Setting up the keyboard using the control
EN
The programme also allows you to change the colour of the current backlight. You can do this in the Colour
subsection. Click into the colour window and use the menu to chose the colour to be applied to the keyboard.
The keyboard supports an RGB spectrum of more than 16 million colours. If the colour menu is not sufficient
for you, click on the More button in the colour selection window. A menu will display which allows you to choose
more colours or define custom colours.

Setting up the keyboard using the control
EN
In the subsection called Direction, you can easily set the direction of animation for animated effects. If an effect
is animated, arrows will light up for you to specify the direction. The choice of direction is entirely yours. Finally,
you can set animation speed of the backlight itself and set the overall brightness. To do so, use the Speed and
Brightness sliders in the middle and at the bottom of the window. All changes will be saved automatically.

Setting up the keyboard using the control
EN
Here, the custom backlight setting is expanded with the option to assign any colour and the control is much
easier. In the Backlight menu, choose Custom backlight and click on the keyboard symbol displayed in the Colour
section.

Setting up the keyboard using the control
EN
The Configurator window contains all the tools needed to create a custom backlight easily. In the menu in
the left column, you can choose the sections used on the keyboard. By clicking the Deselect All and Reverse
Selection buttons, you can quickly select all the buttons on the keyboard. To choose a button that is to be
backlit, click on the desired button. A square will appear around the button and you will be able to specify the
colour in the swatch.
If you prefer a button to be non-backlit, simply choose the backlit button in the keyboard preview and click
Remove at the bottom right of the window. A quick selection can be easily made using the functions on the left
side of the window.
To save all your changes and preferences, click Apply.
Your backlight is now saved and you can use it by selecting Custom backlight in the Backlight list. You can edit
the backlight by pressing the keyboard symbol in the Colour subsection again.

Setting up the keyboard using the control
EN
Gaming mode
The gaming mode and the function controlled in this window have been specifically developed for players. It will
avoid minimising the window to the taskbar in the case that you accidentally press one of the corresponding
shortcuts during a game. Any shortcuts that might be accidentally pressed will get deactivated so that you can
enjoy your games without worries.
In the Gaming mode window, you can choose which shortcuts to deactivate. Turn on the mode using the slider at
the top and deselect the Deactivate box next to the requested function. All changes will be saved automatically.

Setting up the keyboard using the control
EN
Macro
Macros are used exclusively to speed up commands or typing texts. The macro editor contained in the
programme is very powerful and simplifies as far as possible both obtaining and subsequently editing a macro.
On the left side of the window, there is a box to label your macro and the New button to create it. Below it, you will
find the list of all the macros you have created. You can delete or rename the macros using the symbols below
the list. To rename a macro, click on the symbol on the right and type a new label in the next menu. Confirm with
the OK button.

Setting up the keyboard using the control
EN
The middle section pertains to editing macros. Above all, here you will find the Start recording and Stop
recording buttons. Recording is indicated by flashing of the red REC field above the right part of the window.
Using the buttons located above the header Insert function, you can add macros concerning functions of the
mouse and whether it has been pressed or released to the actions in the action list. The differentiation between
pressing and releasing a button allows you to create keyboard shortcuts.
You can also add a specific delay between the actions. To do so, type it in the Insert delay box and press the
arrow next to the label.
In the last row, you can set a constant delay between presses for a macro. Simply tick the option Fixed delay and
type the required delay in the corresponding box.
Use the right column to review and adjust all the actions that were set during the creation of the macro. These
might be strokes, delays and releases/presses of buttons. Under the list called Button sequences, there are
controls used to handle the actions. You can move specific actions to the very beginning or end or shift them by
only one action ahead or back. The last two symbols allow you to delete a specific action or the whole action list.
The bottom right corner contains the Reset and Apply buttons. Use the Reset button to reset the macros to
factory settings. All macros will be deleted. Use the Apply button to save all the changes made in the macro
area.

Setting up the keyboard using the control
EN
Saving settings into profiles
User specific settings made in the programme can be saved into various profiles. This way, you can assign many
functions to one and the same button without the need to retype the functions. Simply open the profile menu
in the lower left corner and choose a profile or create a new one. The previous profile will be saved along with
all the functions that have been defined for the keyboard. For reuse, simple select the specific profile which the
requested functions have been saved under.

Instructions and information regarding the disposal of used packaging materials
EN
Dispose of packaging material at a public waste disposal site.
Disposal of used electrical and electronic appliances
The meaning of the symbol on the product, its accessory or packaging indicates that this product shall
not be treated as household waste. Please, dispose of this product at your applicable collection point
for the recycling of electrical & electronic equipment waste. Alternatively in some states of the Europe-
an Union or other European states you may return your products to your local retailer when buying an
equivalent new product.
The correct disposal of this product will help save valuable natural resources and help in preventing the
potential negative im pact on the environment and human health, which could be caused as a result of
improper liquidation of waste. Please ask your local authorities or the nearest waste collection centre
for further details. The improper disposal of this type of waste may fall subject to national regulations
for fines.
For business entities in the European Union
If you wish to dispose of an electrical or electronic device, request the necessary information from your
seller or supplier.
Disposal in other countries outside the European Union
If you wish to dispose of this product, request the necessary information about the correct disposal
method from local government departments or from your seller.
This appliance complies with EU rules and regulations regarding electromagnetic and electrical safety.
Changes to the text, design and technical specifi cations may occur without prior notice and we reserve the
right to make these changes.

Aktivuje herní zámek klávesy Windows.
Otevře okno „Tento počítač“.
Otevře váš výchozí internetový
prohlížeč. Pokud jej máte již zapnutý
či v něm pracujete, stiskem zkratky
docílíte otevření nové záložky.
Spustí váš výchozí e-mailový klient v
počítači.
Spustí výchozí hudební přehrávač ve
vašem operačním systému.
Přepne na předchozí audio/video
stopu.
NÁVOD K OBSLUZE
CZ
Spustí/pozastaví aktuálně
přehrávanou audio/video stopu.
Přepne na následující audio/video
stopu.
Zastaví aktuálně přehrávanou audio/
video stopu.
Otevře okno pro vyhledávání
v operačním systému.
Zobrazí oblíbené záložky
v internetovém prohlížeči.
Sníží rychlost animace efektu
obvodové RGB lišty (5 úrovní).
Sníží jas obvodové RGB lišty
(5 úrovní + vypnuto).
Zvýší rychlost animace efektu
obvodové RGB lišty (5 úrovní).
Zvýší jas obvodové RGB lišty
(5 úrovní + vypnuto).
Změní barvu/směr podsvícení
obvodové RGB lišty.
Reaktivní efekty podsvícení klávesnice.
Podsvícení reaguje a mění se dle stisku
tlačítka (5 efektů).
Dýchací efekty podsvícení. Efekty, které se
pomalu rozsvěcí a zhasínají a mění barvu.
Změní barvu aktuálního efektu
na jednu z osmi solidních barev.
Změní aktuální efekt na jeden
z 11 duhových a barevných animací.
Spustí procházení pěti profilů pro
individuálně nastavené rozložení
podsvícení tlačítek. Aktuálně vybraný
profil je znázorněn podsvícením tlačítka
na škále 1 až 5 nad blokem s písmenky.
Změní efekt podsvícení
obvodové RGB lišty (6 efektů).
Zahájí nahrávání uživatelského
individuálního podsvícení.
Tovární nastavení celé klávesnice. Po-
držte zkratku tři vteřiny. Úspěšný restart
symbolizuje trojité bliknutí klávesnice.
Zpomalí animaci aktuálního efektu (3
úrovně).
Zrychlí animaci aktuálního efektu
(3 úrovně).
Sníží jas podsvícení klávesnice
(5 úrovní).
Zvýší jas podsvícení klávesnice
(5 úrovní).

Definování individuálního podsvícení
CZ
Před zahájením nahrávání vlastního podsvícení je nutné si napřed vybrat, pod jaký profil bude rozvržení uloženo.
Toho docílíte stiskem klávesové zkratky .Díky této zkratce klávesnice začne procházet všech pět profilů
pro podsvícení, které nabízí. O jaký profil se jedná dává klávesnice najevo podsvícením jednoho z pěti tlačítek, pod
která se dá v kombinaci s tlačítkem vlastní podsvícení uložit. Jsou to tlačítka ve škále až nacházející
se nad oblastí s písmeny (tato tlačítka mohou svítit v kombinaci se ScrollLockem, NumLockem či CapsLockem v
případě, že jsou tato zmíněná tlačítka aktivní).
Poté, co si vyberete tlačítko, pod které bude podsvícení uloženo, stačí už jen stisknout klávesovou zkratku
, tím zahájíte nahrávání podsvícení do paměti klávesnice, což symbolizuje bílé blikání kláves
, , . Stiskem tlačítka se tlačítko rozsvítí červeně, ale dalších základních barev docílíte
opětovným stiskem. Nachází se jich zde 8, přičemž další úroveň symbolizuje stav vypnutého podsvícení. Poté, co
budete se svým rozvržením spokojeni, stiskněte opět kombinaci tlačítek , tím se vaše rozvržení uloží do
paměti klávesnice.
Vaše podsvícení tak nyní naleznete pod příslušnou klávesovou zkratkou ( + tlačítko na škále - ,
které při volbě profilu, pod který bude podsvícení uloženo, svítilo).

Nastavení klávesnice prostřednictvím ovladače
CZ
Hlavní obrazovka
Po spuštění programu se objevíte na hlavní obrazovce v první sekci ze 4, které program nabízí. Tato konkrétní
sekce s názvem Přizpůsobení nabízí přeprogramování kompletní klávesnice. Jednoduše zvolte tlačítko, které
chcete přeprogramovat a klikněte na něj levým tlačítkem myši. V rozbalené nabídce následně vyberte, co bude
k tlačítku přiřazeno.
Nabídka nabízí defaultní funkci tlačítka, klasické záměnu funkce s jiným tlačítkem, funkce myši či přiřazení
vámi vytvořeného makra. Nechybí ani kombinace dvou tlačítek, spuštění libovolného programu či konkrétní
internetové stránky. Stačí pouze vložit konkrétní URL adresu. Dále jsou v nabídce multimediální funkce pro
ovládání médií a zkratky pro zjednodušení funkce s operačním systémem. Taktéž lze tlačítko deaktivovat.

Nastavení klávesnice prostřednictvím ovladače
CZ
Obrazovka podsvícení
Druhá sekce se týká kompletního nastavení podsvícení. Rolovací nabídka v levé části okna zahrnuje veškeré
efekty podsvícení, které klávesnice obsahuje. Jednoduše klikněte na šipku vedle názvu efektu, čímž nabídku
zobrazíte, a zvolte jeden požadovaný efekt podsvícení. Všechny změny se automaticky uloží a aplikují.
Pokud vám vyhovuje více klávesnice bez rušení, které podsvícení může vykazovat, posuvníkem v horní části
okna je možné jej jednoduše vypnout.

Nastavení klávesnice prostřednictvím ovladače
CZ
Program taktéž umožňuje změnit barvu aktuálního podsvícení. K tomu slouží podsekce Barva. Klikněte do
okénka s barvou a v nabídce zvolte, která barva má být na klávesnici aplikována. Klávesnice podporuje RGB
spektrum více než 16 milionů barev, pokud pro vás není nabídka barev dostatečná, v okénku s výběrem barev se
nachází tlačítko Další, které vyvolá nabídku s vícero barvami a možnosti nadefinování své vlastní.
Table of contents
Other Yenkee Keyboard manuals