YESOUL E30S User manual

Before using this product,
carefully read
and properly keep this manual.
E30S Product Manual
Product model: E30S
E30S
Elliptical Trainer
YESOUL Smart Elliptical Trainer

Product parameter
Product name
Voltage
Step
Flywheel
Rated maximum load
Net weight
Gross weight
Package size
Dimensions
Standard
YESOUL Smart Elliptical Trainer E30S
12V
40cm
External magnet 6kg
120kg
61.5kg
70kg
(Length) 1450 × (Width) 455 × (Height) 840 (mm)
(Length) 1440 × (Width) 590 × (Height) 1700 (mm)
GB17498.1-2008/GB17498.9-2008
YESOUL Smart Elliptical Trainer E30S

Safety Instructions
1. This device complies with relevant standards of fitness exercise products used at home or for
non-medical purposes.
2. This HB-class sports device is equipped with an electronic speed control. It must not be used
without system control.
3. Avoid using this product at high temperature and humidity or where there is water splashing.
4. Please read the manual carefully before using the product.
5. Keep this device on a fixed flat ground. Select a fixed safe area for exercises. Keep sufficient
clearances (at least 1m) in all directions of this device.
6. Incorrect and irregular training may cause personal injury.
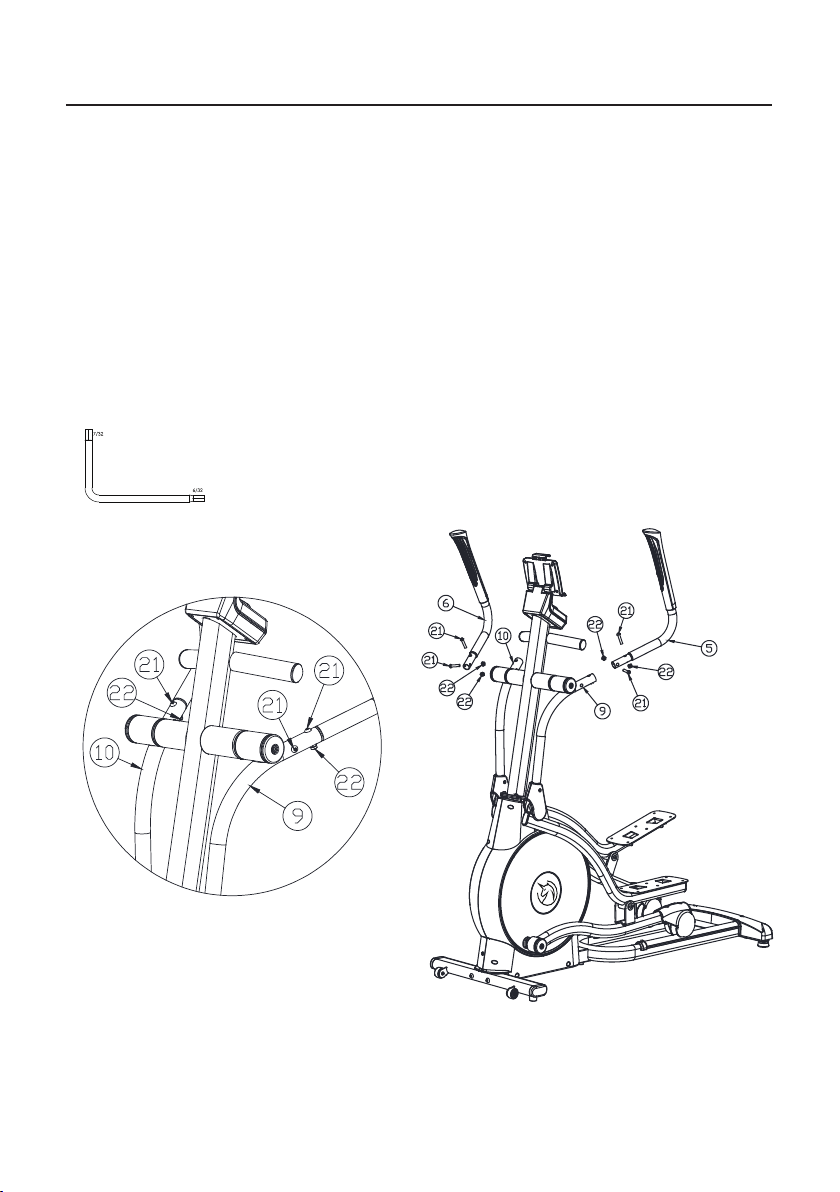
7. The handlebar and other mechanical devices of this product must not be obstructed by the site
during use.
8. Check screws and nuts on a regular basis.
9. The trainer must not be used as a toy or game machine.
10. Installation, use and training instructions are available when you order this product.
11. The owner should inform others of precautions to prevent danger.
12. This device is designed for indoor use. It must be used indoors (not outdoors).
13. Do not transport this device alone.
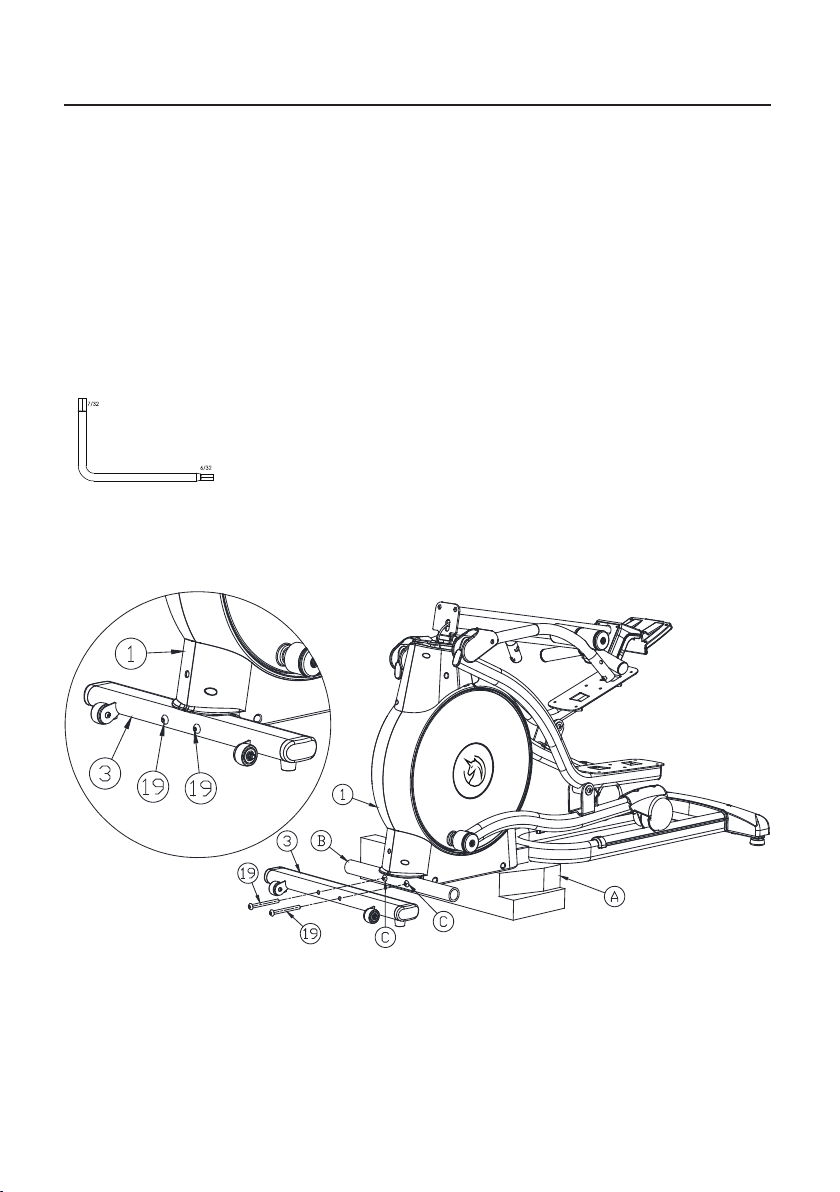
14. If necessary, please disassemble this product in accordance with the opposite order of
installation steps in the product manual. Please use this product according to its manual.
15. Never close your eyes while using this device.
16. The maximum load-bearing capacity of this device is 120kg.
17. Information about the brake system: Not related to the speed.
18. Training information: Training of the lower and upper limbs and the whole body.
19. Children must not get close to this product without the supervision of an adult.
Consult a doctor before using this product. This is particularly
important for those who are over 35 years old or were once
unhealthy. Before using this product, please read all precau-
tions.

Installation Guide - List of Parts
STEP 1: Check of parts
List of Parts
Hexagon socket head bolt
3/8"-16*70 (17)-2pcs
Hexagon socket head bolt
3/8"-16*95 (19)-2pcs
10#
13#
14#
32/6
32/7
Installation
Before installation, refer to the assembly drawing below, so that you can install this product more
accurately according to the numbers shown below.
S/N Item Quantity
Underframe assembly
Rear bottom tube assembly
Front bottom pipe assembly
Upper column assembly
Left large handle pipe assembly
Right large handle pipe assembly
Left pedal frame assembly
Right pedal frame assembly
Left swing rod assembly
Right swing rod assembly
Rear base cover
Rear cover of shield
Front cover of shield
Pedal
Electronic meter assembly
Electronic meter core assembly
Hexagon socket head bolt
Cross recessed pan head tapping
screws
Hexagon socket head bolt
Locknut
Hexagon socket head bolt
1
1
1
1
1
1
1
1
1
1
1
1
1
2
1
1
2
2
2
2
4
4
8
1
2
3
4
5
6
7
8
9
10
11
12
13
14
15
16
17
18
19
20
21
22
23

1.After unpacking, find the accessories shown below. Keep the following accessories aside. They
will be used in subsequent installation.
STEP 2: Unpacking
Installation Guide
Please pay attention after unpacking! Do not remove other packaging
materials. Please follow the instructions.

Installation Guide
STEP 3: Installation of rear bottom tube assembly and cover
1. Find the rear bottom tube assembly (2), rear base cover (11) and two hexagon socket head (17).
2. First, put a styrofoam pad (A) under the rear end of the underframe (as shown in the figure
below). Then, affix the rear bottom tube assembly (2) under the square tube of the underframe
assembly (1), and alight the holes. Install the two hexagon socket head bolts (17) through the
holes of the square tube of the underframe assembly (1), to lock the rear bottom tube assembly (2)
on the underframe assembly (1).
3. Remove the two cross recessed pan head tapping screws (18) that are locked in advance on the
underframe assembly, and keep them aside. Then put the rear base cover (11) on the square tube
of the underframe assembly (1) and align the holes. Lock the rear base cover (11) on the square
tube of the underframe assembly (1) via the two cross recessed pan head tapping screws (18) (as
shown in the figure below).
Installation tool

Installation Guide
STEP 4: Installation of front bottom tube assembly
1. Find the front bottom tube assembly (3) and 2 hexagon socket head bolts (19).
2. Put one styrofoam pad (A) under the front end of the underframe. Remove the round paper
tube (B) and two hexagon socket head bolts (C) that are locked in advance on the underframe
assembly (1), and keep them aside (they will not be used later).
3. Put the front bottom tube assembly (3) close to the arc-shaped sheet metal on the underframe
assembly (1), and align the holes. Install the two hexagon socket head bolts (19) through the
holes of the front bottom tube assembly (3). Lock the front bottom tube assembly (3) onto the
underframe assembly (1) (as shown in the figure below).
Installation tool

Installation Guide
STEP 5: Installation of the upper column assembly
1. Remove the two hexagon socket head bolts (20) that are locked in advance on the underframe
assembly (1) and keep them aside.
2. Turn the upper column assembly (4) as indicated by the arrow until the sheet metal on the
upper column assembly (4) is close to the mounting sheet metal on the underframe assembly (1)
(never press the signal cable in the column while turning the upper column assembly).
3. Install the two hexagon socket head bolts (20) through the holes of the sheet metal of the upper
column assembly (4), and lock the upper column assembly (4) on the underframe assembly (1) (as
shown in the figure below).
Installation tool

STEP 6: Installation of the left and right handle assembly
Installation Guide
1. Find the left and right handles (5) and (6) (note: The handles are distinguished by “L/R” mark).
2. Remove the four hexagon socket bolts (21) and locknuts (22) that are locked in advance on the
left and right swing rods (9) and (10), and keep them aside.
3. Install the left handle (5) outside the round tube of the left swing rod (9). Then install two
hexagon socket bolts (21) through the holes of the left handle (5) and left swing rod (9). Install the
locknut (22) to secure them (Note: Pay attention to the direction of the locknut (22) (as indicated
below). The hexagon head of the locknut (22) should be aligned with the hexagon hole on the left
handle (5)).
4. Install the right handle assembly (6) on the other side in the same way (as shown in the figure
below).
Installation tool

Installation Guide
STEP 7: Installation of the front and rear covers of shield
1. Find the front and rear covers (12) and (13) of the shield.
2. First, clamp the front and rear covers (12) and (13) securely on the upper column assembly (4) as
indicated by the arrow.
3. Then, pull down the front and rear covers until they are in place outside the left and right shields
of the underframe assembly (1).
4. Insert the left and right dowels of the rear cover (13) of the shield into the square holes of the left
and right shields. Flatten them down (as shown below).

Installation Guide
STEP 8: Pedal installation
1. Find the left and right pedals (14).
2. Remove the eight hexagon socket head bolts (23) that are locked in advance on two pedals (14),
and keep them aside.
3. Install the pedal (14) on the pedal mounting plate of the left pedal assembly (7), and align the
holes. Install the four hexagon socket head bolts (23) through the pedal mounting plate, to lock
the pedal (14) on the left pedal frame assembly (7).
4. Install the pedal on the right pedal frame assembly (8) on the other side in the same way (as
shown in the figure below).
Installation tool

Statement:
Complete Installation
This manual contains the functional introduction and operating instructions as much as possible
when printed.
With the continuous improvement of hardware and software and optimization of design, this
manual may be inconsistent with the purchased product.
In case of any discrepancy in appearance, interface and color, the actual product shall prevail.
Mobile phone
holder
Smart knob
Pedal
Handheld handle
tube
Handle tube
Handling
wheel

Welcome screen
Press the knob to change
1.Numerical description
All function values are displayed alternately at intervals of 5s according to the following order:
Resistance⇨Speed⇨Pedal frequency⇨Bluetooth connection state.
Pedal frequency: 0~15~999
Number of resistance segments: 24
Speed display: 0-99.9
2.Function description
Turn on the product. The welcome image will be shown for 3s, and then the function change mode
will be enabled. Press the knob to start running. The current speed and pedal frequency will be
displayed and automatically changed. Turn the knob left to reduce the resistance and right to
increase the resistance. Press and hold the middle for 3s to shut down the product.
Bluetooth APP function: After connecting the Bluetooth APP, the Bluetooth connection state will
be displayed, indicating that the Bluetooth is connected.
Knob Functions
resistance speed pedal
frequency blue tooth
connection state

1.Registration
APP Connection of Bluetooth
Download the APP from Google play/Apple Store (keyword: eHealth or e-Health), or download it
by scanning the QR code.
2.Bluetooth connection
First, power on the elliptical trainer and enable the Bluetooth of the mobile device. Enter the main
interface of the APP, and select the elliptical trainer to open the Bluetooth search interface. Click
“Scan Device”. The following will be shown on the screen of the mobile phone: Bluetooth name
“EW-**-****” (as shown in Fig. I). Click the Bluetooth name to connect it. After the Bluetooth is
connected successfully, the Bluetooth address of the device will be displayed in the upper right
corner (Fig. II).
Open the APP and complete the registration according to prompts.
(Fig. I) (Fig. II)
IOS Android

1. Exercise guide
Start Guide
Recommended stretching exercises (The correct postures of basic stretching exercises are shown
below. Perform stretching exercises slowly.)
1.Stretching by touching toes
Keep standing, with your knees slightly bent and your hips moving slowly forward. Touch your
toes as far as possible, while relaxing your back and shoulders. Keep this posture for 15s and then
relax. Repeat the exercise three times. Stretched parts: Ligaments, internal parts of knees, and
back.
2.Ligament stretching exercise
Keep a sitting posture, with one leg stretched forward. Put the other sole close to your body and
on the inner side of the thigh of the stretched leg. Touch your toes as far as possible. Keep this
posture for 15s and then relax. Exercise both legs three times, respectively. Stretched parts:
Ligaments, back and groin.
3.Calf/heel stretching exercise
Stand with one leg in front of the other, leaning forward and press your hands against the wall.
Straighten the rear leg, with the feet flat on the floor. Bend the front left, lean forward, and move
your hips toward the wall. Keep this posture for 15s and then relax. Exercise both legs three times,
respectively. To further stretch the Achilles tendon, bend the rear leg at the same time, Stretched
parts: Calves, Achilles tendon and ankles.
4.Quadriceps femoris stretching exercise
Keep one hand against the wall to maintain balance, while holding the foot backward with the
other hand. Make the heel close to your hips as much as possible. Keep this posture for 15s and
then relax. Exercise both legs three times, respectively. Stretched parts: Quadriceps and hip
muscles.
5.Inner thigh stretching exercise
Keep a sitting posture, with your soles facing each other and knees outward. Make your feet as
close as possible to the groin. Keep this posture for 15s and then relax. Repeat the exercise three
times. Stretched parts: Quadriceps and hip muscles.

Like muscle exercise, aerobic fitness also requires larger blood flow and higher heart rate, so it will
improve the cardiovascular system. The heart rate is usually judged by pulses. The pulses below
the maximum exercise target level are safe and effective. The exercise target level is 72% to 87% of
the maximum heart rate. The training target should be gradually improved by developing training
programs, at least 3-4 times a week and 15-20 minutes each time.
Warning: Never try to exercise above the target heart rate. You must improve the exercise intensity
gradually. Those with a medical history must exercise as instructed by doctors. For those who are
over 35-40 years old without normal training, it is recommended to follow doctors’ instructions.
Keep a few minutes for warm-up and cooling (as shown in Fig. B).
2. How to Improve Exercise Effect
3. Maintenance
1. Regularly check whether the bolts and nuts of each part are tightened, whether the adjustment
knob is locked, whether rotary parts are flexible and whether there are worn or damaged parts.
These parts must in good conditions to guarantee the safety.
2. The worn or damaged parts must be immediately removed or replaced or repaired by the
maintenance center.
3. Keep the device clean. However, this device must not be wiped with acidic, alkaline or organic
solvents.
Start Guide
Maximum heart rate-exercise target zone (as shown below)
Fig. B
Temperature rise Temperature drop
Time
15-25min.
85%OF MAX
Resting heart
rate
55%OF MAX
70%OF MAX
Temperature drop

Start Guide
4. Troubleshooting
5. Heart Rate Management
Find the appropriate age segment on the abscissa of Fig. C, and then the target heart rate zone.
1.The floor is not flat or there is
debris.
2.The base is not leveled
during rack assembly.
1.The magnetoresistive gap
increases.
2.The spinner is damaged.
1.Clean up debris.
2.Loosen the rack connecting bolts,
level the base and then tighten the
bolts.
3.After making adjustments, tighten
the bolts of the bottom tube pad.
1.Open the shield for
adjustment.
2.Replace it.
3.Open the shield for
adjustment.
Fault
Rack inclination
Handle instability Tighten the bolts.Thread loosening
Abnormal sound of
rotary parts Gap misalignment Open the shield for
adjustment.
Weak rotation
Cause Solution
Example: For the age of 40, 72% of the maximum
heart rate level is 133 heartbeats per minute, and
87% of the maximum heart rate level is 161
heartbeats per minute.
Keep the heart rate target within this optimal
range.
1.If the heart rate is too low, increase the exercise
speed or load.
2.If the heart rate is too high, reduce the exercise
speed or load.
3.If you feel it difficult to exercise but there is still
a long time before the exercise setting, reduce
the exercise time.
4.If your heart rate does not return quickly to
normal within 5-10 minutes (excluding excep-
tions), reduce the exercise load.
Note: The above heart rate management is for
reference only. Please consult a doctor for
specific data and methods!
200
190
180
170
160
150
140
130
120
110
100
20 25 30 35 40 45 50 55 60 65 Age
Beats per minute
200
195
190
185
180
175
170
165
160
139
143
119 115
122
148
126
130
152
157
133
161
165
136
140
169
174
144
87% of maximum
heart rate
Training Zone
100% heart rate line
72% heart rate line

Stability adjustment of the entire product:
After assembling the entire product, push it onto a stable ground and start exercising. Check
whether this product is stable during exercise. In case of any instability and shaking, make
adjustments as follows until the product is stable.
6. How to Extend Exercise Time
1. For correct aerobic training, keep your heart rate within the training zone for at least 12 min.
2. If the training time exceeds 60 min, the training effect will decline, and the risk or injury will
increase.
3. If you have to increase the exercise intensity, it is recommended to continue exercising for at
least 12 min per week. If you think it acceptable, the exercise time must increase by 10% or less.
4. Never rush to increase the exercise intensity; otherwise, you will feel tired after exercise.
5. Check your health level and progress.
The exercise intensity and progress can be measured based on the heart rate. Your heart rate will
drop within one minute after acceleration, and thoroughly return to normal within several
minutes.
6. Check your training effect.
1) Measure your heart rate at the end of aerobic training.
2) Slow down and cool down.
3) Remember the heart rate after 60s.
4) Record the time required to restore your normal heart rate.
5) Check your exercise intensity once every a few weeks.
Start Guide
Product movement:
1. Hold the rear bottom tube with both hands, lift it until the moving wheel of the front bottom
tube is on the ground, and then move the product via the moving wheel.
2. Pay attention to the slide rail, rollers and movable parts while moving this product, to avoid
hand injury.
3. This product is heavy, so it is recommended to appoint two or more persons to handle it.
4. It is recommended to keep this product in a dry place, and not on a balcony or any place prone
to exposure to the sun and rain for a long time.
Handling Instructions
Maintenance Instructions

Maintenance
The two front fixing pads are not adjustable. The middle and rear regulating pads can be applied
to adjust the stability of this product. If the product is not stable, adjust the two rear regulating
pads on the left and right. If any pad is not leveled, please adjust it. Turn the pads left to screw
them out gradually. When the entire product is stable, adjust the middle regulating pad until it is
suspended by 3-5mm above the ground.
Use of the oil pocket:
Oil is applied on the guide rails and universal joints. If the product has been used for a long time
and the rollers and track produce abnormal noise, a small amount of oil needs to be applied on
the track.
If the universal joints produce abnormal noise, remove the screw (A) of the arm cover and left and
right covers (B) and (C) at the lower end of the arm, and keep them aside. Remove the screws and
nuts (D) and (E) of the universal joints. Keep them aside. Apply a small amount of oil evenly on the
spherical surfaces of the universal joints. Then clamp the universal joints into the U-shaped sheet.
Lock them with the screw (D) and nut (E). Finally, lock the left and right covers (B) and (C) at the
lower end of the arm onto the arm via screws (A). Apply oil in the same way on the left and right
universal joints.
Rear regulating padFront fixing pad Stable
ground
Intermediate regulating pad
(suspended by 3-5mm)
Apply lubricating oil evenly on the
spherical surface

Antes de usar el producto,
por favor, lea detenidamente el
manual de las instrucciones,
y guárdelo bien.
E30S Manual de instrucciones
del producto
Modelo de producto: E30S
E30S
Máquina elíptica
YESOUL Máquina elíptica inteligente
Table of contents
Languages:
Popular Elliptical Trainer manuals by other brands

Kettler
Kettler Unix M Important instructions

Milo Fitness
Milo Fitness Total X-Trainer owner's manual

Horizon Fitness
Horizon Fitness ELITE SERIES AFG ELLIPTICAL E6 user guide

Horizon Fitness
Horizon Fitness 1.2E manual

Kettler
Kettler Unix E Important instructions

FOCUS FITNESS
FOCUS FITNESS SENA TOR FFCR014 manual