manuals.online logo
Brands
  1. Home
  2. •
  3. Brands
  4. •
  5. YIHUA
  6. •
  7. Power Supply
  8. •
  9. YIHUA 302D Technical manual

YIHUA 302D Technical manual

RegulatedDCPowerSupply
English
O P E R AT I O N
INSTRUCTION
04.07.03.252
MadeinChina Statement: The company reserves the right to improve & upgrade products,
product specifications and design are subject to change without notice.
Thank you for purchasing this product. Please read the manual
carefully before operating and keep this manual for future reference.
SPECIFICATION
303D
L250xW125xH155mm±5mm
0~3A
-10℃~40℃/14℉~104℉
<90%
≤0.01%+2mV
0~30V
ModelNumber
ControlUnitDimensions
OperatingAmbientTemperature
OutputRange(Voltage)
OutputRange(Current)
Display(Voltage&
CurrentReadings)
RelativeHumidity
≤0.01%+2mV
1mV(有效值/Validvalue)
≤200PPM/℃
≤0.1%+3mA
2mA(有效值/Validvalue)
≤0.02%+3mA
ReadingAccuracy
(Voltage&Current)
LineRegulation
LoadRegulation
Ripple&Noise
C.V.Mode(ConstantVoltage)
C.C.Mode(ConstantCurrent)
LoadRegulation
TemperatureCoefficient
LineRegulation
Ripple&Noise
302D 305DI 305DII 305DIII
0~2A 0~5A
Three-digitdisplay
(LEDNixieTube)
Four--digitdisplay
(LEDNixieTube)
Readingdiscrepanciesofupto±1%,
or±1unitofthereading.
302D /303D /305D I /305D II /305D III
I. APPLICATIONS & FEATURES
This product is specifically developed for use in scientific research, product R&D,
test labs, higher education practical lessons, laptop repairs, electronic product
manufacturing lines and more. The voltage and current are continuously
adjustable within the specified range. Highly accurate and reliable, this product
is also equipped with a complete set of overload protection circuit, making it an
ideal choice for your industry.
II. PRODUCT REFERENCE
POWER
A
CURRENT
V
VOLTAGE
CURR ENT
FINE FINECOAR SE COARSE
C.C C.V
VOLTAGE
ON OFF GND
POWER
AmA
CURRENT
V
VOLTAGE
CURR ENT
FINE FINECOARSE COARSE
C.C C.V
VOLTAGE
ON OFF GND
AMPS
LO(m A)
HI(A )
1 1
2 2
33
4 4
5 5
6
7
8
9
10
11
12
6
8
9
10
11
12
13 13
302D、303D、305DII 305DI
Control Panel
    This product should not be thrown in the garbage. In accordance with the European directive
2012/19/EU,electronicequipmentattheendoftheirlifemustbecollected&returnedtoanauthorized
recycling facility.       Este producto no debe desecharse en la basura. De acuerdo a la directiva
europea2012/19/EU,los equipos electrónicosalfinal de suvida se deberànrecogery trasladarauna
planta de reciclaje autorizada.     Dieses Produkt sollte nicht mit dem Hausmüll entsorgt werden.
In Übereinstimmung mit der europäischen Richtlinie 2012/19/EU müssen elektronische Geräte am
Ende ihrer Lebensdauer eingesammelt und einem autorisierten Recyclingbetrieb zugeführt werden.
01 02
Ⅳ. MAINTENANCE & PRECAUTIONS
1. When charging up a battery, DO NOT connect the positive and negative in reverse.
2. The power supply SHALL NOT be used in its full operation capacity for an extended period.
Please control the usage rate within 60%, failure to do so may result in premature failure
of the power supply. (Set aside additional current capacity when ordering)
3. The cooling fan is located at the rear of the station, you should reserve enough space to
allow cooling. The fan will turn ON when the power supply is turned ON. DO NOT use the
power supply in environments where the room temperature is above 40℃/104 °F.
4. As the output power is relatively high, DO NOT short the circuit when the voltage setting is
above 5V.
1. Connect the power supply’s power cord to an electrical outlet.(If the power supply comes
with an AC input voltage selector, adjust the selector’s voltage to the same voltage speci-
fications as your electricity mains.)
2. Turn ON the power switch, and the C.V. mode indicator turns ON (When the coarse & fine
adjustment knob is not at 0). The current & voltage display will turn ON, the current dis-
play shows value “000”, while the voltage display shows the output voltage.
3. Adjust the voltage coarse / fine adjustment knob to set the desired output voltage (when
the current coarse & fine adjustment knob is not at 0).
4. C.C. Mode
1) First, adjust the voltage coarse / fine adjustment knob to any value between 2V to 5V
(when the current coarse & fine adjustment knob is not at 0).
2) Then, adjust the current coarse / fine adjustment knob to 0 (by turning the knob anti-
clockwise all-the-way down).
3) Use the leads to connect the positive terminal “+” with the negative terminal “-”.
4) Then, adjust the current coarse / fine adjustment knob to the desired amperage value,
and proceed for use.
III. OPERATION
05
1
2
3
4
1
2
3
4
5
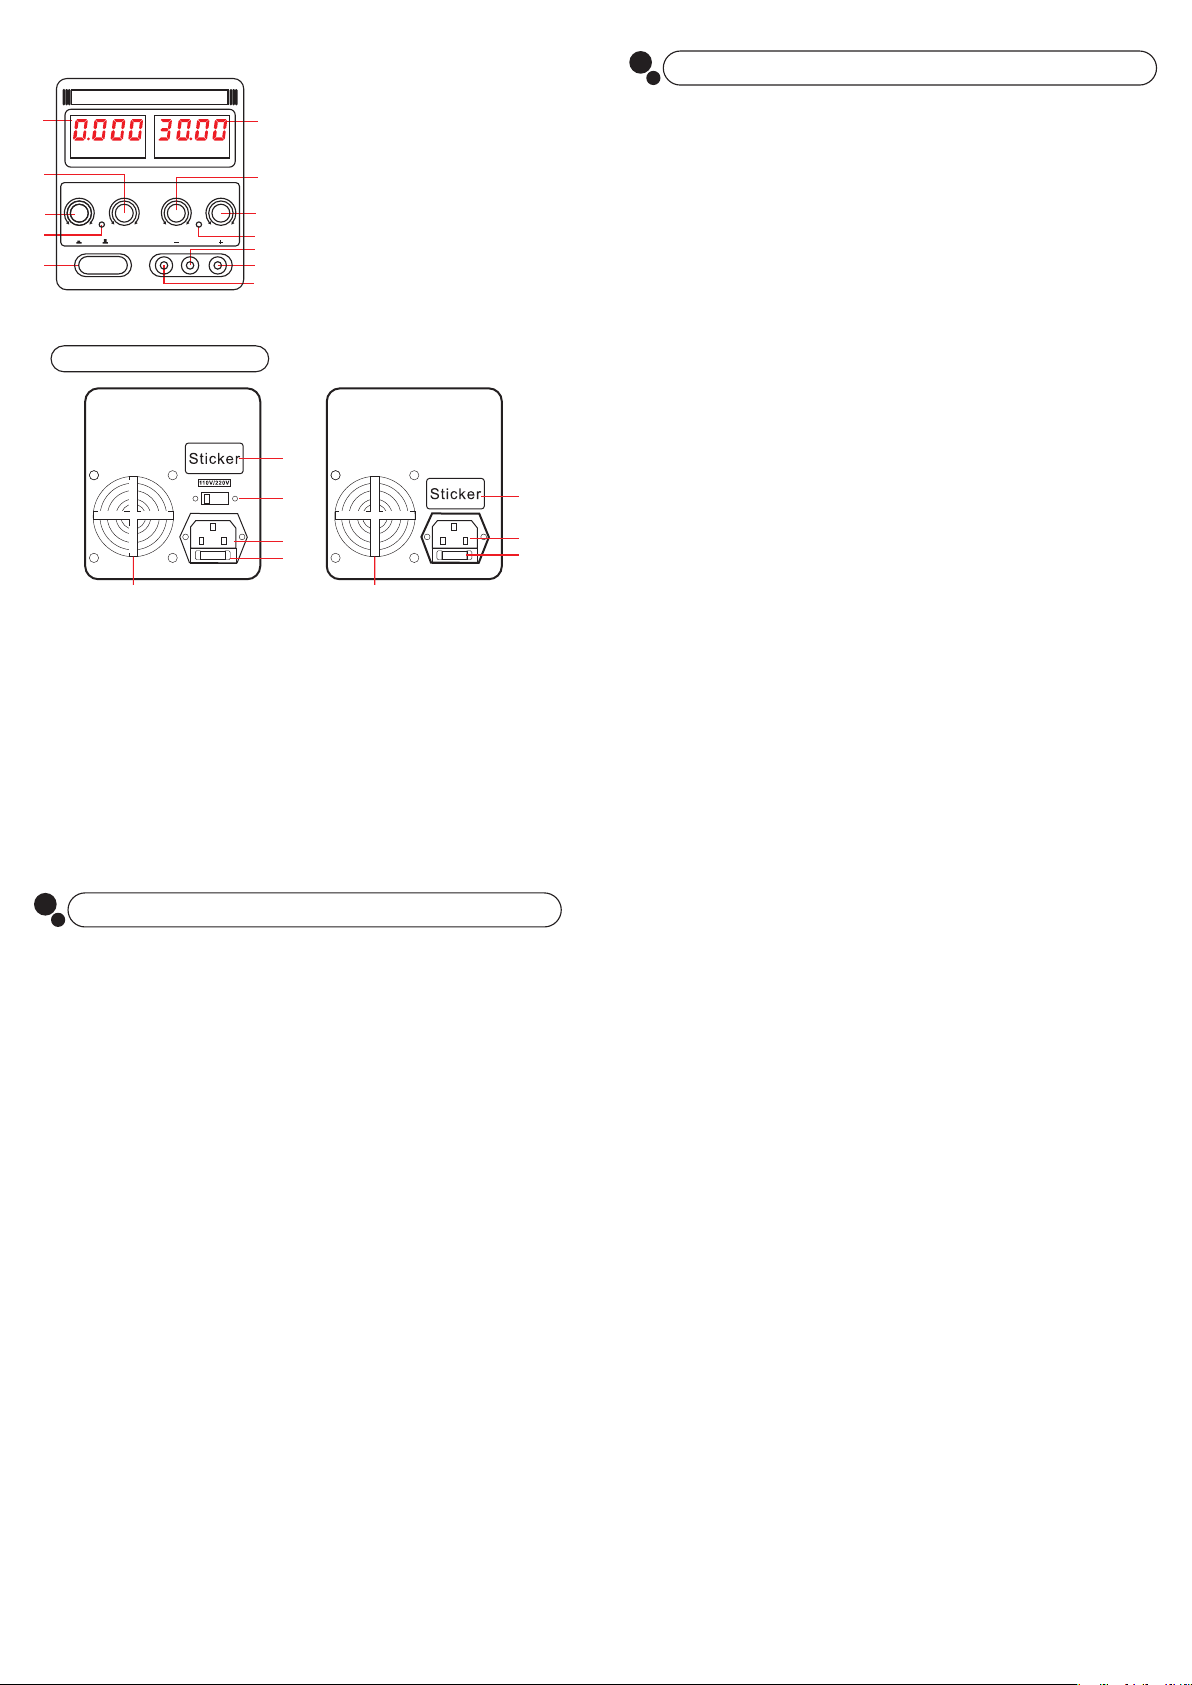
Reference: Rear Panel
1. Sticker
2. Terminal (AC Input)
3. Fuse box
4. Cooling Fan
5. AC Input Voltage Selector
(110V or 220V)
5. Connect the load to the power supply’s positive “+” and negative “-” terminal to begin
powering the load.
6. When the unit’s internal temperature is equal to or higher than 45°C/113°F, the cooling
fan will start up automatically and begin cooling.
7. Characteristics of Constant Voltage / Constant Current
This power supply’s key function is referred to as “automatic C.C. and C.V. switching”. This
power supply can switch between C.V. mode and C.C. mode automatically based on the
load change connected to the power supply. We refer to the change between modes as
the point of change.
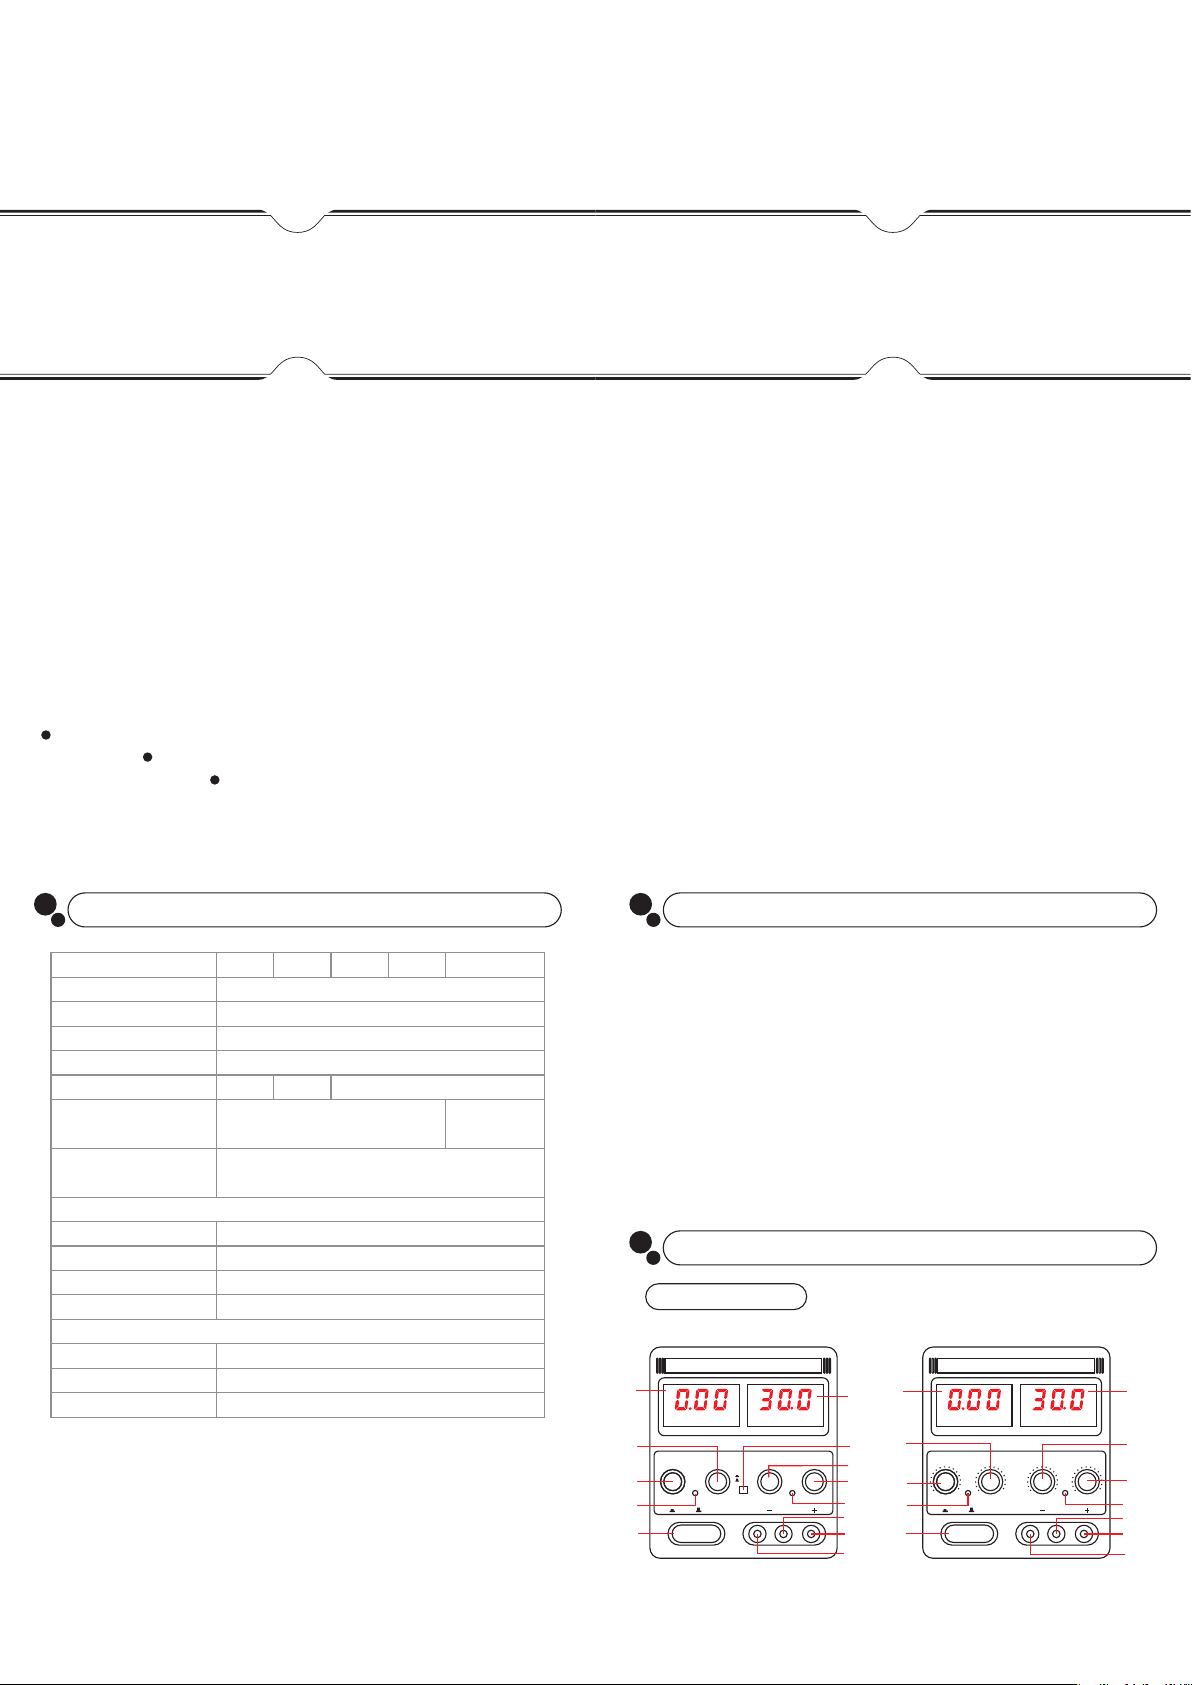
1
2
3
4
5
6
8
9
10
11
12
13
POWER
A
CURRENT
FINE FINECOARSE COARSE
C.C C.V
VOLTAGE
ON OFF GND
V
305DIII 1. Current Display
2. Coarse Adjustment (Regulated Current)
3. Fine Adjustment (Regulated Current)
4. C.C. Mode Indicator (Constant Current)
5. Power Switch
6. Voltage Display
7. Unit Selector (A or mA)
8. Fine Adjustment (Regulated Voltage)
9. Coarse Adjustment (Regulated Voltage)
10. C.V. Mode Indicator (Constant Voltage)
11. Terminal (Ground END)
12. Output Terminal (Positive + )
13. Output Terminal (Negative - )
03 04
How it works: If the load puts the DC power supply in C.V. (Constant Voltage) Mode, then
the power supply will output stabilized voltage (with the CV indicator ON). As the load
increases, the output voltage will remain stabilized until it reaches the preset current.
At this point, the output current will remain stabilized (with the CC indicator ON). As the
load increases the output voltage will decrease in ratio to the increase. Vice versa, the
change from C.C. (Constant Current) mode to C.V. (Constant Voltage mode) occurs as
the load decreases.

This manual suits for next models

4

Other YIHUA Power Supply manuals

YIHUA 1502USB User manual

YIHUA

YIHUA 1502USB User manual

YIHUA 305D IV User manual

YIHUA

YIHUA 305D IV User manual

Popular Power Supply manuals by other brands

Emerson ALP-130 installation manual

Emerson

Emerson ALP-130 installation manual

ENERMAX NAXN datasheet

ENERMAX

ENERMAX NAXN datasheet

Wieland gesis RM-PS 12/5 installation instructions

Wieland

Wieland gesis RM-PS 12/5 installation instructions

Toshiba QX7 Series Brochure & specs

Toshiba

Toshiba QX7 Series Brochure & specs

luminii PSDMX-3X96-24 installation instructions

luminii

luminii PSDMX-3X96-24 installation instructions

Bluetti B300 manual

Bluetti

Bluetti B300 manual

Altronix VertiLine48MV Series installation guide

Altronix

Altronix VertiLine48MV Series installation guide

Vertiv NetSure 2100 Series installation manual

Vertiv

Vertiv NetSure 2100 Series installation manual

Velleman HQPOWER PS3003 user manual

Velleman

Velleman HQPOWER PS3003 user manual

Thermolec DCC-11-PCB installation manual

Thermolec

Thermolec DCC-11-PCB installation manual

Eleshop LABPS3060SM operating manual

Eleshop

Eleshop LABPS3060SM operating manual

Beckhoff PS1061-2405-0000 installation manual

Beckhoff

Beckhoff PS1061-2405-0000 installation manual

Wheelock ET80-24MCW-FW installation instructions

Wheelock

Wheelock ET80-24MCW-FW installation instructions

Trane Technologies PM014 24 Installation, operation and maintenance

Trane Technologies

Trane Technologies PM014 24 Installation, operation and maintenance

Yamaha PW3000MA owner's manual

Yamaha

Yamaha PW3000MA owner's manual

Velleman LABPS6030SM user manual

Velleman

Velleman LABPS6030SM user manual

Alpha HDN 300 Technical manua

Alpha

Alpha HDN 300 Technical manua

FONESTAR PH-5 quick start guide

FONESTAR

FONESTAR PH-5 quick start guide

manuals.online logo
manuals.online logoBrands
  • About & Mission
  • Contact us
  • Privacy Policy
  • Terms and Conditions

Copyright 2025 Manuals.Online. All Rights Reserved.