manuals.online logo
Brands
  1. Home
  2. •
  3. Brands
  4. •
  5. Yugenlab
  6. •
  7. Projector
  8. •
  9. Yugenlab Milkyway User manual

Yugenlab Milkyway User manual

User instructions
Installation instructions
Troubleshooting
Warranty information
8VHU RYHUYLHZ
The optimal viewing distance to fully enjoy the
image is between 1.5 to 2.5 meters.
Darken the room as much as possible.
Tip: Cover any windows and stand-by lights
for additional dimming of the room.
Adjust the zoom lens of the chargepod so the
light covers the entire surface of the View.
Make sure the chargepod batteries are
charged.
Tip: recharge after using about 20 times.
Give your eyes some time to get used to the
dark. Then, the View is at its most intense.
For the greatest ‘wow effect’ keep your eyes
closed during charging period.
The best point of View to look at the light
image is from the centre.
Enjoy the View!
optimal viewin
g
distance 1.5 - 2.5 meter
3UHSDUDWLRQV
,QVWDOODWLRQ LQVWUXFWLRQV
1.Remove dust and dirt from the ceiling
If there is any grease on your ceiling, use a
degreaser before you install the View.
2.Vacuum
After preparing the ceiling, remove dust
from the room by vacuuming.
This will minimize the chance of dust or dirt
attaching itself to the View.
wall
ceiling
3.Mark the centre on the wall
Place the marking sticker on the wall in the
centre of your bed. The sticker will act as a
point of reference to help you while placing
the View.
marking sticker
4.Clean your hands
Clean your hands with the supplied alcohol
wipes. Make sure your hands are always
clean when handling the product. The View
is made of white fabric. Any staining or
grease spots will be visible.
6.Place the included help-strip
Take the help-strip from the box and remove the backing.
The help-strip is self-adhesive.
It should be placed at the edge as seen in
the illustration.
(Please do this on a solid/hard surface)
This strip will make the placing the View easier.
5.Remove the protective paper
Carefully remove the packaging paper to uncover the Night View.
Allow the View to stabilize to room conditions 24 hours before use.
help-strip.
FRONT
place help-strip here




1.Peel section
on
e
Clean your hands with the provide
d
alcohol based cleaning wipe. Gentl
y
r
emove the first backing section (the pa
r
t
with the number ‘1’ on it)
.
It's just li
k
e pu
t
ting a giant sti
ck
er abo
v
e
y
our
bed.
T
o ma
k
e su
r
e the p
r
ocess goes smooth
l
y
,
f
oll
o
w the inst
r
uctions.
Ma
k
e su
r
e you
c
a
r
r
y the
supplied
r
oller a
r
ound your
wrist
2.Allign and stic
k
Align the view and push the help-strip against
the ceiling. Make sure the first section i
s
placed parallel to the side of the wall
.
Ca
r
efully smooth out the first section with the
r
oller while keeping it in place.
4.Peel and Roll section
t
w
o
Gently remove the second backin
g
section (the pa
r
t with the number
‘2’ on it) and again use the rubber
roller to smooth out the secon
d
pa
r
t of the Vie
w
.
3.Roll section
on
e
Use the supplied roller t
o
smooth out the
r
est of the
first section.
5.
R
epeat
f
or
three
and
f
our
Repeat step 3 for the third an
d
fou
r
th pa
r
t of the Vie
w
.
6.Remove the help tool
s
Remove both marking sticker
s
and the help-strip ca
r
efull
y
.
Should bubbles of air appear in the su
r
f
ace
,
c
a
r
eful
l
y pull the
Vi
e
w ba
c
k as
f
ar as necessa
r
y
.
R
eapply and smooth out with the p
ro
vided
r
olle
r
.
3ODFLQJ WKH 9LH
Z
BACK


Removing the back
The back of the chargepod is
magnetically attached. Remove
the back by sliding it down and
gently pulling it off.
Activating the batteries
Remove the protective plastic
from the battery holder. This will
enable the batteries to make
contact. Your light is now ready
for use.
Positioning the chargepod
Put the chargepod on your
nightstand
- Mark the place for the chargepod on the wall
- Drill and place the provided plug in the wall
- Carefully screw the base plate in the plug
- Attach the chargepod to the base plate
OR
Baseplate
&KDUJHSRG LQVWUXFWLRQV
Make sure the chargepod batteries are
charged.
Tip: recharge after using about 20
times.
For the greatest effect keep your
eyes closed during charging
period.
- Charge chargepod batteries exclusively with micro USB output 5V 1 Amp re.
- Do not charge the batteries longer than 8 consecutive hours.
- Do not plug in charge cable unless the batteries are in the chargepod.
- Do not look directly at the UV light, looking directly into UV light may cause damage
to your eyes.
- If the light does not automatically turn off after 2 minutes, please remove batteries
from chargepod and contact Yügenlab.
Aiming the light beam
Make sure the room is dark. Turn on the
chargepod. Aim the light beam at the
View by rotating and zooming in and
out.
Full coverage
Make sure the entire surface of the
image is covered by the light beam to
fully charge it.
7URXEOHVKRRWLQJ
Important:
Make sure the wall has been previously primed prior to painting (otherwise the
paint or adhesive may come off.) Concerning newly painted surfaces, make
sure you allow 30 days for out gassing preventing bubbling. If you place your
product on a pebbly, textured surface that has used eggshell paint or a very
porous surface (i.e. brick, cement walls, stucco) you may receive poor results.
I opened the package and the release liner (the back of the View) looks
wrinkled
The original backing of the product may be wrinkled due to packaging challenges.
This will not have any effect on the quality of the product.
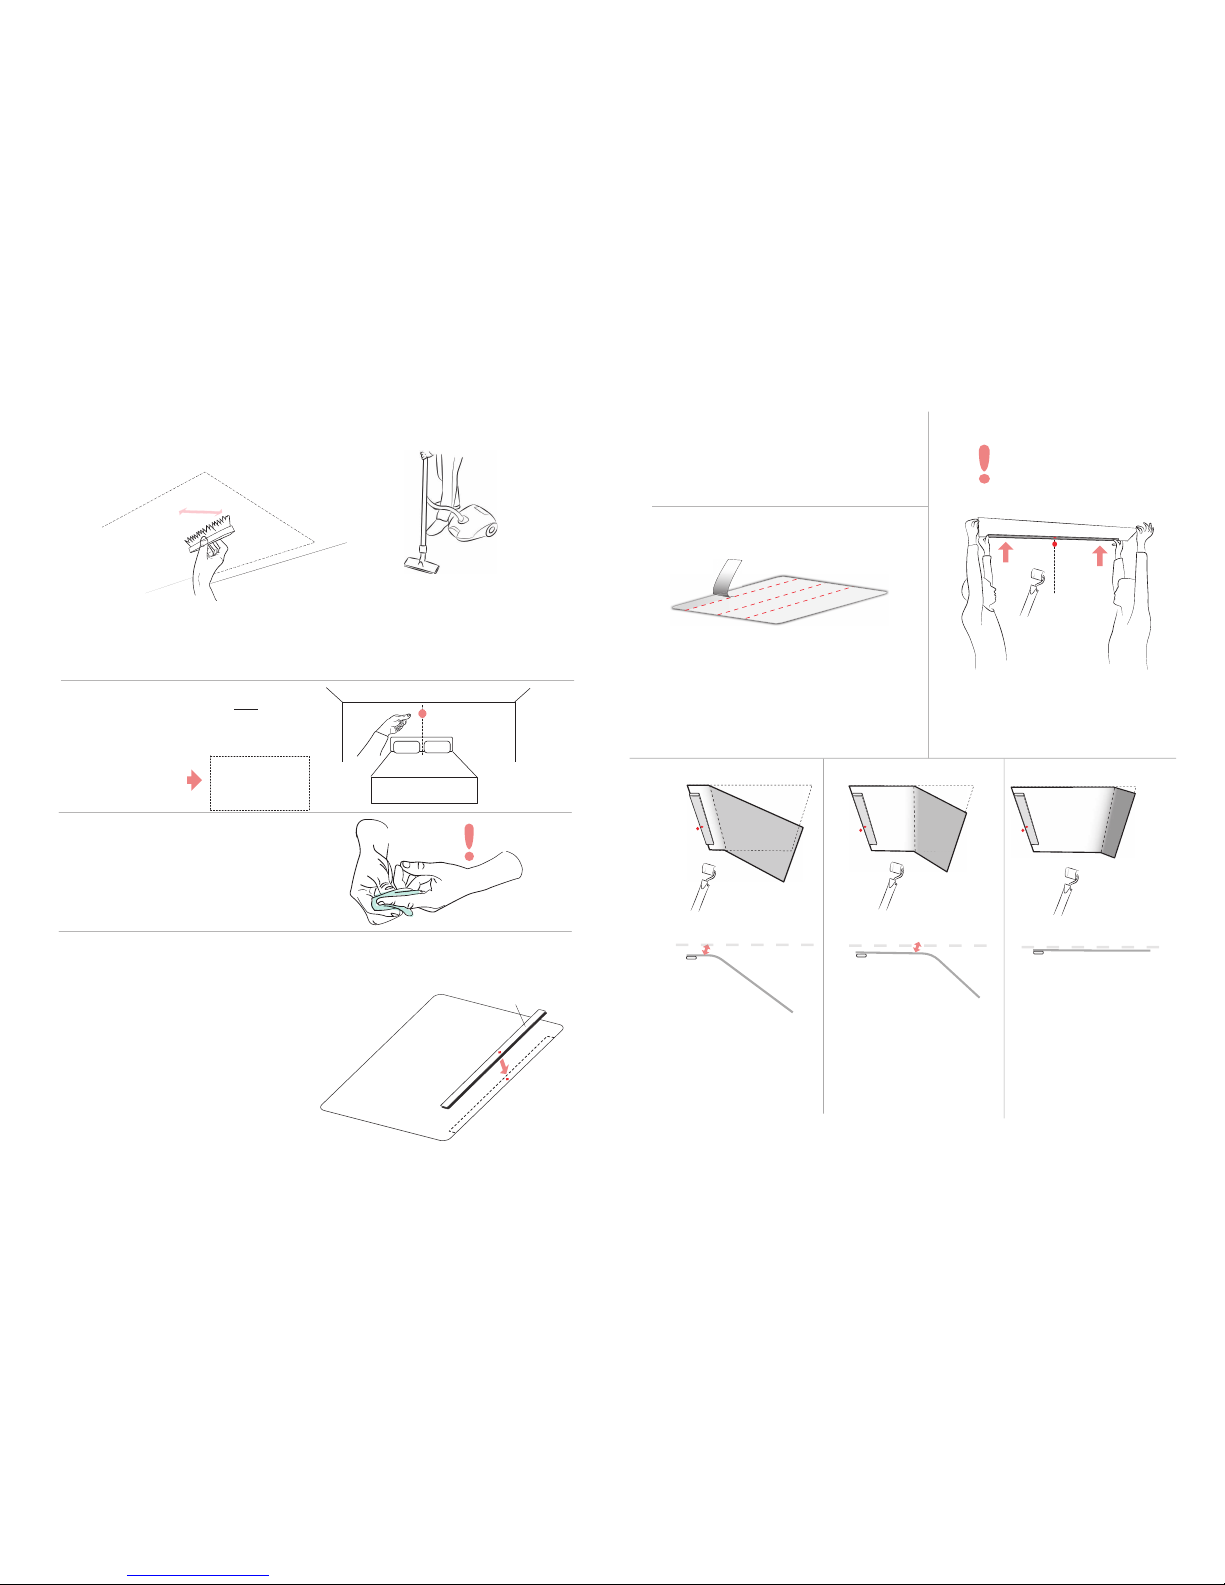
I stuck the View to my ceiling and air bubbles appeared
Clean your hands and gently pull back the View as far as necessary. Reapply with
the supplied rubber roller. Smooth out any excess air.
The View does not adhere to my ceiling
Is your ceiling greasy or dusty? Dust, grease and other forms of dirt could damage
the quality of the adhesive on the back of the product.
If this is not the case, put the product on some sort of silicon paper (such as baking
sheets) and contact us for support.
The View is detaching from the ceiling
Contact us for support.
I wrinkled/folded the product and now it sticks together
Try not to let the self-adhesive material stick to itself. Do not fold. In case of
accidental sticking, you can seperate it by (carefully) pulling it apart.
A dark stain has appeared on the product
The natural oils on your hand can cause staining. Always use the alcohol based
cleansing wipe supplied to clean your hands prior to touching the View. Please
contact us for support.
There is dust on the View
Gently brush it of with the provided dust brush.
Use
The image of the View is vague/not bright enough
There are multiple possible reasons for this problem:
- The room is not dark enough
Please darken the room as much as possible. Light pollution will influence the quality
and duration time of the product. Tip: Cover windows and any stand-by lights.
- The batteries of the chargepod are empty
Please charge the chargepod with micro USB 5v 1 Amp re.
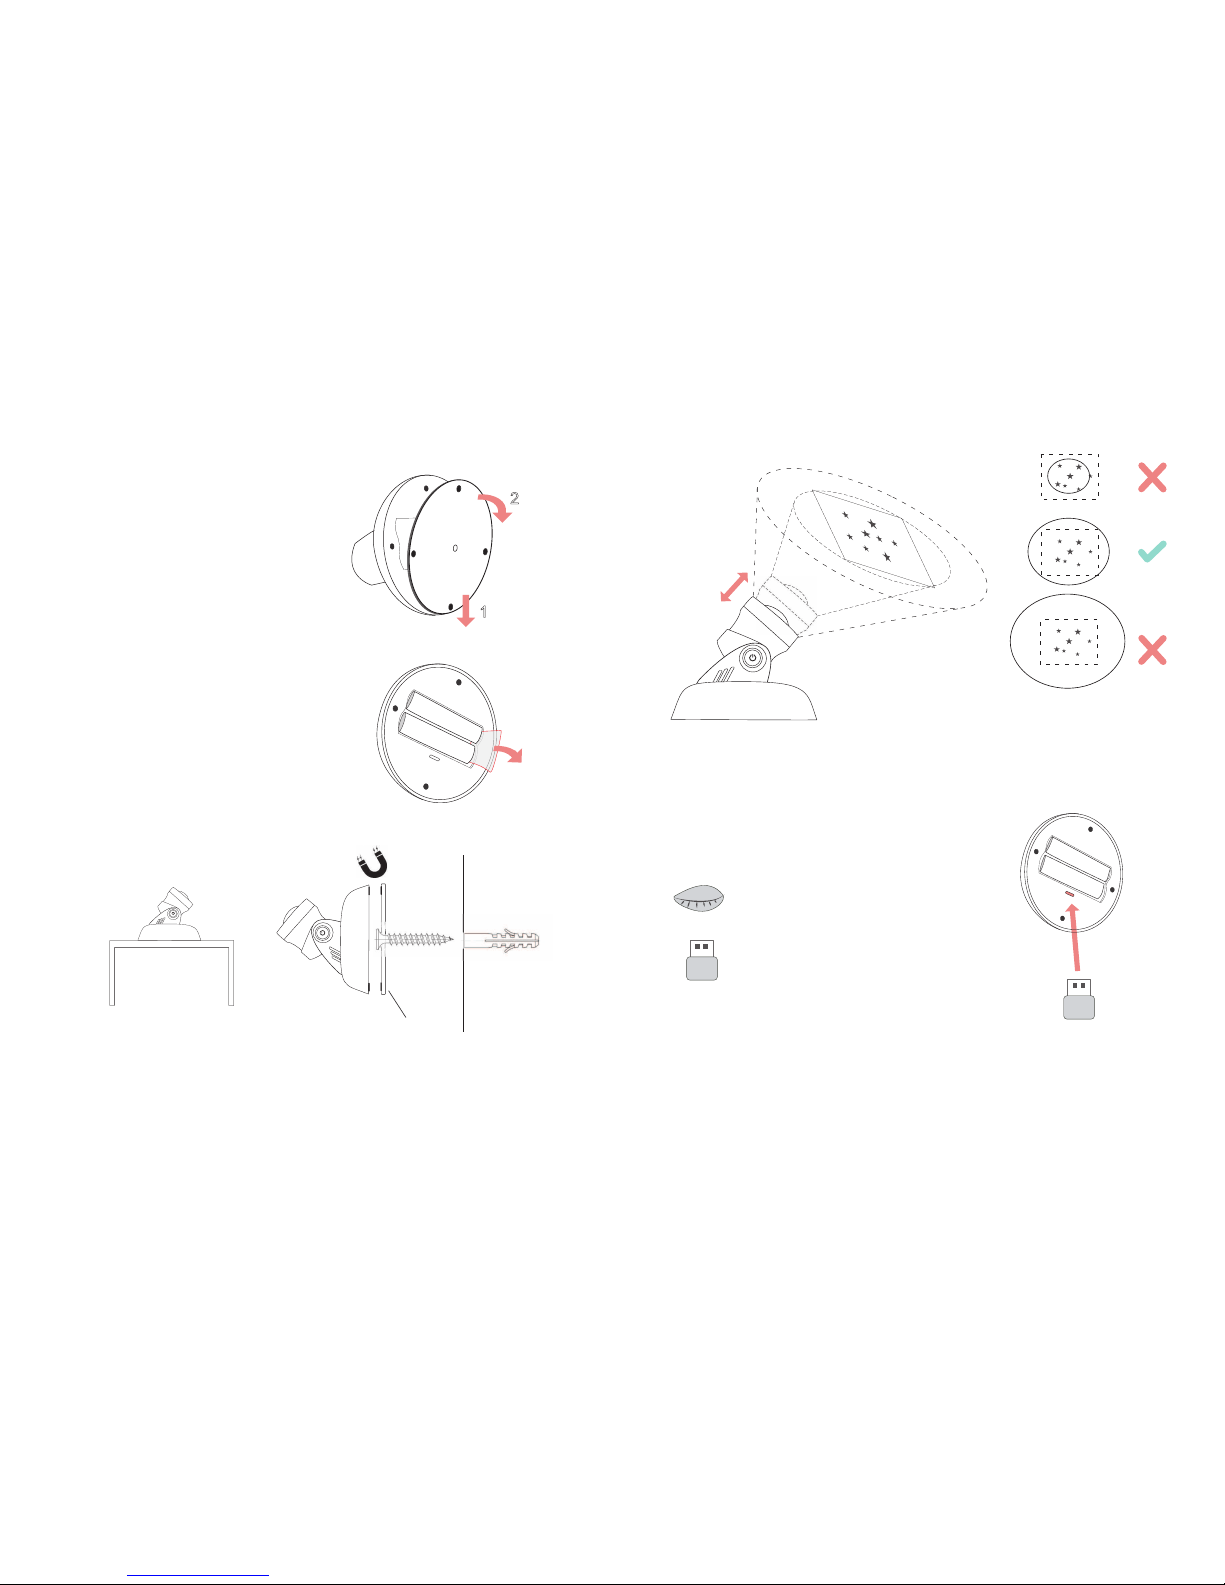
- The chargepod light is not focused enough
Please aim and focus the special UV light onto the View so it can fully charge. Make sure
the entire surface is covered.
-You are too far from the View
The ideal distance between you and the View for optimal viewing quality is 1 to 2.5
meters.
- The chargepod light is too far from the View
Please move the chargepod closer to the View so the UV light can fully charge it.
- Your eyes are closed
Please open your eyes.
The light does not automatically turn off
Remove the back of the chargepod, take out the batteries and contact us for support.
The batteries of the chargepod don’t charge optimally
Please contact us for support.
7URXEOHVKRRWLQJ

Popular Projector manuals by other brands

BenQ GP20 Features

BenQ

BenQ GP20 Features

BenQ MW712 Specifications

BenQ

BenQ MW712 Specifications

Toshiba TLP X4100 owner's manual

Toshiba

Toshiba TLP X4100 owner's manual

Panasonic PT-TW342 Operation instructions

Panasonic

Panasonic PT-TW342 Operation instructions

promethean PRM-30A Service manual

promethean

promethean PRM-30A Service manual

Sony HDMI VPL-FH300L operating instructions

Sony

Sony HDMI VPL-FH300L operating instructions

Optoma EP 758 Service manual

Optoma

Optoma EP 758 Service manual

Casio XJ-L8300HN user guide

Casio

Casio XJ-L8300HN user guide

Knoll HT300 technical information

Knoll

Knoll HT300 technical information

Epson EB-770Fi user guide

Epson

Epson EB-770Fi user guide

Panasonic PT-LB10NTU - Mobile Proj XGA 2000 Lumens 4.9LBS Cross Platform... Specifications

Panasonic

Panasonic PT-LB10NTU - Mobile Proj XGA 2000 Lumens 4.9LBS Cross Platform... Specifications

Marantz VP8600 Service manual

Marantz

Marantz VP8600 Service manual

Yaber L1 user manual

Yaber

Yaber L1 user manual

Dukane Micromatic II 28A81C operating instructions

Dukane

Dukane Micromatic II 28A81C operating instructions

Toshiba TDP-MT500 owner's manual

Toshiba

Toshiba TDP-MT500 owner's manual

Epson PowerLite S3 Product information

Epson

Epson PowerLite S3 Product information

3M Multimedia Projector X70 Operator's guide

3M

3M Multimedia Projector X70 Operator's guide

Panasonic PT-LB51NTEA quick guide

Panasonic

Panasonic PT-LB51NTEA quick guide

manuals.online logo
manuals.online logoBrands
  • About & Mission
  • Contact us
  • Privacy Policy
  • Terms and Conditions

Copyright 2025 Manuals.Online. All Rights Reserved.