YUKI MODEL Gyro Hero2.0 Installation and user guide

Gyro Hero2.0
für RC-Flugmodelle, Nurflügel und Flugmodelle mit V-Leitwerk
for RC planes, flying wing and V-tail

Technische Daten
Maße: 36 x 28 x 6mm
Gewicht: 15g
Betriebsspannung: DC 3,5V-9V
Betriebsstrom: 20mA
maximale Winkelgeschwindigkeit: 80°/sec
mit Servo kompatibel: 1,52µs analog
1,52µs digital
mit Sender kompatibel: PPM/ PCM/ 2,4G
Arbeitstemperatur: -15°C bis +60°C
Funktionen und Verbindungen
Eingangssignale
AILE IN Querruder
ELE (E) Höhenleitwerk
RUD (R) Querruder
SW Locking-Mode-Schalter
AUX IN Landeklappe
Ausgangssignale
AILE OUT Querruder
ELEV OUT Höhenleitwerk
RUDD OUT Querruder
FLAP OUT Landeklapen
Specification
Dimensions: 36 x 28 x 6mm
Weight: 15g
Operating voltage: DC 3.5 V - 9 V
Operating current: 20 mA
Maximal angular velocity: 800 degrees/sec
Servo compatibility 1.52µs analog servo
1.52µs digital servo
Radio compatibility: PPM/ PCM/ 2.4G
Operating Temperature: -15°C to +60°C
Function and connection
Signal Input
AILE IN Signal input for Aileron
ELE (E) Signal input for Elevator
RUD (R) Signal input for Rudder
SW Locking mode switch
AUX IN Signal input for Flap
Signal Output
AILE OUT Signal output for Aileron
ELEV OUT Signal output for Elevator
RUDD OUT Signal output for Rudder
FLAP OUT Signal output for Flap
Modell -Auswahl
S1 •S2 •S3
Model Selection
S1 •S2 •S3
S1 S2 S3 AIL OUT ELEV OUT RUDD OUT
Setting 0 0 0 - - -
Normal Airplane 1 0 0 AIL servo ELE servo RUD servo
Flying Wing (delta) 0 1 0 left wing servo right wing servo RUD servo
V-Tail 0 0 1 AIL servo left wing servo right wing servo

1AIL OUT
2ELEV OUT
3RUDD OUT
4FLAP OUT
Glider Normal Airplane
LED-Status
Initialisierung blaue LED blinkt schnell für 3 sek.
nach dem einschalten
Initialisierung läuft normal, Flugzeug
nicht bewegen
Nach der Initialisierung leuchtet die
blaue LED ein paar mal auf
einmal blinken = normaler Flieger,
zwei mal aufleuchten = Nurflügler,
drei mal aufleuchten = V-Tail
Schnelles Aufblinken der roten LED
nach der Initialisierung
Initialisierung ist gescheitert
Betriebsmodus blaue LED leuchtet dauerhaft normaler Modus
rote LED leuchtet dauerhaft AVCS Modus
keine LED leuchtet GERO HERO2.0 ist aus
Einstellungsmodus Einstellungsmodus einschalten, die
rote LED blinkt langsam
Signal des Empfängers ist verloren
Initialization Blue flashes rapidly for 3 secs after
powering on
Initialization is normal, please don’t
move the plane
After initialization, the blue LED will
flash some times
Flash one time for normal model, two
times for flying wing (delta) and three
times for V-Tail
Fast circular flashing of red LED after
initialization
Initialization failed
Working Status Blue LED steady on Normal Mode
Red LED steady on AVCS Mode
Both LEDs Extinguished Gyro Off
Setting Mode Entering into Setting Mode,
the Red LED flashes slowly
Signal of receiver undetected
Flying Wing (delta) V-Tail

Installation
Der Flieger muss gerade auf einem stabilen Un-
tergrund stehen und der GERO HERO2.0 muss
möglichst genau am Schwerpunkt eingebaut
werden.
Installation
The GERO HERO2.0 unit must be installed in a
flat and stable platform close to the center of
gravity in your plane.
Der GYRO HERO2.0 muss in Richtung vorwärts
eingebaut werden.
The GYRO HERO2.0 unit must be installed
towards forward in a level platform
Sender einstellen
Sender anschalten, alle Gleichgewichtseinstel-
lungen auf 0 setzen, auch die Mischfunktionen
ausschalten.
Transmitter Setting
Turn on the transmitter and create a new model,
set the trims and sub-trims of all channels to
zero, making sure that all mix-function are off.
Einstellungen
a. Drehknöpfe AIL, ELE und RUD im uhrzei-
gersinn drehen, das verstärkt die Wirkung
zum Kanal, entgegen dem Uhrzeiger wird die
Wirkung reduziert
b. Kreisel-Ausgleichsrichtung überprüfen
•GYRO HERO2.0 richtig mit dem Empfänger
und den Servos verbinden
•Richtige Modell-Einstellung (S1, S2, S3) zum
Flugzeug überprüfen
•Das Flugzeug in die Querachse, die
Längsachse und die Hochachse bewegen,
um die Stellung der Ruder zu überprüfen.
Gain Adjust
a. trimming potentiometers AIL,ELE and RUD
correspond to the gain adjustment for those
three channels, clockwise to increase and an-
ti-clockwise to reduce.
b. Gyro Compensation Direction Verification
•Connect the gyro, receiver and servo
correctly;
•Choose correct model for your airplane by
dialing S1, S2 and S3;
•Pick up the aircraft around the pitch axis, the
roll axis and the yaw axis to check if the
direction of movement of the rudder (control
surface) is correct, otherwise enter into Set-
ting Mode to adjust the compensation directi
on of gyro.

•Die Hebel vom Querruder, Höhenruder und
Seitenruder separat bedienen, um zu sehen,
ob alles korrekt funktioniert. Falls nicht, neu
justieren.
•Die Drehschalter AIL, ELE und RUD am
GYRO HERO2.0 in die mittlere Position
stellen. Das Flugzeug in die Quer-, Hoch-,
und Längsachse bewegen, um zu schauen,
ob die Bewegungen angemessen sind.
GYRO HERO2.0 überprüfen
Bild 1 und 2
Flugzeug um die Querachse bewegen,
Einstellung des Höhenruders beachten
Bild 3 und 4
Flugzeug um die Längsachse bewegen,
Einstellung des Querruders beachten
Bild 5 und 6
Flugzeug um die Hochachse bewegen,
Einstellung des Seitenruders beachten
•Move the sticks of aileron, elevator and
rudder separately, to see if the moving
direction of rudder(control surface) is correct,
otherwise adjust the normal/reverse of
corresponding channel on your transmitter.
•Move knobs of AIL,ELE and RUD on the
gyro, to adjust the gain of AIL,ELE and RUD
to the middle position, then pick up the
aircraft around the pitch axis, the roll axis
and the yaw axis to check if the reacting
amount of rudder(control surface) is
appropriate.
Gyro Gain Correction Diagram
Pic 1 and 2
Rotating the plane around pitch axis, check the
correction of gain for elevator.
Pic 3 and 4
Rotating the plane around the roll axis, check
the correction of gain for aileron.
Pic 5 and 6
Rotating the plane around the yaw axis, check
the correction of gain for rudder

Den AVCS - Modus wählen
SW ist der Schalter, um in den AVCS Modus
zum Fliegen zu wechseln. Bei einem 2-Wege
Schalter kann zwischen AVCS und normalem
Modus gewechselt werden.
Switch of AVCS Mode.
SW is the switch to change mode of AVCS for
flight. If use 2-section switch, it just can change
between AVCS and Normal mode. For 3-section
switch, apart from the AVCS and Normal mode,
it has an additional Gyro off Mode.
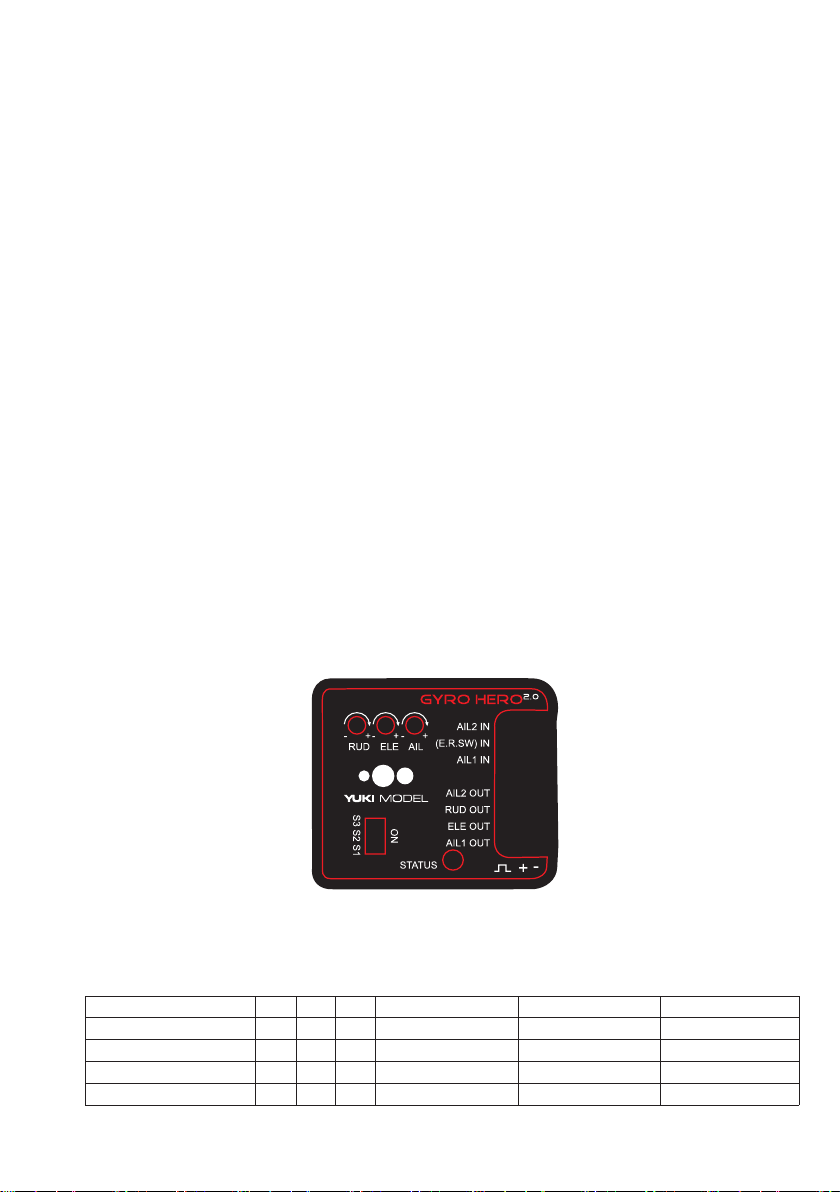
Flight Mode Range of switch Signal Pulse Width LED Status
Non-Locking Less 1320 µs Blue on
Gyro Off Middle 1520 ± 200 µs Off
Locking (AVCS) More 1720 Red on
Kalibrierung über den Hebel
Ganz wichtig, den Hebel in die mittlere Position
bringen. Den Hebel am Funksender mittig
stellen und in den Einstellungsmodus gehen.
Beim ersten benutzen des GYRO HERO2.0
oder benutzen eines neuen Funksenders ist
das Kalibrieren notwendig, danach richten sich
die Servos automatisch aus. Das Zentrieren
des Höhen-, Seiten- und Querruders kann die
Justierung der Schubstangen beeinflussen. Die
Funktion der Servomittenverstellung an dem
Funksender kann nicht benutzt werden.
Stick Centering Calibration
First, to get the best performance, centering
function is required. Make the stick in your
transmitter to be centered and then enter into
Setting Mode to calibrate. When you use the
GYRO HERO2.0 unit for the first time, or change
your transmitter, the calibration of stick center is
required, after centering, all servos will be cente-
red automatically. The center of aileron, elevator
and rudder could be obtained by adjusting the
linkage rods. The function of sub-trim in your
transmitter could not be used.
Setting Process
Turn on transmitter, set the trims of channel
ELE, AIL and RUD to zero, dial S1, S2 and S3
downwardly (OFF), then, connect the GYRO
HERO2.0 with power supply.
Waiting for 5 seconds
2. The LED status will enter into circulatory
flash, the color of LED represent the direction of
gyro compensation, blue for Normal and Red for
reverse.
a.) Blue or Red LED will flash 1time per second
for 5 times in total, now you can move the
rudder stick to adjust the compensation direction
of aileron.
b) Blue or Red LED will flash 2times per second
for 5 times in total, now you can move the
rudder stick to adjust the compensation direction
of elevator.
Einstellungsprozess
Funksender einschalten, die Trims der Kanäle
ELE, AIL und RUD auf 0 setzen, S1, S2 und S3
auf OFF setzen, dann den GYRO HERO2.0 mit
der Stromzufuhr verbinden.
5 Sekunden warten
2. Die LED wird regelmäßig blinken, die Farbe
zeigt den Kreiselausgleichsmodus. Blau für
normal, rot für rückwärts.
a) Die Blaue oder rote LED wird einmal die
Sekunde blinken, insgedamt 5 Mal. Nun kann
der Seitenruderhebel zur Änderung der Kom-
pensationsrichtung des Querruders verwendet
werden.
b) Die blaue oder rote LED blinkt 2 mal in der
Sekunde (5 Wiederholungen), nun kann der Sei-
tenruderhebel zur Änderung der Kompensations-
richtung des Höhenruders verwendet werden.

c) Blue LED or Red will flash 3 times per second
for 5 times in total, the move the rudder stick to
set the compensation direction of rudder.
3 Direction of Gyro Calibration
a) During the process of flash, move the rudder
stick to left or right to switch the direction of gyro
calibration
b) Nor (Blue flash) + Rev (Red Flash) or Rev
(Red Flash) + Nor (Blue Flash)
c) When moving the rudder stick, LED keeps
rapid flashing until it returns to the center.
4) Quit Setting Mode
The setting of Nor/Rev for gyro finished, unplug
the power supply and quit setting mode.
First Flight.
For the first flight, please check if the direction of
gyro compensation, direction of control by stick
are correct, and set the gain to a small volume,
and after times of flight test, then set it to a
appropriate volume, in order to get the
most excellent flight performance.
Troubleshooting
•Airplane swings regular, rapid and alternately
Decrease the gyro gain.
•Airplane swings irregularly
Check if the vibration of engine with airframe is
too much, reduce the vibration ,use soft doub-
le-sided foam adhesive to install the gyro.
•Airplane rotates irregularly, side tumbling or
overturning after taking off.
Check if the direction of movement of AIL, ELE,
and RUD are correct.
Move sticks of Aileron, Elevator and Rudder se-
parately to check if the directions of movement
of rudder (control surface) are correct.
c) Die blaue oder rote LED leuchtet 3 mal pro
Sekunde auf (insgesamt 5 Wiederholungen),
den Querruderhebel direkt das Querruder
ausgleichen.
3. Richtung der Kreisel Einstellung
a) Während des Prozesses des Blinkens, den
Querruderhebel nach Links oder rechts bewe-
gen, um die Empfindlichkeit der Kreiseljustie-
rung zu wählen.
b) Normal (Blau blinkt) + Rückwärts (Rot blinkt)
oder Rückwärts (Rot blinkt) + Normal (Blau
blinkt)
c) Sobald der Querruderhebel wieder zurück in
die Mitte gesteuert wird, blinkt die LED schnell
4) Einstellungsmodus beenden
Sobald die Einstellungen des Gyros fertig sind,
die Stromzufuhr abklemmen und den Einstel-
lungsmodus beenden.
Erster Flug
Vor dem ersten Flug die Justierung des Gyros
kontrollieren. Die Wirkung vom Hebel auf den
Gyro überprüfen. Den Gyro erst etwas niedriger
einstellen und nach einer Weile fliegen, wieder
höher stellen.
Fehlersuche
•Der Flieger schwingt kontinuierlich schnell.
> Die Kreiselzunahme verringern.
•Das Flugzeug schwingt unregelmäßig
> Die Vibrationen am Motor und Rahmen über-
prüfen. Den GYRO HERO2.0 mit doppelseitigem
Klebeband fixieren.
•Das Flugzeug rotiert unregelmäßig, taumelt
seitlich oder überschlägt sich nach dem Abhe-
ben.
> Die direkten Bewegungen von AIL, ELE und
RUD überprüfen.
Die Hebel vom Seiten-, Höhen- und Querruder
bewegen und die Bewegung überprüfen.

1 Turn on transmitter, set the trims of channel
ELE, AIL and RUD to zero, dial S1, S2 and S3
downwardly (OFF), then, connect the GYRO
HERO 2.0 with power supply. - wait 5 se-
conds
2. The LED status will enter into circulatory
flash, the color of LED represent the direction
of gyro compensation, blue for Normal and Red
for reverse.
a.) Blue or RED LED will flash 1/ sec for 5 times
in total, now you can move the rudder stick to
adjust the compensation direction of aileron.
b) Blue or Red LED will flash 2x/ sec for 5 times
in total, now you can move the rudder stick to
adjust the compensation direction of elevator .
c) Blue LED or Redwill flash 3x/ sec for 5 times
in total, the move the rudder stick to set the
compensation direction of rudder.
3. Direction of Gyro Calibration
During the process of flash, move the rudder
stick to left or right to switch the direction of
gyro calibration
Nor (Blue Flash) -> Rev (Red Flash)
or Rev (Red Flash) -> Nor (Blue Flash)
When moving the rudder stick, LED keeps rapid
flashing until it returns to the center.
4. Quit Setting Mode
The setting of Nor/Rev for gyro finished, unplug
the power supply and quit setting mode.
1. Funksender einstellen, die Kanäle ELE, AIL,
RUD auf null stellen, S1, S2, S3 runterdrehen,
dann GYRO HERO 2.0 mit der Stromzufuhr
verbinden. - 5 Sekunden warten
2. LED‘s blinken wiederholt, die Farben der
LED‘s geben die Einstellung wieder - blau für
Normal und rot für Rückwärts.
a) Blaue oder rote LED leuchtet 1x pro Sekunde
auf (5 Wiederholungen), das Querruder kann
eingestellt werden.
b) Blaue oder rote LED leuchtet 2x pro Sekunde
auf (5 Wiederholungen), das Höhenruder kann
eingestellt werden.
c) Blaue oder rote LED leuchtet 3x pro Sekunde
auf (5 Wiederholungen), das Seitenruder kann
eingestellt werden.
3. Genauigkeit der Gyro-Kalibrierung
Während die LED‘s blinken, den Schalthebel
nach links oder rechts bewegen, um den Gyro
zu kalibrieren.
Nor (blaues leuchten -> Rev (rotes leuchten)
or Rev (rotes leuchten) -> Nor (blaues leuchten)
Sobald der Schalthebel in die Neutralstellung
gebracht wird, blinkt die LED schneller.
4. Einstellungsmodus beenden
Sobald die Einstellungen vorgenommen sind,
die Stromzufuhr trennen. Der Einstellungsmo-
dus ist beendet.
CN Development & Media • Haselbauer & Piechowski GbR
Am Hasselt 20c • 24576 Bad Bramstedt • Germany
www.yuki-model.com

Table of contents