YZXStudio ZY1270 User manual

User Manual for YZXStudio ZY1270
Please read the user manual carefully before using.
CAUTION: Don’t calibrate the Voltage and/or Current benchmark unless you have the professional high-accuracy
equipment.
Technical Specification:
Model: ZY1270
Firmware Version: 3.0
Input Voltage Range: DC 4-24V
Input Current: Continuous -3A to 3A
Voltage Resolution: 0.0001V
Current Resolution: 0.0001A
Ah/Wh Range: 0-99999Ah;0-99999Wh
Ah/Wh Resolution: 0.0001Ah;0.0001Wh
Accuracy: Voltage 0.2%+2d;Current 0.1%+2d;
Display Screen: 1.3 inch 128*104 FSTN LCD Display
Screen Refresh Frequency: 3 times/second
Quiescent Current: 6mA (10mA with Backlight)
Resistor of Current Sampling: 12mΩ
Circuit Resistance: 42mΩ
Memory Type: Ferroelectric FRAM
Rewrite Cycle: 10 Billion Times
Recording Pattern: To record once Ah/Wh changed +
Load Balancing
Operation Instruction
Totally 6 operating modes, which can be shift from one to another by clicking the button.
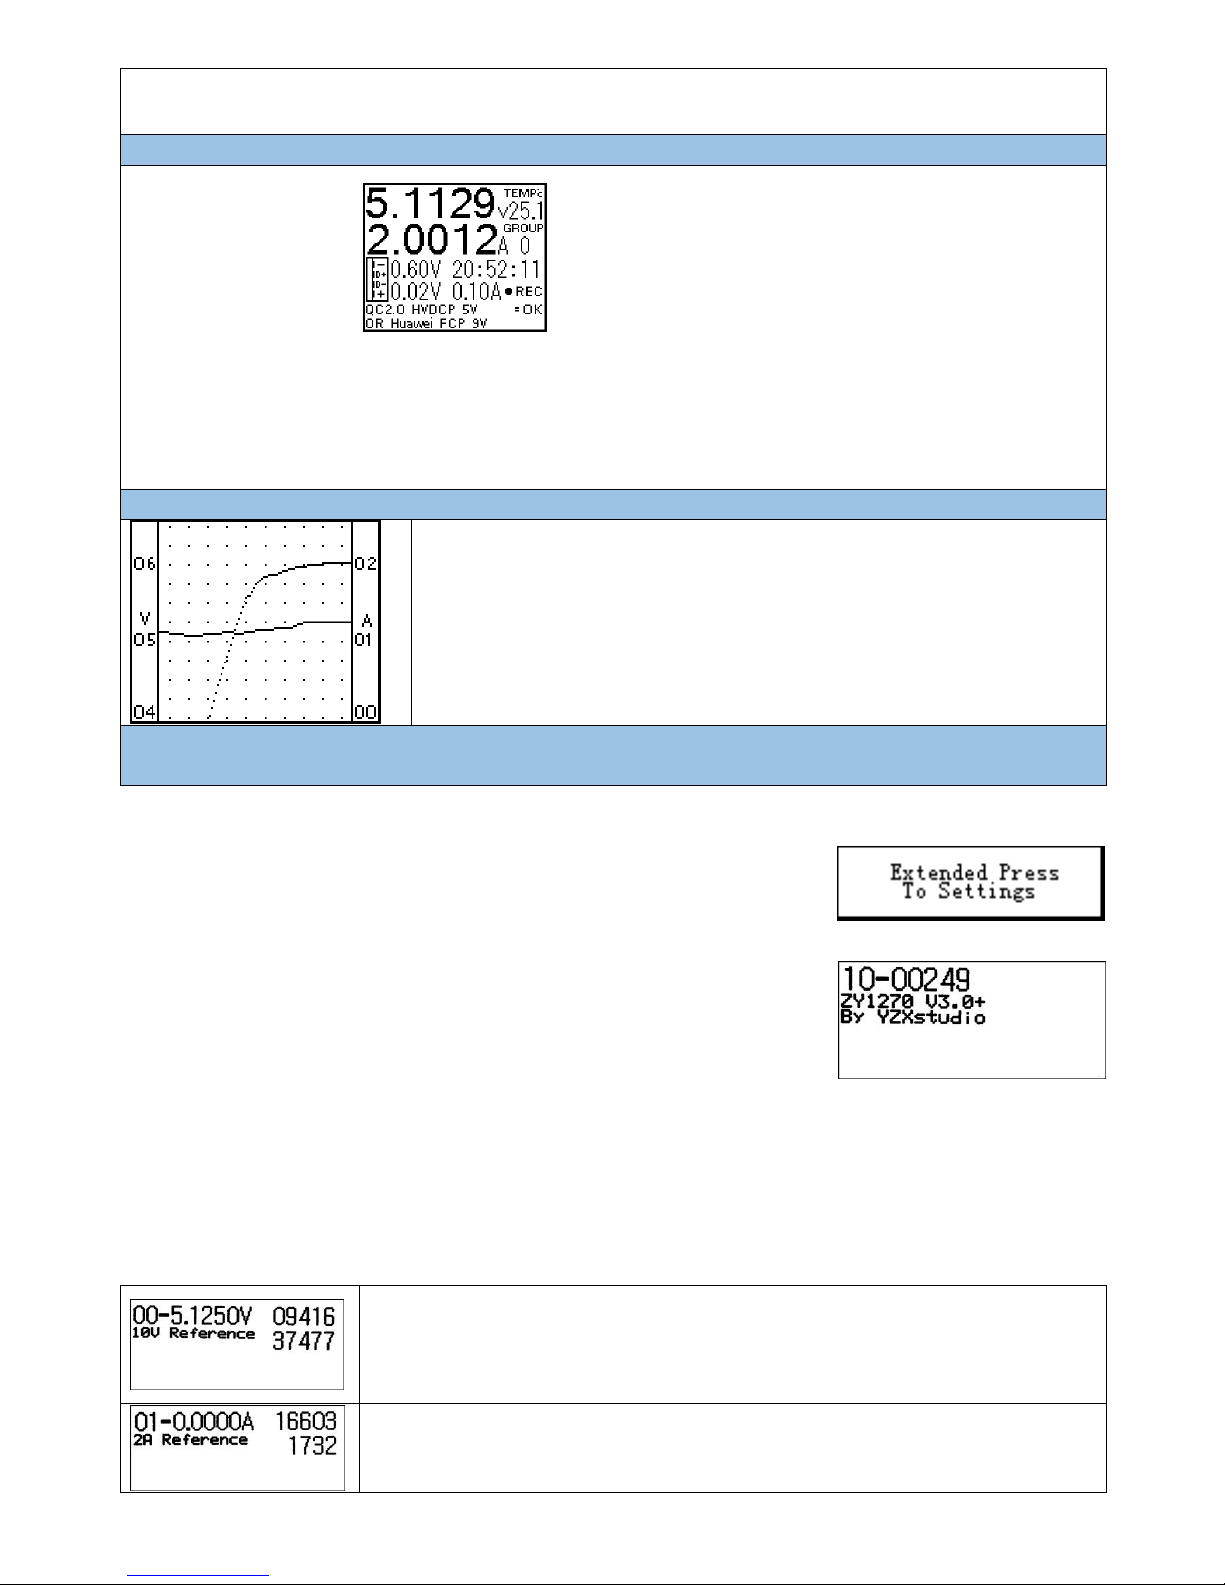
Mode 1 To test Voltage, Current, the Ah, Wh and Temperature of the Current Ah/Wh recording group (currently
group 0 as shown in the pic middle right)
Ah/Wh Recording Group(s):
1. Totally 6 recording groups available, indicated by number from 0 to 5.
2. To shift among the recording groups, Press and Hold the button for 2
seconds and release once the group number changed.
3. To clear the Ah data of current recording group, Press and Hold the button
for 5 seconds and release once the Ah data being zeroed.
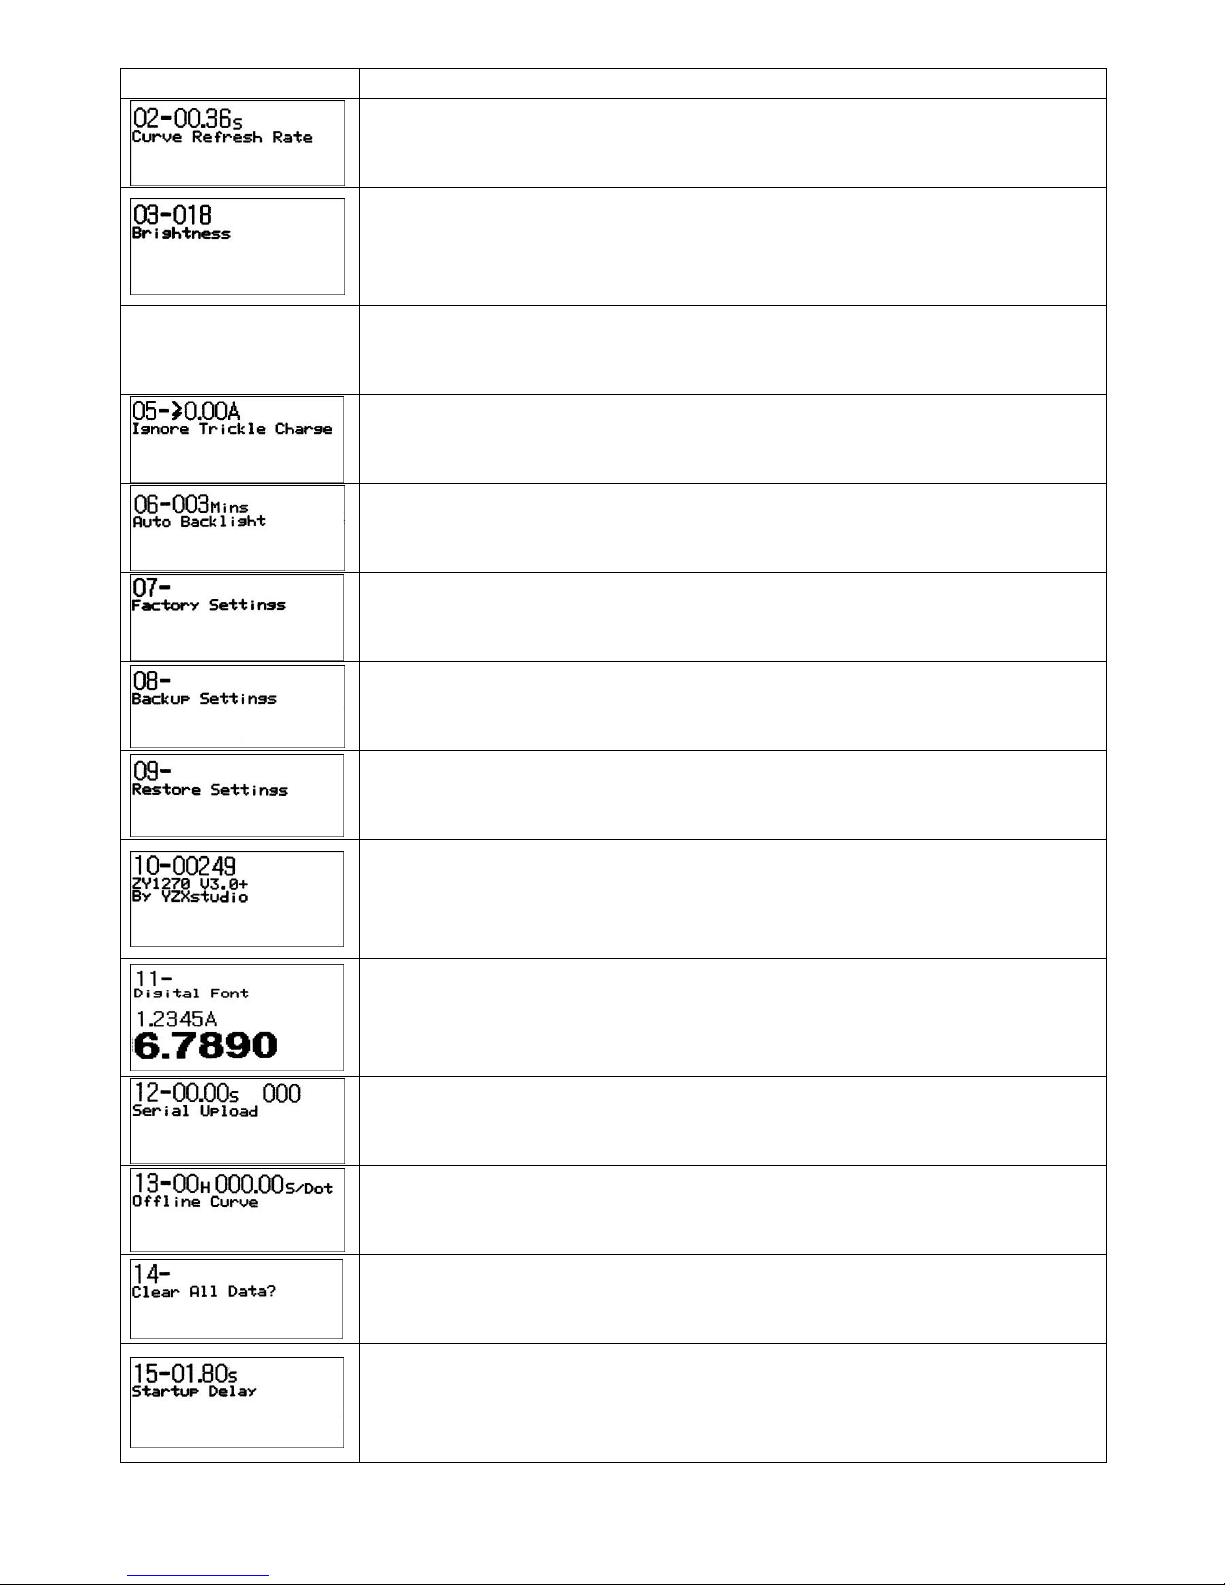
Mode 2 To test Voltage, Current, Power, Resistance and Temperature of Current Ah/Wh recording group
(currently group 0 as shown in the pic middle right)
Power of Load and Equivalent load resistance:
1. Totally 6 testing groups available, indicated by number from 0 to 5.
2. To shift among the testing groups, Press and Hold the button for 2 seconds
and release once the group number changed.
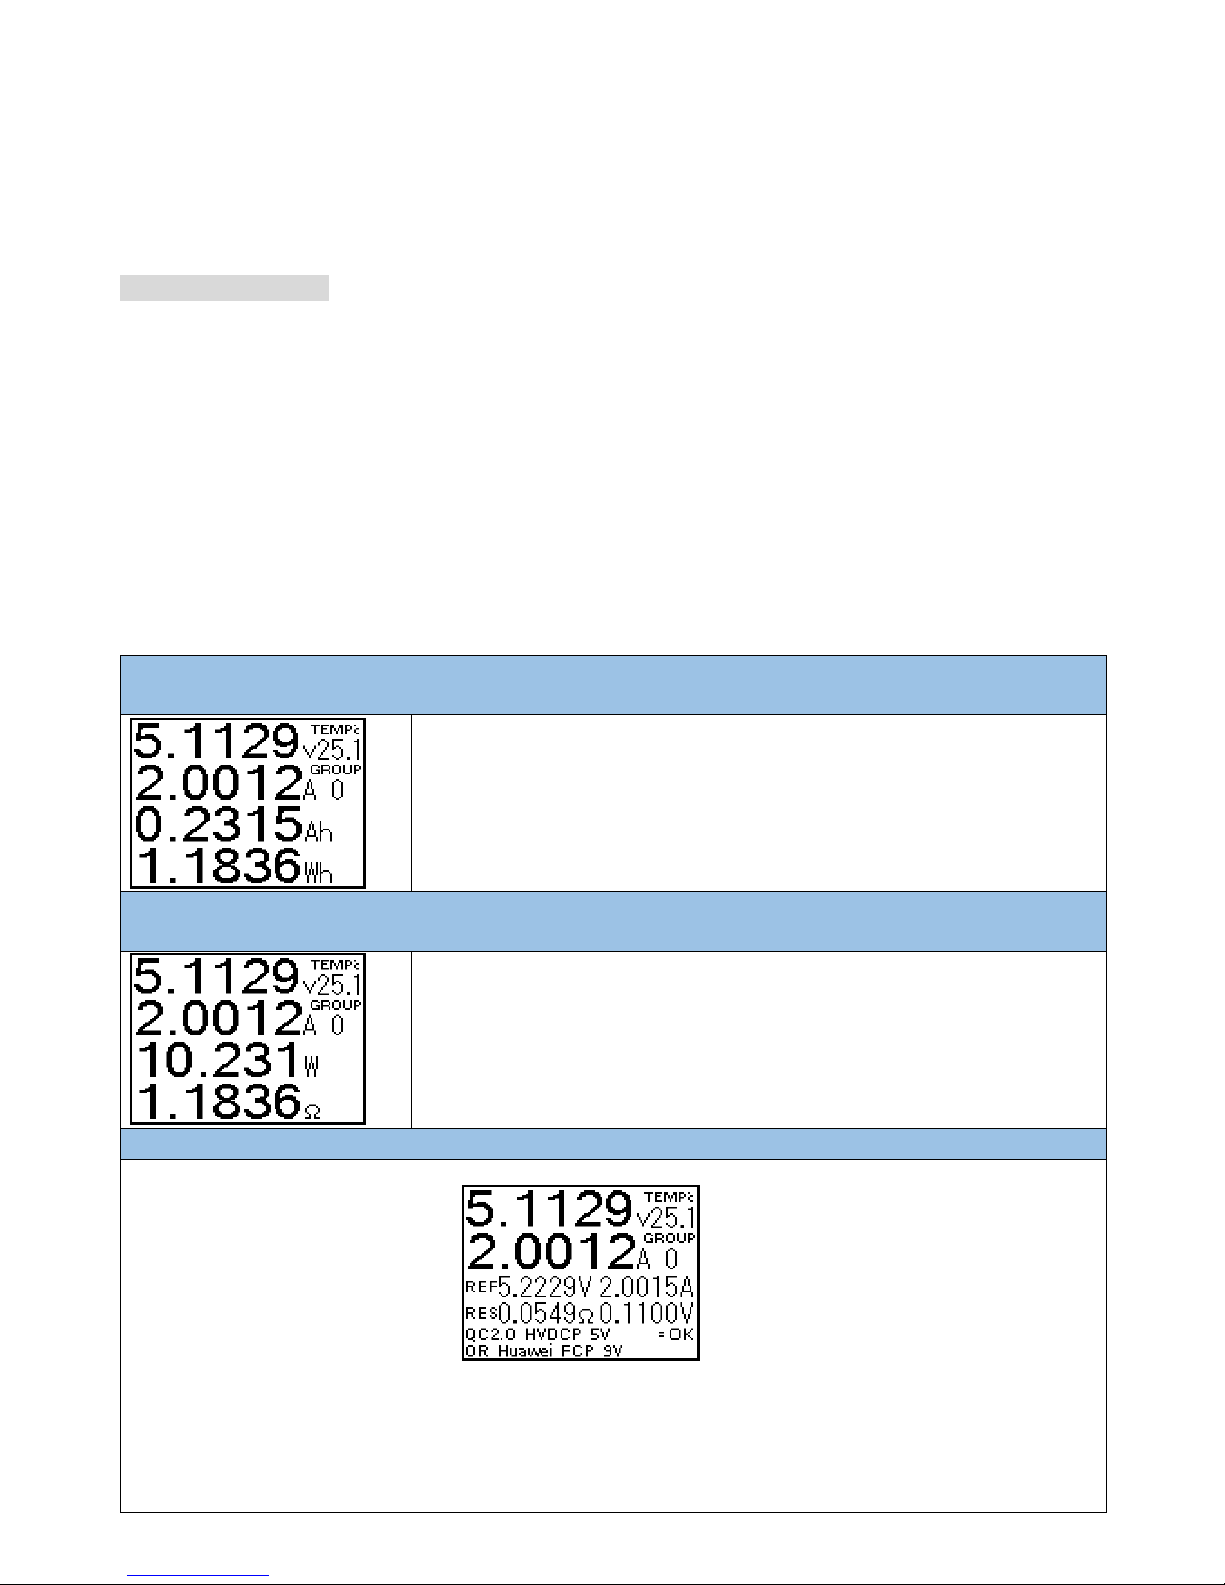
Mode 3 To test Micro Resistance value and voltage drop through charging cable
In-time Voltage Temperature
Testing Group
Current
Reference Voltage and Current Value
Resistance, and voltage drop
Current Recognition Type
Testing Method:
1. Connect the meter between the adapter/power bank and the constant current load, so as to get the Reference
Voltage and Current Value
2. Keep the constant current load on meter, unplug the meter and load combo from the adapter/power bank,
connect the target testing cable(micro USB type) between the adapter/power bank and the meter and load

combo, so as to get the In-time Voltage and Current
3. The meter will calculate and display the cable resistance and voltage drop.
Mode 4 To verify Charging Recognition Type (Apple 1A, Apple 2.1A, Apple 2.4A, DCP, QC2.0, QC3.0 etc.)
Voltage thru meter Meter temperature
Current thru meter Testing Group
D+ Voltage Recording Time
D- Voltage Trickle current filter value(0.10A as in the picture)
Current Recognition Type
Trickle current filter value: Ah/Wh Value and Time only can be recorded when the current thru meter is above the
trickle current filter value, which can be set in the Setting Mode.
Operations:
Press and Hold for 2 seconds respectively to shift the display way between Normal display and Rotate display.
Mode 5 To draw the dynamic Voltage and Current curve
Operation:
To Press and Hold the button for 2 seconds respectively to shift among:
1. Express curve drawing
2. D+/D- curve drawing
3. Off-line curve drawing (can be set ON/OFF in Settings)
Mode 6 To switch off the screen display while Ah/Wh recording
Settings Mode
To enter Settings, Press and Hold the button while the meter is energized, and don’t
release the button until the screen shows the “Extended Press To Settings” Then,
release the button and the screen shows “Settings” and the meter gets into Settings
Mode successfully.
There are totally 16 settings marked from 00 to 15. Once entered the Settings Mode,
the setting 10 will display on the screen as the default page to show the model
number, firmware version and manufacturer. (At this setting item, Press and Hold of
the button could EXIT the Settings.)
Click the button, the settings will shift from 11 to 15 and then back to 00 to start a new circle. In each settings, Press
and Hold the button for 2 seconds until “Keep Settings?” appear on the screen, then click the button to make the
changes of the current settings. Once done, Press and Hold the button again until the “Keep Settings?” disappear which
means already exit the current setting item and the click of the button will shift to another setting item. Here after are
the 16 settings and the operation method.
Voltage Benchmark Calibration
Operation: Input the high-accuracy 10V voltage, and Press and Hold the button to
calibrate.
CAUTION: Please DON’T calibrate unless with professional high accuracy power supply.
Current Benchmark Calibration
Operation: Input the high accuracy 2A current, and Press and Hold the button to
calibrate.

CAUTION: Please DON’T calibrate unless with professional high accuracy power supply.
Curve Refresh Rate
Operation: Press and Hold the button, until “Keep Settings?” appear. Click button to set.
Another Press and Hold to exit.
Brightness
Operation: Press and Hold the button, until “Keep Settings?” appear. Click button to set
brightness between 001 and 002, and to set the time interval of serial port uploading
data. Another Press and Hold to exit.
Rotate/Invert Display
Operation: Press and Hold the button, until “Keep Settings?” appear. Click button to set.
Another Press and Hold to exit.
Ignore Trickle Charge
Operation: Press and Hold the button, until “Keep Settings?” appear. Click button to set
minimum trickle to filter while recording Ah. Another Press and Hold to exit.
Auto Backlight
Operation: Press and Hold the button, until “Keep Settings?” appear. Click button to set.
Another Press and Hold to exit.
Factory Settings
Operation: Press and Hold the button to reset to the Factory Settings (uncalibrated).
Backup Settings
Operation: Press and Hold the button to backup the current settings.
Restore Settings
Operation: Press and Hold the button to restore the backup settings.
Model Number and Firmware Version
Operation: Press and Hold the button to EXIT settings.
Digital Font
Operation: Press and Hold the button, until “Keep Settings?” appear. Click button to set.
Another Press and Hold to exit.
Contrast Ratio
Operation: Press and Hold the button, until “Keep Settings?” appear. Click button to set.
Another Press and Hold to exit.
Offline Curve
Operation: Press and Hold the button, until “Keep Settings?” appear. Click button to set
time interval between dots. Another Press and Hold to exit.
Clear All Data
Operation: Press and Hold the button to clear all data.
Startup Delay
Operation: Press and Hold the button, until “Keep Settings?” appear. Click button to set
the time of LOGO displaying at startup. Another Press and Hold to exit.
Table of contents