ZALMAN ZM-MH200 Series User manual

English


1
1
Eng
ZM-MH200 Series
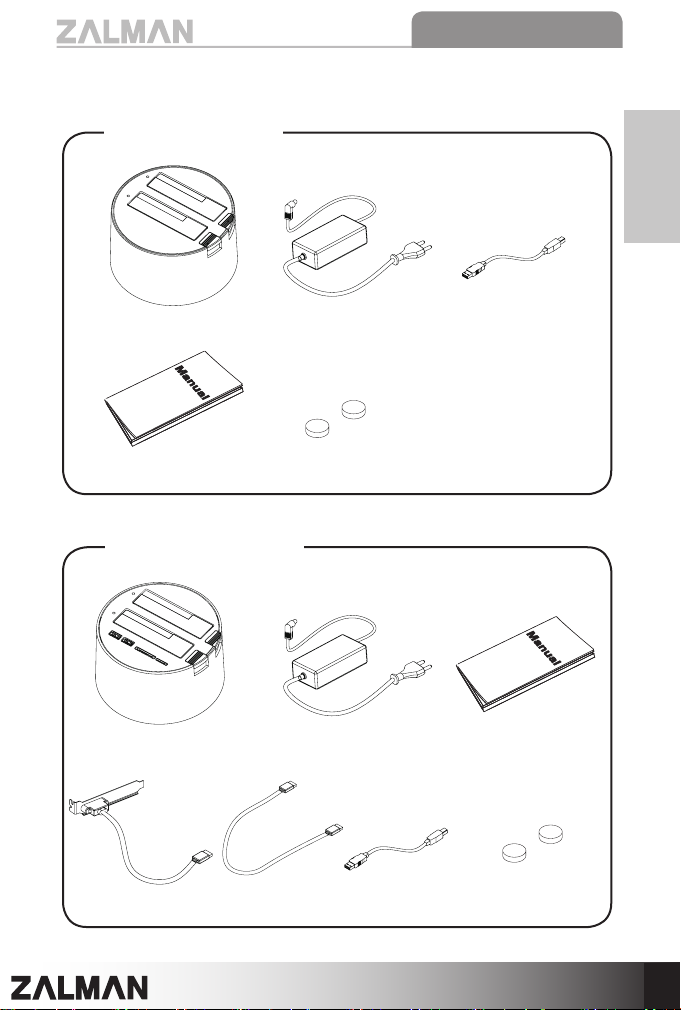
(1) Check the components list and condition of the product before installation. If
any problem is found, contact the retailer to obtain a replacement.
(2) Keep this unit away from heat sources, direct sunlight, water, oil, and humid
environments, and place the unit on a flat, stable, vibration-free, and well-
ventilated area.
(3) Do not clean the product surface with chemicals or wet cloth. (chemicals:
industrial brightener, wax, benzene, alcohol, paint thinner, mosquito repellent,
aromatics, lubricant, detergent etc.)
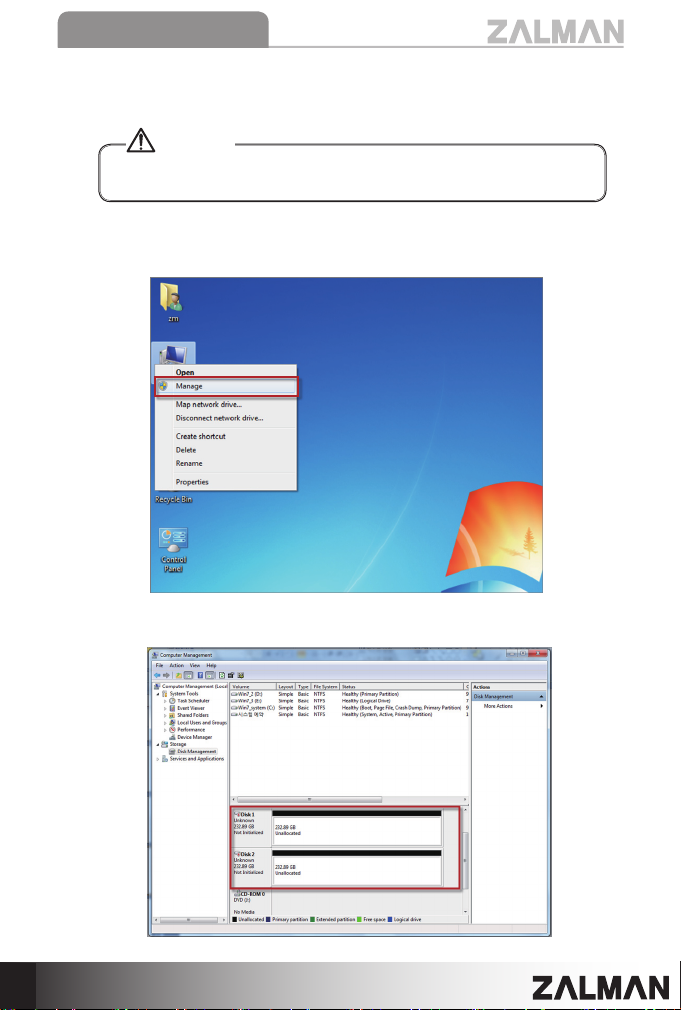
(4) Do not connect unit to computer without installing HDD to MH200. HDD and
unit damage may occur.
(5) Avoid inserting objects or hands into the system while it is in operation to
prevent product damage and injuries.
(6) Malfunctions can cause HDD data lose. Please backup critical data to another
storage device. Zalman is not responsible for lost data.
(7) Changing RAID mode change, partitioning, and formatting will delete all HDD
data. Please take proper caution.
(8) Transportation during HDD activity can damage HDD. Please turn the unit’s
power OFF unit before transport.
(9) When removing HDD from MS200, please take caution as the HDD can be hot.
(10)
For extending periods of storage and chances of thunderstorms, please unplug
device before storage to prevent short circuiting and electrocution.
(11) Product design and specifications may be revised to improve quality and
performance.
Safety Precautions
Disclaimer) Zalman Tech Co., Ltd. is not responsible for any damages due
to external causes, including but not limited to, improper use,
electrical power, accident, neglect, alteration, repair, improper
installation, or improper testing.

2
ZM-MH200 Series
2Product Info
(1) Specifications
(2) System Requirements
Models ZM-MH200 U3 ZM-MH200 HUB
Type HDD Docking Station
Dimensions 158(L) ×158(W) ×90(H)㎜
Materials Plastic
Color Black or White
RAID Mode RAID 0, RAID 1,
JBOD, Dual X
HDD Interface 2.5”& 3.5”S-ATA Ⅰ/Ⅱ
PC Interface USB 3.0 USB2.0, e-SATA
SD/SDHC & Micro SD Slots
USB HUB Ports X○
Number of Slots 2
Power Supply
Input: AC 100 ~ 240V / 50/60㎐/ MAX 1.2A
Output: DC 12V / 3A
▶CPU: Intel Pentium-4 or higher
▶RAM: 256MB or higher
▶USB 1.1 or higher
▶Windows 2000 or higher, Mac OS X 10.2 or higher
※ZM-MH200 U3 will enter Standby mode if idle for 10 minutes. The unit
requires startup time to exit Standby mode.

3
Eng
ZM-MH200 Series
(3) Components
ZM-MH200 U3
ZM-MH200 HUB
Adaptor
Adaptor
USB 3.0 Cable
USB 2.0 Cable
User’s Manual
Foot Rubber
(Replacement Extra)
Foot Rubber
(Replacement Extra)
User’s Manual
e-SATA Cablee-SATA PCI Bracket
ZM-MH200 U3
ZM-MH200 HUB

4
ZM-MH200 Series
(4) Component & Functions
①
②
③
④
①#1 HDD Slot
②#2 HDD Slot
③HDD Eject Button
④HDD Activity LED
⑤USB 2.0 HUB Port
⑥SD/SDHC Card Slot
⑦Micro SD Card Slot
⑧e-SATA Port
⑨USB 2.0 Port
⑩Power Switch
⑪Power Port(DC 12V)
⑤
⑥⑦
⑧⑨⑩⑪
ZM-MH200 HUB
①
②
③
④
①#1 HDD Slot
②#2 HDD Slot
③HDD Eject Button
④HDD Activity LED
⑤Power Switch
⑥USB 3.0 Port
⑦Reset Switch
⑧RAID Mode Toggle Switch
⑨Power Port(DC 12V)
⑤⑥⑦⑧⑨
ZM-MH200 U3
▶When using the USB HUB, there may be insufficient power depending on the
device. When peripherals have no power input, please use Power Adaptor.
▶When connecting solely with the e-SATA cable, use of USB HUB and SD/
SDHC Card Slot is disabled. When connecting with both e-SATA and USB
cables, e-SATA connects the HDD while USB connects both the USD Hub
Port and SD/SDHC Card Slot.
Caution

5
Eng
ZM-MH200 Series
Directions
3
(1) HDD Installation and Removal
1) HDD Installation
2) HDD Removal
Align and maintain the HDD perpendicular and flat relative to the HDD Ports.
(See diagram.)
①Please run “Safe Removal of Hardware”from the Windows task bar.
②Press the HDD Eject Button before removing HDD from MH200.
In case an HDD has already been recognized by the system, adding or
removing an HDD will cause the system to newly recognize the HDD.
Caution

6
ZM-MH200 Series
(2) PC Connection
1) USB Port Connection
2) e-SATA Port Connection(ZM-MH200 HUB)
Tip
▶ZM-MH200 HUB can be connected using the e-SATA Port. If the
motherboard does not have an e-SATA Port, please use the e-SATA
Bracket to connect to the motherboard and e-SATA Port.
Exception: when using the internal SATA, the motherboard may not
support Hot-Swap function.
※Please refer to the FAQ section of Zalman website for detailed
product information.
▶When using e-SATA, 2 HDD’s can be used only if the motherboard
supports the PM (Port-Multiplier) function. For motherboards that do
not support the PM function, 1 HDD can be used in the #1 Slot.

7
Eng
ZM-MH200 Series
(3) System Settings
1) Activity Test
2) [ZM-MH200 U3] RAID Mode Configuration
①Connect the MS200 to the PC and turn the power ON.
②For the MH200 U3, please refer to the ‘RAID mode selection’section below to
configure RAID mode and press ‘Reset’.
③When the HDD activity light is activated, HDD status can be checked by
following either step below:
A. Go to Start menu > Control Panel > Administrative Tools > Computer
Management > Disk Management
B. Go to Start menu > Control Panel > System > Device Manager
④After the HDD is recognized by the system, please set up the partition.
①Please set the RAID mode to the desired RAID setting.
※Black is empty, White is PIN setting.
Mode Setting Description Example
Dual Each Slot is recognized as
an independent HDD.
JBOD
Two HDD’s are combined
and recognized as a single
HDD drive.
RAID 0
(Striping)
Data is striped into 2 HDDs
for increased performance,
but damage in 1 drive can
cause total loss of data.
RAID 1
(Mirroring)
By mirroring the same data
in 2 HDDs, damage in 1
drive does not affect data
in the other HDD.

8
ZM-MH200 Series
②When ‘Reset’is pressed, the PC recognizes the drives with new RAID settings.
③After the device is recognized, RAID settings can be checked in the System
Properties menu.
①Right-mouse click the My Computer icon on the Desktop and select ‘Manage’.
②HDD can be selected from ‘Disk Management’.
Changing the RAID mode, partitioning, and formatting can delete all HDD
data. So, be sure to back up data before changing the mode or formatting.
Caution
3) Partitioning
Windows 7
Windows 7

9
Eng
ZM-MH200 Series
③Right click on the HDD and select partition from the ‘Format’menu. For 2TB
drives, select GPT.
▶MBR: Up to 4 main partitions can be created for a maximum of 2TB.
▶GPT: For use of a single HDD larger than 2TB.
※For a single HDD larger than 2TB, update firmware first.
④Select ‘New Simple Volume’(XP: ‘New Partition’) and then click Next.
Windows 7
Windows 7

10
ZM-MH200 Series
⑤Enter the volume size (Default setting uses the total disk capacity).
⑥Select a Character (C, D, E...) for the drive and click Next.
Windows 7
Windows 7

11
Eng
ZM-MH200 Series
⑦Select File System and click Next.
⑧Check details of Disk Partition Wizard and click Finish.
Please visit the Zalman website (www.zalman.com) to download the
latest firmware. For details, please visit the product page on the website.
4) Firmware Upgrade
Windows 7
Windows 7

12
ZM-MH200 Series
MEMO
This manual suits for next models
2
Table of contents