Zanussi ZD1919 User manual

抽濕機
使用手冊
型號:ZD1919
使用本產品前,請先詳讀本手冊中的指示,
並將本手冊好好保留於適當地方以備未來參考用。
為了避免機身內部受損,使用前請至少要讓機身直立 2小時以上。
ZANUSSI is a registered Trademark used under license from AB Electrolux (publ)

目錄
安全注意事項
警告事項…………………………………………………………….............................……………………………………………………………2
注意事項…………………………………………………………………….............................……………………………………………………2
電氣資訊…………………………………………………………………..............................………………………………………………………3
抽濕機上的控制面板
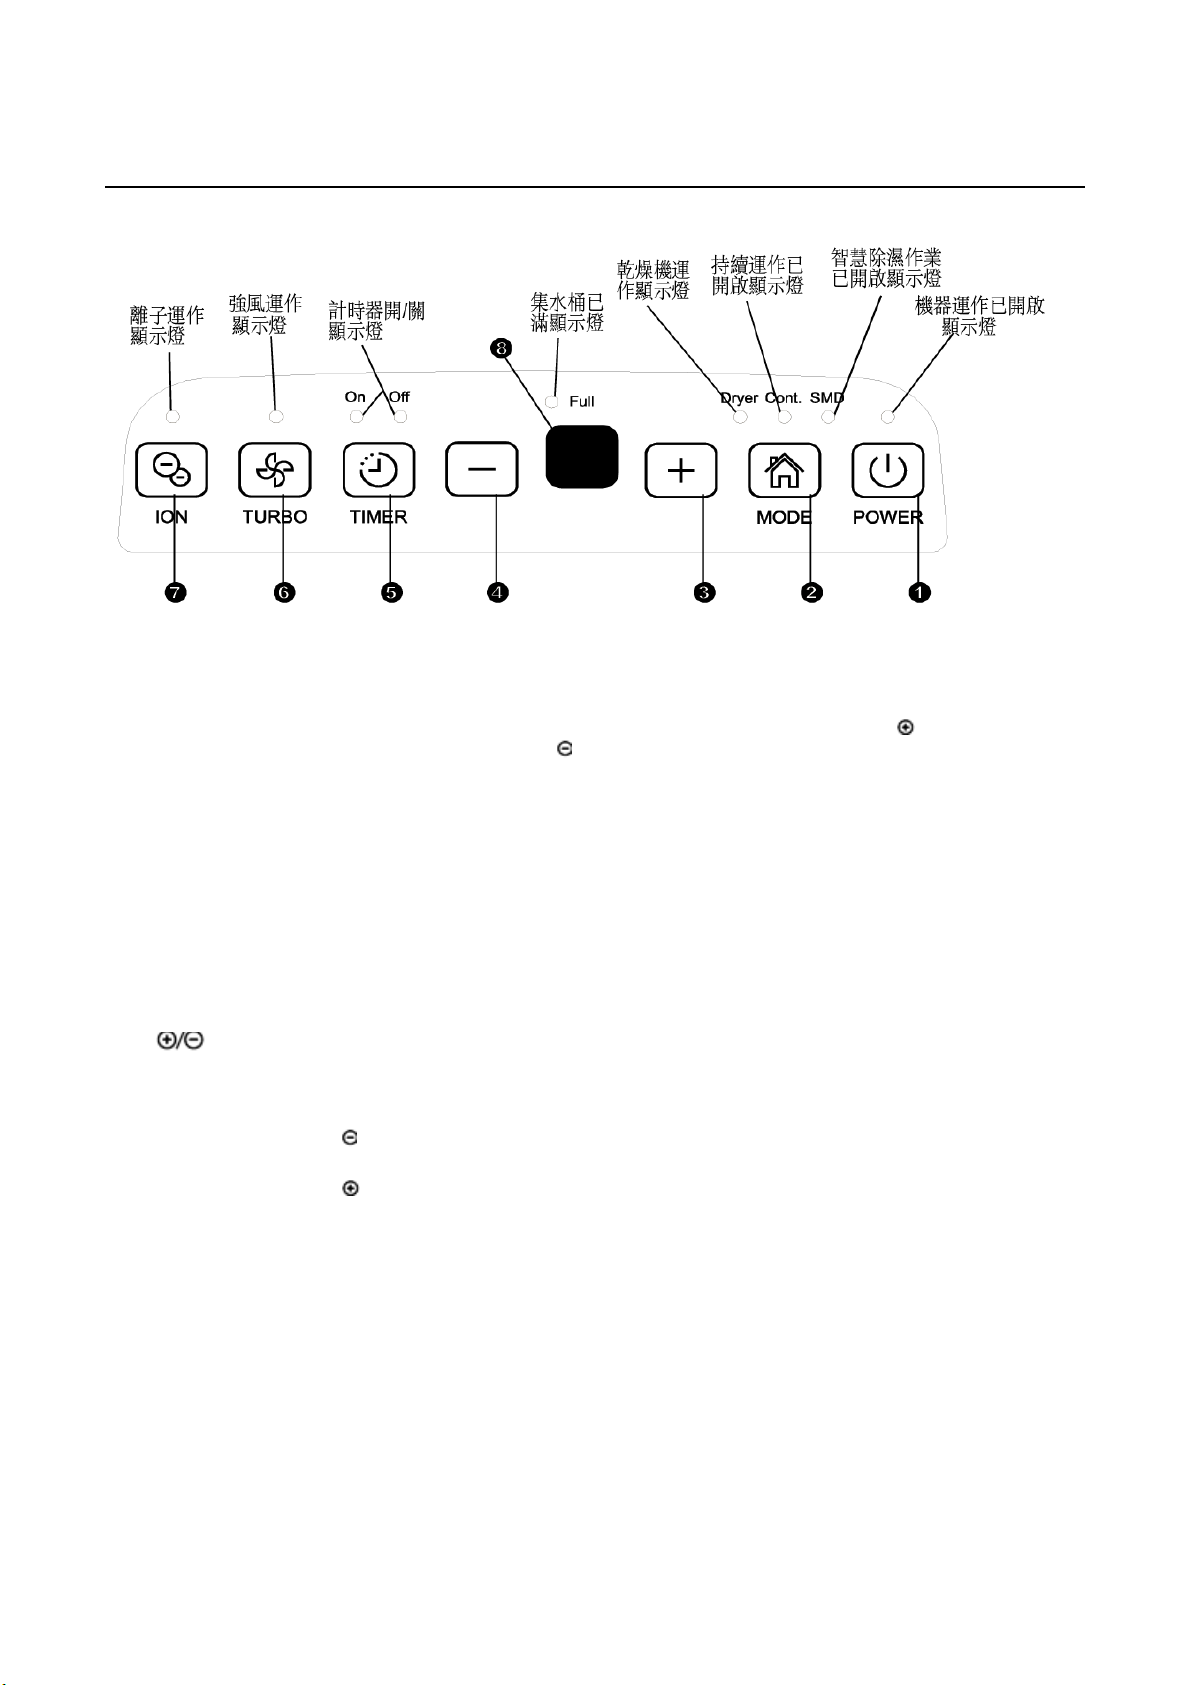
控制面板……………………………………………………..............................……………………………………………………………………4
其他功能……………………………………………………...............................……………………………………………………………………5
零件之辨識
零件之辨識……………………………………………………..............................…………………………………………………………………6
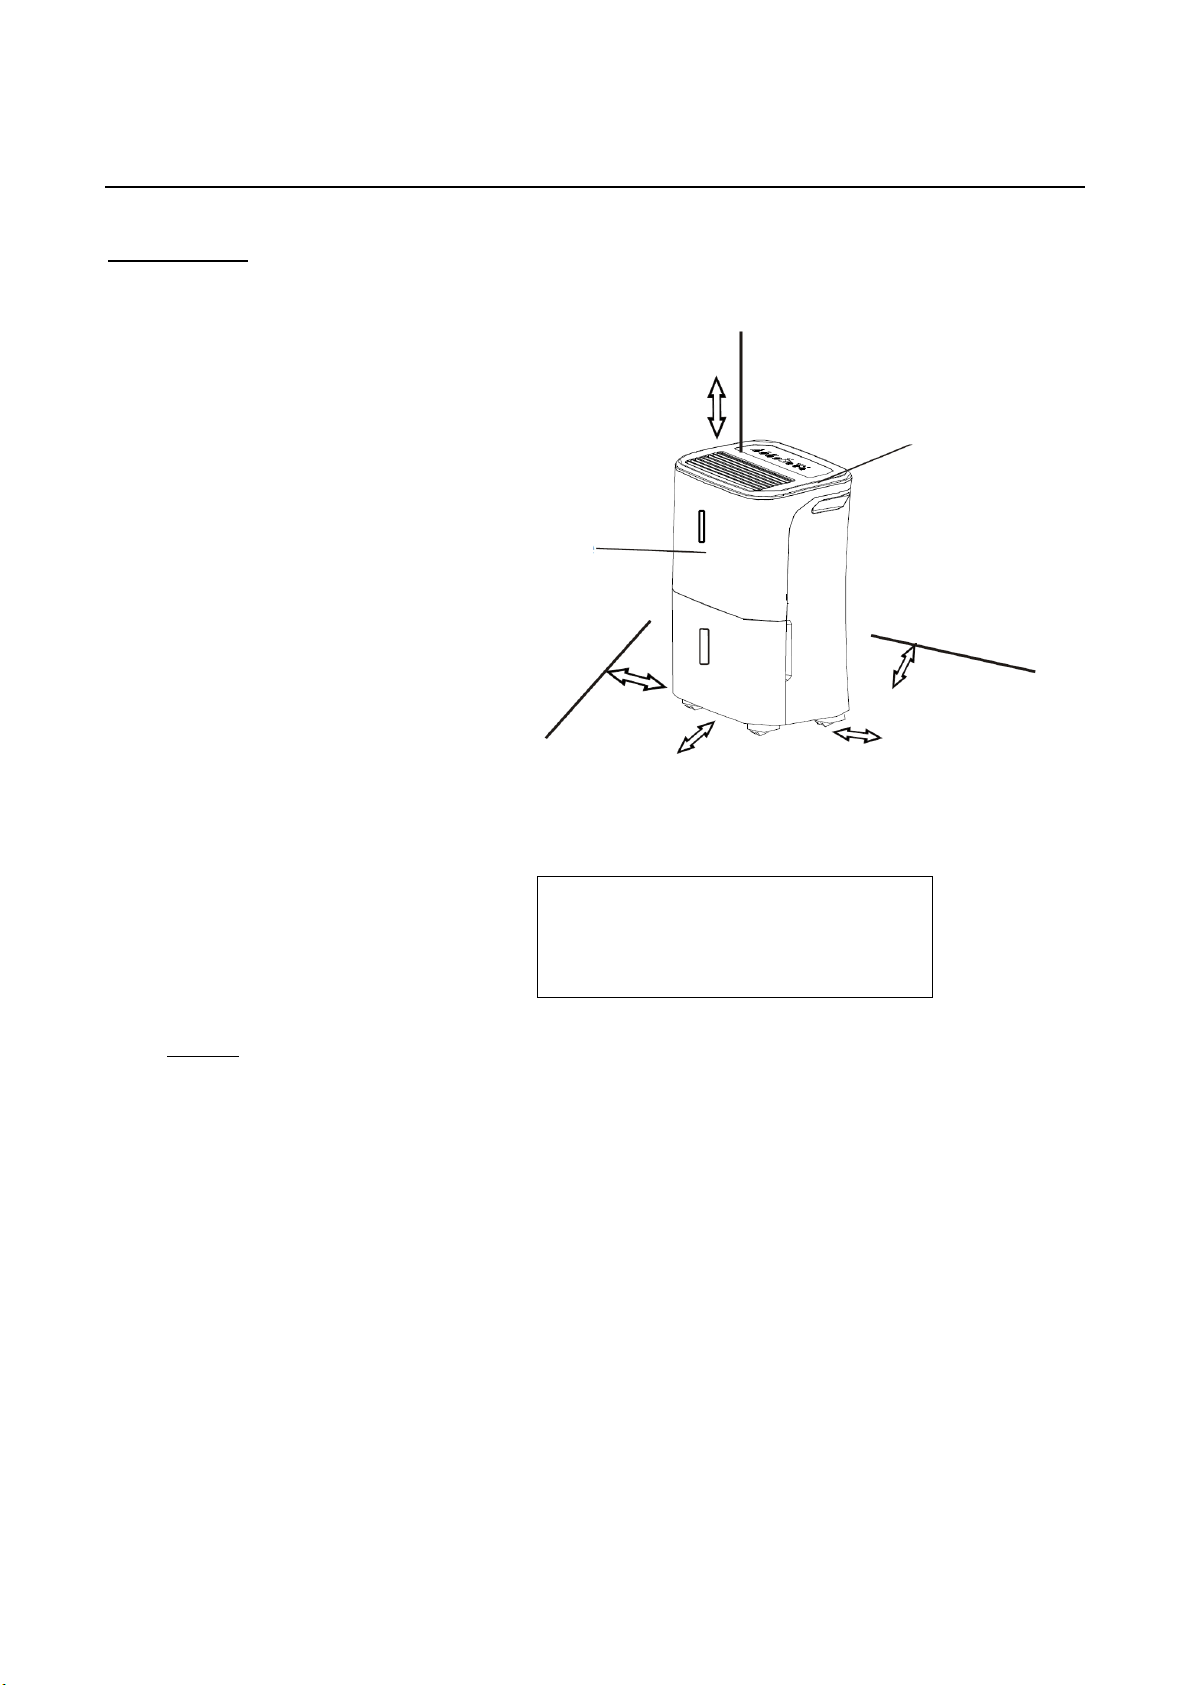
本機之安裝位置…………………………………………….............................……………………………………………………………………7
本機之操作
當使用本機時……………………………………………….............................……………………………………………………………………7
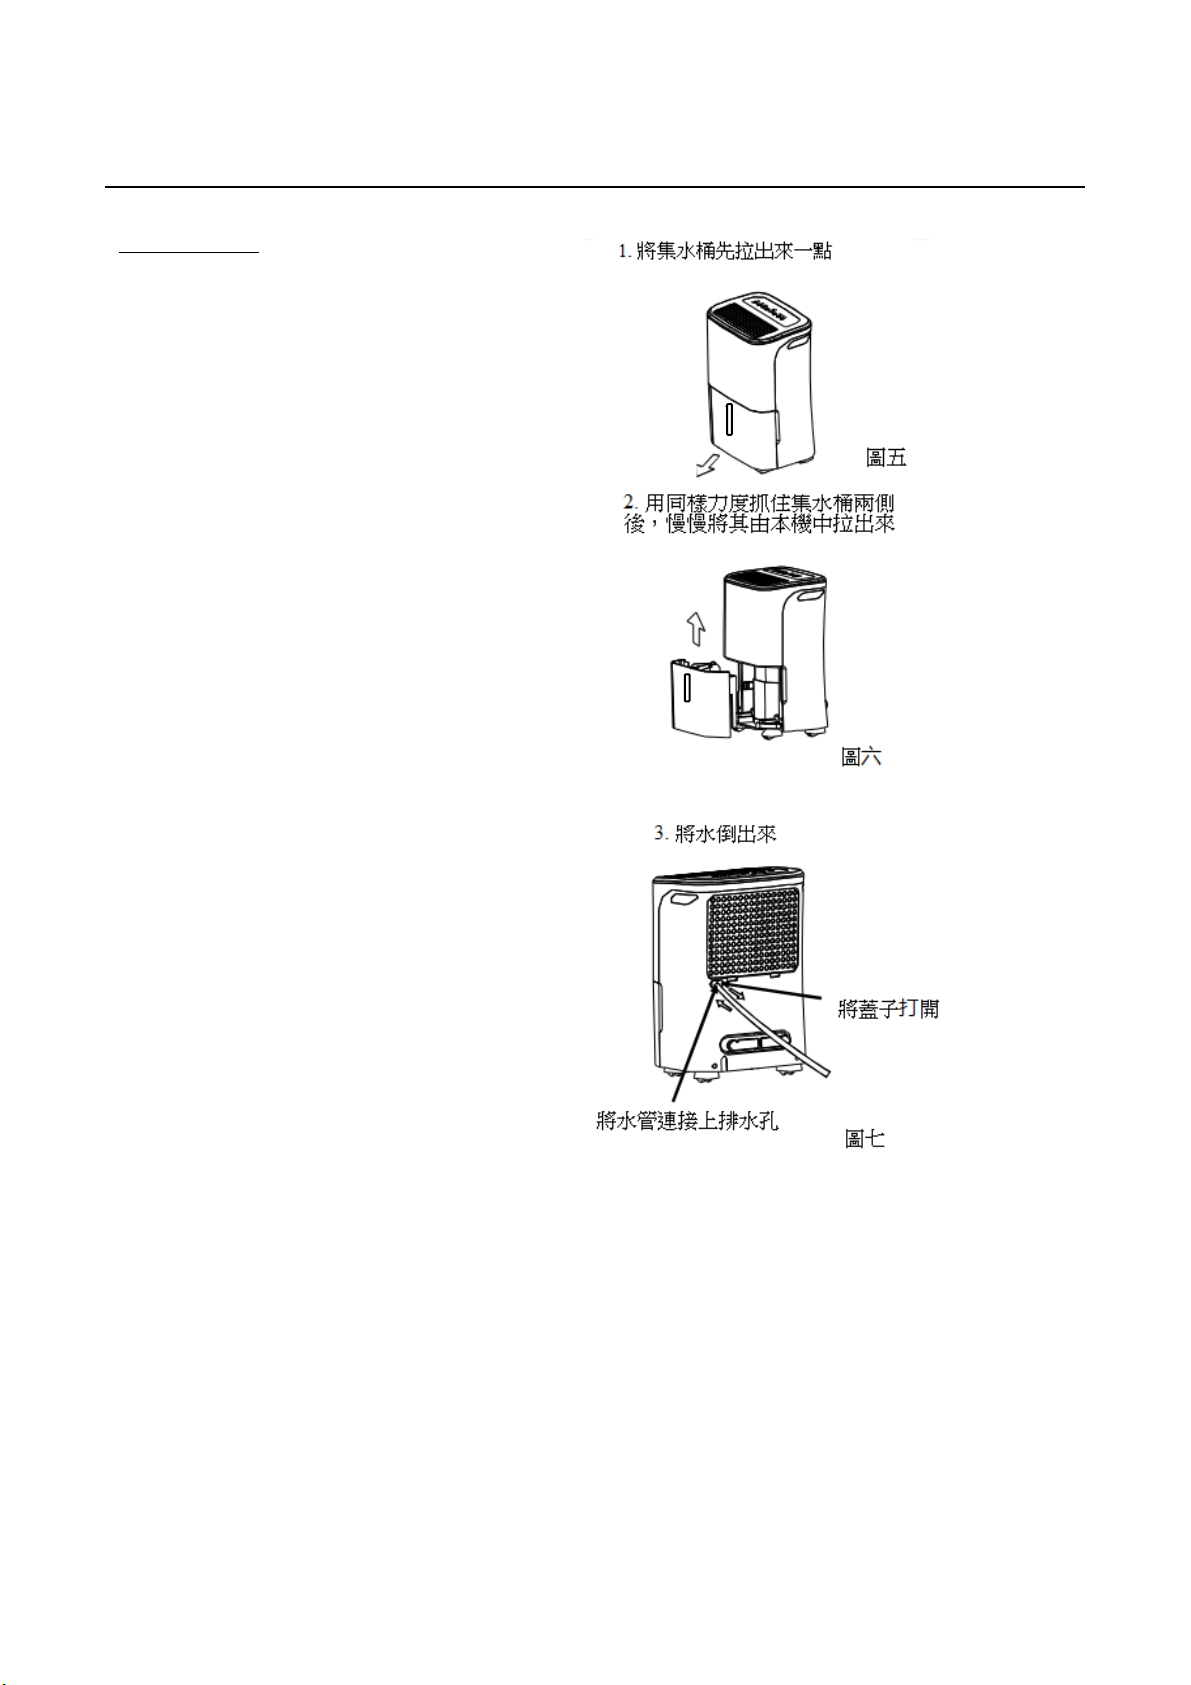
移除所收集的水…………………………………………............................………………………………………………………………………8
保養與維修
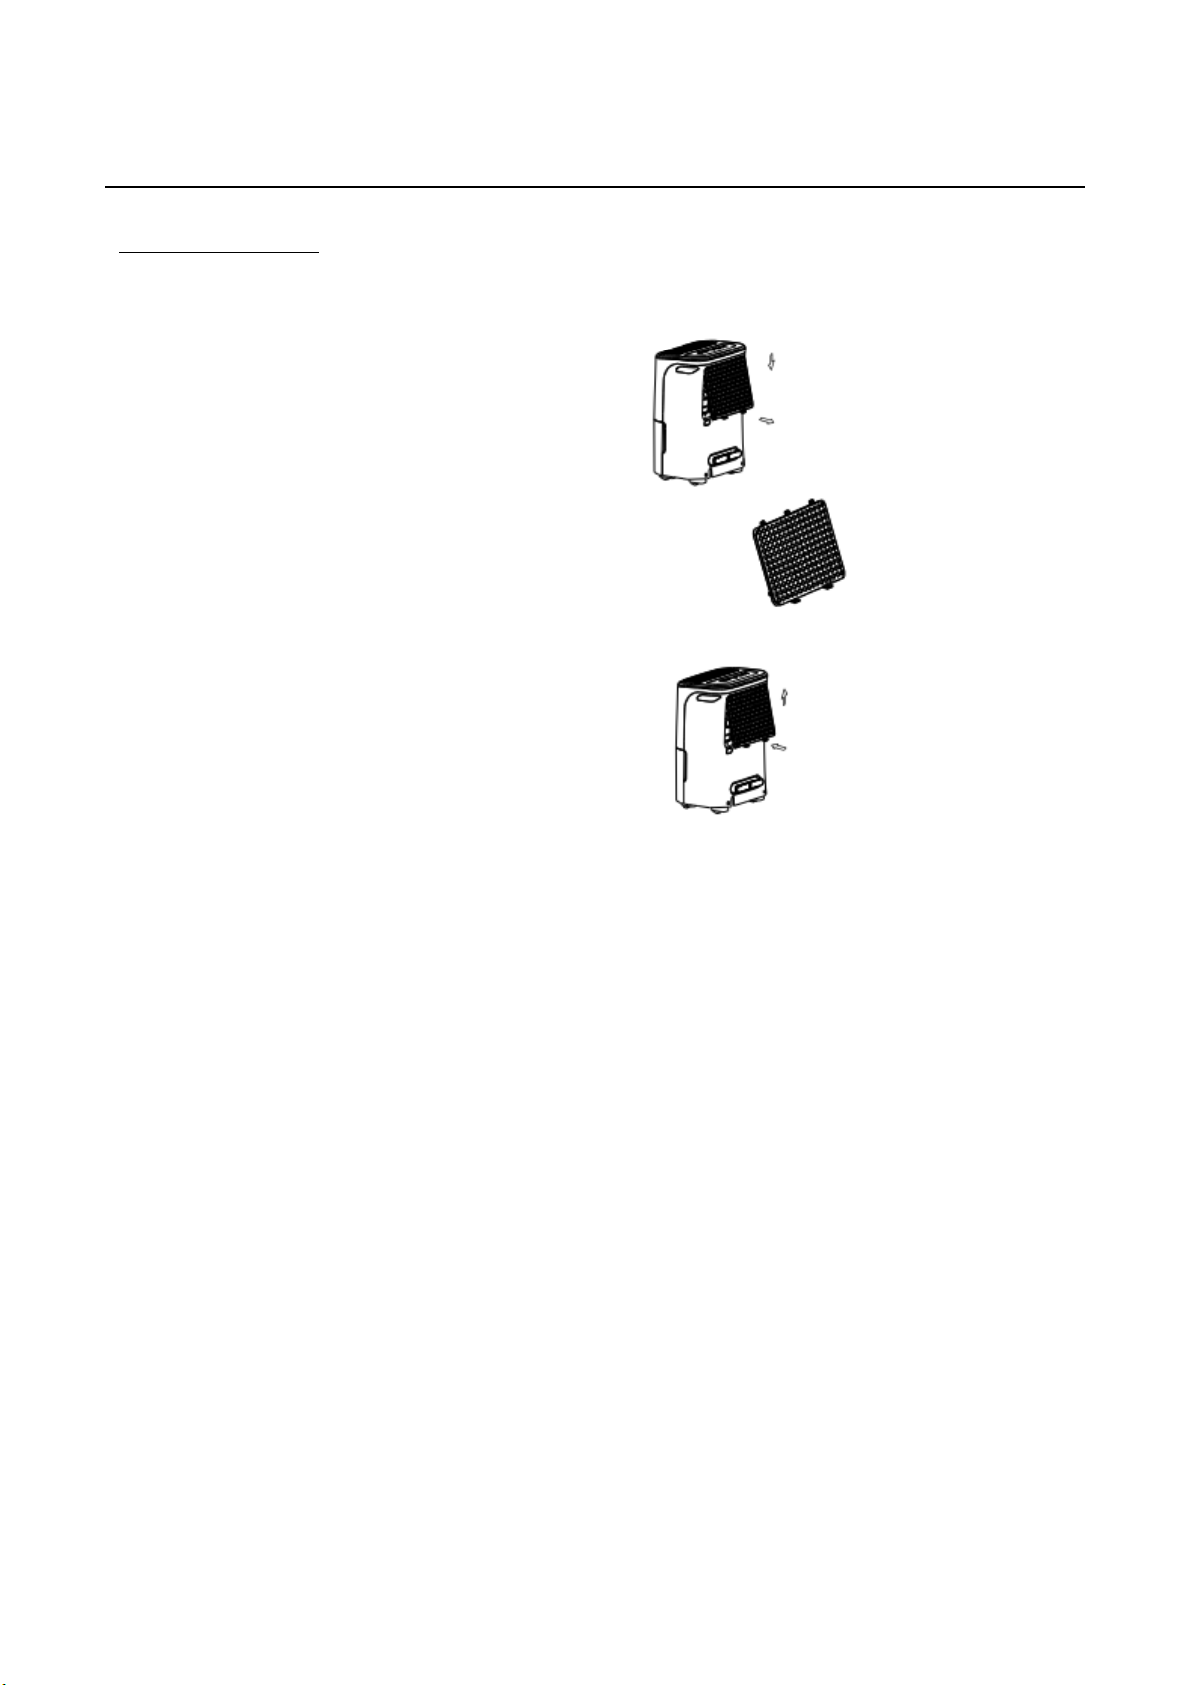
抽濕機的保養與清潔………………………………….........................…………………………………………………………………………9
疑難排解
疑難排解…………………………………………….............................……………………………………………………………………………10
產品參數表……………………………………….............................………………………………………………………......…………………11
詳細閲讀本手冊
於本手冊中你可以找到如何適當使用本機的提示。只要採取一些預防性維護工作就能節省你許多時間與金錢並延長本機的使
用壽命。你也可在故障排除章節中找到許多常見問題的解答。若你先閲讀過疑難排解中的建議,你就可能不需要尋找客戸維
修服務了。
注意事項
-本裝置可於有適當人員監督下或給予如何安全使用本裝置的指示並讓其了解涉及的風險後由八歲以上的小孩,或運動,
感官與感知能力受限,或缺乏相關知識或使用經驗的人來使用。孩童不得胡亂使用本裝置。本裝置的清潔與維護也不得
由孩童在無人監督下進行。(EN 標準要求)
-除非有適當人員監督下或給予如何安全使用本機的指示並讓其了解涉及的風險,本機並非設計給運動,感官與感知能力
受限,或缺乏相關知識或使用經驗的人(包括孩童)來使用的。(IEC 標準要求)
-本機旁有孩童時應有成人監督,確保他們不會胡亂使用本裝置。
-若電源線受損時,必須由製造商,其維護代理商或合資格的技術人員來更換,以免發生危險。
-本裝置的安裝應根據國家電線安裝的相關法例進行。
-有電氣加熱器的家電必須與易燃物件相隔至少一公尺的距離。
-本機需要修理或維護時須聯絡合資格的技術人員。
1

安全注意事項
為了避免對使用者或其他人與財物造成傷害,請務必遵循下述指示。
忽略這些指示的不當操作可能會導致人員傷害或財物受損。
▉安全嚴重性是以下列方式分類的。
警告事項
這個符號表示有可能造成死亡或嚴重人身傷害。
注意事項
這個符號表示有可能造成人身傷害或財物損失。
▉本手冊中使用的符號代表下列意義:
切勿這麼做。
確保要遵循指示。
警告事項
切勿超過電源插座或連接裝置的
評定電能。
切勿藉由開關電源來啟動或停止本
機。
切勿損失電源線或使用未經授權的電
源線
●否則可能會因為產生過熱現象
而觸電或引致火災。
●可能會因為產生過熱現象而觸電或
引致火災。
●可能會觸電或引致火災。
切勿更改電源線的長度或與其他
電器分享插座
切勿用濕手來將插頭插入或拔出插座
切勿將本機放得太靠近熱源
●可能會因為產生過熱現象而觸
電或引致火災。
●可能觸電
●塑膠零件可能會融化而引致火災
切勿於本機發生奇怪聲響,氣味
或煙霧時將電源切斷
切勿自己試圖將本機拆開或修理
清潔本機前,務必關掉電源並將電源
線拔開。
●可能會引致火災或觸電
●可能導致機器故障或觸電
●可能觸電或人身傷害
切勿於如汽油,苯,稀釋劑等易
燃物附近使用本機
切勿飲用或使用本機滲出的水
切勿於本機運行中將集水箱拿出來
●可能會爆炸或引致火災
●水中可能有污染物導致你生病
●可能本裝置的傷害且觸電
注意事項
切勿於狹窄空間中使用本機。
切勿將本機置於會給水濺到的地方。
務必將本機放置在水平且穩定的樓面
●缺乏通風可能會導致過熱與引
致火災
●水可能會滲入本裝置導致絕緣給破
壞。可能會觸電或引致火災。
●若本裝置翻覆,可能會導致水滲出
而損傷財物,或觸電或引致火災。
2

安全注意事項
注意事項
切勿用布或浴巾掩蓋住進氣或出
氣口。
於有下列人員的房間內使用本機時要
特別小心:
切勿於有在處理化學品的區域使用本
機
●缺乏通風可能會過熱與引致火
災
●嬰兒,孩童,長者與對濕度敏感的
人
●本機可能因為化學品與溶液揮發在
空氣中而導致裝置損傷
切勿將手指或其他異物插入本機
的百葉窗或開口中。特別要注意
警告孩童這個禁忌。
切勿將重物放在電源線上,並要注意
切勿讓電源線受到擠壓
切勿爬上或坐在本機上
●可能觸電或機器故障
●可能引致火災或觸電的風險
●若你跌倒或本機翻覆,都可能造成
你的人身傷害
務必緊緊插好濾網。每兩週清潔
濾網一次。
若水滲入本機,立刻將本機關機並將
電源線拉開後,就聯絡一位經驗證過
的技術人員。
切勿將花瓶或其他水瓶放在本機上面
●在沒有濾網的情況下使用本
機,可能導致機器故障。
●可能導致機器故障或意外
●水可能會滲入本機,導致絕緣給破
壞,甚至造成觸電或火災。
電器資訊
-製造商說明牌位於本機的後面板,上面記載了本機特定的電氣與其他技術資料。
-確保本機有適當接地。適當接地是很重要的,可以將觸電與火災的風險降到最低。本機的電源線有三個分叉,其中一個
是接地叉用來防護不受到觸電的風險。
-本機必須插在有適當接地的牆壁插座上。若你要用的牆壁插座沒有適當接地,或由一個延時保險絲或電流斷電器保護的
話,就必須請合格的電工來安裝適當的插座。
-確保本機安裝後牆壁插座還是易於接近的。
-切勿將本機連接到延長線或轉接插頭上。
-為了避免人身傷害的可能性,務必於安裝與維護前先將本機的電源線拔出插座。
3

抽濕機的控制面板
註意:你購買機種的控制面板可能會與下列示意圖稍微不同。
控制面板
當你按下按鈕來改變操作模式時,本機會發
出一個嗶聲來顯示模式的改變。
5計時器面板
按下來啟動自動啟動與自動停止功能後用
與鍵來設定數值。
1 電源面板
按下來打開或關上抽濕機。
附註:當壓縮機啟動或停止運作時會發出大
聲響是正常的。
6 加快面板
控制風扇速度。按下來選擇高速或正常風扇
速度。要盡快除去濕氣時,就將風扇控制設
定在高速。當濕氣已經減少且需要較安靜的
運作時就將風扇控制設定為正常。
2 模式面板
按下來從下列模式中選擇想要的模式:抽
濕,乾燥,持續抽濕,與智慧抽濕。
附註:乾燥與智慧抽濕模式為選項模式。
7 離子面板(選項)
按一下來啟動離子產生器。離子會於電離過
程中自動產生,可消除空氣中的化學氣體與
塵埃粒子。再按一次就可以停止該功能。
3/4 :下移/上移面板
●濕度設定控制板
濕度水準可設定在相對濕度 35%到85%之
間,以 5%為漸進間隔。
要有較乾燥的空氣,按下 面板來設定一個
較低的數值(%)。
要有較濕潤的空氣,按下 面板來設定一個
較高的數值(%)。
●計時器設定控制板
用上移/下移面板來將自動啟動與自動停止時
間設定在 0.0 與24 之間。
4
圖一

抽濕機的控制面板
8 顯示
顯示所設定的相對濕度水準(在 35%與85%之
間)或自動啟動/自動停止時間(0到24),然後
顯示實際的房間相對濕度(準確度為 5%,介於
30%與90%之間)。
故障碼與保護碼:
AS –濕度感測器故障。將本機電源拔掉後再插回
插座。若持續出現本故障碼,請聯絡維修人員。
ES –溫度感測器故障。將本機電源拔掉後再插回
插座。若持續出現本故障碼,請聯絡維修人員。
P1 –本機正在除霜。請給予本機足夠時間來除霜。本機
自動除霜完畢後這個保護碼就會消失。
P2 –集水箱已經裝滿,或集水箱沒有放到正確的位置。
將集水箱清空並放回正確位置。
E3 –本機出現故障。將本機電源拔掉後再插回插座。若
持續出現本故障碼,請聯絡維修人員。
EC –偵測到冷卻劑外洩。本機具備自我偵測的新科技,
一旦顯示區出現 EC 時,表示本機偵測到冷卻劑外洩,請
立即通知維修人員。
其他功能
集水箱已滿位燈
當集水箱需要清空,或集水箱已被移除,或集水
箱沒有放置在正確位置時舊會閃爍。
自動重新開機
若本機因電源中斷而意外停機,本機會於電源接上後自
動重新開機並啟動先前的模式與設定。
自動關機
當集水箱已滿,或集水箱已被移除,或集水箱沒
有放置在正確位置時抽濕機會自動關機。當設定
的濕度已達到時,本機也會自動關機。有些機種
的風扇馬達會持續運作。
設定計時器
●當本機開機時,先按下計時器鈕,計時器關機顯示燈
會亮,顯示自動停止功能已經啟動。再按一次計時器
鈕,計時器開機顯示燈會亮,顯示自動開機功能已經
啟動。
●當本機關機時,先按下計時器鈕,計時器開機顯示燈
會亮,顯示自動啟動功能已經啟動。再按一次計時器
鈕,計時器關機顯示燈會亮,顯示自動停止功能已經
啟動。
●按下或持續按著 UP(上移)或 DOWN(下移)面板
來將自動啟動的時間每次增減半個小時,直到十個小
時後,就會每次增減一個小時到二十四個小時。控制
面板會倒數到時間完畢時啟動自動功能。
●被選定的時間會於五秒鐘內登錄入本機內,接著本機
就會回復到顯示先前的濕度設定。
●當已經設定自動開機與停止的時間時,在同一個程序
中,計時器關機顯示燈會亮來確認自動開機與停止時
間已經輸入本機程式中了。
●隨時將本機開機或關機,或將時間設定為 0.0 都會取
消自動開機/停止的功能。
●當LED 顯示視窗顯示出 P2 碼時,自動開機/停止的功
能就會被取消。
自動除霜
當蒸發器盤管起霜時,壓縮機會停機而風扇會持
續運作直到霜消失為止。
附註:當啟動自動除霜時,本機可能會發出冷卻
劑流動的聲音,這是正常現象。
等三分鐘後再重新開機
當本機停機後,是無法於三分鐘內重新開機的。
這項功能是用來保護本機的。本機會於三分鐘後
自動重新開機。
智慧抽濕(選項)
在智慧抽濕模式下,本機會自動根據室溫將房間
濕度控制在很舒適的 45%到55%的範圍內。此時
無法啟動濕度設定功能。
5

零件之辨識
乾燥機模式(選項)
本機可於乾燥機模式下會先讓抽濕功能達到最大,而風扇也會設定在高速。風扇速度接下來會根據實際房間濕
度自動調整。本機會於十個小時的運轉後跳出乾燥機模式。
附註:
●乾燥機模式只能在密閉房間內進行,切勿打開門窗。
●要讓抽濕功能最為有效,請先將房內的濕布擰乾。
●確保抽濕機氣流直接吹在濕布上,如圖 A所示。
●太厚重的濕布可能無法獲得最佳的乾燥效果。
注意事項
●切勿讓布遮蓋住本機的出氣口。這樣可能會導致過熱,火災或機器故障。
●切勿將濕布放在本機上面,且切勿讓水滴進本機中。這樣可能會導致觸電,漏電或機件故障。
零件之辨識
前方
1 控制面板
2 抓把(兩側都有)
3 排氣格子孔
4 集水箱
5 集水程度視窗
後方
1 排水管出口
2 輪腳
3 電源線與插頭
4 進氣格子窗
5 空氣濾網(在格子窗後面)
6 電源線桶(只有在要將本機儲藏起來時才使用)
附註:所有本手冊內的圖片都是示意圖。你所購買
機種的實際形狀可能會稍有不同,但其功能與操作
都是相同的。
6
圖A
濕衣服
讓濕布與本機上方與右邊的距離保持
在30 到50 公分之間。
圖二
圖三

本機之操作
本機放置的位置
放在地下室的抽濕機只在有適當空氣流入流出空間的情況下才能有效地乾燥附近的封閉儲存區域。
●切勿在室外使用裝置。
●本抽濕機只適用於室內住宅的應用,不
適用於商業或工業區的應用。
●將本裝置放置在平滑,水平且能支撐本
機與集水箱滿位時總重量的樓面。
●本裝置周圍均須要有至少 20cm 的淨空
空間來讓空氣流通。
●室溫不得低於攝氏五度(華氏 41 度)。
低於這個溫度,盤管就會結霜而影響抽
濕效度。
●將本裝置放置在遠離乾衣機,加熱器與
暖爐的地方。
●可將本裝置放在儲存書籍或有價值物品
且想避免濕氣的地方。
●可將本裝置放在地下室來預防濕氣造成
的損害。
●要將所有該房間的門窗與出氣口都加以
關閉。
輪腳(本機底端的四個點)
●輪腳能自由移動
●切勿強推輪腳在地毯上移動,也切勿於
集水箱中有水時移動本機。(本機可能會翻
覆而讓水四濺。)
當使用本機時
●第一次使用本抽濕機時,要讓本裝置持續運作二十四小時。
●本裝置是設計於室溫介於攝氏 5度/華氏 41 度與攝氏 35 度/華氏 95 度間的環境中運作
的。
●若本機已關機,但需要迅速再開機時,請等候至少三分鐘讓機件能正常運作後再重新開
機。
●切勿將本機插入有許多家電共用的插座中。
●選擇適當的位置,確保人能輕鬆接觸到電源插座。
●只將本裝置插入有接地的插座。
●確保集水箱有放好,否則本裝置無法適當運作。
附註:當集水箱中水位達到特定水準時,請小心移動本裝置避免翻覆。
7
圖四
40cm 或
更多的空間
出氣格子窗
進氣格子窗
20cm 或
更多的空間
20cm 或
更多的空間
20cm 或
更多的空間
20cm 或
更多的空間

操作本機
移除所收集的水
有兩種方式來移除所收集的水
1. 用集水箱
●在本機關機時,若集水箱已滿,本機會發出嗶
聲八次且滿水顯示燈會亮,數位顯示器會出現
P2 字樣。
●在本機開機時,若集水箱已滿,壓縮機會關
機,風扇會再運作三十秒來吹乾凝結器上的水分
後關機,接下來本機會發出嗶聲八次且滿水顯示
燈會亮,數位顯示器會出現 P2 字樣。
●慢慢拉出集水箱。緊緊抓住兩側的抓把後將集
水箱直直拉出,不要讓水濺出來。否則水桶可能
會翻覆而讓水四濺。切勿將集水箱放在地面上,
因為其底部不平。否則水桶可能會翻覆而讓水四
濺。
●將集水箱中的水倒出後將集水箱放回去。要確
保集水箱放入定位且穩穩卡在本機內後本機才會
適當運作。
●當集水箱放回定位後本機會自動開機。
附註:
●在移除集水箱時,切勿碰觸到本機內的零組
件。這樣可能會導致本機受損。
●確保集水箱有放回本機內的定位。讓集水箱撞
擊本機內部或沒有將其放回定位都可能讓本機無
法運作。
●當移除集水箱時,若發現本機內部還有些水,
務必加以擦乾。
2. 持續排水
透過將本機接上一條水管(沒有隨附,須另
購)後便可自動將水排出到地板上的排水孔
中。
●將後面排水孔的蓋子切開後將排水管(管徑為
13.5 釐米)接上,然後用水管將水引領到地板
上的排水孔或一個適當的排水裝置(參見圖
七)。
●確保水管有接好,沒有滲漏現象。
●將水管拉到排水孔,並確保地面沒有突起導致
水流不順。
●將水管另一端放入排水孔中,確保水流會平順
進入排水孔中。切勿讓水管口朝上。
●選定想要的濕度與風扇速度設定後讓持續排水
能啟動。
附註:不再使用持續排水功能時,將水管從本機的
排水孔上移除。
8

保養與維修
本抽濕機的保養與清潔
將本抽濕機關機且將電源線從插座中拔出後才能開始清
潔。
1. 清潔格子窗與外殼
●用清水與柔和的清潔劑即可。切勿使用漂白劑或磨
料。
●切勿直接將水灑在主機上。這樣可能會導致觸電,
讓本機的絕緣給破壞,或導致機體腐蝕。
●進氣與出氣格子窗常會沾惹塵埃,可以用吸塵器或
毛刷來清。
2. 清潔集水箱
每隔幾週就應把集水箱清潔一次,以預防黴菌與細
菌累積滋生。將集水箱裝一部分水後加入一些柔和
的清潔劑。讓水在集水箱中沖洗後倒掉,再用清水
沖洗。
附註:切勿使用洗碗精來清洗集水箱。清潔後要將
集水箱穩穩放入本機定位後本機才能運作。
3. 清潔空氣濾網
在前方格子窗後面的空氣濾網每三十天就應檢視並
清潔一次,若有需要時可以更頻繁的清潔。
附註:切勿用水清洗或將濾網放進自動洗碗機清
洗。
移除濾網時,
●抓住濾網邊緣後往上拉,然後如圖八所示將濾網拉
出來。
●用溫的肥皂水清洗濾網。清洗後讓濾網晾乾之後才
放回去。切勿將濾網放入洗碗機中清洗。
連接濾網時:
●將濾網從下方向上插入本機中。參見圖十所示。
注意事項:
切勿在沒有濾網的情況下操作抽濕機,這樣會讓塵
埃與纖維塞住本機而影響效能。
4. 當會有很長一段時間不使用本機時
●在關機後,等待一整天的時間後才將集水箱中的水
倒掉。
●將本機,集水箱與濾網都清潔乾淨。
●用塑膠袋將本機覆蓋好。
●將本機垂直立放在一個乾燥且通風良好的地方。
9
圖八
七
圖九
七
圖十
七

疑難排解
在打電話給維修人員前,可以先看看這裡的建議。
問題
要檢查些什麼
無法開機
●確保抽濕機的插頭有完全且穩穩地插入插座中。
●檢查房屋的保險絲/斷電盒。
●抽濕機是否已經達到預設的濕度水準,或集水箱已滿。
●集水箱未放入定位。
抽濕機無法有效抽濕
●還沒有足夠時間來抽濕。
●確保沒有窗簾,百葉窗或傢俱堵住抽濕機的前面或背
面。
●濕度控制沒有設定到夠低的數值。
●檢查所有的門窗與通氣口都已經關閉。
●室溫過低,低於攝氏五度(華氏 41 度)。
●房間內有煤油加熱器或其他會釋出水蒸氣的裝置。
本機在運作時發出大聲的噪音
●空氣濾網堵塞住了。
●本機有點傾斜而不是垂直立著。
●樓面不夠水平。
盤管出現結霜現象
●這是正常現象。本抽濕機具備自動除霜功能。
樓面出現水
●水管與排水接頭間鬆動,或水管連結鬆動了。
●試圖要用集水箱來收集水,但後面的排水接頭塞給移除
了。
顯示器上出現 ES,P2 或P2 字樣
●這些是故障碼與保護碼。參見有關抽濕機上控制面板的
段落。
10

產品參數表
型號:
ZD1919
除濕能力:
9L/DAY (26.7ºC RH=60%)
20L/DAY (32ºC RH=90%)
額定電壓:
220V~
額定頻率:
50Hz
輸入功率
234W (26.7ºC RH=60%)
280W (30ºC RH=80%)
水箱容積:
3L
風量:
150 m³/h
製冷劑:
R134a/95g
噪音(聲壓級):
47dB(A)
淨重:
15.1kg
排氣壓力:
1.7MPa
回氣壓力:
0.7MPa
有關氟化氣體
-氟化溫室氣體往往藏在緊緊密封的家電設備中。至於(在有些機種中的)這些氟化溫室氣體的類型,數量
與相當的二氧化碳噸數方面的資訊,請參見該機種的相關標簽。
-本機的安裝,維護服務與修理必須由合資格的技術人員來執行。
-本機的卸裝與回收必須由合資格的技術人員來執行。
11

本產品的設計與規格會因產品改良後在沒有事先通知下就隨之加以改變。細節請向銷售代理商或製造商諮詢。
CD031IU-DF(ZG)
16120100000251

Before operating this product, please read the instructions
carefully and save this manual for future use.
ZANUSSI is a registered Trademark used under license from AB Electrolux (publ)
DEHUMIDIFIER
DEHUMIDIFIER

CONTENTS
SAFETY PRECAUTIONS
Warning ..........................................................................................................................................2
Caution ...........................................................................................................................................2
Electrical information ......................................................................................................................3
OPERATING THE UNIT
When using the unit .......................................................................................................................8
Removing the collected water ........................................................................................................9
CARE AND MAINTENANCE
Care and cleaning of the dehumidifier ..........................................................................................11
TROUBLESHOOTING TIPS
Troubleshooting tips ..................................................................................................................... 13
CONTROL PADS ON THE DEHUMIDIFIER
Control pads....................................................................................................................................4
Other features................................................................................................................. ...............5
IDENTIFICATION OF PARTS
Identification of parts ......................................................................................................................7
Positioning the unit .........................................................................................................................8
11
Inside you will find many helpful hints on how to use and maintain your dehumidifier
properly. Just a little preventive care on your part can save you a great deal of time
and money over the life of your air conditioner. You'll find many answers to common
problems in the chart of troubleshooting tips. Ifyou review our chart of Troubleshooting
Tips first, you may not need to call for service at all.
Read This Manual
CAUTION
!
This appliance can be used by children aged from 8 years and above and persons
with reduced physical, sensory or mental capabilities or lack of experience and
knowledge if they have been given supervision or instruction concerning use of the
appliance in a safe way and understand the hazards involved. Children shall not play
with the appliance. Cleaning and user maintenance shall not be made by children
without supervision. ( EN Standard requirements )
This appliance is not intended for use by persons (including children) with reduced
physical ,sensory or mental capabilities or lack of experience and knowledge, unless
they have been given supervision or instruction concerning use of the appliance by a
person responsible for their safety. Children should be supervised to ensure that they
do not play with the appliance. (IEC Standard requirements )
If the supply cord is damaged, it must be replaced by the manufacturer, its service
agent or similarly qualified persons in order to avoid a hazard.
The appliance shall be installed in accordance with national wiring regulations.
The appliance with electric heater shall have at least 1 meter space to the combustible
materials.
Contact the authorised service technician for repair or maintenance of this unit.

22
SAFETY PRECAUTIONS
Do not exceed the rating
of the power outlet or
connection device.
Do not modify power cord
length or share the outlet
with other appliances
Disconnect the power if
strange sounds, smell, or
smoke comes from it.
Otherwise, it may cause
electric shock or fire due to
excess heat generation.
It may cause electric shock
or fire due to heat generation.
It may cause fire and
electric shock.
It may cause electric shock
or fire due to heat generation.
It may cause electric shock.
It may cause failure of
machine or electric shock.
It contains contaminants and
could make you sick.
It may cause electric shock
or fire.
Plastic parts may melt and
cause a fire.
It may cause electrical shock
or injury.
It may cause an explosion
or fire.
Do not operate or stop the
unit by switching on or off
the power supply.
Do not insert or pull out
plug with wet hands.
You should never try to
take apart or repair the
unit by yourself.
Do not drink or use the
water drained from the unit.
Do not damage or use an
unspecified power cord.
Do not place the unit near
a heat source.
Before cleaning, turn off
the power and unplug the
unit.
Do not use the machine near flammable
gas or combustibles, such as gasoline,
benzene, thinner, etc.
!!
!!
CAUTION
Do not use the unit in
small spaces.
Lack of ventilation can
cause overheating and fire.
Do not put in places where
water may splash onto the
unit.
Water may enter the unit and
degrade the insulation. It may
cause an electric shock or fire.
Place the unit on a level,
sturdy section of the floor.
If the unit falls over, it may
cause water to spill and
damage belongings, or cause
electrical shock or fire.
!!
To prevent injury to the user or other people and property damage, the following instructions
must be followed. Incorrect operation due to ignoring of instructions may cause harm or damage.
The seriousness is classified by the following indications.
This symbol indicates the possibility of death or serious injury.
Meanings of symbols used in this manual are as shown below.
Always do this.
Never do this.
CAUTION
This symbol indicates the possibility of injury or damage to property.
WARNING
WARNING
It may cause bucket full protect of
the unit and cause electric shock.
Do not take the water buc-
ket out during operation.

33
SAFETY PRECAUTIONS
Do not cover the intake or
exhaust openings with
cloths or towels.
A lack of air flow can lead
to overheating and fire.
Never insert your finger or
other foreign objects into grills
or openings. Take special care
to warn children of these
dangers.
Do not use in areas
where chemicals are
handled.
This will cause the unit
deterioration due to
chemicals and solvents
dissolved in the air.
Care should be taken when
using the unit in a room with
the following persons:
Infants, children, elderly people,
and people not sensitive to
humidity.
You may be injured if you
fall or if the unit falls over.
Water may spill inside the
unit, causing insulation
failure and electrical
shock or fire.
!!
!!
It may cause failure of
appliance or accident.
There is danger of fire or
electric shock.
Do not place heavy object on
the power cord and take care
so that the cord is not
compressed.
Operation without filters
may cause failure.
Always insert the filters
securely. Clean filter
once every two weeks.
CAUTION
Do not climb up on
or sit on the unit.
If water enters the unit, turn
the unit off and disconnect the
power , contact a qualified
service technician.
!!
Do not place flower
vases or other water
container on top of
the unit.
The manufactures nameplate is located on the rear panel of the unit and contains electrical
and other technical data specific to this unit.
Be sure the unit is properly grounded. To minimize shock and fire hazards, proper grounding
is important. The power cord is equipped with a three-prong grounding plug for protection
against shock hazards.
Your unit must be used in a properly grounded wall receptacle. If the wall receptacle you intend
to use is not adequately grounded or protected by a time delay fuse or circuit breaker(please
refer to the nameplate for the electrical data), have a qualified electrician install the proper
receptacle.
Ensure the receptacle is accessible after the unit installation.
Do not use extension cords or an adapter plugs with this unit.
To avoid the possibility of personal injury, always disconnect the power supply to the unit,
before installing and/or servicing.
Electrical Information
It may cause electric shock
or failure of appliance.

44
CONTROL PADS ON THE DEHUMIDIFIER
Control pads
33
When you push the button to change
operation modes, the unit will make
a beep sound to indicate that it is
changing modes.
NOTE: The control panel of the unit you purchased may be slightly different according
to the models.
22
Humidity Set Control Pads
: Down/Up Pads
TIMER Set Control Pads
Use the Up/Down pads to set the Auto start and
Auto stop time from 0.0 to 24.
The humidity level can be set within a range of
35%RH(Relative Humidity) to 85%RH(Relative
Humidity) in 5% increments.
For drier air, press the pad and set to a lower
percent value(%).
For damper air, press the pad and set a higher
percent value(%).
55
Timer Pad
Press to initiate the Auto start and Auto stop
feature, in conjuction with the and key
pads.
11
44
Power Pad
Press to turn the dehumidifier on and off.
11223344556677
Unit operation on
indicator light
88
High fan
indicator light
Timer on/off
indicator light
Ion operation on
indicator light
Bucket full
indicator light
Continuous
operation on
indicator light
Dryer operation
on indicator light
Smart dehumidifying
operation on indicator
light
Mode Pad
Press to select the desired operation mode from
Dehumidifying,Dryer,Continuous dehumidifying and
Smart dehumidifying.
NOTE: Dryer and Smart dehumidifying modes are
optional.
66
Turbo Pad
77
Ion Pad(optional)
Press to activate the ionizer. Anions are
automatically generated by ionization. The
anions deactive the airborne chemical vapors
and dust particles. Press it again to stop the
function.
Control the fan speed. Press to select either
High or Normal fan speed. Set the fan
control to High for maximum moisture
removal. When the humidity has been
reduced and quiet operation is preferred,
set the fan control to Normal.
NOTE: When the compressor startups or stops
running, the unit may make a loud voice, it is normal.

55
CONTROL PADS ON THE DEHUMIDIFIER
Other features
Bucket Full Light
Glows when the bucket is ready to be
emptied, or when the bucket is removed
or not replaced in the proper position.
When frost builds up on the evaporator coils, the
compressor will cycle off and the fan will continue
to run until the frost disappears.
NOTE:When Auto defrosting operation,the unit may
make a voice of refrigerant flowing,it is normal.
Auto Defrost
Wait 3 minutes before resuming operation
After the unit has stopped, it can not be restart
opertation in the first 3 minutes. This is to protect
the unit. Operation will automatically start after
3 minutes.
Setting the Timer
When the unit is on, first press the Timer
button, the Timer Off indicator light
illuminates. It indicates the Auto Stop
program is initiated. Press it again the
Time On indecator light illuminates.It
indicates the Auto Start is initiated.
Press or hold the UP or DOWN pad to
change the Auto time by 0.5 hour incre-
ments, up to 10 hours, then at 1 hour
increments up to 24 hours. The control
will count down the time remaining until
start.
The selected time will register in 5 seconds
and the system will automatically revert
back to display the previous humidity
setting.
When the Auto start & Auto stop times are
set, within the same program sequence,
TIMER ON OFF indicator lights illuminate
identifying both ON and OFF times are
now programmed.
Turning the unit ON or OFF at any time or
adjusting the timer setting to 0.0 will cancel
the Auto Start/Stop function.
When LED display window displays the
code of P2, the Auto Start/Stop function
will also be cancelled.
When the unit is off, first press the Timer
button, the TIMER ON indicator light
illuminates. It indicates the Auto Start
program is initiated. Press it again the
Time Off indecator light illuminates.It
indicates the Auto Stop is initiated.
Display
Shows the set % humidity level from 35% to 85% or
auto start/stop time (0~24) while setting, then shows
the actual ( 5% accuracy) room % humidity level
in a range of 30%RH(Relative Humidity) to 90%RH
(Relative Humidity).
Error Codes and Protection Codes:
AS- Humidity sensor error--Unplug the unit and plug
it back in. If error repeats, call for service.
Auto Shut Off
The dehumidifier shuts off when the bucket is full,
or when the bucket is removed or not replaced in
the proper position.When the setting humidity is
reached, the unit will be shut off automatically.
For some models,the fan motor will continue
to run for 30 seconds.
Auto-Restart
If the unit breaks off unexpectedly due to the power cut,
it will restart with the previous function setting automa-
tically when the power resumes.
88
P1- Unit is defrosting-- Allow the unit time to automatically
defrost. The protection will clear after the unit self defrosts.
P2- Bucket is full or bucket is not in right position-- Empty
the bucket and replace it in the right position.
E3- Unit malfunction-- Unplug the unit and plug it back in. If
error repeats, call for service.
EC- Refergerant leakage detection malfunction-- Call for
service.
Smart dehumidifying mode(optional)
At smart dehumidifying mode, the unit will
automatically control room humidity in a
comfortable range 45%~55% according to the
room temperature. The humidity setting
function will be invalid.
ES- Temperature sensor error-- Unplug the unit and
plug it back in. If error repeats, call for service.

66
Dryer mode(optional)
The unit can make the MAX dehumidification function
when it is under the Dryer mode. The fan speed is fixed
at high fan speed. The humidity level is automatically
controlled according to the actual room humidity.The unit
will quit dryer mode after a maximum 10 hours' operation.
NOTE:
The Dryer mode must be operated in a close room,do not
open the door and window.
To make the best effective dehumidification ,please first
dehydrate the wet clothes.
Make sure to direct airflow at the wet clothes (See Fig.A).
For thick and heavy wet clothes may not get the best
effective dehumidification.
CAUTION
Do not cover the air outlet of the unit with clothes. It may
cause excessive heat, fire or failure of unit.
Do not place the wet clothes on the top of the unit and do
not make the water drop into the unit. It may cause
electric shock,creepage or failure of unit.
30~50cm
30~50cm
Airflow
Fig.A
Wet clothes
Allow 30~50cm of distance
on the top and right side of
the unit to the wet clothes.
CONTROL PADS ON THE DEHUMIDIFIER
Table of contents
Other Zanussi Dehumidifier manuals