Zapak ZP-SW25 User manual

USER MANUAL
(V1.0)
MODEL ZP-SW25A
BATTERY POWERED
PLASTIC STRAP SEALING TOOL
UN38.3

0
INDEX
1INTRODUCTION OF ZAPAK ZP-SW25 LINE OF PRODUCTS ...........................1
1.1 Description of major components ..........................................................................1
2MODEL NUMBERS & SPECIFICATIONS ...............................................................2
3SAFETY INSTRUCTION .............................................................................................3
4SETTING BEFORE OPERATION ..............................................................................6
4.1 Introduction of operating components ...................................................................6
4.2 Operation indicator .................................................................................................7
4.3 Charging battery .....................................................................................................7
4.4 Battery installation and removal ............................................................................9
4.5 Sealing time adjustment .........................................................................................9
4.5.1 Best sealing efficiency adjustment ...............................................................10
4.6 Strap thickness setting ..........................................................................................11
4.7 Strap width adjustment set ...................................................................................11
5OPERATION ................................................................................................................12
5.1 Insert straps into sealing slot ................................................................................12
5.2 Sealing ..................................................................................................................12
5.3 Remove the tool from straps ................................................................................12
6MAINTENANCE AND SERVICE .............................................................................13
6.1 General notice ......................................................................................................13
6.2 Dust cover ............................................................................................................13
7CHANGING WEARING PARTS ...............................................................................14
7.1 Bottom sealing gripper .........................................................................................14
7.1.1 Strap thickness 0.7mm and above ................................................................15
7.1.2 Strap thickness 0.65mm and under ...............................................................15
8OPTIONAL ACCESSORIES ......................................................................................16
8.1 BOSCH Li-Ion Battery (Part No. 9380).................................................................16
8.2 BOSCH Charger (Part No.2382-XX).....................................................................16
9WORKING WITH MANUALTENSIONER .............................................................16
9.1 Introduction of manual tensioner .........................................................................16
9.2 Operation notice ...................................................................................................17
9.3 Operation notice for fiber baling and strapping system .......................................17
10 COPYRIGHT NOTICE ...............................................................................................17
11 WARRANTY PROOF .................................................................................................18

1
1. INTRODUCTION OF ZAPAK ZP-SW25 LINE OF PRODUCTS
Zapak ZP-SW25 line of products are battery powered portable plastic straps
sealer. A more convenient and affordable tool for strapping. Save significant
packing cost by eliminating the conventional metal clips or seals.
1.1 Description of major components
FIGURE 1.
(1) Dust cover
(6) Sealing time adjustment knob
(2) Operation indicator
(7) Bottom sealing gripper
(3) Handle
(8) Sealing head
(4) Battery
(9) Front cover
(5) Operation lever
(10) Sealing lever

2
2. MODEL NUMBERS & SPECIFICATIONS
ZP-SW25 A
Model
Battery
Charger
Voltage
Fits poly
strap
Max. Strap Width
Max. Strap Thickness
Sealing
Efficiency
mm
inch
mm
inch
ZP-SW25A
100V
PP &PET
25
1
1.53
0.06
85±5%
115V
230V
240V
A.Specification
B. Dimension:
(Tool size with
battery)
Length: Approx. 345 mm (13.6’’)
Width : Approx. 87 mm (3.4”)
Height: Approx. 135mm (5.3 ”)
C. Weight:
TOOL : Approx. 1.50 Kgs. (3.30 Lbs)
BATTERY: Approx. 0.60 Kgs. (1.32 Lbs)
D. Noise:
Sound pressure level : 115 dB(A)
Sound power level : 120 dB(A)
E. Sealing time
adjustment:
0.6~4.8 seconds
F. Sealing
Efficency:
85%+-5% based on normal strap specification and conditions.
NOTE : Sealing efficiency varies based on strap quality, remaining
battery power and set sealing time.
G. Battery:
For ZP-SW25 : BOSCH (ZAPAK Item no. 9380)
Voltage / Capacity 18Vd.c./4.0Ah Li-Ion.
NOTE:
1. The Li-Ion battery may fail to work when ambient temperature
is lower than -10°C~40°C (14℉~104℉). Please use Li-Ion
battery within such temperature range
(ZAPAK Item no. 9380 Li-Ion battery, 18Vd.c., 4.0Ah)
2. Number of sealing cycles based on a brand new & fully charged
battery :
Approx. 420 cycles with 25mm x 1.05mm PET strap
Approx. 650 cycles with 19mm x 1.05mm PET strap
Approx. 810 cycles with 16mm x 1.05mm PET strap
Approx. 1,220 cycles with 15mm x 0.85mm PP strap
Model
Version

3
REMARKS:
1. Each tool is equipped with one ZAPAK battery powered plastic sealing tool, one
BOSCH Li-Ion battery, one BOSCH charger(with charger manual), cleaning brush,
bottom sealing gripper plate, strap width adjustment set and operation user manual
etc.
2. All electrical and mechanical specifications conform to the most major safety
standards. Please refer to the label and packaging for detail information.
3. Plug specification of charger varies with different country /areas’ request.
4. Most parts of this tool are made of recyclable material. Please refer to the recycle
mark on each component.
5. Products and specifications subject to change without notice.
3. SAFETY INSTRUCTION
When using this sealing tool, basic safety precautions should always be followed to
reduce the risk of fire, leaking batteries and personal injury including but not limited to
the followings:
Read all these instructions before operating this product and save these instructions.
Number of sealing cycles varies based on strap quality,
specification, set sealing time, operation habit, ambient environment
(The approx. number was tested on normal quality straps based on
a new and fully charged Li-Ion battery, part no. 9380 ).
3. Life cycle: Approx. 2000 charges (based on proper charging &
discharging operation and working habits).
4. Please refer to “4.3. Charging Battery“ regarding usage and
storage of battery
5. Storage temperature : -20℃~60℃(-20℃~20℃would be better)
Storage humidity: 65% ± 20%
6. Ambient temperature: -10℃~40℃
7. Average ambient temperature for charge is 0 0C~45 0C, charging
efficiency drops if ambient temperature is above 45 0C or lower than 0
0C which may lead to deterioration in performance and even battery
leakage.
(Please refer to article 3. “SAFETY INSTRUCTION “ and BOSCH
Safety Notes regarding environmental, recycle and safety
precautions of battery.) BOSCH Li-Ion battery (No. 9380) complies
with UN38.3 safety requirements.
H. Bosch
Charger
For ZP-SW25 ( ZAPAK part no.2382-XX, BOSCH Charger no.
AL1860CV/GAL1880CV): Charging time 30 minutes under normal
condition. (Please refer to user manual of Bosch charger for detailed
specification and safety precautions.)

4
Labels on the tool
Please notice and follow the safety precautions listed on the security label and
manufacture label which show on tool before operation. Please notice the
following position of labels on tool.
(1) Security label
The precautions and instructions of this marking should be always
noticed and followed.
Always wear safety goggles and ears protection device to protect your
eyes and ears during operation, failure to wear it may result in serious
eyes injure or blindness.
Read all instructions carefully before operating this product.
(2) Manufacture label contains model number,
serial number, country of origin and CE mark.
Working Environment
* Do not expose and use the tool to wet or dusty environment.
* Do not use the tool where is risk to cause fire or explosion or near flammable
substances including but not limited to fine dusts and gas.
* Keep your working area clean. Cluttered areas and benches invite injuries.
Operation Precautions
*Properly use the tool: please use the tool in accordance to this user manual. Do not
use the tool for any unintended purpose.
*Use authentic accessories and components recommended in this manual,
Improper or unauthentic accessories components / parts may damage the tool
& result in a risk of personal injury & invalidate your warranty.
*Positioning yourself and keep other personnel at a safe distance from direction of
the loosened strap end when operating tool. The loosened strap end might fly and
hurt the user and bystanders.

5
*Keep proper footing and balance at all times when operating the tool. Do not use
the tool when you are in an awkward position.
*Stay alert during operation. Watch what you are doing. Use common sense. Do not
operate the tool when you are tired
*Avoid long time idle running of motor which may cause damages on the control
system and mechanical parts.
*Dress properly. Do not wear loose clothing or jewelry. They can be caught in
moving parts. Rubber gloves and non-skid footwear are recommended when
working outdoors. Wear protecting hair covering to contain long hair.
Strap
* Use only recommended strap specifications in this manual. Poor quality strap or
improper strap specifications may reduce sealing performance.
Sealing Joint Examination
* Check the sealing joint after sealing. Please re-seal the article when sealing joint is
poor in order to secure goods in transit. Please adjust the sealing time according
to this manual to reach the best sealing efficiency.
Environmental, Recycle and Safety Precautions for Battery
*Do not dispose battery in household refusal, water or fire.
*Do not store battery together with metal objects to prevent any hazard of
short circuit.
*Do not open up battery cases. Keep it in dry place.
*Never attempt to short-circuit the battery by connecting the positive (+) and
negative (-) terminals.
*Remove battery from the tool when tool is not in use to prevent quick power
exhaustion. This good habit will extend the life of the battery.
*Remove battery from charger as soon as the charging process is completed.
*A fully charged battery will gradually lose its power naturally in storage.
Please activate the battery by a full charge every 3-6 months.
*When operation indicator of tool is flashing in red with continuous “beep”
sound alarm, please recharge the battery.
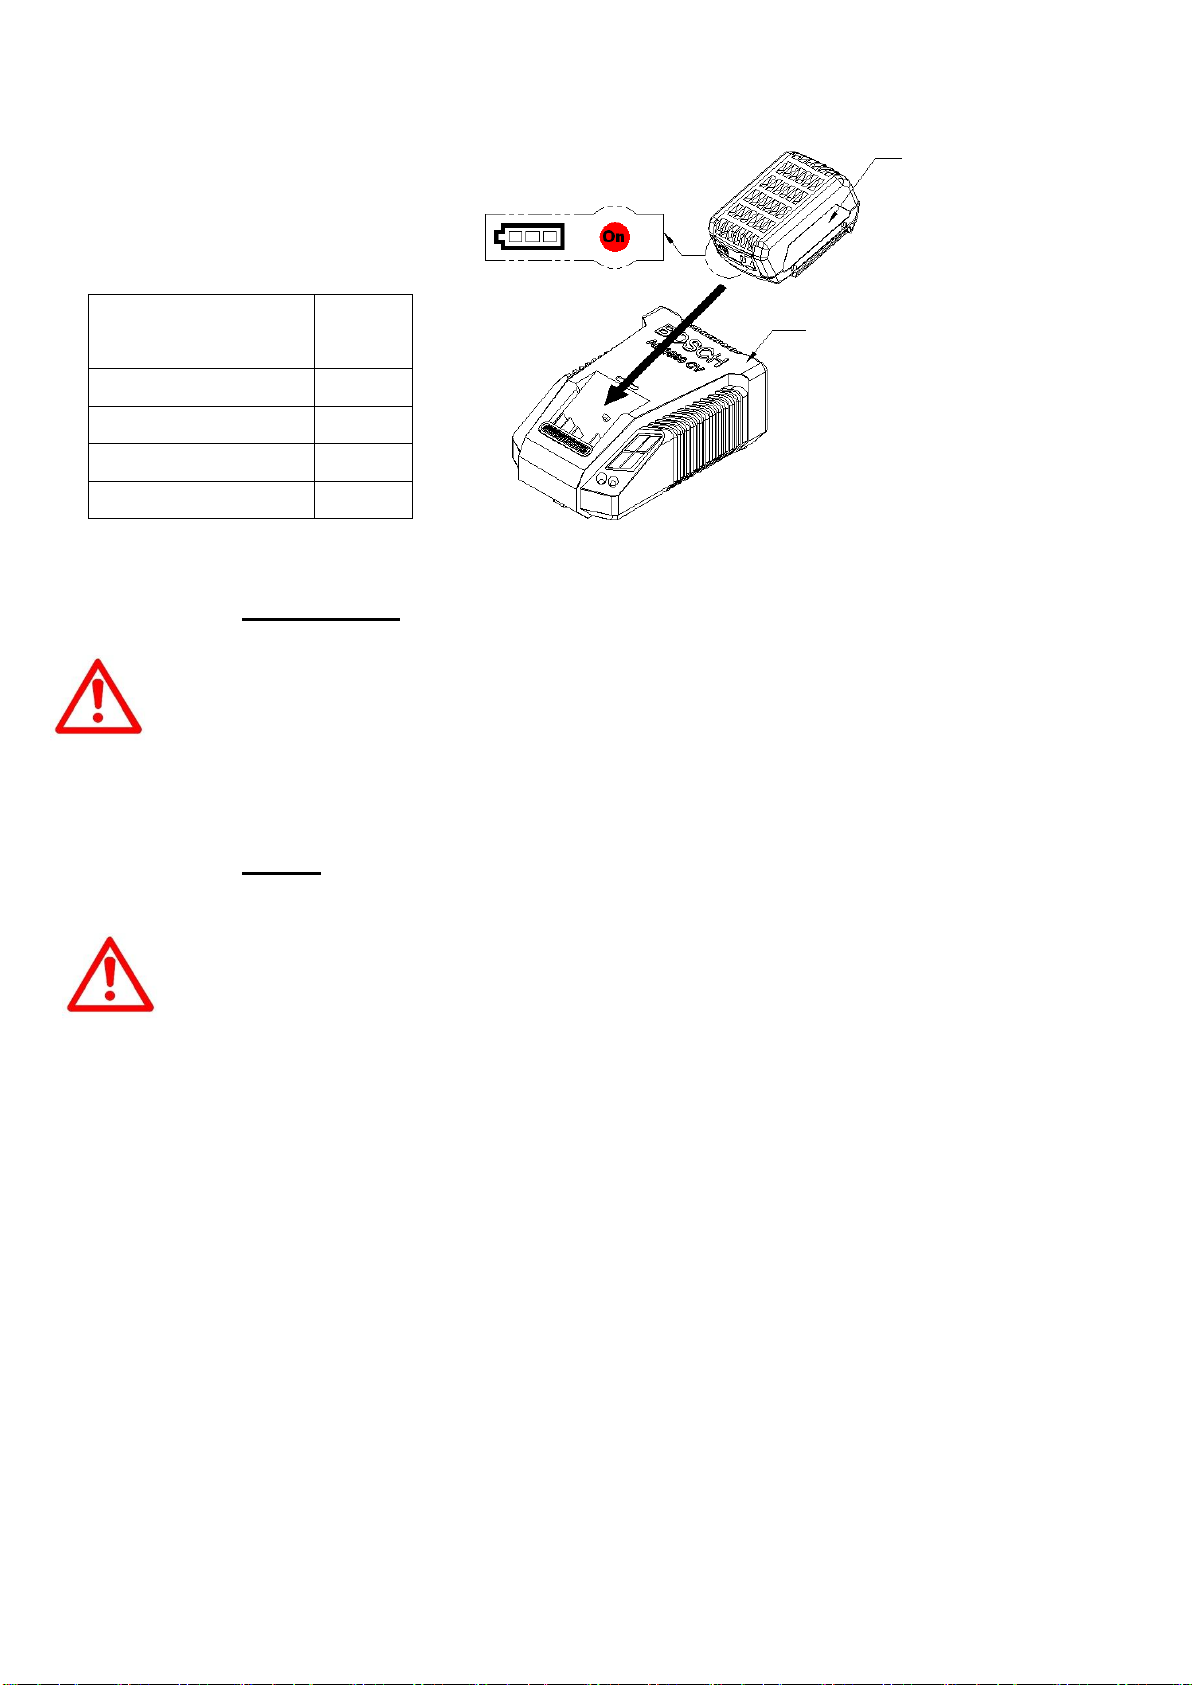
*Use BOSCH Li-Ion battery (part no. 9380) only for ZP-SW25. ZAPAK 9380
battery is only suitable for BOSCH Charger ( AL1860CV /GAL1880CV,
ZAPAK part no. 2382-XX), No adaptor is needed for charging battery part no.
9380. Using improper charger or improper battery may result in risks of
electric shock, overheat, explosion, burning or leakage of corrosive liquid
from the battery and invalidate your warranty.
*If corrosive liquid contacts your body, please clean and wash it with water
immediately.
Safety Precautions for Charger
*Please read and follow the safety instruction of the charger user manual before
using charger.
*Ensure the battery is clean and dry before plugging into the charger.

6
Maintenance & Service
* Good maintenance and keeping the tool clean can ensure a normal operation and a
good performance of the tool. Use genuine spare parts or accessories according to
this user manual for replacement. Using non-genuine spare parts for replacement
may result in considerable danger. If any damage occurred, please send it to
manufacturer’s authorized dealer for repairing.
Do not try to repair the tool by yourself, it will invalid your warranty.
* Check damaged parts. Before further use of the tool, part which is damaged should
be carefully checked to determine that it would operate properly and perform its
intended function. Check for alignment of moving parts, free running of moving parts,
breakage of parts, mounting and any other conditions that may affect its operation.
Do not operate tool with broken or worn parts. Never modify the tool.
* Please remove battery from the tool before maintenance.
* Please refer to articles 6 “ MAINTENANCE AND SERVICE” for detailed
information.
* When the tool is damaged, please do not operate it again. Do not modify the tool
either.
Storage
* Store the tool and battery separately in a dry and clean location when not in use.
Keep away from reach of children.
4SETTING BEFORE OPERATION
Read and follow the safety instructions of this manual. Please follow the
steps as follows before initial operation
4.1Introduction of operating components
Please refer to 1.1 “ Description of major components. “
FIGURE 2. ZP-SW25 Description of major components
Handle
Battery Release Button
Operation Lever
Sealing time adjustment knob
Sealing Lever
Level

7
4.2 Operation indicator
The operation indicator can instantly tells you the operation status of the tool.
Operation status
Indicator light status
Remark
Load Battery
OFF
Remove battery if tool is not
in operation for a long period
of time. Removing Battery
can avoid unexpected
accident.
Lift up the
operation lever
Green light on ( when sealing is
started)
Turn the sealing
lever to start
sealing
Green light flashing (cooling)
Green light on (operation done)
A Beeping noise comes upon
the finish of cooling.
Tool is not in
operation over 10
minutes
OFF
A power saving mode
Battery needs to be
re-charged
Red light flashing
●●●●●●●●●(continued)
Continuous beeping noise
Device Error
Stop every 2 flashes
●●___●●___●●( continued)
1.3 sec 1.3 sec.
No beeping noise
Motor is jammed.
Please contact your Zapak
dealer for inspection.
Stop every 3 flashes
●●●___●●●___ (continued)
1.3 sec. 1.3 sec.
No beeping noise
Motor temperature is too high
Please wait until motor’s
cooled down
Stop every 4 flashes
●●●●___●●●●(continued)
1.3 sec.
No beeping noise
Other motor malfunction
Please contact your Zapak
dealer for inspection.
4.3 Charging battery
Refer to FIGURE 3 to insert the battery into charger (Please refer and follow the safety
instruction and operation of the battery and charger user manual.)
I. Usage Notice:
* Each BOSCH Li-Ion battery (No. 9380) is equipped with Charge Level Indicator.
Press button to check the status of charge level condition (capacity), as shown on
Figure 3 (*For safety reasons, it is only possible to check the charge condition when
the tool is at a standstill.)
* When you receive BOSCH Li-Ion battery, its capacity may not be sufficient. Please
check capacity status and charge fully before use when necessary.
* When three LEDs light up, the capacity is sufficient, no need to charge.
* When only one LED lights up or flashing green, or the Tool’s “Operation Indicator” in
flashing red, proceed charging with BOSCH charger (No. 2382-XX).
* Adaptor is NOT required for charging BOSCH Li-Ion battery (No. 9380)
* Remove battery from charger upon charging process is completed. Otherwise, it may
shorten battery’s service life due to over-charging.

8
FIGURE 3. Illustration of Inserting Battery onto Charger
II. Storage Notice:
* For storage within 6 months under normal temperature and environment, BOSCH
battery does not require a full charge before storage. However, when the Charge
Level Indicator shows low capacity with only one LED light, a 5~10 min. charge is
needed to raise the capacity up to 2 green lights.
* For long time storage or un-use over one year or above, Check capacity level every 6
months. When only one LED lights up, please charge 5~10 minutes until two LEDs
light up.
III. Others:
* In order to achieve the best charging capacity, please wait until the battery has cooled
down before recharging.
* Charging time may vary based on the voltage variation of each individual
area/country.
* Abnormal temperature of battery and charger will reduce the charging efficiency
significantly.
*Always remove battery from tool when tool is not in use.
*Always remove a low-power battery from tool for a recharge process SOON
AFTER the “Battery Power LED” blinks in red and continuous “beep… beep”
alarm appears. DO NOT wait and leave such battery unattended and
un-recharged. Fail to recharge timely will cause quick battery failures due to
power being overly output and discharged.
* Charging the battery: When charging speed becomes abnormally slow due battery
temperature is raised abnormally or charger shows abnormal signal , Please remove
the battery from charger for cooling. Either battery or charger is defective if the
battery still can not be charged. Use another battery to check which is defective.
* Bosch charger is installed with protection device to avoid overcharge hazard. Such
device will cut off charging process automatically when the battery has been charged
fully or reached its maximum voltage level. Even so, for safety reason, please remove
battery from charger upon charging process is completed.
* Remove battery and discontinue charging process if any abnormal situation
occurs.
* It is required to install a surge protector to protect the charger and minimize the
risks and damages caused by surge (a strong and sudden electricity shock).
“Charge Level Indicator”
LED
Status
Continuous lighting 3 x green
OK
Continuous lighting 2 x green
OK
Continuous lighting 1 x green
Charge
Flashing light 1 x green
Charge
Li-Ion Battery Charger
(BOSCH AL1860CV/
GAL1880CV) (NO. 2382-XX)
Charge Level Indicator Button
BOSCH Li-Ion
Battery
(NO.9380)

9
4.4 Battery installation and removal
Slide the fully charged battery from top to bottom onto the tool as (FIGURE 4) shown.
The light should be in “off “ status. Always check and make sure release button pops
up after the battery is installed.
FIGURE 4. Illustration of Inserting and Removal of Battery
* When the operation indicator shows “Red flashing”, it means the battery power
is too low to work and needs to be re-charged. Then the tool is NOT supposed to be
operated under such condition. You will simultaneously hear “Beep..beep..beep”
alarm. Please press “Battery Release Button “ on top of battery and pull battery upward
to remove it from the tool. The “ beep..beep” alarm will continue until the battery is
removed. (FIGURE 4)
4.5 Sealing time adjustment
Sealing time is adjustable from 0.6 ~4.8 seconds. Please set a proper sealing
time in accordance with the strap’s quality and specifications. Sealing time
setting as below shown.
Sealing time adjustment knob has 14 increments, each increment equals
to approximately 0.3 seconds.
A tip to set proper sealing time.
Suggest to cut off a length of strap and fold it into two sections. Put the overlap section
〈REFERENCE〉
PET 25mm x 1.27mm requests approx. 2.1 seconds
PET 25mm x 1.05mm requests approx. 1.5 seconds
PET 19mm x 1.27mm requests approx. 1.8 seconds
PET 19mm x 1.05mm requests approx. 0.9 seconds
PET 16mm x 1.05 mm requests approx. 0.6 seconds
PP 15mm x 0.85mm requests approx. 0.6 seconds

10
into sealing slot. Lift the operation lever and turn the sealing lever to seal the straps as
(FIGURE 5) shown. By doing this way, it can be quickly adjusted to the best sealing
efficiency for your strap.
FIGURE 5. Illustration of Pretesting for a Proper Sealing Time
*If the battery power is low, it would affect and decrease the sealing efficiency.
Please turn sealing time adjustment knob clockwise to next increment to
extend sealing time to reach normal sealing efficiency.
4.5.1 Best sealing efficiency adjustment
1. Adjust sealing time properly and avoid overmelting straps, for the sealing joint may
overflow too much and cause difficulty in cleaning the sealing head and removal of tool
from straps. Pretesting for a proper sealing time is necessary.
2. In order to further protect goods in transportation, multiple seals is suggested for
further reinforcement.
Normal Sealing
Sealing joint is mostly or completely welded
over the whole width of the straps.
Sealing time too short
Sealing joint is small and incompletely cover
the width of the straps. Please refer to article
4.5.
Sealing time too long
the straps are over melted and sealing joint
overflow too much on both sides of the
straps. Please refer to article 4.5
Approx.20mm

11
4.6 Strap thickness setting
When applying strap thickness 0.65mm and under, please add a bottom sealing gripper
plate (part no. 25XX-4T) under bottom sealing gripper. The plate is enclosed in the
packing. Please refer to article 7.1 “ bottom sealing gripper” and 7.1.2 “Strap thickness
under 0.65mm”.
4.7 Strap width adjustment set ( part no. 25XX-2J)
The tool is preset for 25mm strap width. When applying strap width 19 mm and under,
please add strap guider spacer and strap guider holder. The strap width adjustment set is
enclosed in the packing. Remove original screw ( M4X 0.7 X 10mm) and lock washer
M4. Keep both parts properly in the box for future 25mm application, when necessary.
Then install strap guider spacer into left housing hole, and
add strap guider holder (left), lock washer M4, and screw on screw (M4X 0.7X 16mm)
as shown in figure 6.
Refer to figure 7, remove original screw ( M4X 0.7 X 10mm) and lock washer
M4. Also keep them in box properly as above.Then install strap guider spacer, strap
guider holder (right), lock washer M4 in order into right housing hole, and screw on
screw (M4X 0.7X 16mm)
FIGURE 6. FIGURE 7.
1. The width of strap guider holder (left) and strap guider holder (right) is different.
The wider one is strap guider holder (left).
2. Strap width adjustment set (25XX-2J) includes:strap guider spacer x2、lock washers x2、
screws x2、strap guider holder (right) x1、strap guider holder (left) x1
In case of any abnormal situation, please remove battery from the tool
immediately and send the tool for repair.
Guider spacer
Lock washer
Guider holder(R)
holder(R)
Screw(M4×0.7×16mm)
Guider spacer
holder
Lock washer
washerwas
her
Guider holder(L)
Screw
(M4×0.7×16mm)

12
5OPERATION
5.1Insert strap into sealing slot
Hold the straps and make sure the straps are aligned and inserted all the way
in. See Figure 8 & 9.
FIGURE 8.FIGURE 9.
5.2Sealing
Lift up and hold the operation lever gently. Then turn the sealing lever as shown.
DO NOT RELEASE until the sealing is done and the cooling beeping noise stops.
See figure 10.
Do not force to squeeze the operation lever to the upmost. Sealing function will be
activated abnormally and cause insufficient sealing joint.
The surface of strap must not be stained by oil or grease. Otherwise, it will
cause insufficient sealing efficiency or failure of sealing.
FIGURE 10.
5.3 Remove the tool from straps
Turn back the sealing lever and release the operation lever to remove the tool from
straps.
1). DO NOTACTIVATE THE SEALING LEVER WITHOUT STRAPS.
2). Keep at least two cm between each sealing joint for multiple sealing joints.

13
6. MAINTENANCE AND SERVICE
6.1General notice
*The quality of this tool is protected by manufacturer limited one
year warranty with exception of 3 years warranty on brushless
motor and ECU.Please refer to conditions on warranty proof. To protect
your warranty rights, please make sure your dealer had completely filled out
your warranty proof and signed on it. The warranty excludes all wearing
parts and battery charger. Please refer to “Wearing parts list” in article 7
“CHANGING WEARING PARTS”.
*When tool is damaged, please call your dealer for further instruction and send
your tool to manufacturer’s authorized dealer for repair service. Do not
attempt to repair it by yourself.This may invalidate the warranty.
*Please use enclosed cleaning brush to clean strap slot including strap gripper,
sealing head and bottom sealing gripper. Regularly cleaning will assure
efficient working and decrease malfunction possibilities. You may also clean
the residues on strap slot with air gun.
*Clean your tool exterior with only slightly damp cloth. Never use any
chemical, gasoline, thinner, turpentine, dry cleaning fluids or liquids which
may damage the plastic housing or finishing. Never let any liquid get into the
tool and never immerse into any liquid.
WARNING
Keep the tool away from magnetic fields, liquid, fumes, and small metal
objects including but not limited to metal debris, particles etc. within
operating surroundings. Fail to follow this instruction may cause
inhalation or ingress of foreign objects into motor and/or electronic control
unit (ECU) and causes damages and malfunctions to the tool and invalidate
warranty.
6.2 Dust cover:
Keep the filter of the dust cover clean and ventilation at all time. Replace
immediately if the filter is broken to avoid any possible tool damage.
Dust cover can be washed in water and air dried. DO NOT USE ANY
CHEMICAL CLEANER. See figure11&12 for disassemble & assemble.
Take off screw (M3*0.5*10 mm) as figure11 shown, lift the dust cover from

14
front end until hook A is released from undercut B. Hook up A on B first when
reassemble. And screw back screw (M3*0.5*10mm)
FIGURE 11. FIGURE 12.
7. CHANGING WEARING PARTS
*Please remove battery from the tool before maintenance.
*The warranty excludes all wearing parts and battery charger (2382-XX).
Bosch battery and charger are covered by BOSCH warranty program and
not covered under ZAPAK warranty policy.
*The following wearing parts (marked with *) can be changed by user which
will not affect your warranty of other parts in the tool.
Wearing parts list
Item No.
Description
Remark
*9380
Li-Ion battery
BOSCH (18V/4.0Ah Li-Ion)
26XX-3P
Sealing head
Must be maintained by
manufacturer’s authorized dealer
*25XX-4N
Bottom sealing gripper
7.1Replacement of bottom sealing gripper (Item no. 25XX-4N)
Take off the 2 pcs screws (M4.* 0.7 *10.3mm) as Figure 13 shown to take out the
bottom sealing gripper holder(25XX-4O) and bottom sealing gripper ( 25XX-4N).
FIGURE 13.

15
7.1.1. For strap thickness 0.7mm and above
Put new bottom sealing gripper (25XX-4N) into bottom sealing gripper holder (25XX-4O) by
matching the screw holes as Figure 14 shown. Then put the holder ( 25XX-4O) and the gripper
( 25XX-4N) back into the tool as Figure 15 shown and screw back the 2 screws
(M4*0.7*10.3mm).
FIGURE 14. FIGURE 15.
Before replacing with new bottom sealing gripper, strap residue must be
cleaned to keep the alignment when reassemble.
7.1.2. For strap thickness 0.65mm and under
Add bottom sealing gripper plate (25XX-4T) under bottom sealing gripper (25XX-4N) and
place them into bottom sealing gripper holder (25XX-4O) by matching screw holes as Figure 16
shown, then put the holder back into the tool and screw back the 2 screws.
FIGURE 16.
25XX-4O
Bottom sealing
gripper holder
25XX-4N
Bottom sealing
gripper
Screws
(M4*0.7*10.3mm)
25XX-4T
Gripper Plate
25XX-4O
Gripper Holder
25XX-4N
Gripper

16
8. OPTIONALACCESSORIES
8.1Li-Ion Battery (Item no. 9380)
Recommend to buy more than one or two batteries as spares to meet more frequent
strapping job demand. BOSCH Li-Ion battery ( 9380) are only suitable for BOSCH
Li-Ion Charger ( part no. 2382-XX, BOSCH no. AL1860CV/ GAL1880CV) (Please
refer to article 3. “ SAFETY INSTRUCTION” regarding environmental, recycle and
safety precautions of battery.)
8.2 Battery Charger (BOSCH AL1860CV/GAL1880CV, ZAPAK Item
no.2382-XX)
Battery charger 2382-XX is suitable for ZAPAK ZP-SW25 sealing tools. Please
refer to article 3. “ SAFETY INSTRUCTION” regarding safety precautions and the user
manual of charger.
Item No.
VOLTAGE
Applicable model
PLUG
REGIONS
2382-10
100V
ZP-SW25
2 flat pins
Japan
2382-15
115V
ZP-SW25
2 flat pins
USA, Canada, Mexico
N. America, Taiwan
2382-23
230V
ZP-SW25
2 round pins
European countries,
China, Middle/S. America
2382-25
240V
ZP-SW25
2 diagonal flat pins
Australia, N.Z.
9. WORKING WITH MANUALTENSIONER
9.1 Introduction of working with manual tensioner
Working with maximum 25mm PP & PET straps manual tensioners. See figure
17.
FIGURE 17.
Cutting
Blade
Strap Roller
Operation
Strap Holder
Leave 7 cm bottom strap

17
9.2 Operation notice
*Leave at least 7 cm bottom strap out for easy sealing (As Figure 17 shown)
9.3 Operation notice for fiber baling and strapping system application:
9.3.1 Keep at least 2 cm space between each sealing joint for multiple joints sealing.
9.3.2 ZAPAK ZP-SW25 sealer is applicable to seal and connect the two strap
rolls of their tail and head together on strapping system. Suggest to adjust the
sealing time longer than usual to get a deeper seal. Trim off the overflow on
both sides of the sealing joint to ensure the straps go through the track of
strapping system smoothly.
10 Copyright Notice
This document is copyrighted in 2019 by Pantech International Inc. All rights
are reserved. Pantech International Inc., reserves the rights to make
improvements to the products described in this manual at any time without
notice.
No part of this manual may be reproduced, copied, translated or transmitted in
any form or by any means without the prior written permission of Pantech
International Inc. Information provided in this manual is intended to be
accurate and reliable. However, Pantech International Inc. assumes no
responsibility for its use, nor for any infringements upon the rights of third
parties which may result from its use.
PANTECH INTERNATIONAL INC.
Taipei, Taiwan, R.O.C.
© 2019 Pantech International Inc. All rights reserved.
Worldwide Patent Pending
Printed in Taiwan, R.O.C.
ZAPAK is a registered trademark of Pantech International Inc.
Product and specifications are subject to change without notice.
One year limited manufacturer warranty
Printed in Taiwan 2019

18
WARRANTY PROOF
LIMITED WARRANTY
This product is warranted by Pantech International Inc. to be free from defects in
material and workmanship under normal conditions of use and service in accordance
with the accompanying user manual. This warranty proof is effective for one calendar
year from the date of shipment dispatched from Taiwan, except brushless motor and
ECU which are covered by a 3-year period of time. Pantech International Inc. and its
authorized dealers are responsible to fulfill obligations of warranty in conformity with
“ZAPAK PRODUCTS WARRANTY AND AFTER SERVICE BY LAW “ .
This warranty proof is invalid including but not limited to those failures caused by acts
of god, accidents, misuse, abuse, negligence, improper operation, product modified ,or
unauthorized service or parts. This warranty proof is in lieu of all other warranties,
expressed or implicated including but not limited to the warranties of merchantability
and fitness for a particular purpose which are hereby excluded.
To obtain services under warranty, you may return the defective tool intact, in person or
by post with this warranty proof or an invoice of sale, receipt or other dated proof of
purchase to the dealer whom you purchased from or to the dealer’s authorized service
center near you. Please enclose a short description of malfunction with tool when
returning it by post.
To assure product safety & reliability, service should be performed by your dealer or
dealer’s authorized service center. Do not attempt to disassemble & repair the tool by
yourself. Violation of this restriction may invalidate this warranty proof.
This warranty proof is granted to the final purchaser only. This warranty proof is not
transferable. It is invalid if the serial number is removed or modified or not conformed
to the product.
This warranty proof gives you specific legal rights which may vary from state to state
and country to country. If you have any questions concerning this warranty proof,
please contact our dealers.
Warranty obligations can be fulfilled provided the following details are filled out fully.
Otherwise, the purchaser’s invoice or receipt or other equivalent dated proof of
purchase should be presented.
All wearing parts listed in the user manual and BOSCH battery / charger are not
covered under warranty.
Table of contents