zapco Z-PS110B P100A User manual

1
Z-PS P100A Powe Supplies
Owne ’s Manual
Befo e ope ating the unit, please ead this manual th oughly and etain it fo futu e efe ence.

Features f the Zapc AC~DC P wer Supplies
Z-PS110B P100A (110~130 V lt)
Z-PS220I P100A (220~240 V lt)
Uses AC power to power equipment t at requires 9V~16V DC power.
Provides up to 100 amps continuous power adjustable from 9V to 16V.
N te: A n rmal vehicles electrical system pr vides ab ut 13.5 t 14 v lts when the engine is
running
T e supplies can be used for audio displays, s ow cars, test benc es, etc.
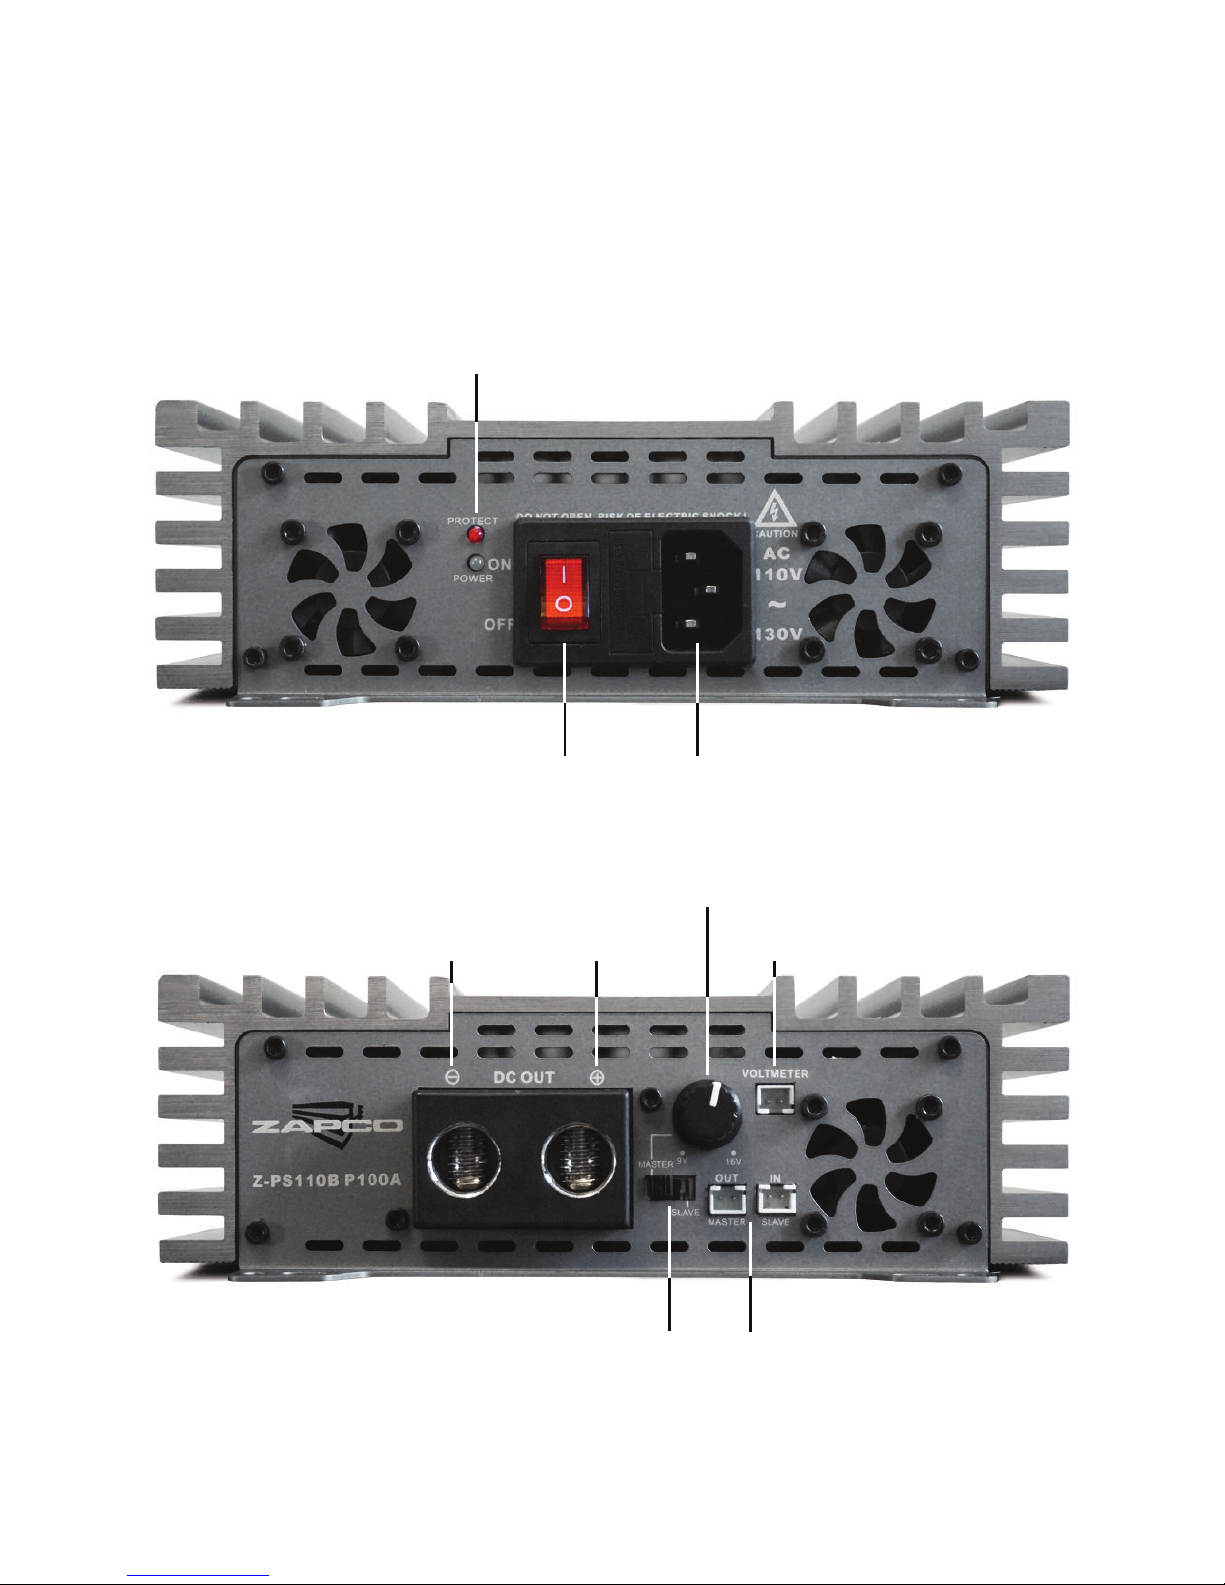
Features include:
• Adjustable regulated output voltage from 9V~16V
• Remote panel-mount Volt Meter to monitor t e output
• Up to 100 amps of current
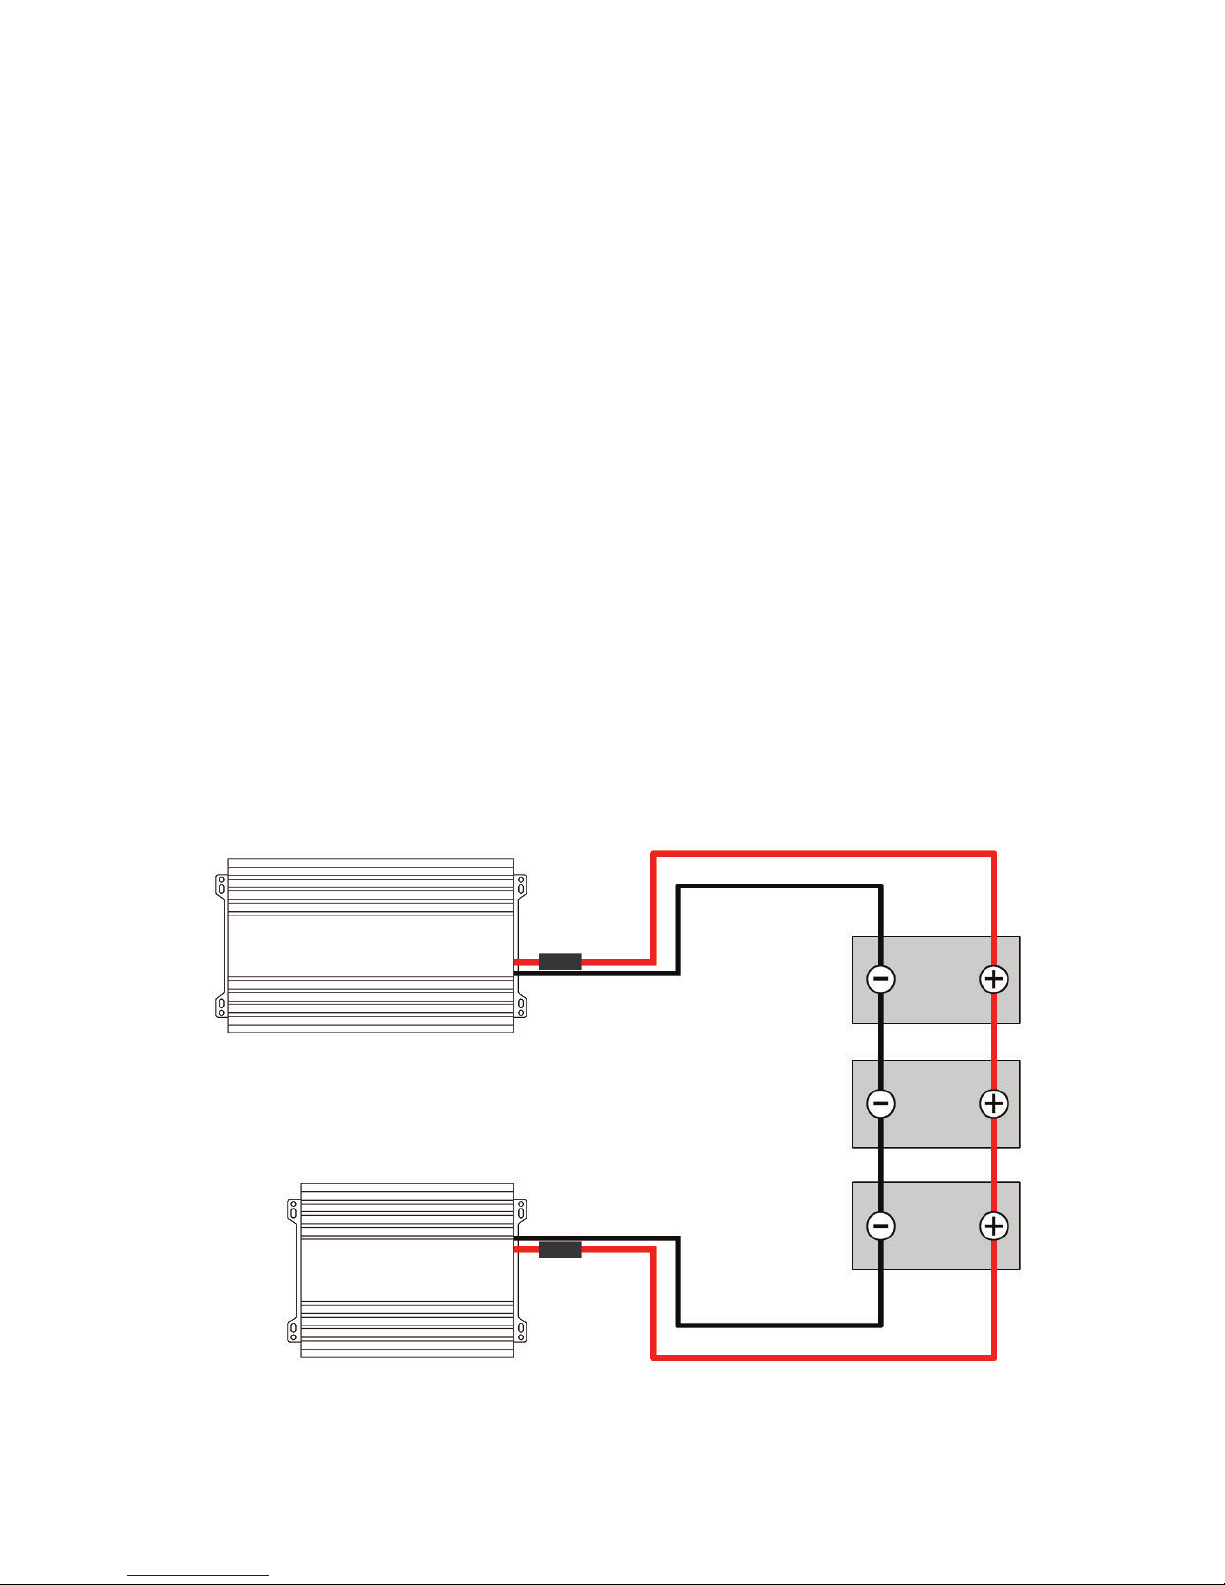
• Units are "strappable" to combine up t e 4 units, and provide up to 400
Amps of current. Eac unit includes t e connection cable for strapping
multiple supplies
• Temperature controlled cooling fans
• T ermal s ut-off protection
• Over-current protection
• Pulse c arging to in ibit battery sulfating (overc arging)
Fuse all connected devices as recommended by t e manufacturer.
Specificati ns
Design ........................................................................................ Switc ing Type
Input Voltage Z-PS220I P100A ................................................... 220V AC±10%
Z-PS110B P100A .................................................. 110V AC±10%
Input Frequency ........................................................................ 50Hz~60Hz
DC Output ................................................................................. Adjustable 9V~16V DC ±0.5V
Output Current ......................................................................... 100 Amps DC Continuous (Maximum)
Line Regulation ......................................................................... < ±5%
Load Regulation ........................................................................ < ±5%
Fuse ........................................................................................... Fuse 10A/250V (Input Voltage: 220V)
Fuse 20A/120V (Input Voltage: 110V)
Output Ripple ............................................................................ 150 mV RMS
Protection Temperature ............................................................ 75°C
Overload Protection .................................................................. UL more t an 105 Amps
Cable ......................................................................................... UL 14 AWG
Dimensions (cm) ....................................................................... 31.3L x 6.2H x 19W
Specifications are current at t e time of printing but may be c anged wit out notice during our continuous product
improvement process.

Imp rtant Safety Instructi ns
T is manual contains important safety and operating instructions. To reduce
t e risk of fire, electric s ock, and injury to person or equipment; carefully
read t e following before you use t e power supply. Also, please read all
cautionary markings on any product t at you will connect to t e power supply.
Warnings:
• T is power supply is not recommended for outdoor use
• Do not expose power supply to excessive moisture
• Fuse all connected devices as recommended by t e manufacturer
• T is power supply is not intended for use as a battery c arger. Connecting
to a deeply disc arged battery can cause t e supply to go into current
limit mode and can damage t e power supply
• T is supply can be used alone or in conjunction wit a battery or multiple
batteries. If used wit a battery, t e output will be automatically adjusted
depending on battery condition to avoid battery damage
• Batteries s ould not remain connected to t e c arger for extended
periods of time
• T e power supply s ould be operated from a standard 110V or 220V
50Hz~60Hz AC Outlet (as indicated in model number). A minimum of 20
Amps will be required
• If required at a later date, t e input supply voltage can be c anged as per
instructions in t is manual
• Avoid use of extension cords
• T e power plug is polarized for safety, do not modify t e power plug.
• Do not cover or block t e power supply's cooling fans
If your unit s ould require service,
contact your dealer. Do not attempt
to service t e unit.

Charting the P100A P wer Supplies
T e controls and functions of t e Z-PS110B and Z-PS220I are identical in all ways
except AC input voltage.
Main P wer switch AC P wer C nnec n
P wer-On and Pr tec n Indicat rs
DC Out Negave DC Out P sive
DC Out V ltage Select r
Output f r LCD V ltmeter
Master/Slave Select r In/Out c nnect rs f r
"Strapping" P wer Supplies

C nnecting the P100A P wer Supplies
Cau n: Make all c nnec ns bef re y u c nnect the p wer supply t AC p wer
1. Assure t at t e device requiring power is turned off
2. Assure t at t e power supply switc is turned off
3. Assure t at t e Master/Slave switc is set to Master (see instrucons
below for strapping mulple supplies)
4. Set t e output voltage selector to t e required voltage (13.5 volts for
most car electronics)
5. Connect t e volt meter if you will be using it
6. Connect t e Posive, and t en t e Negave power cables from t e
device to t e power supply. USE Extreme Cauon and assure t at t e
posive and negave power connecons are correct, as reversing polarity
may well damage bot t e power supply and t e device being powered.
T e connected device s ould be fused as per t e manufacturer's
recommendaon
7. Aer double c ecking items 1~5, connect t e A/C cord to a correct
standard 110B or 220I power receptacle, depending on t e power supply
model
8. Flip t e power switc to t e ON posion and t e blue LED will lig t to
indicate t e powered up condion
N tes n the Operati n f the P100A P wer Supplies
Master/Slave Switch: W en using a single P100A supply, t e Master/Slave
switc must be set to Master or t e Supply will go into protect and t e red LED
will lig t.
Included V lt Meter: Your package include a panel mount volt meter. You can
plug t e meter's cable into t e Volt Meter port in t e supply's control end plate.
Temperature C ntr lled Fans: T e fans will stay off until temperatures reac
50⁰C (120⁰F), w en t ey begin to cool t e unit. If t e temperature s ould ever
exceed 75⁰C (167⁰F) t e unit will go into t ermal protection until t e unit cools
to operating temperature.
Over Current: If t e device connected requires more t an 16Volts, or more
t an 100 Amps of current to operate, t e power supply will sense t is and go
into protect and t e red protect LED will lig t.

Interference: T e Zapco power supplies are ig power switc ing supplies and
as suc may cause some interference to TV or radio reception. If you experience
t is you s ould turn t e power supply off and move it furt er away from t e
receiving device.
C rrect Input V ltage: Your P100A supply is set for to t e proper input voltage
for t e country in w ic it was first sold. If you s ould move or need it c anged
for some ot er reason, you may contact your Zapco Dealer of Zapco directly
about modifying your unit.
Using P wer Supplies with Batteries
T e Zapco power supplies can be used in combination wit a battery or batteries,
depending on t e usage requirements. Batteries s ould be 12 volt automotive
type. Hig er voltage commercial batteries s ould not be used and will put t e
supply into protection. Multiple batteries must be connected in parallel.
For safety, t ere s ould be a 100A fuse at t e output of t e power supply and a
fuse of manufacturer's recommended amperage at t e amplifier.
AC P wer Z-PS P100A FUSE
FUSE
M de: Master
Baery
Baery
Baery
Amplifier

Using Multiple P wer Supplies
Up to four P100A power supplies can be strapped to provide more DC current if
required by t e powered device. Eac supply will add 100 Amps to t e circuit for a
maximum of 400 Amps. T e first supply in suc a circuit must be set to Master. All
following supplies are set to Slave, t en t e Master supply's voltage control will set
t e voltage for all t e supplies.
See ab ve: Using t e supplied connecting cables, t e control OUT of #1 goes to
t e IN of #2. OUT of #2 goes to IN of #3, etc. Only Supply 1 is in Master mode, all
ot ers are in Slave mode.
Supply 1
Master
Supply 2
Slave
Supply 3
Slave
Supply 4
Slave
AC P wer
AC P wer
AC P wer
AC P wer
Amplifier
M de: Master
M de: Slave
M de: Slave
M de: Slave
Master Out
t Slave In
Master Out
t Slave In
Master Out
t Slave In
400A
FUSE
FUSE
FUSE
FUSE
FUSE
FUSE
Baery

Modesto, Califo nia USA
Since 1974
zapco.com
This manual suits for next models
1
Table of contents