Zappiti One 4K HDR User manual

English ● Français
Quick Start Guide
Guide de démarrage rapide
Manufactured under license from Dolby Laboratories.
Dolby and the double-D symbol are trademarks of Dolby Laboratories.
DTS, the Symbol, & DTS and the Symbol together are registered trademarks & DTS 2.0+Digital Out
is a trademark of DTS, Inc. Product includes software. © DTS, Inc. All Rights Reserved.

2
Dune HD TV-303D Quick Start Guide
Getting More Information
Due to the regular evolution and the addition of new functionalities,
provided by firmware and software updates, it is impossible to cover
all functionalities in this user's guide. For this reason, we invite you to
visit our online Zappiti Knowledge Base. You will find a large amount
of tutorials and various help topics concerning the use of the media
player and Zappiti applications:
zappiti.uservoice.com/knowledgebase
About Zappiti
Zappiti is a French company based in Paris. Zappiti designs and manufactures only professional grade
Video Management Systems; delivering the highest quality, outstanding performance, and best possible
user experience. The sofware development & enginering, design and support teams are located in
France (Europe).
All of the Zappiti products are designed to provide our end-user customers with convenient and intuitive
access to their entire movie library collection, in stunning 4K, High Definition resolution. The award
winning Zappiti devices are being successfully used to improve the movie watching experience, in
residential and commercial environments all over the globe.
To ensure the ultimate performance, all Zappiti devices are supplied to authorized resellers through a
worldwide network of established and well respected distribution partners.
Zappiti products are distributed in over 40 countries worldwide.
More info: zappiti.com

3
English
3
Table of Contents
Table of Contents
English
Quick Start Guide
General, Key Features
Organize your Video Collection with Movie Covers
Package Contents
Exterior
Remote Control, Connect a Computer Keyboard / Mouse
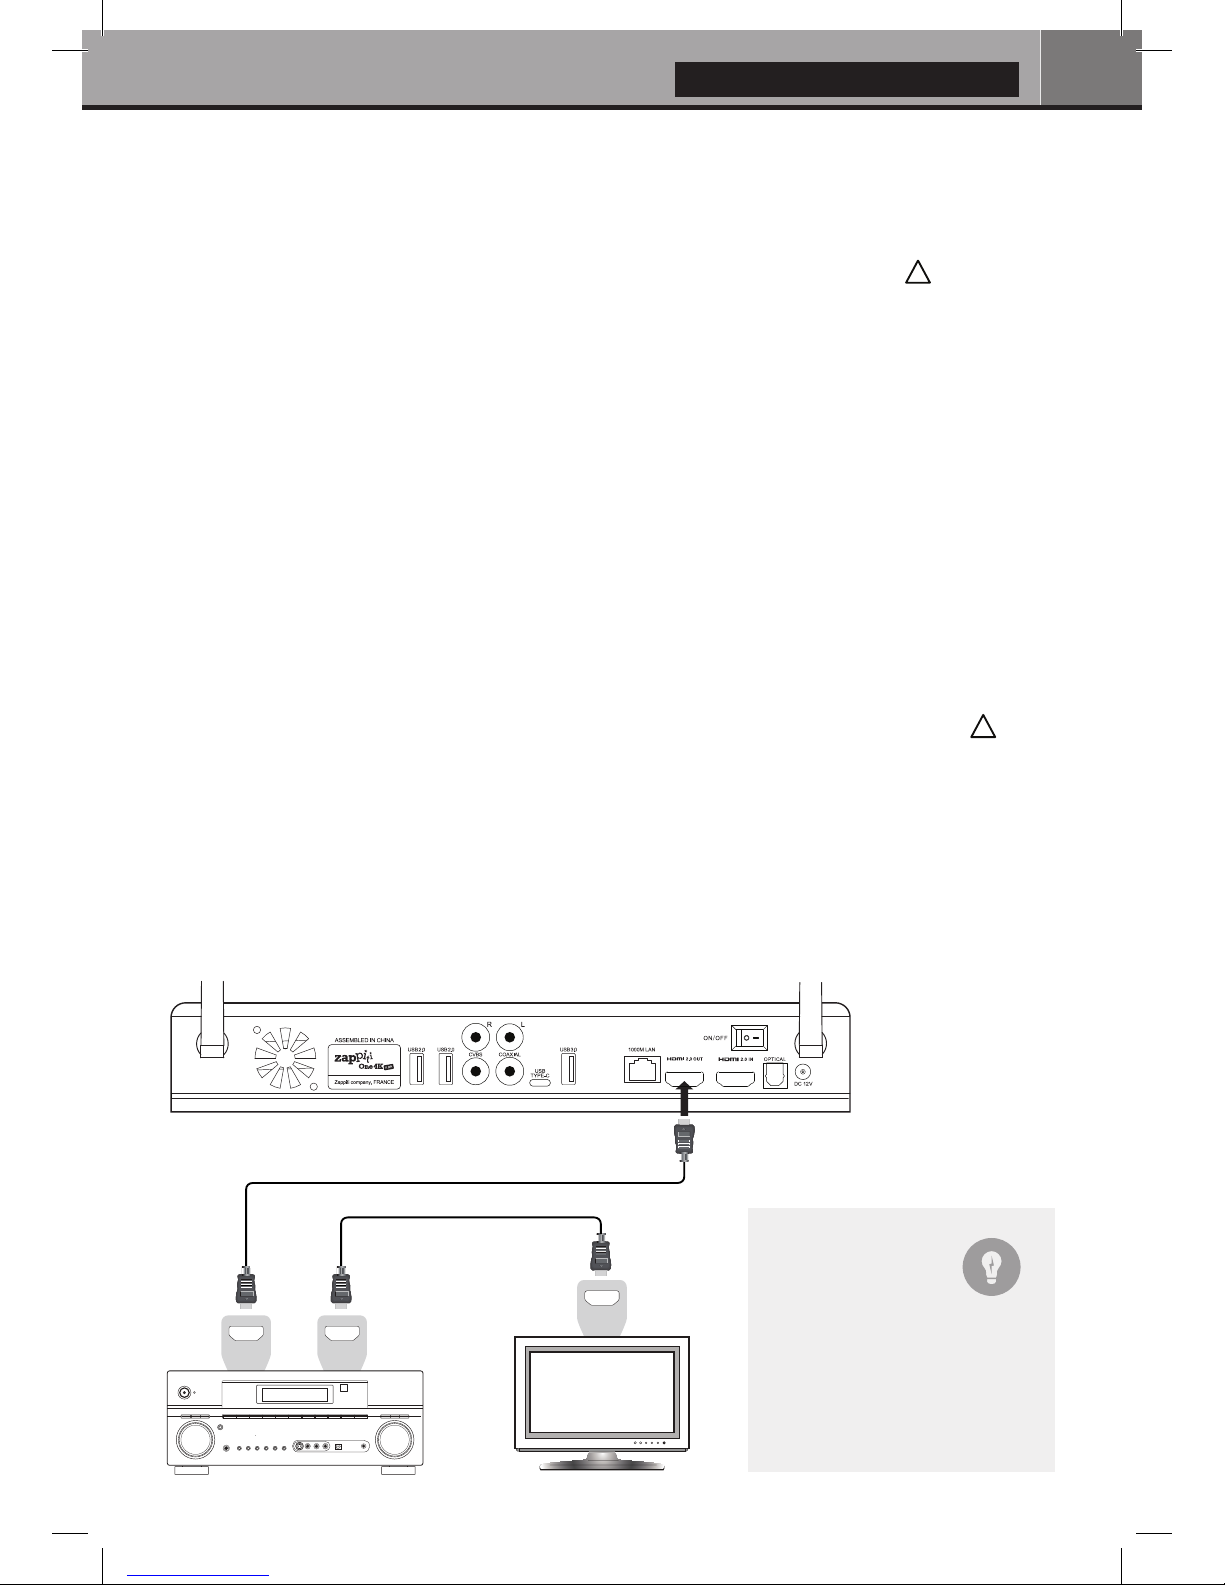
Getting Started, HDMI Outputs, Black Border Issue (overscan)
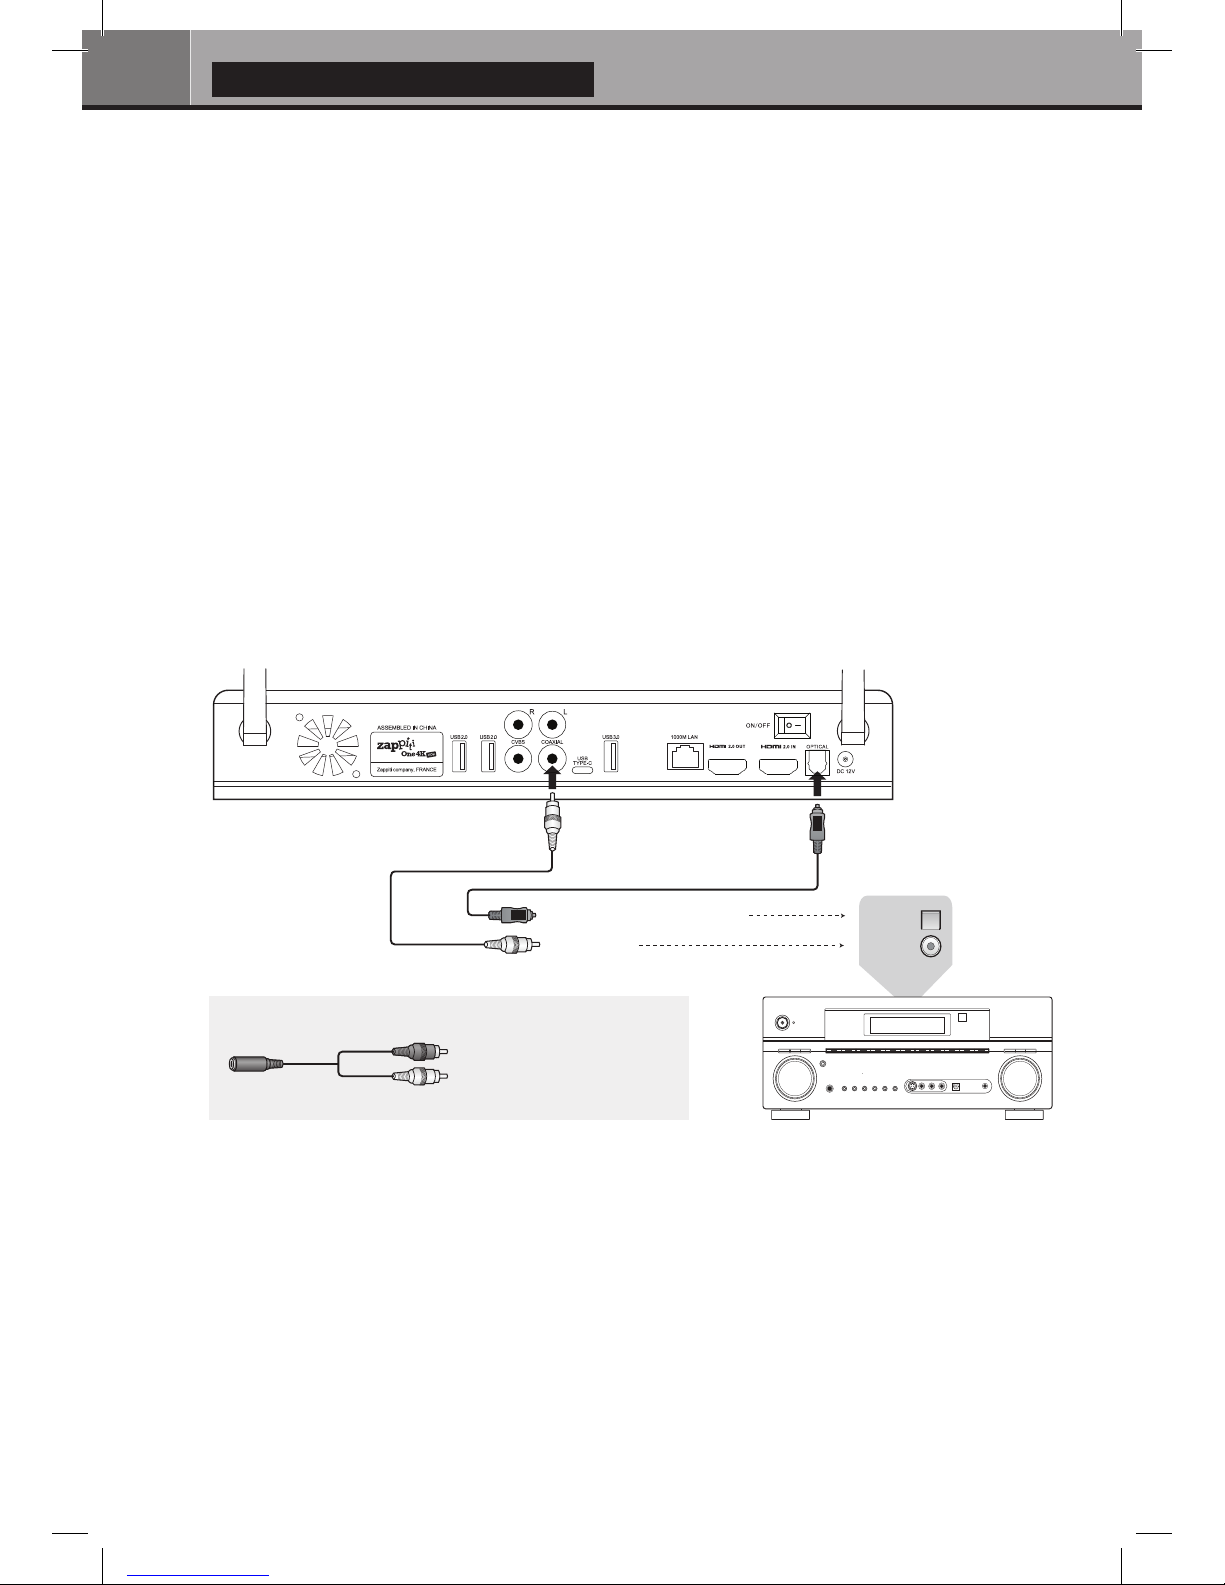
Firmware Upgrade, Audio & Video Settings
Connecting USB Drives, Using Internal Drive, SD / MMC Cards
Zappiti Video, Zappiti Music & Zappiti Explorer, Create an Account
Accessing Network Drives and Access to Zappiti Storage
How to Transfer Your Files Using Zappiti Explorer
Video And Audio Playback Options, Slideshow Function, Properties
Adding a Movie File, Deleting a Movie File
How to Identify Unidentified Movies, How to Identify 3D, 4K and UHD File
4 •
5 •
6 •
7 •
8 •
9 •
10 •
11 •
12 •
13 •
13 •
13 •
How to install an App, Add a Shorcut to the Home Page
13 •
Ethernet, Wi-Fi, Bluetooth, Audio/Video Mirroring14 •
Zappiti Music, How to Control Your Zappiti Using your Tablet / Smartphone14 •
15 •
16 •
16 •
Parental Control, Personal Categories, Zappiti On Start-Up, Subtitle options17 •
Default Subtitles and Language, User Support, Zappiti Db Community17 •
How to Create a Movie Collection in Zappiti Video
4
Table des matières
Français
Guide de démarrage rapide
18 •
19 •
20 •
21 •
22 •
23 •
24 •
25 •
26 •
26 •
27 •
27 •
27 •
28 •
28 •
29 •
30 •
Introduction, fonctions clés
Système de jaquettes intégré
Contenu de la boîte
Vues extérieures
Télécommande, Connectez un clavier ou une souris informatique
Démarrage, Bordure noire
Mise à jour firmware, Réglages audio et vidéo
Zappiti Video, Zappiti Music et Zappiti Explorer, Enregistrement
Disque dur externe, Périphérique USB, Disque dur interne
Utilisation de cartes mémoire SD
Accéder aux dossiers réseau
Copiez et gérez vos fichiers avec Zappiti Explorer
Fonction Diaporama, Touche Info, Installer une app, Ajouter un raccourci sur la page d’accueil
Ethernet, Wi-Fi, Bluetooth, Mirroring audio et vidéo
Zappiti Music, Contrôlez votre Zappiti via tablette / smartphone
Créer une collection de films / séries avec Zappiti Vidéo
Utilisation de Zappiti Vidéo, Film non trouvé, Fichiers 3D et UHD
31 •
16
Contrôle parental, Catégories personnelles, Zappiti au démarrage, Réglages des sous-titres
31 • Sous-titres et langue par défaut, Devenir contributeur Zappiti Db
31 • Installer une application tierce, Ajouter un raccourci sur la page d’accueil

Vote for Future Features
To propose a new function or vote for an upcoming feature, visit:
zappiti.uservoice.comzappiti.uservoice.com
4
Quick Start Guide
General
The Zappiti One 4K HDR is an all-in-one solution for video playback with HDMI 2.0, 10-bits, 4K60p,
HEVC, HDR and 3D MVC capabilities.
Key Features
HDR: Display your HDR video content, while also providing increased dynamic range.
4K 50/60p: Display your 4K video content in 3840x2160p at 50 Hz or 60 Hz (HDMI 2.0a).
MKV Player: Playback SD, HD and UHD video contents in MKV, M2TS, DVD / BD / UHD ISO
and other modern video file containers and formats, including top quality HEVC/H.265 video
codec, with very high bit-rates up to 400 Mbp/s.
HDD Rack Option with Hot Swap Function: Easily and quickly insert and exchange internal
3.5’’ SATA hard drives.
Network Player: Connect your Zappiti on your local network and enjoy your content from a
computer PC/MAC or a NAS via SMB.
USB Ports: Conveniently connect hard drives, USB flash drives, USB card readers, computer
mouse / keyboard, and other USB storage devices.
USB Port 3.0 and Type-C: Read or copy your files in ultra high speed.
Full Range of A/V Connectors: S/PDIF coaxial and optical audio output, audio analog RCA,
RCVBS, HDMI 2.0 CEC, HDMI Audio only, HDMI Input.
Multichannel home cinema audio: Bitstream (RAW), downmix LPCM stereo .
Hi-Res Music Playback: Play your Hi-Res Audio quality music files and control them from your
smartphone / tablet (iOS/Android) without the need of TV.
Video Output Flexibility: Output video in any resolution and format including SD, 1080p
(1920x1080), Ultra HD (3840x2160p) and true 4K (4096x2160p) up to 12-bit by primary color.
Auto Framerate: Auto framerate detection 24/50/60p (compatible 24.000 Hz / 23.976 Hz).
Playback Memory: Resume playback from the last position.
Advanced File Browser: Convenient file browser with powerful file management (select,
select all, copy, cut, past, delete, rename, ...).
Audio playback functions: Album cover art support, folder playback, random, repeat, loop...
Photo slideshows: Convenient features to easy create beautiful photo slideshow with music and
amazing transition effects.
Backlit Remote Control: High quality remote control with direct access and shortcuts with
backlit buttons and recordable buttons to control another device.
Wi-Fi 5 GHz with 2 dual antennas: Playback your video content wirelessly with high bitrate.
●
●
●
●
●
●
●
●
●
●
●
●
●
●
●
●
●
●

5
English
Organize your Video Collection with Movie Covers
●
●
●
●
●
●
●
●
●
●
●
●
●
Zappiti Video Interface: Browse your movie and TV show collection with cover art and media
information: (subtitles, actors, director, release date...). Zappiti features an automatic category index
of movies and TV shows directly to the player, without requiring a computer.
Zappiti Search: Easy access to your movies or TV shows, thanks to Zappiti powerful search engine
combined with smart filters (actor, director, length, rating, release date...).
Zappiti Stand-Alone: Add, edit or delete movie covers directly on your Zappiti via the remote
control (no PC required). Change the posters, edit the synopsis, change the associate category,
create and organize your own personal categories, etc.
Zappiti on Start-up: Enable/disable start-up for Zappiti Video from system boot by Zappiti setting.
Zappiti Collections: Create and manage one collection by each family member or one collection by
HDD and switch easily from one collection to another.
Parental control: With the parental control feature, you can designate movies as ‘‘children's’’ and
block access to other movies with a PIN code. Thus, your children can safely access only their
movies! In addition, the child mode provides direct access to movies for greater ease of use.
Movie sagas: The saga films are automatically placed in groups and sorted by release date. A saga
cover dedicated to the collection is associated with the group and movies are displayed in a stun-
ning carousel with great 3D motion effects!
Zappiti Off-line: Save a collection locally and use it without any Internet connection.
Zappiti Trailers: Watch the trailer of your movies.
Zappiti Bonus Live: Watch additional contents such as Making Of, Deleted Scenes, Extracts,
Reviews, Blooper Reel, ... The additional contents are regularly updated for more results.
Zappiti Sub: Easily download the subtitle of a movie or TV show episode, directly from the Zappiti.
Zappiti Sync: Thanks to Zappiti Sync, your movie collections are automatically synchronized to
your other Zappiti Player 4K (multiroom) and to all your computers MAC and PC!
Zappiti Explorer: Zappiti Explorer is the easiest way to launch the playback of most of multimedia
files such as UHD, BD and DVD ISO, BDMV, M2TS, MKV, MP4, MOV, MP3, FLAC, JPG...
Zappiti Explorer makes file exploration so easy!

6
Package Contents
Quick Start Guide
1. Zappiti One 4K HDR
2. IR remote control
3. Ethernet cable
4. USB Type-C cable
5. HDMI 4K cable
6. Power adaptor
7. Quick Install Guide
1
5
2
76
3 4
HDMI Cable
The supplied cable is compatible with 4K HDR. For longer lengths, we recommend the
cables offered on store.zappiti.com. All the proposed HDMI cables have been tested
in 3840x2160 resolution at 60 Hz, and in 4:4:4 / 10-bit in real situation on Zappiti 4K
HDR media players. By choosing one of the cables offered by Zappiti, you will have the
insurance of optimal operation. Indeed, a large number of HDMI cables yet certified 4K
60p and 2.0 are not compatible with Zappiti boosted video streams and it can happen
that the picture displays jerks, freezes, white pixels, or a black screen .
NOTE: Additional items (optional) may be included into the package, package, on player configuration, region,
and distributor.

7
English
1. Wi-Fi Antenna
2. USB 2.0 Host
3. Analog Video Output CVBS
4. Analog Audio Output Right / Left
5. Coaxial Digital Audio Output
6. USB TYPE-C
9. HDMI 2.0 Output
10. HDMI 2.0 Input
11. Optical Digital Audio Output
12. DC Power 12V 2A
13. Power Switch ON/OFF
7. USB 3.0 Host
8. LAN 10/100/1000
Front View
Side View (Right)
1. Rack HDD Door
1. USB 2.0 Host
2. Restore
3. SD/MMC Card Reader
1. LED Indicator
Side View (Left)
1
1
123
Rear view
12345 6 7 8 9 1011 1213

8
Remote Control
Quick Start Guide
1. POWER: Toggle power ON/OFF.
2. POWER ON: Power ON.
3. ZOOM: Zoom In / Out (overscan).
4. DELETE: Delete / Change home template.
5. POWER OFF: Power OFF.
6. ASP. RATIO: Switch the Aspect Ratio.
7. DIMMER: Toggle Front LED ON/OFF.
8. 3D: Toggle 3D mode (2D / 3D).
9. PREV: Go to the previous chapter.
10. PLAY/PAUSE: Start / Pause playback.
11. NEXT: Go to the next chapter.
12. ZAPPITI: Zappiti Media Center shortcut.
13. REPEAT: Repeat playback (file, all, off).
14. EXPLORER: Zappiti Explorer shortcut.
15. RED: For future function.
16. GREEN: Shortcut to Settings.
17. YELLOW: Shortcut to HDMI IN Recording page.
18. BLUE: Shortcut to Firmware Upgrade page.
19. HOME: Go to Main Menu (Home Page).
20. MOUSE: Switch to the virtual mouse mode.
21. MENU: Show / Hide the pop-up menu.
22. BACK: Return or Stop playback.
23-26. ARROWS: Navigate menu selection.
23,25. UP: Fast forward. DOWN: Fast backward.
24,26. LEFT/RIGHT: Timeline navigation (+/-1 min).
27. OK: Enter or validate the current item.
28-29. VOLUME +/-: Increase / Decrease volume.
30. INFO: Show / Hide the pop-up info (properties).
31-32. PAGE+/-: Timeline navigation (+/-10 sec).
33. MUTE: Mute audio.
34. NUMBER Buttons:
- 1-9: direct playback access to 10 - 90%.
- 0: Restart the playback from the beginning.
35. SUBTITLE: Subtitle switch / settings.
36. AUDIO: Audio track switch.
37-41. TV: TV remote.
37. POWER: Toggle power ON / OFF.
38-39. VOLUME +/-: Increase / Decrease volume.
41. LEARN: Record an external RC.
RC/BACKLIT: Activate backlit.
1
4
5
8
11
14
18
17
20
23
22
26
31
32
33
36
40
39
3
2
7
6
10
9
13
12
15
16
19
21
27
24
25
30
28
29
34
35
37
38
41
LEARN
Programming Buttons
1. Press and hold the LEARN button (41) until the ON button is lit in red (not blinking).
2. Please take the TV remote control then press and hold the button you want to learn (example Vol +) until the
Zappiti remote's ON button flashes red (blinking).
3. Take the Zappiti remote control and press the button (37-40) you want to assign to the programming
(example Vol +).
4. Repeat steps 2 and 3 for the other buttons to be programmed.
5. To finish programming, quickly press the LEARN button (41).
Note: It is possible to connect a keyboard and a computer mouse to the Zappiti. By default, the keyboard is set
in QWERTY. To switch the keyboard recognition to AZERTY or other key position, first connect your keyboard
to one of the available USB ports. Press the GREEN button on the remote control to access the Android settings.
Then, click Languages & input. Finally, choose your language in Current Keyboard section, Android
Keyboard & Physical Keyboard. Warning! The mouse is not compatible with Zappiti Video, Zappiti Music and
Zappiti Explorer apps. But it can be useful for third-party apps downloaded from GooglePlay or AptoideTV.

HDMI
IN
HDMI
OUT
9
English
● Please use alkaline AA batteries. Please observe polarity when inserting batteries.
● Please Remove the plastic film from the Z logo of the front panel. The IR led is located behind.
● If RC functions only at short distances or stops functioning, make sure to replace the batteries.
● Point the remote control at the Zappiti. There must be no obstacles between the RC and the media player.
● Some RC buttons may be available only in certain player modes or only during playback of a certain content.
Getting Started
Please make sure there is enough space around the device for proper cooling (10 cm at minimum).
Ensure the remote control has batteries installed. Connect the player to your TV and other A/V equipment in
an appropriate way. Use HDMI connection to get the best possible audio and video quality. Make sure
to power off the player and related A/V equipment before connecting them. Ensure your TV and other
A/V equipment are configured to use proper inputs/outputs. For the best audio & video experience,
please use the HDMI output.
***Please make sure to use HDMI OUT and not HDMI IN connection to link your Zappiti to your
TV or your front projector (or to your AV receiver or soundbar if you are using it).
Switch on the Zappiti. The media player will perform its initial boot up procedure, which may take up to
about 1 minute (depends on apps). During the boot up procedure, “Z” logo is shown on the TV.
***If you have a black screen or no video signal, please visit the Zappiti Knowledge Base.
zappiti.uservoice.com/knowledgebase
Finally, you should see the main screen with access to applications Video (Media Center), Music and
Explorer. On the top you’ll find access to the Settings and MyApps.
To adjust the player settings, press the GREEN button of your RC or click on “SETTINGS” item located
on the top of the screen. In particular, you can adjust the following settings: video, audio, and network
configurations. To choose the language of the Android menus, please use: Settings / Personal /
Language & input setting. Zappiti apps use specific language settings. To set Default Audio Language,
during video playback, press the MENU button of your RC, and click on Advance. Then you will be able
to set the Default Audio and Subtitle language.
HDMI Out
Zappiti back panel
AV Receiver TV / projector
AUDIO/VIDEO MULTI-CHANNEL
RECEIVER
Black Border
& Overscan
If you have a black border
problem all around the screen,
press the "zoom" button on the
remote control (3). You can
also adjust the aspect ratio of
your TV (Fit to Screen option).
!
!
HDMI
IN

10 Quick Start Guide
Firmware Upgrade
To access the Firmware upgrade page and update the firmware online or via USB, please press the
BLUE button of the RC. To check the most recent changes, latest firmware versions and get recovery
firmware, please visit our website at: zappiti.com/firmwares
Audio Setup
The Audio section of the Settings Menu allows you to configure preferences for audio output formats.
To access the audio settings, please go to “Settings/Device/Sound and notification”. If you are
using an AV receiver compatible with HDMI and multichannel audio, please set the HDMI output to
“Auto”. If your AV receiver is compatible HDMI but not compatible HDR, please connect your Zappiti
to your AV receiver using the S/PDIF output. You can also force it to “RAW” (Bitstream). If your AV
receiver is not compatible with DTS and Dolby Digital, please set the S/PDIF output to LPCM 2Ch.
Force SD Audio: The S/PDIF does not support HD Audio such as DTS-HD or Dolby TrueHD. To
convert HD audio into SD Audio (DTS-HD to DTS or Dolby TrueHD to Dolby Digital), please switch “ON”
the Force SD Audio option located in Settings/Developer options. More info:
zappiti.uservoice.com/knowledgebase
Video Setup
By default, the Zappiti is able to auto adjust the video output. But you can manually select the resolution
and frequency of the GUI. To force the output resolution, please switch “ON” the Ignoring HDMI EDID
option located in Settings/Developer options. Then go back to the general settings by pressing the
BACK button of your RC, and go to “Display”. You will be able to see all the output modes available
in Manual Settings but the Auto mode will be not available anymore. To adjust the Color Space and the
Deep Color (OFF/10/12-Bit), go to Settings/Developer options. For the best performances, we
advise you the following settings: Y’CbCr 4:4:4 / 10-Bit (if your display is compatible).
Note: the auto framerate is still activated even if you force the HDMI output in a specific
resolution/frequency, however, in some cases, the manual resolution mode can generate some issues.
AUDIO/VIDEOMULTI-CHANNEL
RECEIVER
Coaxial In
Optical In
Please connect one of these cables:
SPDIF Optical (Toshlink) cable
Coaxial cable
Zappiti back panel
AV Receiver
Headphones
To connect wired headphones,
please use RCA to 3.5 mm
female adapter. Then, connect
the RCA connectors to the
RCA inputs of the Zappiti.
For video playback without audio-video sync issue, please choose a
wireless headphones compatible with Apt-X Low Latency technology.
Zappiti RCA OutputHeadphones

11
English
Use the RC buttons UP, DOWN, LEFT, RIGHT, OK, RETURN to navigate through the player menu.
Use the MENU RC button to show the list of available commands. Use the INFO RC button to show
the INFO panel.
The Home Page features 3 main applications: Zappiti Video, Zappiti Music and Zappiti Explorer.
Zappiti Video
Zappiti Video is a media player, software and entertainment hub, featuring an impressive user interface
with movie covers. With Zappiti Video, you can experience your entire movie and TV series collection,
browse and play your titles from local and network storage media, view cast information, download
subtitles, play trailers and much more.
Zappiti Music
Zappiti Music is an app dedicated to music playback designed for Zappiti players. Listen to your favorite
tracks, and manage your music collection in a simple way. With Zappiti Music you can play your favorite
music stored anywhere on your home network or on a local drive connected to your Zappiti media
player. With Zappiti Music, you can control your music playback through your Zappiti media player,
from your smartphone or tablet (iOS or Android) without the need of TV. Select the Zappiti media player
you want to control and manage your music collection directly from your tablet or smartphone.
Zappiti Explorer
Zappiti Explorer is a File Manager. You can easy explore and launch playback of your music, pictures
and video content. But Zappiti Explorer is more than just a file explorer — it also provides many
advanced multimedia features and a complete file management system.
Before to start using the Zappiti apps, you have to create a Zappiti account and register your device.
First, connect your media player to Internet through Wi-Fi or Ethernet. Please launch one app and
select you language. Then, follow the on-screen instructions. If you have never used Zappiti before and
if you don’t have any Zappiti account, please click on Create an account now.
Then, you’ll be invited to enter your Zappiti Token. The token number is printed on a sticker located
under the Zappiti case. You’ll have to enter it only one time. Then, all the info of your account will be
saved in the internal memory.
Login
Click here to create
a Zappiti account
Email
Login
Create an account now
Forgotten password?Return
Password
Note: If you do not have any Internet connection, you can explore your files using:
MyApps/Media Browser.

12 Quick Start Guide
Using Internal Drive
To insert the internal 3.5’’ SATA HDD, please open the rack door, then insert the drive into the internal
enclosure until 3/4, then complete the installation by closing the door. This operation will complete the
installation of the disk into the rack. The Zappiti media player is compatible with drives formatted in
NTFS, ExFAT, FAT16, FAT32, HFS, EXT2/3. It is not possible to format hard drives via the Zappiti. You
must use a computer for this purpose. In case of NTFS GPT, please use 64 Ko allocation tables. To use
a 2.5" internal drive, please use an adapter box.
Note: Please make sure that your hard drive is correctly formatted before you insert it in the tray. The
hard drives dedicated to NAS are not compatible.
More info: zappiti.uservoice.com/knowledgebase
Connecting USB Drives
You can connect your USB drives to one of the
available USB ports. If you want to play video
files, USB 2.0 is enough to support very high
bitrate (up to 480 Mbps). If you want to transfer
files, we advise you to use USB 3.0 or USB
Type-C (not available on Zappiti Mini 4K HDR
model).
***Note: A dedicated USB icon located on the
home page can help you to detect if the drive is
connected correctly.
Power provided by USB ports may not be
enough to allow the USB drive to function
correctly; depending on the drive. Please do not
disconnect or switch off the USB drive during
write (copy / transfer) operations.
The Zappiti players are compatible with UASP
HDD docking stations as well as USB hubs.
Using SD / MMC Memory Cards
To use a memory card, insert it in the memory card slot located on the left side of the media player. It will be
detected as USB device (USB icon on the home page). Some SD memory cards may not be recognized by
the player or may work incorrectly ; in such case, please use a different model of memory card.
Zappiti Side View (right)
Open the tray and insert the HDD,
keeping the connectors on the front
External USB
If you are using an external HDD 2.5’’, please use
the USB cable provided with your HDD for best
performance.
Zappiti back panel
External HDD
Pre-formated HDDs are
available on sale here:
store.zappiti.com

13
English
Accessing Network Drives and Access to Zappiti Storage
The Zappiti media player features a Samba client (SMB) to explore and playback your videos, pictures
and music, located on your local network (NAS, computers, ...). The SMB Server is activated by default.
You can access your Zappiti using the Zappiti IP address as following: \\192.168.1.15 (example). To find
the IP address of your Zappiti, go to: SETTINGS (GREEN button of the RC) / Ethernet Configuration.
More info about SMB Server, FTP and DLNA Server here: zappiti.uservoice.com/knowledgebase
The Zappiti media player also features a function called Zappiti Share, based on Samba server technology.
This allows you to access your video, pictures and music content, located on internal HDDs (or local drive
connected in USB to the media player) from another Zappiti player 4K or 4K HDR through your local
network. You can playback video contents, in 5 different rooms simultaneously, equipped with Zappiti
media players. Thanks to Zappiti Share, a NAS server or computer is not required to stream your
media content in different rooms of your home. To use Zappiti Share, please select Zappiti Share
instead of Local drive in the Zappiti Video Folder Configuration.
How to Transfer your Files Using Zappiti Explorer
Slideshow Function
Zappiti Explorer offers a slideshow function with
cross fades and transition effects. To access the
slide show display settings including the frame
time, transitions and effects, press the MENU
button on the remote control (slide show off). To
add a music to a slide show, simply place an audio
file in the folder containing your pictures. If several
audio files are in the same folder as the photos,
the tracks will be linked one after the other and
played in alphanumeric order.
Properties
To view the complete technical information of
the file being played, press the INFO button on
the remote control. You will find in particular,
the datarate, framerate, video and audio codec
and format, size, resolution, and more...
How to Install a New App
To install a new app, please go to My Apps /
AptoideTV. You’ll find many apps dedicated
to media players that can be controlled by RC.
You can also use GooglePlay but some apps
may be not compatible with the Zappiti. If you
want to install an APK from a USB stick, please
use Zappiti Explorer or MediaBrowser.
How to add an App Shortcut
to the Home Page
To add a shortcut to a favorite app on the
home page, please click on icon and select
your favorite app to add it to the home page.
Zappiti Explorer is a File Explorer, but also a
complete file manager with features such as:
Copy, Cut, Paste, Select, Select All, Delete, and
Rename. Zappiti Explorer is also multi-tasking. To
access these functions and display the task
manager, press the MENU button on the Zappiti's
remote control.
Video And Audio Playback Options
The Zappiti Explorer MENU also provides access
to various video and audio playback options such
as sequencing of file playback, loop playback, ...
Copy
Cut
Paste
Rename
Delete

14
Ethernet
The Zappiti provides two network connection methods: through Ethernet cable or through the built-in
wireless LAN adapter. For the fastest and most stable network connection, we recommend using an
Ethernet cable whenever possible. Plug one end of a network cable (straight Ethernet cable) into the
LAN port on the back of the Zappiti (Category 5E or more). Then, plug the other end of the network cable
into a LAN port on the broadband router or modem (or switch if you are using one).
Zappiti Music
On the main page of the Zappiti, you will find Zappiti Music, an app dedicated to Music playback. Use the
UP/DOWN button to browse your music folders. Use the RIGHT button to access the additional options.
Press ENTER on Favorite button to mark the current track as Favorite. Press ENTER 2 times on Favorite
button to mark the current track as Excluded track. To create a folder shortcut, select a folder, press
MENU and press ENTER on Create a shortcut. The shortcut will be placed on the Zappiti Music home
page. Press ENTER on to filter a music title by entering a keyword.
How to Control your Zappiti Using your Tablet/Smartphone
You can also control the Music and Video playback using the dedicated apps named Zappiti Video
Control and Zappiti Music Control available for iOS and Android. To install them, switch on your tablet or
smartphone, then go to the Play Store (Android) or App Store and search them using Zappiti control
keywords. Then, launch the app and enter your zappiti account credentials. You will be access to you
video and music contents and control the music without the need of TV. More info on: zappiti.com
Quick Start Guide
Internet Connection
WAN 1 2LAN3 4
Internet Ethernet cable
LAN
Router / Modem
Favorite Excluded Unchained Chained Shuffle ABC order Loop Loop Off Playlist
Add to
playlist
Zappiti rear panel
Wi-Fi
To set the wireless feature, please click
on the “Settings” icon located on the
top of the home page, then click on the
Wi-Fi settings. You will be able to select
a wireless network and enter the
security password.
Bluetooth
The Zappiti player is compatible with
devices using Bluetooth technology. To
access the list of Bluetooth-enabled
devices, go to Settings / Bluetooth.
Then switch the option to “On”.
Audio & Video Mirorring
For more info about mirorring audio & video, please search
“mirroring” using the search engine in the Knowledge Base
here: zappiti.uservoice.com/knowledgebase

15
English
How to Create a Movie Collection in Zappiti Video
Before starting, you must create a folder named MOVIE on your HDD. Then, place all your movies inside
this folder. If you have TV shows, place them in a dedicated folder named SERIES or TV SHOWS.
Movies
1. On your NAS or HDD, please create a movie folder named MOVIES. Place all your movie files in it.
2. Your files should be named with the title of each movie. For example, the file of the movie "Metropolis"
should be named "Metropolis.mkv". You can create subfolders in the folder MOVIES if you want.
TV Shows / TV Series
1. On your NAS or HDD, please create a folder named SERIES or TV SHOWS .
2. Then, create a subfolder for each TV Show / Series. You can create a subfolder for each season if you
want. Then, place all your TV Show episodes in it.
3. Your episodes must be named as: "Seriename s01e01" ("Seriename 1x01" also supported).
For the special episodes, please name them as: ‘‘s00e01’’.
On the Folder configuration window, please click on Add a folder containing movies (or TV Shows).
If your files are located on a local storage, please click on Local drives. If you want to share your video
contents with others Zappiti players though your local network, click on Zappiti Share. Then click on the
storage name. Next, browse it and go inside the Movies (or TV Shows) folder. Finally, when you are in
the folder MOVIES (or TV SHOWS) click on OK button.
WARNING! When you are in the folder containing your movies or TV Shows DON'T EXPLORE THE
MOVIE FOLDERS! Just press OK button. If not, Zappiti will analyse only one movie instead of all the
movies. You should add your "MOVIES" folder. Do not add a folder containing only one movie.
Your folder will be added in the MOVIE folder list (or TV SHOW). You can check the path by looking on
the generated path located between "MOVIES" button and "Edit" button. Your path should stop to the
"MOVIES" folder (or "FILMS" folder). If your path is incorrect, you can modify it by using the Edit button.
Press Delete button to delete the folder from Zappiti. (Don't worry! Your movies will not be deleted).
If you want to add another folder containing movies or TV Shows, please click on the dedicated button.
Done! Now you can enjoy your Zappiti collection! To access to the settings panel again, press the MENU
button on your remote control. In the settings panel, you’ll find many options such as: language (GUI and
identification), translations, templates, top movie cover, glass effect, parental control, identification on
startup and other options, terms to exclude, token and other account administration.
More info here: zappiti.uservoice.com/knowledgebase
Start your Zappiti. On the main page,
click on the first button named VIDEO.
Choose your language and enter your
login. If you do not have any Zappiti
account, please report to page 11.
Then, click on the button Connection
located on the bottom of the window.
Then, press RETURN if you don’t want to
add another folder containing movies.
Zappiti will start to scan your folders and
analyse your video contents. You can see
the current scan task in a dedicated
panel. To close the current task panel,
press the RETURN button of your RC. If
you close it, you can display it again
through the MENU button of your RC.
Connection
Collection 1
Zappiti Cloud
my[email protected]Zappiti Accounts
Zappiti Servers
Collections
Connection
Folders
Files
EditMovies /storage/HDD/Films
Storage ID: fs3sho54suey-ya55h4st7e-syot563lj3a
Delete
Add a folder containing TV shows
Add a folder containing movies

If you get a wrong storage
ID with « 00000000000 »,
it means that Zappiti
cannot write on the drive
due a defective sector.
Please format it again.
To access to additional features,
press MENU button of your IR
remote control.
ALL
In this section you can find all your video contents sorted by
alphabetical order.
MOVIES
In this section you can find all your movies.
TV SHOWS
In this section you can find all your TV Shows and Series Episodes.
RECENT
In this section you can find the most recent video contents.
CATEGORIES
In this section you can find your video contents sorted by categories.
Adding a Movie File
When you add a movie file to your ‘Movies’ folder, Zappiti will automatically index it during the next restart
of the application. To force the analysis, please use the dedicated option located in the Zappiti Menu.
(Please use the MENU button on the remote).
Deleting a Movie File
When you delete a movie file from your ‘Movies’ folder, Zappiti automatically removes its cover and
descriptive page from your Zappiti collection during the next analysis. You can manually remove a movie
using the Delete option located in the Zappiti menu.
How to Identify Unidentified Movies & TV Shows
Even if your files are not named correctly with the name of the film (or TV show), Zappiti can identify it
but only if a Zappiti user previously identified it manually. If you are living in a country where Zappiti is
not yet popular, which could happened often at the beginning, mostly if you are using a Zappiti NAS Rip
because the generated files are rarely named correctly. But day after day, Zappiti Db will become more
and more reliable as users will manually identify files of movies and TV series.
Press MENU of the RC and select X to Identify. You’ll see the list of the files that are not identified. Then,
click on the button named Identify... On the Identify window, please enter again the movie name.
You can also enter the IMDb, TMDb or TVDb ID code to identify your movie or your TV show. On TMDb,
TVDb or IMDb, the ID code is located in the URL of the movie page. For instance, the URL of the movie
"Metropolis" will be "http://www.imdb.com/title/tt0017136/". Enter the ID number "tt0017136" into the
field instead of the title name. Then press the "Search" button. Zappiti will find the right movie at 100%.
If your movie or TV show does not exist on TMDb or TVDb, you can add it by creating an account on it.
3D, 4K and UHD Files
The 3D BD ISO, UHD ISO and 4K ISO files as well as BDMV folders for 3D and 4K UHD are not identified
automatically. To identify the container, please add the following tags in the name as following:
3D Files: "3D". (For exemple: "Metropolis.3D.iso").
UHD Files: "UHD" or "ULTRAHD" or "ULTRA-HD". (For exemple: "Metropolis.UHD.iso").
4K Files: "4K" or "4096" (For exemple: "Metropolis.2160x4096.iso").
16 Quick Start Guide
/storage/HDD/Films
Storage ID: 000000000000000

17
Parental Control
To tag a movie as Allow for children, select a movie (or a group
of movies), then press the MENU button on the RC and click on
Allow for children. Then, enter a 4-digit pin code.
Personal Categories
By default, the movies and TV shows are automatically associated to
categories. But you can create your own categories and associate
manually your movies. To create a category, go the categories, then
press MENU and click on Create a categorie. Then, enter a name and
choose an icon. The contextual menu give also access to additional
options such as: modify the position of the categories, edit or remove.
Zappiti On Start-Up
To activate this function, press MENU, then go to Settings, click on
the second tab and switch ON the option in the list.
Filter and Sort
To sort your movies, press MENU, then go to Filter and sort. Then
click on the first item. Then select the sorting: A to Z, Z to A,
Release date, Duration, Addition... To filter your movies, please
click the following options: Seen, Ongoing, or Not seen.
Subtitle Display Options
To change the subtitle display options such as color, position, or
sync, press the MENU button on the remote control during video
playback, then go to Subtitle and change the desired option. To
change the vertical position of the Blu-ray subtitles (PGS), go to
the ADVANCE section, then click on PGS Subtitle Offset and
decrease or increase the vertical position of the subtitles. To add
external subtitles, please use the same name of the video file as
following: Metropolis.mkv / Metropolis-en.srt / Metropolis-es.srt
User Support & Zappiti Db
For User Support, please contact us at:
To join the Zappiti Db Community and create movie covers and
fanarts for Zappiti, please contact us at:
English
Decreasing Release date
Filter and sort
Seen videos
Ongoing videos
Not seen videos
Please enter a 4-digit pin code.
This code will allow you to lock your collection
and restrict access to movie tagged ‘‘Allowed for
children’’.
Cancel
Parental code
*7
Third Party
Control
You can control your Zappiti
using third party devices
such as Control4, Crestron,
ProControl, RTI, Logitech,
Pronto, ...
More info:
zappiti.uservoice.com/
knowledgebase
Factory Reset
To reset the Zappiti, go to
MyApps / Factory Reset.
Auto launch Zappiti on start-up
Auto-start

18 Guide de démarrage rapide
Introduction
Le Zappiti One 4K HDR est un lecteur multimédia compatible HDMI 2.0, 10-bits, 4K60p, HDR et 3D.
Fonctions clés
HDR : Affichez vos vidéos HDR pour plus de dynamique sur votre écran compatible HDR.
4K 50/60p : Affichez vos contenus vidéo de résolution 3840x2160p en 50 Hz/60 Hz.
3D : Compatibilité 3D MVC (Frame Packing), SbS et Top Bottom. Conversion 2D/3D.
MKV : Lecture de contenu vidéo SD, HD et UHD en format MKV et autres formats de fichiers
vidéo récents, tels que HEVC / H.265 pour une qualité supérieure jusqu’à plus de 400 Mb/s.
Rack à disque dur à échange à chaud : Insérez et interchangez facilement vos HDDs.
Lecteur réseau : Lisez vos contenus multimédia stockés sur votre réseau local via SMB.
Ports USB : Connectez facilement des disques durs, clés USB, et autres périphériques USB.
Port USB 3.0 et Type-C : Lisez ou copiez vos fichiers à très haut débit.
Connectique A/V complète : Sorties audio numérique S/PDIF coaxiale et optique, audio
analogique, HDMI 2.0 CEC, Vidéo Composite, report IR.
Son home cinéma multicanal : Bitstream, downmix stéréo.
Zappiti Music Control : Pilotez la musique depuis votre tablette / smartphone sans TV.
Flexibilité de sortie vidéo : Affichage vidéo dans différentes résolutions et fréquences, dont
SD, 1080p (1920x1080), Ultra HD (3840x2160p) et 4K (4096x2160p) jusqu’à 12 bits.
Auto Framerate : Détection automatique de la fréquence d’image 23,976/24/29,97/30/50/60p
Playback Memory : Reprise de lecture automatique depuis la dernière position de lecture.
Langue et sous-titres par défaut : Choix automatique de la langue et sous-titres par défaut.
Explorateur de fichiers : Explorateur et gestionnaire de fichiers (copier-coller, supprimer, ...).
Fonctions de lecture audio : Prise en charge des pochettes d’album et tags, lecture de
dossier, lecture mélangée, favoris, répétition, boucle, listes de lecture (playlists).
Diaporama musical : Fonction diaporama musical avec options de transitions dynamiques.
Télécommande rétro-éclairée :Télécommande rétro-éclairée avec boutons d’accès directs.
Wi-Fi 5 GHz double antennes détachables : Lecture et transfert sans fil à haut débit.
Voter pour les futures fonctionnalités
Pour proposer une nouvelle fonctionnalité ou voter pour une fonction à venir, consulter la page
suivante: zappiti.uservoice.com
●
●
●
●
●
●
●
●
●
●
●
●
●
●
●
●
●
●
●
●

19
Français
Système de jaquettes intégré
●
●
●
●
●
●
●
●
●
●
●
●
Jaquettes : Système d’exploration par jaquettes pour vos films et séries TV avec présentation
des informations (sous-titres, acteurs, réalisateur, date de sortie...). Indexation automatique des
films et séries TV par genre. Affichage sur 2, 3, 4 ou 5 lignes de jaquettes.
Moteur de recherche : Retrouvez facilement vos films et séries TV - puissant moteur de
recherche, filtres et tris (acteurs, réalisateur, durée, note, date de sortie, …).
Édition depuis le lecteur Zappiti : Éditez ou supprimez les fiches de films directement à l'aide
de la télécommande. Changez les posters, éditez les synopsis, modifiez la catégorie, etc.
Zappiti au démarrage : Lancez automatiquement Zappiti Video au démarrage du lecteur.
Multi collections : Créez une collection de films et séries TV par membre de votre famille ou par
disque dur et passez facilement de l'une à l'autre.
Contrôle parental : Grâce à la fonction de contrôle parental, vous pourrez marquer vos films en
tant que « film pour enfant » et verrouiller l'accès aux autres films avec un code PIN. Ainsi, vos
enfants pourront accéder en toute sécurité à leurs films! En plus, le mode enfant propose un
accès direct aux films sans les synopsis pour une plus grande simplicité d'utilisation.
Sagas : Les films d’une saga sont automatiquement placés dans un groupe et triés par date de
sortie. Une pochette dédiée à la collection est associée au groupe et les films sont affichés dans
un magnifique carousel 3D du plus bel effet!
Zappiti Offline (hors ligne) : Sauvegardez votre collection dans le lecteur pour une utilisation
locale sans connection Internet.
Bandes annonces : Visualisez la bande annonce de vos films en langue française.
Bonus Live : Accédez aux contenus associés à vos films tels que making of, scènes coupées,
extraits, critiques, bêtisiers, bande originales.
Téléchargement automatique de sous-titres : Grâce à Zappiti, vous pouvez télécharger en un
clic les sous-titres d'un épisode de série TV ou d'un film.
Zappiti Explorer : Explorez vos dossiers et lancez la lecture de vos fichiers vidéo d'une manière
simple et rapide.

20 Guide de démarrage rapide
1. Zappiti One 4K HDR
2. Télécommande IR
3. Câble Ethernet
4. Câble USB Type C
5. Câble HDMI 4K
6. Adaptateur secteur
7. Manuel d’utilisation
NOTE : des accessoires supplémentaires (optionnels) peuvent être inclus dans la boîte en fonction du pays,
du distributeur et de la configuration du lecteur.
Câble HDMI
Le câble fourni est compatible 4K HDR. Pour de plus grandes longueurs, nous vous
recommandons les câbles proposés sur le site store.zappiti.com. Tous les câbles
proposés ont été testés en résolution 3840x2160 à la fréquence de 60 Hz, et en 4:4:4 /
10 bits en situation réelle sur des lecteurs Zappiti 4K HDR. En choisissant l’un des
câbles proposés par Zappiti, vous aurez la certitude d’un fonctionnement optimal. En
effet, un grand nombre de câbles HDMI pourtant certifiés 4K 60p et 2.0 ne sont pas
compatibles avec les flux vidéo boostés des lecteurs Zappiti et il peut arriver que
l’image présente des saccades, des pauses, des pixels blancs, ou un écran noir.
Accessoires fournis
1
5
2
76
3 4
This manual suits for next models
2
Table of contents
Languages: