manuals.online logo
Brands
  1. Home
  2. •
  3. Brands
  4. •
  5. ZComax
  6. •
  7. Wireless Access Point
  8. •
  9. ZComax ZN-7100 Series User manual

ZComax ZN-7100 Series User manual

ZN-7100 SERIES
Wireless Access Point
Quick Setup Guide
This Quick Setup Guide provides step-by-
step instructions on how to set up your ZN-
7100 Series Access Point. After completing
the steps described in this Guide, you will
be able to place the AP at your site and
provide wireless network access to users.
PACKAGE CONTENTS
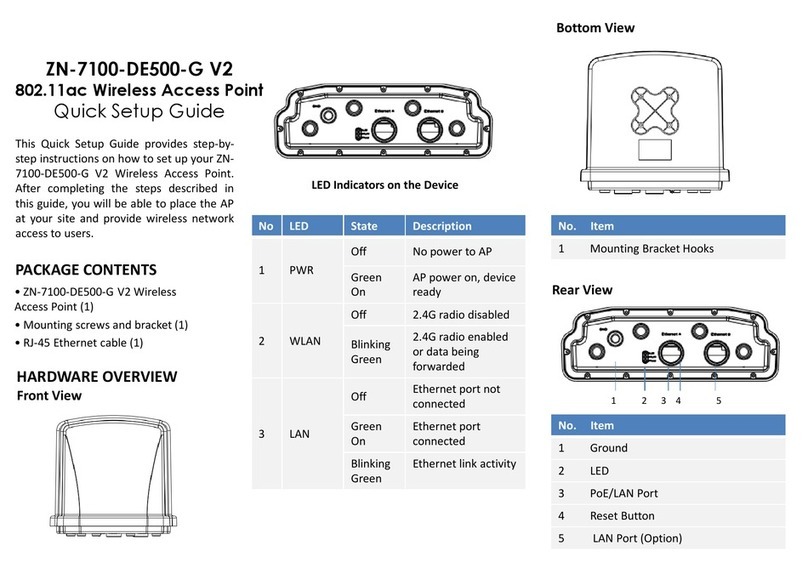
HARDWARE OVERVIEW
Front View
No
LED
State
Description
3
WLAN2
On
5G radio enabled
Off
5G radio disabled
Rapid
Blinking
Data forwarding
through 5G radio
4
LAN
Green
On
Ethernet is linked
Off
No Link
Blinking
Ongoing data
transmission
Rear View
No. Item
1 Reset Pinhole
2 LAN/PoE
3 48VDC
SETUP REQUIREMENTS
Before installing your ZN-1000 Series Access Point,
be sure that you have the following:
No. Item
1 LED Indicators
No
LED
State
Description
1
Power
On
Power on, device
ready
Off
No power to AP
Blinking
System initializing
2
WLAN1
Solid
Green
2.4G radio enabled
Off
2.4G radio
disabled
Rapid
Blinking
Data forwarding
through 2.4G radio
•
A computer running Windows 7, Vista, or XP
•
A CAT5 UTP cable of required length
•
One of the following power sources:
-IEEE 802.3at-compliant Power over Ethernet
(PoE) source
-Power adapter came with thepackage
STEP 1: POWER ON THE AP
1. Using the shipped power adapter to connectto
rear side of the AP. Then connect the power
plug to a wall socket.
Alternatively,you may connect the PoE port to a
PoE switch for power and networkconnectivity.
2. After a minute, verify that the PWR LED isa
steady ON.
STEP 2: CONNECT THE AP TO YOUR PC
1.
Using an Ethernet cable to connectyour PC’s
Ethernet port to the LAN port on the rear of
the AP.
2.
Start > Settings > Network Connections
Start > Control Panel > Network Connections
3.
When the Network Connections window
appears, right-click the icon for Local Area
Connection, and then click select Properties.
4.
Select Internet Protocol (TCP/IP) from the
scrolling list, and then clickProperties.
5.
Select Use the following IP address option (if it
is not already selected), and then make the
following entries:
•
IP address: Any address in the 192.168.1.x
network
• Subnet mask: 255.255.255.0
6.
Click OK to save your changes, and exit the
dialog box.
STEP 3: LOG INTO THE AP
1. On your PC, open a Web browser window.
2. In the browser, type https://192.168.1.1 and
press <Enter> to connect to theAP.
3. When a security alert dialog box appears,click
OK/Yes to proceed.
4. When the login page appears, enter the following:
•
Username: admin
•
Password: password
5. Click Login.
STEP 4: CONFIGURE THE AP
1. On the Web interface menu, click Basic
Setup.
2. Select Wireless Mode: FAT AP.
3. Select DHCP Client to obtain an IP address
from the DHCP server automatically, or
select STATIC to enter the valuesmanually.
Click Apply to save changes.
4. Go to RF Configure > Wireless Settings. (For
dual band AP ZN-7100-2DHO 5G setting,
select Card 2 first then go to RF Configure >
Wireless Settings.)
5. Select a clean channel.
6. Select your location fromCountry/Region.
Click Apply to save the changes.
7. Go to RF Configure > Security Profile
8. Select a profile (eg. #1) , then click Edit.
9. Type the name of the network in the SSID
field.
10. Enable authentication and encryptionas
needed. Click Apply to save thechanges.
11. Repeat Steps 8-9 for each Profile # interface
that you want to enable.
12. Click Logout to exit the Web interface.
STEP 5: INSTALL THE AP
1.
Disconnect the AP’s power adapter from
the power outlet (or disconnect the PoE
cable).
2.
Move the AP to its permanent location
(accessible to both power source and
network connections).
Important!
Use only the 48VDC power adapter thatcame
with the wireless AP.
Note:
If the AP is deployed with a AP controller,please
follow the section INSTALL THE AP to proceed.
INSTALLING ON A TABLE or SHELF
1. The AP can be installed on top of a
table or shelf. Make sure it is installed
on a flat surface that is near an AC
power source.
MOUNTING ON A WALL
The wireless AP can be mounted on a wall
to save space, for aesthetic considerations,
and to achieve the best wireless coverage
even in blindareas
indoors.
1. Choose a solid, even surfacewith
ample room for cabling.
2. Drill holes on the wall corresponding
to the mounting holes under the AP.
Note: Make sure the wall is solidand
stable.
Note: Make sure the holes matchthe
mounting holes.
3. Insert the plastic wall plugs into the
drilled holes.
4. Insert the provided screws intothe
wall plugs.
5. Align and insert the wider end of the
mounting holes into the screw heads.
6. Slide the device up until the narrow
end of the mounting holes are
securely engaged to the screw heads.
STEP 5: POWER AND CONNECT
1. Use an Ethernet cable to connect the AP to the
appropriate device:
•The ISP’s modem or gateway device
•The Ethernet switch that is connected to
the ISP’s device.
2. Connect the AP power adapter to the AP,
then to a convenient power source.
Alternative, you may power AP with a PoE
switch by connecting them with an
Ethernet cable.
3. Verify that the PWR and LAN LED are lit.
STEP 5: VERIFY THE CONNECTION
1. Use any wireless-enabled computer or mobile
device to search for and select the wireless
network you’ve previouslyconfigured.
2. If you can connect, open a browserand link to
any public Web site.
Congratulations! Your wireless network is active
and ready for use.
Copyright© 2016 Zcomax Technologies, Inc. All rights
reserved. All other company and productnames mentioned
in the documentation are held to be trademarked (and
registered) by the primaryholders.
TIP: Follow these guidelines tomaximize
wireless signalperformance:
•
Place the AP as close to the center of the room,
and away from any physical obstructions, as
possible.
•
Avoid any interfering sources.
Note:
Make sure that the required cables are
accessible within the installation location

This manual suits for next models

2

Other ZComax Wireless Access Point manuals

ZComax ZN-1000-ZBS User manual

ZComax

ZComax ZN-1000-ZBS User manual

ZComax AIRRUNNER CPE-2 Series User manual

ZComax

ZComax AIRRUNNER CPE-2 Series User manual

ZComax ZAC-1023-2 User manual

ZComax

ZComax ZAC-1023-2 User manual

ZComax AG-3621 User manual

ZComax

ZComax AG-3621 User manual

ZComax ZLF-372 User manual

ZComax

ZComax ZLF-372 User manual

ZComax ZN-7100-DE500-G V2 User manual

ZComax

ZComax ZN-7100-DE500-G V2 User manual

Popular Wireless Access Point manuals by other brands

Planet WDAP-W7200AC Quick installation guide

Planet

Planet WDAP-W7200AC Quick installation guide

D-Link DAP-3410 user manual

D-Link

D-Link DAP-3410 user manual

Planet Networking & Communication WDAP-802AC user manual

Planet Networking & Communication

Planet Networking & Communication WDAP-802AC user manual

3Com OfficeConnect 3CRWE454A72 installation guide

3Com

3Com OfficeConnect 3CRWE454A72 installation guide

Repotec 1T1R user manual

Repotec

Repotec 1T1R user manual

ZyXEL Communications NWA1120 Series quick start guide

ZyXEL Communications

ZyXEL Communications NWA1120 Series quick start guide

Cambium Networks PMP 450 AP Planning and installation guide

Cambium Networks

Cambium Networks PMP 450 AP Planning and installation guide

D-Link AirPremier DWL-7700AP Quick installation guide

D-Link

D-Link AirPremier DWL-7700AP Quick installation guide

Proxim Skyline user guide

Proxim

Proxim Skyline user guide

Ubiquiti NBE-M5-16 quick start guide

Ubiquiti

Ubiquiti NBE-M5-16 quick start guide

On-Ramp Wireless ULPAP110 user guide

On-Ramp Wireless

On-Ramp Wireless ULPAP110 user guide

Airlink101 AP411W user manual

Airlink101

Airlink101 AP411W user manual

SENAO SL-2511AP2 PLUS user guide

SENAO

SENAO SL-2511AP2 PLUS user guide

Ruckus Wireless ZoneFlex 7762-T installation guide

Ruckus Wireless

Ruckus Wireless ZoneFlex 7762-T installation guide

Motorola WA840GP user guide

Motorola

Motorola WA840GP user guide

Ubiquiti UBB quick start guide

Ubiquiti

Ubiquiti UBB quick start guide

Enterasys RoamAbout R2 installation guide

Enterasys

Enterasys RoamAbout R2 installation guide

D-Link DAP-2553 - Wireless N Dual Band Gigabit Access... Quick installation guide

D-Link

D-Link DAP-2553 - Wireless N Dual Band Gigabit Access... Quick installation guide

manuals.online logo
manuals.online logoBrands
  • About & Mission
  • Contact us
  • Privacy Policy
  • Terms and Conditions

Copyright 2025 Manuals.Online. All Rights Reserved.