Zefon GEMINI User manual

GEMINI®
Twin Port Sampler
Operation Manual
The warranties made by Zefon International Inc. with respect to the
product are voided if the product is not used and serviced in accordance with the
instructions in this manual. Please protect yourself and others by following them.
We encourage our customers to write or call regarding this equipment prior to use
or for any additional information relative to use or repairs.
In the U.S., contact Zefon at 1-800-282-0073.
To contact Zefon outside the U.S., dial +1 (352) 854-8080
© Zefon International, Inc. 2011 - All Rights Reserved
PRODUCT OF U.S.
Manufactured by
ZEFON INTERNATIONAL, INC.
5350 SW 1ST LANE • OCALA, FL 34474
(L) Rev 6 800302
WARNING
THIS MANUAL MUST BE CAREFULLY READ BY ALL INDIVIDUALS WHO HAVE OR
WILL HAVE THE RESPONSIBILITY FOR USING OR SERVICING THE PRODUCT. Like
anypieceofcomplexequipment,the instrumentwillperformasdesignedonlyifit
is used and serviced in accordance with the manufacturer’s instructions.
OTHERWISE, IT COULD FAILTO PERFORMAS DESIGNEDAND PERSONSWHO RELY
ONTHISPRODUCTFORTHEIRSAFETYCOULDSUSTAINSEVEREPERSONALINJURY
OR DEATH.


Table of Contents
Chapter 1, Basic Operation ..................................1-1
Introduction................................................................................................ 1-1
Description................................................................................................. 1-1
Contents of Kit............................................................................................ 1-1
Figure 1-1. Worker Wearing GEMINI Twin-Port Sampler................... 1-2
Figure 1-2. Worker Wearing 2 Samplers with “Y” Connection.......... 1-3
Operation Instructions ................................................................................ 1-4
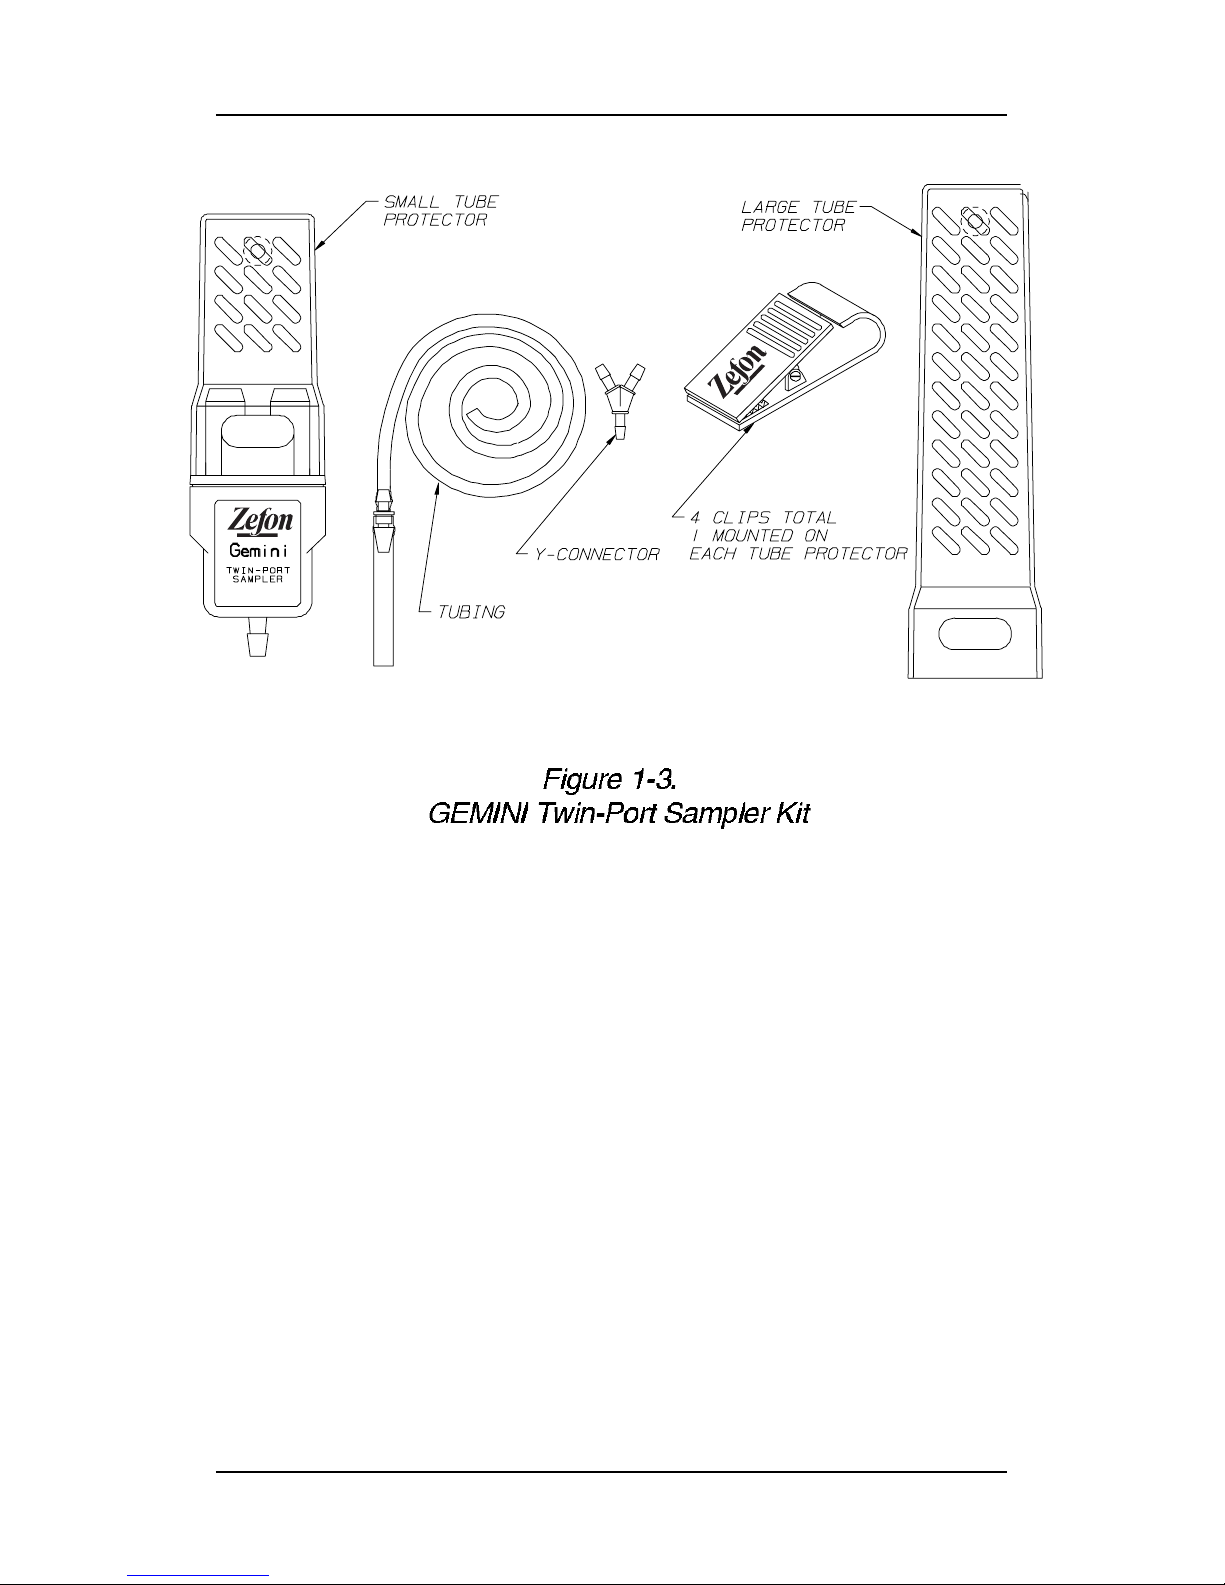
Figure 1-3. GEMINI Twin-Port Sampler Kit........................................ 1-4
Figure 1-4. Inserting Sorbent Tubes into the GEMINI Sampler........... 1-5
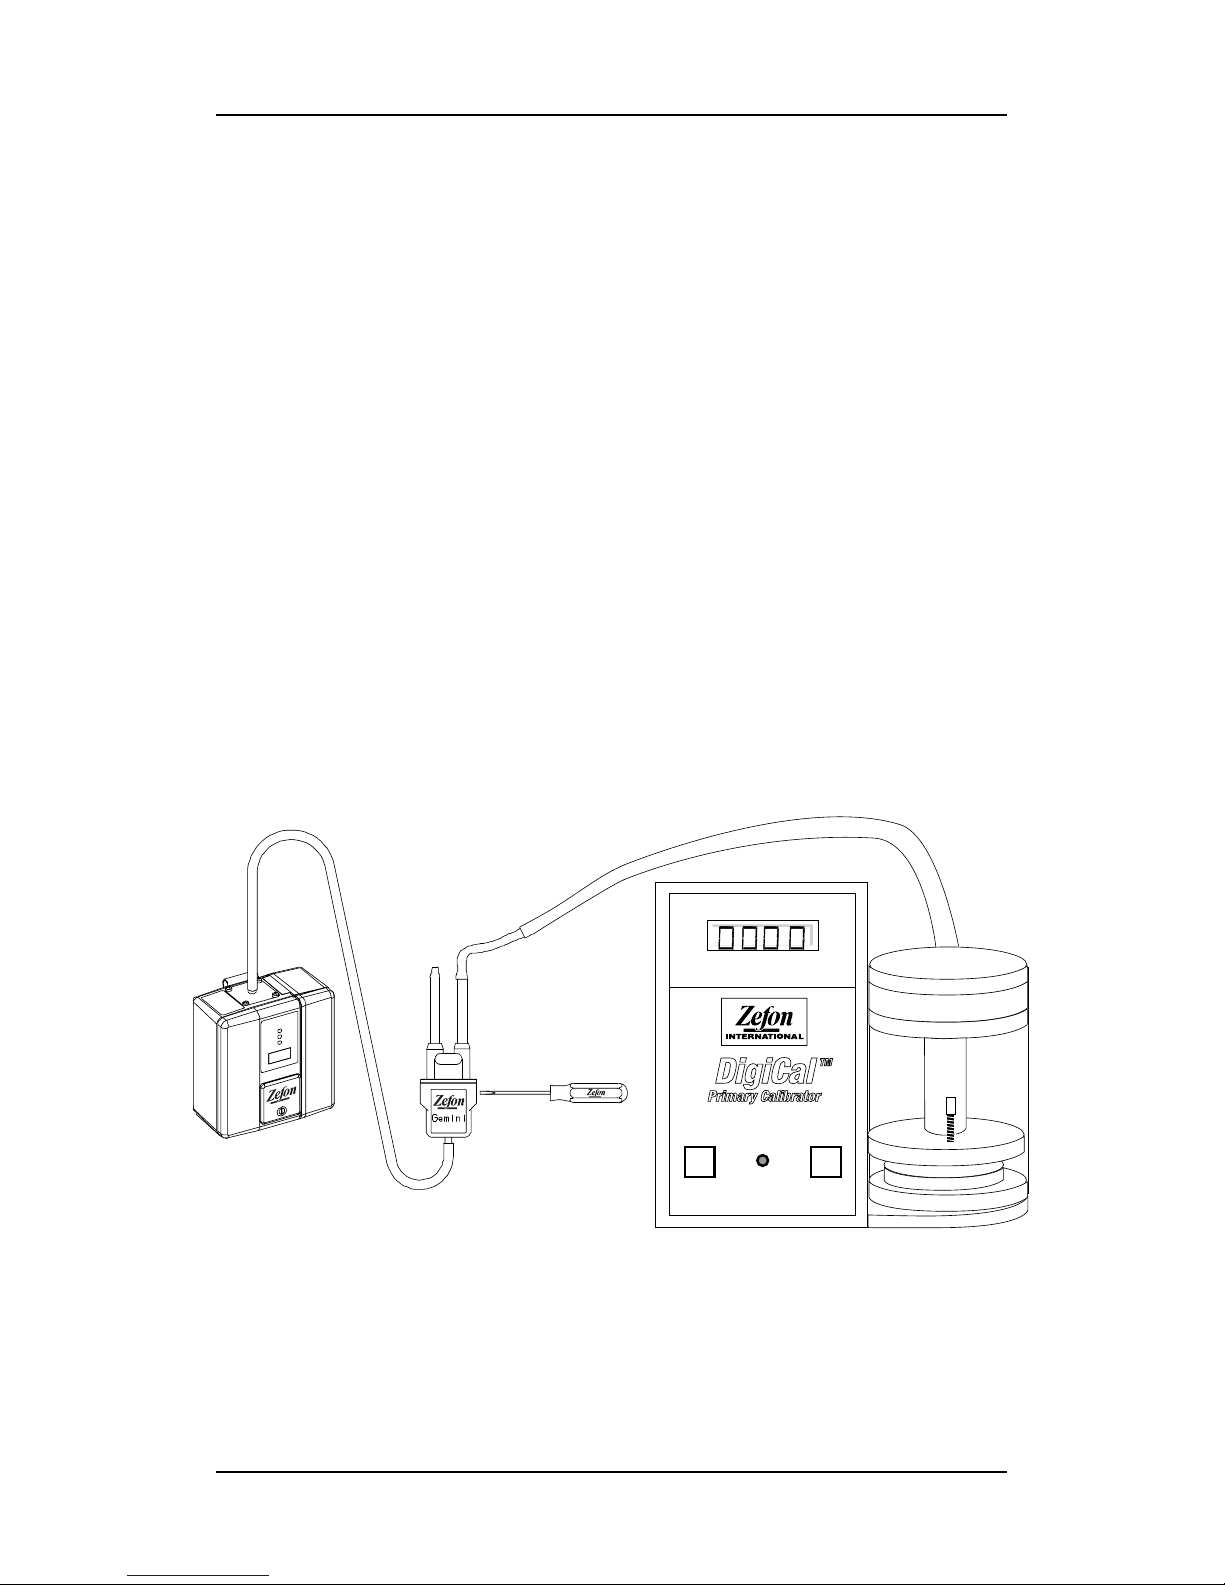
Figure 1-5. Setting the Flow Rate with the DigiCal Calibrator............ 1-6
Helpful Hints............................................................................................... 1-7
Remote Sampling....................................................................................... 1-8
Chapter 2, Maintenance.......................................2-1
Tube Holder................................................................................................ 2-1
Foam Filter ................................................................................................. 2-1
Filter Disc ................................................................................................... 2-1
Valves......................................................................................................... 2-2
Performance Test ....................................................................................... 2-2
Chapter 3, Parts List.............................................3-1
Repair Kit Parts List.................................................................................... 3-1
Accessories Parts List ................................................................................ 3-2
Table of Contents
GEMINI Twin Port Sampler TOC-1


Chapter 1, Basic Operation Operation Manual
GEMINI Twin-Port Sampler 1-1
Chapter 1
Basic Operation
Introduction
Congratulations on your purchase of the GEMINI Twin-Port
Sampler, an instrument designed for low ow industrial
hygiene sampling and backed by years of Zefon qualty,
dedication, and service.
Please read the “Operation Instructions” and “Helpful Hiits”
portions of this manual before using the Sampler.
Description
The GEMINI Sampler is designed to measure concentrations of
gases and vapors when used with Zefon or other manufacturer’s
Sorbent Tubes. It is compatible with any personal sampling pump
capable of 1.5 LPM ow rate at a load of 25” of water column
(w.c.). See FIGURES 1-1 and 1-2.
Contents of Kit (See FIGURE 1-3)
• GEMINI Sampler with Tube Protector for small
Sorbent Tubes
• Tube Protector for larger Sorbent Tubes
• Tubing (1/8” ID for connection to GEMINI Sampler,
connected by a tting to 1/4” ID)

Chapter 1, Basic Operation Operation Manual
1-2 GEMINI Twin-Port Sampler
•
• Four Clips (one for each Tube Protector and two
extra for clipping to the bottom of the GEMINI
Sampler and for tubing management)

Chapter 1, Basic Operation Operation Manual
GEMINI Twin-Port Sampler 1-3
•
• “Y” Connector for multi-Sampler applications

Chapter 1, Basic Operation Operation Manual
1-4 GEMINI Twin-Port Sampler
Operation Instructions
1. Connect the pump inlet to the GEMINI Sampler barb tting
using the tubing and the adapter supplied. (The adapter
may not be needed for some pumps.)
2. Turn on the pump, and adjust the ow to approximately 1.5
LPM (1.2 to 1.7 LPM). As a general rule, the pump ow
rate needs to be at least two to three times the total ow
rate through the tubes.
3. Remove the Tube Protector from the GEMINI Sampler.

Chapter 1, Basic Operation Operation Manual
GEMINI Twin-Port Sampler 1-5
4. Break off both tips of the Tube to be used for sampling.
5. Install Tubes in the Tube Holders. See FIGURE 1-4.
6. Preset the ow rates through each Tube to the approximate
ow desired (see “Helpful Hints” #3 later in this chapter).
7. Connect a length of tubing to the inlet of one Tube.
8. Connect the other end of this tubing to a primary calibrator
or a precalibrated owmeter.

Chapter 1, Basic Operation Operation Manual
1-6 GEMINI Twin-Port Sampler
FLOW RATE
LOW BATT
On Off
• Flow rates may be easily set by using the DigiCal 5
Primary Calibrator (part no. 655101) or an equivalent
device (FIGURE 1-5)
9. Adjust the needle valve to obtain the desired ow rate
through the Tube.
10. Repeat steps 6, 7, and 8 for the other Tube.
NOTE: The total ow must not exceed 500 ml per
minute (ml/min).
11. Install either the large or small Tube Protector.
12. Sampling may begin immediately, or the pump may be
turned off until sampling is to be started.
Figure 1-5.
Setting the Flow Rate with the DigiCal 5 Primary Calibrator

Chapter 1, Basic Operation Operation Manual
GEMINI Twin-Port Sampler 1-7
Helpful Hints
1. The needle valves have very ne threads and seats; do not
force them closed. If no sample is to be taken through one
side, simply turn the valve clockwise until resistance is felt;
then, stop.
2. Do not attempt to operate the Sampler with needle valve
settings beyond the point where the top of the slotted
portion is ush with the brass valve body.
3. There is a very small interaction between the setting of the
two ows. The ows can be most quickly and accurately set
by:
• Presetting both valves to the approximate ow desired:
• 50 ml/min. = one turn counterclockwise
• 200 ml/min. = two turns counterclockwise
• 350 ml/min. = three turns counterclockwise
• If samples are to be taken at two different ow rates,
calibrate and ne adjust the higher ow rate tube
position rst.
If the total ow through both tubes is near the 500 ml/min.
limit and difculty is experienced, try increasing the pump
setting to 1.7 LPM or use some other equipment to make sure
the pump is actually delivering 1.5 LPM when loaded to 25” w.c.
4. When operating two Samplers from one pump, these hints
are even more important. Presetting all four valves will
make calibration easier. If all four tubes are set for high
ows and the total ow is near the 500 ml/min. limit,
make sure the pump is drawing 1.5 LPM. If some
additional care is taken when calibrating and ne adjusting.

Chapter 1, Basic Operation Operation Manual
1-8 GEMINI Twin-Port Sampler
the total ow for four tubes may be up to 1000 ml/min.,
with a maximum of 500 ml/min. through each GEMINI
Sampler if the pump ow rate is adjusted nearer to 1.7
LPM. Keep in mind that this additional load will likely
shorten the expected running time of the sampling pump.
5. While rotameters or other devices may be used for rough
setting of ows, their inherent pressure drop adds to the
tube load. Therefore, use only a soap lm device, the DigiCal
5 Primary Calibrator (Part No. 655101) for nal ow
calibration. Always have the actual tube or equivalent load
in place during ow calibration.
Remote Sampling
Remote sampling can be accomplished by connecting a remote
sampling line between the pump and the Sampler. The sampling
line should have an inside diameter of 1/8-inch or larger to prevent
loading the pump.

Chapter 2, Maintenance Operation Manual
GEMINI Twin-Port Sampler 2-1
Chapter 2
Maintenance
Under conditions of normal use, this Sampler should require
little maintenance. Depending on the frequency of use, periodic
cleaning and cheks for correct performance are recommended.
Tube Holder
Replace the Tube Holder when it shows signs of wear or
damage. If lter is not clogged or cracked, it may be used in
the new tube holder if it is inserted so the ow through is in
the same direction. The stainless steel washer must be placed on
the holder before reinstalling the pressure plate. To remove the
tube holder or to change the lter in the tube holder, remove the
four phillips head screws located on the green pressure plate.
Foam Filter
The round, black oam lter on the back of the GEMINI Sampler
prevents dust from entering the unit. This lter can be easily
removed, cleaned and replaced or replaced by a new foam lter.
Ten extra foam lters (P/N 497715) are supplied with the unit.
Filter Disc
Periodically remove the Filter Disc for cleaning or replacement.

Chapter 2, Maintenance Operation Manual
2-2 GEMINI Twin-Port Sampler
1. Remove the Filter Disc from the Tube Holder by rolling the
ange part of the Tube Holder down and away from the Disc.
2. Gently tap or blow on the surface to remove any foreign matter.
3. Replace the Disc, orienting it so the previously exposed
surface is once again facing away from the Sampler.
Valves
The needle valve stem of each valve can be occasionally
removed for inspection of the needle and the needle seat.
1. Turn the stem counterclockwise until it is free of the valve body.
2. Clean the needle by wiping it with a soft tissue.
3. If the valve seems to be clogged (i.e., you are unable to
achieve 500 ml/min. ow at 3-1/2 to 4 turns open),
remove the pressure plate and Tube Holders. Direct a
stream of compressed air through the open valve body to
help dislodge any particulate matter causing the problem.
4. Reinstall the needle.
Performance Test
After extended idleness and periodically during use, check the
Sampler for proper performance with the following test:
1. Connect a water manometer or vacuum gauge to one of
the Tube Holders.
2. Open the associated needle valve 3 to 4 turns counter
clockwise from fully closed.
3. Connect a owmeter to the other Tube Holder.
4.
Close (fully clockwise position) the associated needle valve.

Chapter 2, Maintenance Operation Manual
GEMINI Twin-Port Sampler 2-3
NOTE: The vacuum setting should read between 18” and
26” w.c.; the ow should read less than 2 ml/min.
5. Open the needle valve to adjust the ow to achieve 250 to
300 ml/min.
NOTE: The vacuum setting should remain within 2” w.c. of the
reading noted after step 4.

Chapter 3, Parts List Operation Manual
3-1 GEMINI Twin-Port Sampler
Chapter 3
Parts List
No. on
Drawing
Part Part No.
Qty in Repair
Kit
1 DISC, FILTER, PUMP 463799 2
2 PLATE, PRESSURE, SAMPLE TUBE 497711 1
3 CLIP ASSEMBLY 800296 1
4 SCREW, #2-56 X 5/16” LG 636267 4
5 WASHER, ST STEEL 634257 2
6 HOLDER, TUBE 463801 2
7 LABEL, FILTER COVER 800095 1
8 FOAM FILTER (Sheet of 10) 497715 1
Not Pictured Repair Kit (Contains Items 1-8) 802208 n/a
Not Pictured Instruction Manual 800302 n/a

Chapter 3, Parts List Operation Manual
GEMINI Twin-Port Sampler 3-2
No. on
Drawing
Part Part No.
1 PROTECTOR, SMALL TUBE 800103
2 PROTECTOR, LARGE TUBE 497712
3 CLIP ASSEMBLY 800296
4 SILICONE TUBING, 1/8” ID 602294
5 “Y” FITTING 636563
6 TUBING CONNECTOR 636477
7 TUBING, 1/4” ID 27234
8 Label, Tamper Proof (Sheet of 10) 802698
Not Pictured Label, Filter Cover 800095
Not Pictured Foam Filter (Sheet of 10) 497715
Not Pictured Digical 5 Primary Calibrator 655101
ACCESSORIES


To contact Zefon International, call 1-800-282-0073.
© Zefon International Inc. 2011 - All Rights Reserved
PRODUCT OF U.S.
Zefon International, Inc. • 5350 SW 1st Lane • Ocala, FL 34474
Table of contents