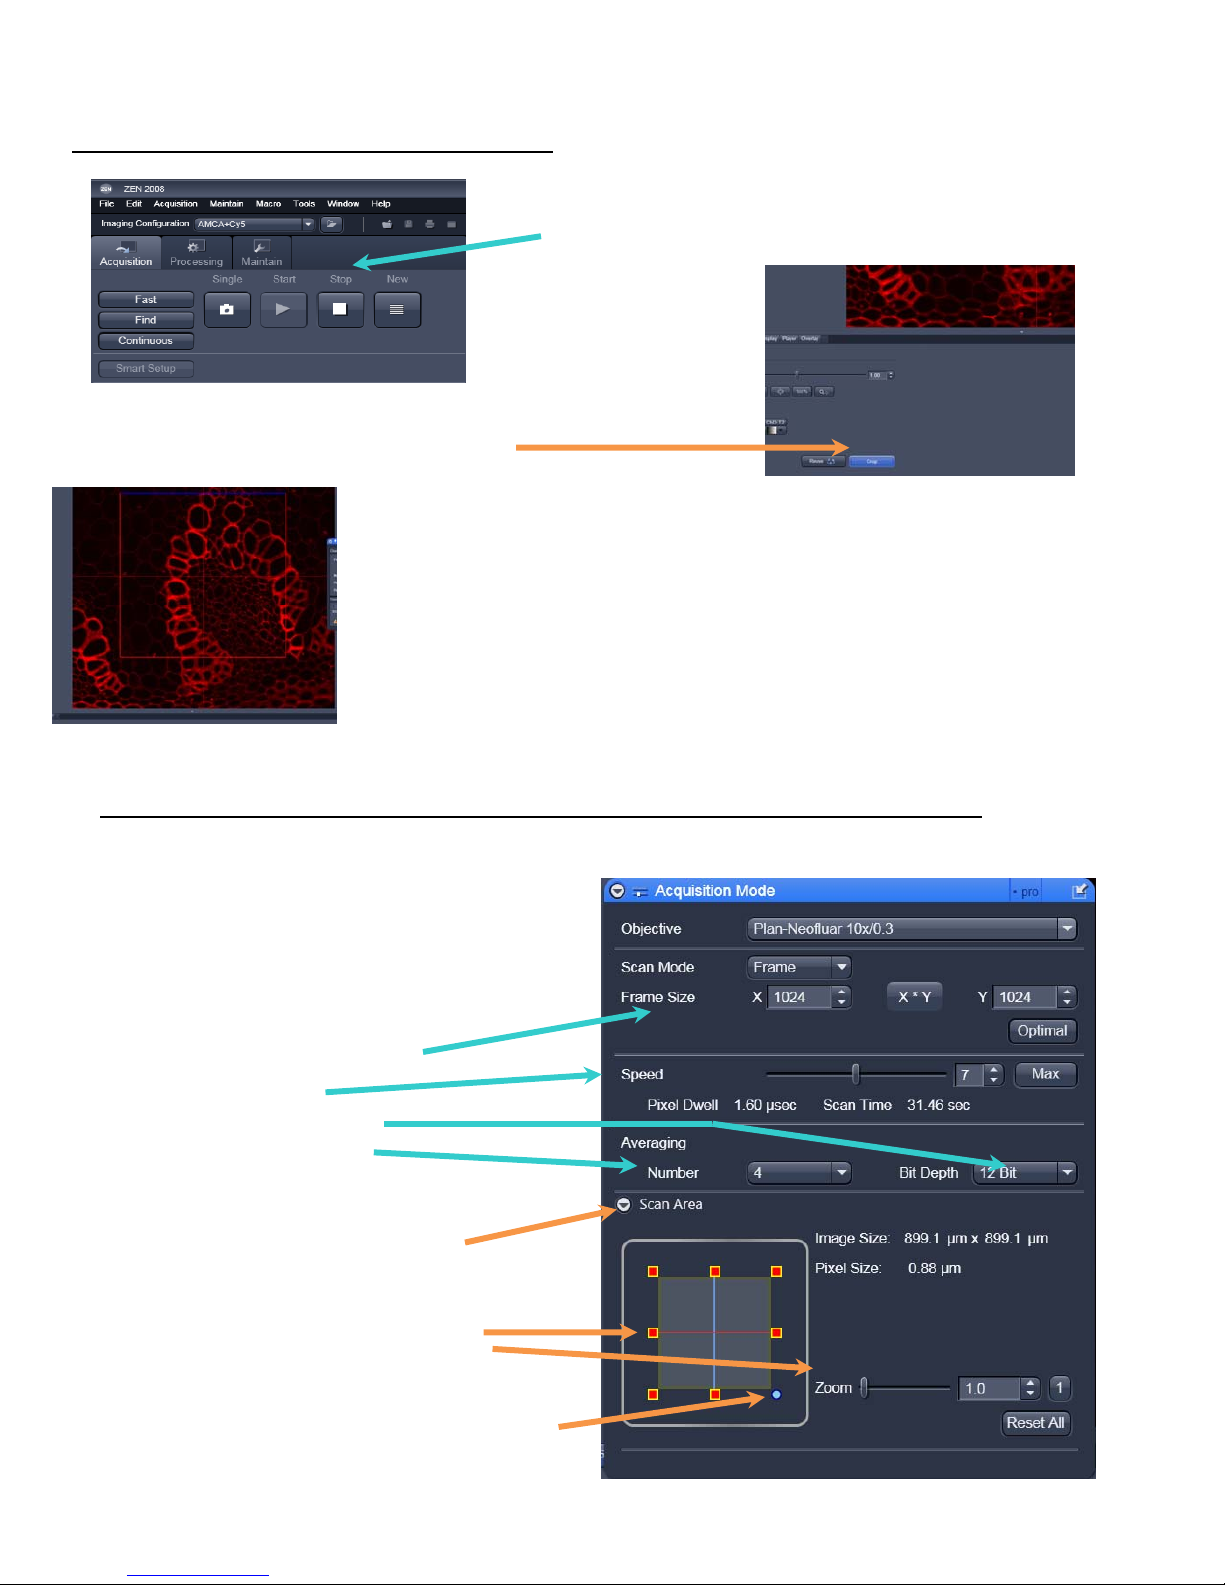
Zeiss LSM 510 Inverted User manual

1
UseoftheZeissLSM510Inverted
Firstlypleasebeawarethatthismicroscopeshouldbetreatedwithrespectandcareatalltimes.
Rulesofuse:
ThisMicroscopecanonlybeusedbyMastersbyResearchorPhDstudents,Postdocsandmembersofstaff.
YoumustreceivetrainingfromAnnWheelerbeforeyouusethismicroscope..
Themicroscopelensesmustbecleanedaftereveryusageandtheequipmenttreatedcarefullyatalltimes.
Ifyouhaveanyproblemsatallwiththemicroscope,nomatterhowtrivialtheymayseempleaseseeAnn
Wheeler,AmandaWilsonimmediately.
REMEMBER:Youhave5GBofdiskspaceonthismicroscope.Checkbeforeyoustartifyouhaveroomforyour
experiment.Ifnotdeleteyourolddata.
Toswitchonthemicroscope.
SwitchontheMercuryarcbulb
Switchontheremotecontrolbutton
Switchonthecomputer
Cleantheobjectivelensyouwanttousebeforeyoustartwork
Logintothecomputer
1.Startthesoftware
ClicktheZENshortcutbutton
Clickstart
system

2
Thescreenlookslikethisonceyouhaveswitchedeverythingon.Thecontrolmenuisontheleftandyouworkfromtop
tobottom.Yourimagesarestoredontheright.
Lightpath(eyes
andlaseris
controlledhere)
2.TurnontheLasers
ToturnonlasersselectLASERmenu,RHSofworkspace.Dropitdownusingthesmallarrowintheleftcorner.
Selectthelasersyouneedforyourexperimentand
turnthemon
FortheArgonandEnterpriselasersdropdownthe
LaserPropertiesarrow
FortheArgonlaser:switchitontostandby,waituntilithas
warmedupandthenswitchon,andsetoutputto6.1A.
NBisthisusesmorethan50%ofthelaseroutputsee
Ann/Amanda
FortheEnterpriselaser:switchitontostandby,waituntilithas
warmedupthenswitchon,andsettheoutputto100%

3
3.SelecttheConfigurationyouneed
PickImagingConfigurationfromthedropdownmenu
Selecttheconfigurationyouneed
Clicktheicontoactivateyourchosenconfiguration
4.SettheMicroscopeupandfindyourspecimen
ClicktheOcularbuttontosendthelighttoyoureyes(toprightareaofthe
workspace)
Thiswillallowyoutocheckyoursamplesdownthemicroscopebeforeyoustart
laserscanning
IntheLightPathcontrolmenu:
Thisopensthetransmitted(Brightfield)light
Selecttheobjectivelensthatyouwanttouse
Selecttheappropriatefilter(DAPI/FITC/TRITC)
ClickthefluorescenceshutterOpen
toseefluorescentlight

4
5.Startconfocalscanning
ClickLSMbutton(toprightoftheworkspace)
ClicktheFastbutton(foundontopleftoftheworkspace)ClickSplitonthelefthandsideof
your image(thissplitstheimage
accordingtochannelsused)
6.Setthelevelsforeachchannel
Clickthecolouredregionundereachchannel(inthepanelunderneaththe
imagewindow)toactivatethe‘rangeindicator’palette;
theimageswillnowgogreyorRedandBlue
Makesurethechannelsmenuisinyourworkspace,ifnotclicktherighthandsidearrowto'float'themenuout
Foreachchannelandchangethefollowingineachtoobtaingoodimage:
1)Pinhole:clickon1tomakepinhole1airyunit(Pleasenote:ifyou’re
doingcolocalisation,refertheworksheetontheBALMwebsite)
2)Mastergain:increaseleveluntilyouseered,thenreduceagainuntil
redjustdisappears
3)Offset:decreaseleveluntilyouseeblue,thenincreaseagainuntilblue
justdisappears

5
7.Resizeyourimagesusingthecroptool.
TostopscanningatanytimeclickStop
StopscanningandpressCrop(bottomofscreen)
Simplyputthecroppingwindow(Redboxwithcrosshair)overtheregionyouwantto
crop
Changetheposition,sizeorrotationofthecroppedareabydraggingtheedgesofthe
cropboxwiththecursor
Startscanningagainandyourcroppedimagewillappear
8.Setupthescanningparametersandselectingtheareayouwanttoimage
Onceyouarehappywithyourimagestopscanning
GototheAcquisitionModetabontheLHSofthe
workspaceandfloatoutifnotinworkspacealready.
Generallyforanicedetailedpicture:
Framesizeshouldbe1024x1024
Scanspeed:7
Datadepthshouldbe16bit
Scanaverageshouldbe4
Optionalifyoudon'twanttousecrop
Toalterthescanareadropdownthearrow
Whiletheimageisscanning:
Youcannowexpandorreducethescanarea,
Zoomin
orturnitaroundasrequired

6
9.Takethepicture
ClickSingleinthescanmenu
10.SavingyourImage(s)
GototheOpenImagessectiononthetoprightofthe
workspace
Selecttheonethatyouwanttosave
Clickthefloppydiskicontosavetheimage
(pleasesavetoyourfolderinUsersonE‐drive!!)
Toconverttotifgotothefilemenu(topright)
andclickExport.
Toexportjusttherawdatathatyouhavepicktheformat(.tif)clickexportRaw
dataSingleplane(normalscan)orSeries(Zstackortimelapse)
Toexporttheimagedisplayincludinganyoverlaysoranalysisthathaschoose
exportContentsofImagewindoworFullresolutionimagewindowSingleplane
(normalscan)orSeries(Zstackortimelapse).
Choose'selectfilenameandsave'tosave

7
12.TotakeaZstack
GototheZ‐Stacktoolbar(foundontheleftsideoftheworkspace)anddropitdown
ClickontheticktoactivatetheZstackmenu(youcan't
collectazstackwithoutthis)Itswhitewhenactivated
Chooseifyouwanttoselectfirstandlastplanesorto
collectdatafromacentralpoint(BALMstaff
recommendselectfirstandlastingeneral)
ForstackscollectedinselectFirstandLastmode
Enteryourrequiredintervalforzstack
SelectKeepinterval
Note:useOptimalIntervalifyouwantthebest
resolvedstack(for3Dimagegeneration)
ClickFasttostartscanning
Movetothebottomyoursampleandhitsetlast
Movetothetopofyoursampleandclicksetfirst
ClickSTARTtocollecttheZstack
Youcanviewthezseries(andtimeseries)asitis
beingcollectedusingtheGalleryoption
13.Collectingatimeseries/timelapse
GototheTimeSeriesiconanddropitdown.
Makesureyouactivatethetick(Righthandside)
Selectthetimeintervalandhowmanyimageyoucantocollect.
ClickSTARTtostartthetimelapse
NBaniconofapilewillappearbelowstartwhenaZseriesisbeingcollectedandaiconofastopwatch
whenatimeseriesisbeingcollected
Other manuals for LSM 510 Inverted
3
Table of contents
Other Zeiss Microphone manuals