Zeizz Primo Star User manual

Primo Star
Primo Star iLED
Operating manual
Bedienungsanleitung
Mode d’emploi
Instrucciones de manejo
Manual de instruções
Инструкция по применению
操作手册
مﺪﺨﺘﺴﻤﻟا ﻞﻴﻟد

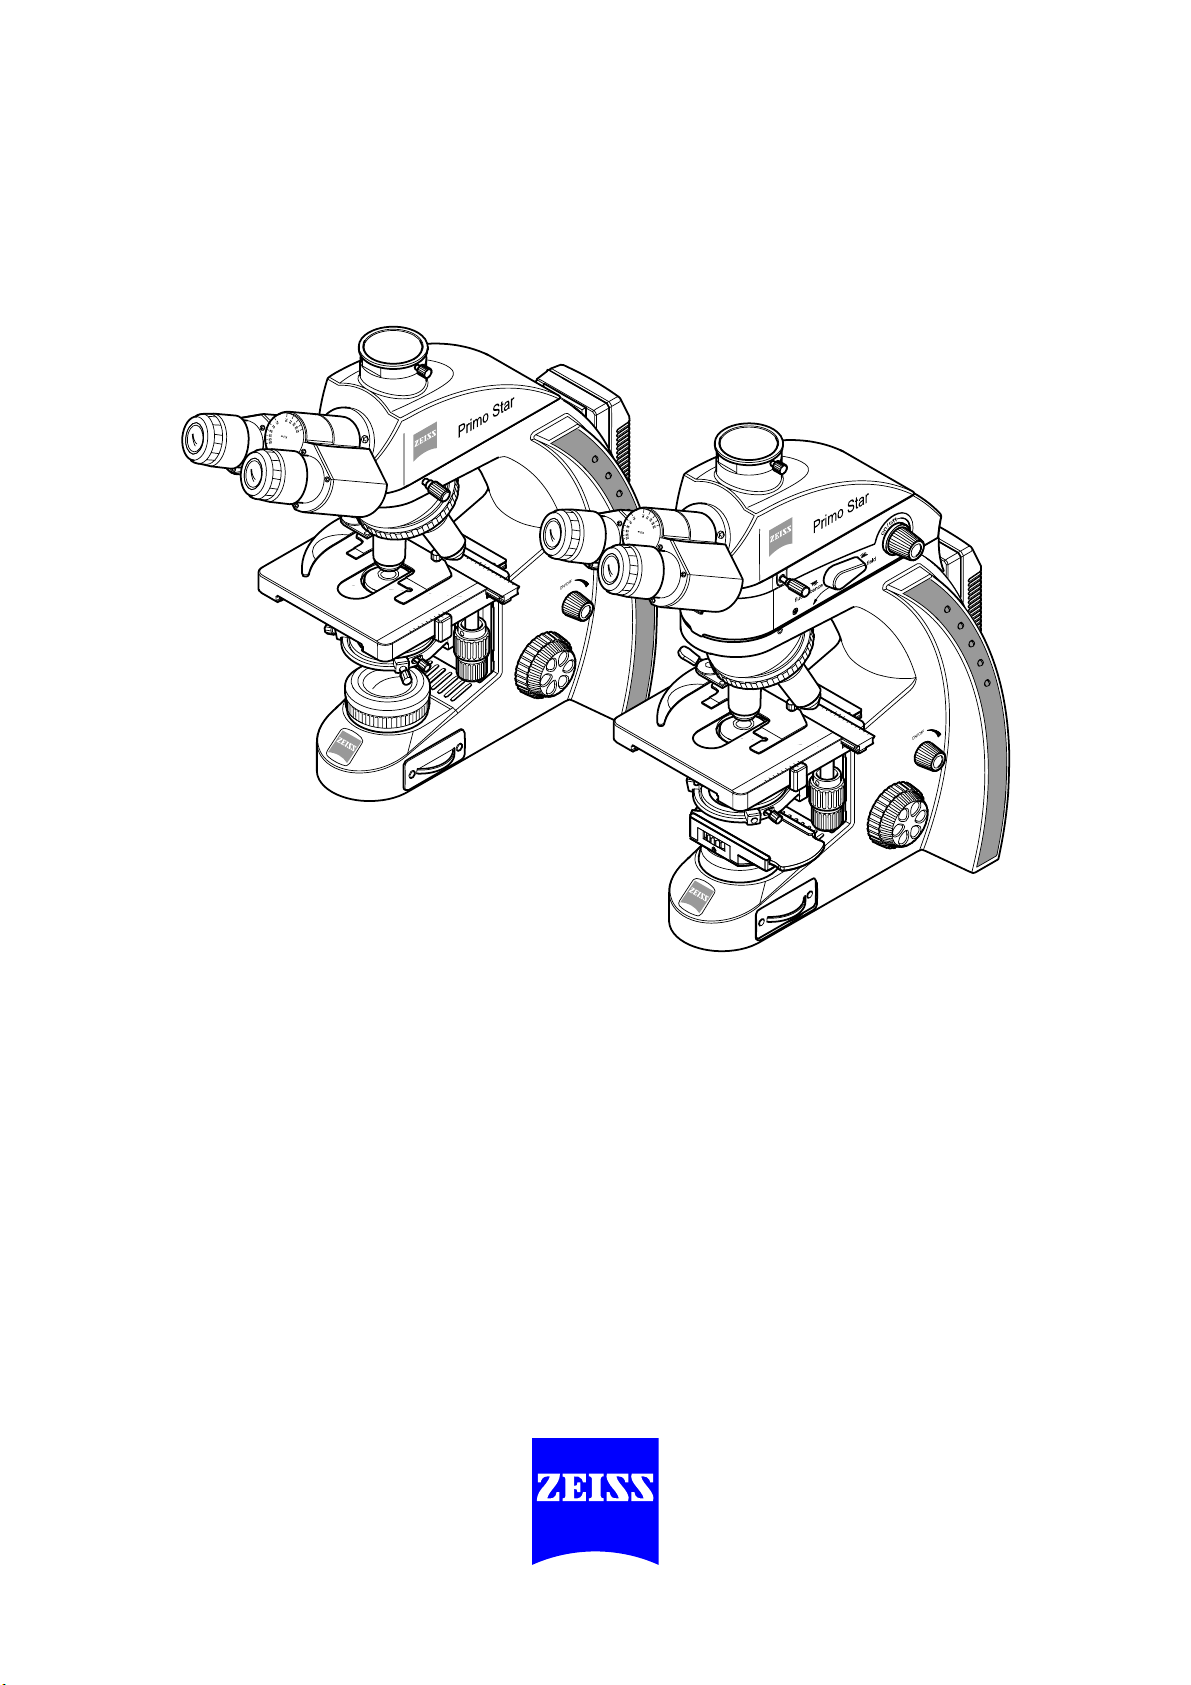
Carl Zeiss Copyright Primo Star / Primo Star iLED
2 M60-2-0011 v 08/2008
En
g
lish Deutsch Fran
ç
ais Es
p
añol Р
у
сский
中文
Portu
g
uês ﻲﺑﺮﻋ
Knowledge of this manual is required for the operation of the instrument. Would you therefore please make yourself
familiar with the contents of this manual and pay special attention to hints concerning safe operation of the instrument.
The specifications are subject to change; the manual is not covered by an update service. Unless expressly authorized,
forwarding and duplication of this document, as well as utilization and communication of its contents are not permitted.
Violations will entail an obligation to pay compensation. All rights reserved in the event of granting of patents or
registration of a utility model.
Die Kenntnis dieser Anleitung ist für die Bedienung des Gerätes erforderlich. Bitte machen Sie sich deshalb mit dem Inhalt
vertraut und befolgen Sie besonders Hinweise, die den sicheren Umgang mit dem Gerät betreffen. Änderungen im Interesse der
technischen Weiterentwicklung bleiben vorbehalten; das Handbuch unterliegt nicht dem Änderungsdienst. Weitergabe sowie
Vervielfältigung dieser Unterlage, Verwertung und Mitteilung ihres Inhalts sind nicht gestattet, soweit nicht ausdrücklich
zugestanden. Zuwiderhandlungen verpflichten zu Schadenersatz. Alle Rechte für den Fall der Patenterteilung oder
Gebrauchsmuster-Eintragung vorbehalten.
L’utilisation de l'appareil suppose la bonne connaissance du présent mode d’emploi. Nous vous prions par conséquent de lire
attentivement les informations contenues dans ce document et de respecter notamment les consignes relatives à la sécurité d’utilisation.
Le fabricant se réserve le droit d’apporter des modifications techniques en fonction de l’évolution des technologies. Ces modifications ne
sont pas automatiquement prises en compte dans le mode d'emploi qui accompagne chaque appareil. Toute divulgation, reproduction
ou publication du présent document, même partielle, est interdite sans notre autorisation écrite. Toute infraction donne droit au
versement de dommages et intérêts. Tous les droits sont réservés en cas de délivrance d’un brevet ou de dépôt d’un modèle d'utilité.
El manejo de este equipo presupone el conocimiento de las presentes instrucciones. Por eso le rogamos familiarizarse con su
contenido y observar en particular las indicaciones que se refieren al manejo seguro del mismo. Nos reservamos el derecho a
modificaciones en interés del desarrollo técnico; el manual no está sujeto al servicio de actualización. Sin nuestro consentimiento
expreso no se autoriza ni la entrega y reproducción de este manual, ni el aprovechamiento y la comunicación de su contenido.
Cualquier contravención implica el pago de una indemnización. Reservados todos los derechos para el otorgamiento de patentes
o el registro de modelos de utilidad.
A operação deste equipamento pressupõe o conhecimento das presentes instruções. Por isso, favor familiarizar-se com seu
conteúdo e observar, em particular, as indicações referidas à operação segura do mesmo. Nos reservamos o direito a
modificações em interesse do desenvolvimento técnico, o manual não está sujeito ao serviço de atualização. Sem nosso expresso
conhecimento não é autorizada nem a entrega, nem a reprodução deste manual, nem o aproveitamento e a comunicação de
seu conteúdo. Qualquer contravenção implica o pagamento de uma indenização. Reservados todos os direitos para o
outorgamento de patentes ou o registro de modelos de utilidade.
Знание данной инструкции необходимо для использования прибора. Поэтому необходимо ознакомиться сее
содержанием иособенно следовать указаниям, касающимся безопасного обращения сприбором. Фирма оставляет
за собой право изменения винтересах технического усовершенствования; руководство не подлежит изменениям.
Передача итиражирование настоящего документа, атакже использование исообщение его содержания не
допускаются без особого разрешения. Вслучае нарушений полагается возмещение убытков. Фирма оставляет за
собой право на выдачу патента или регистрацию промышленной модели.
版 权
操作本仪器必须先阅读本手册内容。因此请务必熟悉本手册内容,尤其要遵从有关仪器正确操作的注意事项。技术可能会有更
新,此手册不含升级服务。未经授权禁止复制,利用和转载本手册内容。如有违背必须承担相应赔偿责任。保留所有申请专利
或者样品注册权利。
اﺬه مﺪﺨﺘﺴﻤﻟا ﻞﻴﻟد ﻰﻠﻋ عﻼﻃﻹا مﺰﻠﺘﺴﻳ بﻮﻜﺳوﺮﻜﻴﻤﻟا زﺎﻬﺟ ماﺪﺨﺘﺳا.ءﺎﺟﺮﻟﺎﻓ ﻚﻟﺬﻟ وﺑ ﺔﻘّﻠﻌﺘﻤﻟا تﺎﻤﻴﻠﻌﺘﻟا ﻰﻟإ ﻩﺎﺒﺘﻧﻻا وﺔﻗّﺪﺑ ﻪﻧﻮﻤﻀﻣ ةءاﺮﻗﺔﻣﻼﺴ
لﺎﻤﻌﺘﺳﻻا.ﺎﻴﺟﻮﻟﻮﻨﻜﺘﻟا تﺎﺒﻠﻄﺘﻤﻟ ﺎﻘﻓو تﻼﻳﺪﻌﺗ قﺎﺤﻟإ ﻖﺤﺑ زﺎﻬﺠﻟا ﻊﻧﺎﺻ ﻆّﻔﺤﺘﻳ وتةﺪﻳﺪﺠﻟا.ﻞﻴﻟد ﻲﻓ ﺎﻴﺋﺎﻘﻠﺗ ﺔﻨﻤﻀﺘُﻣ ﺮﻴﻏ تﻼﻳﺪﻌﺘﻟا ﻩﺬه و
زﺎﻬﺟ ﻞﻜﻟ ﻖﻓاﺮﻤﻟا لﺎﻤﻌﺘﺳﻻا.وﻞﻴﻟﺪﻟا اﺬه نﻮﻤﻀﻤﻟ ءﺎﺸﻓإ ﻞآ ﻊﻨﻤُﻳ وﺎﻨﻣ ﺔﺤﻳﺮﺻ ﺔﻘﻓاﻮﻣ نوﺪﺑ ﺎﻴﺋﺰﺟ ﻮﻟ وﻩﺮﺸﻧ وﻪﺧﺎﺴﻨﺘﺳا.ﻚﻟﺬﻟ ﺔﻔﻟﺎﺨﻣ ﻞآ
تﺎﻀﻳﻮﻌﺗ ﻊﻓﺪﻟ ﺎﻬﺒﺣﺎﺻ ضّﺮﻌﺗ.ﺔﻌﻔﻨﻤﻟا جذﻮﻤﻧ عاﺪﻳإ وأ عاﺮﺘﺧا ةءاﺮﺑ ﻰﻠﻋ لﻮﺼﺤﻟا ﺔﻟﺎﺣ ﻲﻓ ﺔﻇﻮﻔﺤﻣ قﻮﻘﺤﻟا ﻞآ.
Issued by: Carl Zeiss MicroImaging GmbH
P.O.B. 4041, 37030 Goettingen, Germany
Phone: +49 (0) 551 5060 660
Fax: +49 (0) 551 5060 464
www.zeiss.de Date of issue: Version 3, 08/29/2008

Primo Star / Primo Star iLED Contents Carl Zeiss
M60-2-0011 v 08/2008 3
En
g
lish
CONTENTS
Page
1Notes on Instrument Safety.............................................................................................. 4
1.1 General safety notes............................................................................................................. 4
1.2 Instrument safety and EMC .................................................................................................. 5
1.3 Unpacking, transportation, storage....................................................................................... 5
1.4 Disposal................................................................................................................................ 5
1.5 Use....................................................................................................................................... 6
1.6 Warning and information labels............................................................................................ 8
1.7 Notes on warranty................................................................................................................ 9
2Description....................................................................................................................... 10
2.1 System overview.................................................................................................................10
2.2 Intended use ...................................................................................................................... 12
2.3 Instrument description and main features ........................................................................... 12
2.4 Objectives........................................................................................................................... 13
3Start-Up and Operation .................................................................................................. 14
3.1 Starting up the microscope................................................................................................. 14
3.1.1 Setting up the microscope .................................................................................................. 14
3.1.2 Mounting the reflected-light fluorescence illuminator ......................................................... 16
3.1.3 Connecting the battery supply unit..................................................................................... 19
3.1.4 Switching the microscope on / off ...................................................................................... 20
3.2 Controls of Primo Star (Full-Köhler and Fixed-Köhler) .......................................................... 22
3.3 Controls of Primo Star iLED (Fixed-Köhler) with reflected-light fluorescence illuminator....... 24
3.4 Operating the microscope .................................................................................................. 25
3.4.1 Setting interpupillary distance and viewing height .............................................................. 25
3.4.2 Compensating for ametropia and inserting the eyepiece pointer or eyepiece micrometer.... 25
3.4.3 Adjusting transmitted-light brightfield on the Full-Köhler microscope ................................. 26
3.4.4 Adjusting transmitted-light brightfield on the Fixed-Köhler microscope............................... 27
3.4.5 Adjusting transmitted-light phase contrast or transmitted-light darkfield............................. 28
3.4.6 Adjusting reflected-light fluorescence................................................................................. 30
3.5 Converting the microscope................................................................................................. 31
3.5.1 Changing the tube ............................................................................................................. 31
3.5.2 Inserting color filters........................................................................................................... 31
3.5.3 Replacing the 6V 30W halogen lamp or the LED illumination.............................................. 32
3.5.4 Changing objectives ........................................................................................................... 32
3.5.5 Installing/removing the mirror............................................................................................. 33
3.5.6 Installing a camera.............................................................................................................. 34
4Care and Troubleshooting .............................................................................................. 35
4.1 Instrument care .................................................................................................................. 35
4.2 Troubleshooting .................................................................................................................36
4.3 Changing the LED module in the reflected-light fluorescence illuminator ............................ 37
5Appendix.......................................................................................................................... 39
5.1 Technical data .................................................................................................................... 39

Carl Zeiss Notes on Instrument Safety Primo Star / Primo Star iLED
4 M60-2-0011 v 08/2008
En
g
lish
1NOTES ON INSTRUMENT SAFETY
1.1 General safety notes
Please read this Operating Manual carefully before starting up the microscope.
If you need supplementary information, contact our Carl Zeiss Service or an authorized agency.
To ensure safe operation and troublefree function of the microscope, strictly observe the precautions and
warnings given in this manual.
These are marked herein as follows:
CAUTION
This symbol indicates a possible hazard to the user of the instrument.
CAUTION
Hot surface!
CAUTION: LED radiation
LED class 3B, max. 60 mW, 365 - 625 nm
Do not expose yourself to the beam. Avoid radiation exposure to the skin!
CAUTION
This symbol indicates a possible hazard to the instrument or system.
CAUTION
Disconnect the plug-in power unit from line power before opening the microscope!
NOTE
This symbol refers you to advice that you must observe under all circumstances.

Primo Star / Primo Star iLED Notes on Instrument Safety Carl Zeiss
M60-2-0011 v 08/2008 5
En
g
lish
1.2 Instrument safety and EMC
The Primo Star and Primo Star iLED microscopes have been designed, produced and tested in compliance
with the standards DIN EN 61010-1 (IEC 61010-1) and IEC 61010-2-101 "Safety requirements for
electrical equipment for measurement, control and laboratory use “.
The Primo Star and Primo Star iLED microscopes meet the requirements of the EC Directive 98/79/EC
Annex 1 and carry the mark.
Radio interference suppression in compliance with EN 55011 Class B
Noise immunity in compliance with DIN EN 61326
The instruments have to be disposed of in compliance with the WEEE Directive 2002/96/EC.
1.3 Unpacking, transportation, storage
Please observe the following safety notes for unpacking, transportation and storage of the microscope:
−The microscope is supplied packed to commercial standards in a plastic case with cardboard
packaging; use the original packaging only for any transportation.
−Retain the original packaging for longer storage or return to the manufacturer.
−When unpacking the equipment, verify that all parts specified on the delivery note are present.
−Keep transportation and storage temperatures as specified in Technical Data.
−Set up the microscope on a stable worktable with solid and smooth tabletop.
−Do not touch optical surfaces to avoid fingerprints.
Risk of burns due to hot surface on the underside of the microscope during operation and up
to 10 minutes after power off.
1.4 Disposal
Please observe the following safety notes for the disposal of the microscope:
Defective microscopes should not be disposed of with household waste; dispose of them in
compliance with the provisions of the law.
The manufacturer of the device is under the legal obligation to take back defective devices.
Batteries of the battery supply unit should not be disposed of with household waste; dispose
of them in compliance with the provisions of the law.

Carl Zeiss Notes on Instrument Safety Primo Star / Primo Star iLED
6 M60-2-0011 v 08/2008
En
g
lish
1.5 Use
The microscopes including their original accessories must not be used for microscopic techniques other
than those described in this Operating Manual.
Please observe the following safety notes when using the microscopes:
The manufacturer cannot assume any liability for other applications, including those of
individual modules or single components. This also applies to any service or repair work that is
not carried out by authorized service personnel. In case of non-compliance, all warranty claims
shall be forfeited.
Opening of the device is only allowed to accordingly instructed specialists or to the Service
staff.
The LED module of the reflected-light fluorescence illuminator emits LED light of class 3B. For
this reason, never look directly into the light and avoid in any case direct exposure of the skin to
the light. When working with the microscope, it is absolutely necessary to use the
corresponding protective equipment.
Never look into the light beam - neither with nor without optical instruments, not even if you
simply wanted to observe the specimen. In case of non-observance your eyes may be damaged!
Do not operate the devices and their accessories included in the delivery in potentially explosive
areas, in the presence of volatile anesthetics or combustible solvents, such as alcohol, benzene
or similar chemicals.
Dirt and dust may impair the performance of the devices. They must therefore be protected
from such influences to the greatest possible extent and covered with the dust cover when not
in use. Always check whether the devices are switched off before you cover them (blue power-
on light is off).
The microscopes may only be operated by trained personnel who must be aware of the
possible dangers involved with microscopy and the particular application concerned. The
microscope may be put into operation only if placed on a stable, solid, smooth and hardly
flammable surface.
The microscope is a high-precision instrument that can be impaired in its performance or even
be destroyed when handled improperly.
The microscope is equipped with a plug-in power unit allowing line voltages to be used in the
range between 100 and 240 V ±10%, 50/60 Hz, without any need for changing the voltage
setting on the instrument.
The plug-in power unit meets the requirements of protection class II (with protective
insulation). If its casing is damaged, put the plug-in power unit out of operation. The
microscope may be operated only with the supplied plug-in power unit.

Primo Star / Primo Star iLED Notes on Instrument Safety Carl Zeiss
M60-2-0011 v 08/2008 7
En
g
lish
If it is noted that protection measures are no longer effective, the instrument must be switched
off and safeguarded against inadvertent operation. Please contact a Zeiss service agency or the
Carl Zeiss Microscopy Service to repair the instrument.
−Always disconnect the power cable before opening the instrument and changing the lamp
or LED.
−Wait for the lamp to cool down before replacing it and do not touch the new bulb to avoid
fingerprints.
−The instrument may be opened by accordingly instructed specialists or service staff only.
−The operation of the instrument in explosion-risk environments is not allowed.
When using immersion oil, read in any case the safety data sheet.
Immersion oil irritates the skin. Avoid any contact with skin, eyes and clothing.
After skin contact, wash the oil off with plenty of water and soap.
After eye contact, immediately rinse the eye with plenty of water for at least five minutes.
If the irritation persists, consult a medical specialist.
Proper disposal of immersion oil: Take care to ensure that immersion oil does not enter surface
water or the sewage system.
The microscope is not equipped with special devices for the protection from substances that
are corrosive, potentially infectious, toxic, radioactive, or other substances that might be
hazardous to health. Make sure to observe all legal regulations, particularly the relevant
national accident prevention regulations when handling such substances.
−Before any transportation of the instrument, switch it off and let it cool down (hot surface
on the underside of the instrument).
−Operate the device only on a hard, non-combustible base.
−The plug-in power unit must not get in contact with moisture.

Carl Zeiss Notes on Instrument Safety Primo Star / Primo Star iLED
8 M60-2-0011 v 08/2008
En
g
lish
1.6 Warning and information labels
Fig. 1 Warning and information labels on the rear side of the stand
Fig. 2 Warning and information labels on the reflected-light fluorescence illuminator

Primo Star / Primo Star iLED Notes on Instrument Safety Carl Zeiss
M60-2-0011 v 08/2008 9
En
g
lish
Fig. 3 Warning and information labels on the battery supply unit
1.7 Notes on warranty
The Primo Star and Primo Star iLED microscopes including their original accessories must not be used for
microscopic techniques other than those described in this Operating Manual. The manufacturer cannot
assume any liability for other applications.
Please note the following information on warranty for the microscopes:
−The manufacturer guarantees that the microscope is free of material or manufacturing defects when
delivered.
−Possible defects must be notified to us immediately and steps be taken to minimize damage.
−If notified of such a defect, the manufacturer is obligated to rectify it at its discretion, either by
repairing the instrument or delivering an intact replacement.
−No guarantee is provided for defects caused by natural wear (wearing parts in particular) and improper
use.
−The instrument manufacturer shall not be liable for damage caused by faulty operation, negligence or
any other tampering with the microscope, particularly the removal or replacement of microscope
components, or the use of accessories from other manufacturers.
Unauthorized tampering with the instrument shall lead to a forfeit of all warranty claims.

Carl Zeiss Description Primo Star / Primo Star iLED
10 M60-2-0011 v 08/2008
En
g
lish
2DESCRIPTION
2.1 System overview

Primo Star / Primo Star iLED Description Carl Zeiss
M60-2-0011 v 08/2008 11
En
g
lish

Carl Zeiss Description Primo Star / Primo Star iLED
12 M60-2-0011 v 08/2008
En
g
lish
2.2 Intended use
The Primo Star and Primo Star iLED microscopes are universally applicable light microscopes primarily
designed for the examination of cell and tissue cultures as well as sediments in culture flasks, Petri dishes
and microplates.
Typical applications:
Examination of blood and tissue samples from the human body, observation of intracellular
processes on living cell cultures, cell-cell interactions, motility, growth, potential measurements,
detection of medical drugs, microinjection and in vitro fertilization.
The Primo Star iLED microscope combined with the reflected-light fluorescence illuminator offers, for
example, excellent opportunities for the detection of tuberculosis agents by applying the reflected-light
fluorescence method.
When handling hazardous substances, observe the instructions on intended operation, correct use and
statutory safety precautions.
2.3 Instrument description and main features
The Primo Star and Primo Star iLED microscopes are transmitted-light microscopes of compact design
with a small footprint.
Besides the high-resolution, infinity-corrected objectives and the important microscopy techniques, such
as brightfield, darkfield and phase contrast in transmitted light, as well as fluorescence in reflected light
(only Primo Star iLED with reflected-light fluorescence illuminator), the microscope is optionally available
with a camera port for photo and video documentation.
The major features of the microscope include:
−Modular illumination through 6V 30W halogen lamp, LED illumination or illuminating mirror for
transmitted light
−Optional reflected-light fluorescence illuminator (Primo Star iLED)
−Integrated fixture for external power supply and cable (incl. cable with multiple plug and country-
specific plug inserts)
−Optional rechargeable battery supply unit for network-independent operation of the microscope or for
uninterruptible power supply in case of power failure; serves at the same time as a line filter
−Plastic-coated carrying handle integrated in stand for setting up, demounting and transporting the
device
−Blue, light-intensity indicators installed on both sides and well visible from a distance
−Primo Star stand in "Full-Köhler" or "Fixed-Köhler" design
−Primo Star iLED stand in "Fixed-Köhler" design
−Convenient coaxial coarse and fine focusing drive, smoothness of coarse focusing drive being
adjustable
−Mechanical stage 75×30 left/right with specimen holder, stage controls optionally on the right or left
−Space-saving, continuously adjustable illumination module optionally with halogen or LED source
−"Full-Köhler" or "Fixed-Köhler" Abbe condensers for brightfield, darkfield and phase contrast (for
"Full-Köhler" design only)

Primo Star / Primo Star iLED Description Carl Zeiss
M60-2-0011 v 08/2008 13
En
g
lish
−Backward inclined quadruple objective nosepiece with W 0.8 lens thread running on ball bearing
−Infinity-corrected "Plan-ACHROMAT" objectives with magnifications of 4x, 10x, 40x and 100x/Oil for
brightfield, darkfield and phase contrast as well as for oil immersion applications (100x/Oil)
−Binocular tube or binocular phototube (50% vis, 50% doc) with ergonomically favorable tube angle of
30° with adjustable interpupillary distance and viewing height
−10×adjustable eyepieces for field-of-view numbers 18 or 20, suitable for spectacle wearers
2.4 Objectives
The objectives are the optical heart of the microscope. The objectives may be labeled as follows:
Plan-ACHROMAT 10x/0.25 ∞/-.
Where:
10×Objective magnification,
with a defined color ring on the
objective being assigned to each
magnification step (Carl Zeiss color code)
0.25 Numerical aperture
∞Infinite mechanical tube length
−Usable with cover glass thickness D = 0 or
0.17 mm
0 Usable without cover glass
or
0.17 Usable with cover glass thickness
D = 0.17 mm
Other labels:
Oil Oil immersion objective
Ph Phase contrast objective with green
inscription
Objective magnification multiplied by eyepiece magnification results in overall visual magnification, e.g.
10 x 10 = 100x.
Numerical aperture multiplied by 1000, e.g. 0.25 ×1000 = 250×, presents the maximum useful
magnification; there is no resolution for further details above that limit.
When immersion objectives are used, the air between the cover glass and the objective is replaced by a
liquid, which in most cases is immersion oil. The plastic oiler containing 5 ml of immersion oil is
particularly suitable for this purpose.
Because of their short working distances, the 20x, 20x/Ph 2, 40x, 40x/Ph 2, 100x,100x/Oil, and 100x/Ph 3
Oil objectives are equipped with resilient mounts for specimen protection.
Fig. 4 Objective

Carl Zeiss Start-Up and Operation Primo Star / Primo Star iLED
14 M60-2-0011 v 08/2008
En
g
lish
3START-UP AND OPERATION
3.1 Starting up the microscope
3.1.1 Setting up the microscope
Before installing and starting up the microscope, be sure to carefully read and observe the
notes on instrument safety (see section 1).
Do not touch optical surfaces when unpacking the microscope to avoid fingerprints!
The microscope is supplied completely assembled and inclusive of accessories packed to commercial
standards.
Additionally ordered components, such as sliders, transmitted-light module with illuminating mirror or
reflected-light fluorescence illuminator, are delivered in separate packages and must still be mounted to
the microscope.
•Remove the microscope from the transport case and place it onto the worktable.
Retain the original packaging for storage of the instrument in longer periods of non-use or for
return to the manufacturer.
•Remove the plug-in power unit (Fig. 5/2) from
its storage fixture on the back of the
microscope stand.
•Replace the installed power outlet adapter by
one of the supplied country-specific adapters
(Fig. 5/4), if necessary. To this end, pull off the
attached adapter and plug on the desired
adapter.
•If you use a Primo Star iLED with reflected-light
fluorescence illuminator, you will have to mount
this module first, see section 3.1.2.
•If you use a battery supply unit, proceed
according to section 3.1.3. If not, connect the
plug-in power unit to a power outlet.
•If the plug-in power unit cannot be plugged
into the chosen power outlet because of limited
space, replace the power outlet adapter by the
supplied IEC adapter (Fig. 5/3) This allows the
plug-in power unit to be put flat onto the
tabletop and connected to the power outlet
through a country-specific appliance cable.
Fig. 5 Starting up the microscope

Primo Star / Primo Star iLED Start-Up and Operation Carl Zeiss
M60-2-0011 v 08/2008 15
En
g
lish
When using the IEC adapter, the plug-in power unit can be fixed for transportation purposes to the back
of the microscope stand by means of the supplied two self-adhesive hooks and the Velcro®strip:
•Pull the Velcro®strip (Fig. 6/2) through the brackets of the hooks (Fig. 6/1).
•Stick the hooks (Fig. 6/1) together with the Velcro®strip to the recess (above on the right and left,
respectively) at the back of the stand.
•Insert the plug-in power unit (Fig. 6/3) and close the Velcro®strip.
Fig. 6 Fixing the plug-in power unit with IEC adapter to the stand

Carl Zeiss Start-Up and Operation Primo Star / Primo Star iLED
16 M60-2-0011 v 08/2008
En
g
lish
3.1.2 Mounting the reflected-light
fluorescence illuminator
Mounting the reflected-light illuminator onto
the stand
•Remove the tube, see section 3.5.1. If the
clamping screw is used to fix the tube to the
stand, replace it by the Allen set screw.
•Insert the magnetic field transmitter (Fig. 7/1)
for interlock as far as it will go into the stand at
the rear strut and screw it down.
•Push the carrying handle (Fig. 7/3) from the
back into the stand and fix it with two screws
(Fig. 7/2).
•Insert the reflected-light illuminator (Fig. 8/1), in
right angle and slightly inclined with its dovetail
mount into the stand (Fig. 8/4).
•Position the reflected-light illuminator (Fig. 8/1)
horizontally and turn it backwards with the
dovetail mount in the stand, align it to the
outer edges of the stand and tighten the set
screw (Fig. 8/3).
If the outer edges of the reflected-light
illuminator are not exactly aligned to
the stand, it may be that the reflected-
light illuminator cannot be switched on
due to the interlock feature causing
the interruption of the circuit to
protect against emergent LED light.
•Place the tube onto the stand and tighten the
clamping screw (Fig. 8/2), see section 3.5.1.
Fig. 7 Mounting the magnetic field
transmitter and the carrying handle
Fig. 8 Placing the reflected-light
illuminator onto the stand

Primo Star / Primo Star iLED Start-Up and Operation Carl Zeiss
M60-2-0011 v 08/2008 17
En
g
lish
•Loosen the set screw (Fig. 9/6) on the back of
the device, unplug the connector (Fig. 9/2) of
the plug-in power unit (Fig. 9/5) and insert it
into the connection socket (Fig. 9/1) of the
reflected-light illuminator.
•Plug the connector (Fig. 9/3) of the reflected-
light illuminator into the connection socket
(Fig. 9/4) at the stand and tighten the set screw
(Fig. 9/6).
•Fasten the cable of the reflected-light
illuminator by pushing it into the cable clip
(Fig. 9/7).
•Insert the plug-in power unit into a power
outlet.
Mounting the slider with yellow filter to the
luminous-field diaphragm
•Unscrew the cover cap (Fig. 11/2) from the
luminous-field diaphragm (Fig. 11/3).
•Turn the slider (Fig. 10/3) upside down. Loosen
the clamping screw (Fig. 10/4) of the supporting
ring and remove the supporting ring (Fig. 10/1)
upward.
•Put the cover cap (Fig. 10/2), with its upper side
facing downward, into the slider (Fig. 10/3).
•Insert the supporting ring (Fig. 10/1) into the
slider and fix it with the clamping screw
(Fig. 10/4).
Fig. 9 Connecting the power supply unit
Fig. 10 Inserting the cover cap into the
slider

Carl Zeiss Start-Up and Operation Primo Star / Primo Star iLED
18 M60-2-0011 v 08/2008
En
g
lish
•Turn the slider (Fig. 11/1) to its mounting
position, put it on the luminous-field diaphragm
(Fig. 11/3) and fasten it slightly, for the time
being, by means of the cover cap (Fig. 11/2).
•Turn the slider (Fig. 11/1) to the desired position
(for right-hand or left-hand operation) and fix it
in this position by tightening the cover cap.
Removing the yellow filter from the slider
If you find the yellow filter (color conversion filter
from blue (LED) to yellow) for transmitted-light
observations bothersome, you may remove it as
follows:
•Turn the cover cap of the luminous-field
diaphragm (Fig. 11/2) to loosen it and remove it
together with the slider (Fig. 11/1).
•Loosen the clamping screw (Fig. 12/6) and
remove the filter holder (Fig. 12/5) downwards
from the slider (Fig. 12/7).
•Remove the knurled ring (Fig. 12/4) with the
color filter from the filter holder.
•Remove both O-rings (Fig. 12/1and 2) from the
knurled ring, push the yellow filter (Fig. 12/3)
carefully out and keep it for future use.
•Put the knurled ring into the filter holder, insert
both pieces together from below into the slider
and fasten them with the clamping screw.
Using special eyecups with light protection
Our special eyecups with light protection
(Fig. 17/1) are used for fluorescence applications if
no darkroom is available. However, they cannot
be folded over and are, therefore, not suitable
for spectacle wearers.
For this reason, spectacle wearers should use the
standard eyecups or fold-over eyecups.
Fig. 11 Mounting the slider onto the
luminous-field diaphragm
Fig. 12 Removing the yellow filter from the
slider

Primo Star / Primo Star iLED Start-Up and Operation Carl Zeiss
M60-2-0011 v 08/2008 19
En
g
lish
3.1.3 Connecting the battery supply unit
Inserting batteries into the battery supply unit or remove them as follows:
•Loosen the four slotted screws of the battery supply unit.
•Remove the lid upward.
•Insert five commercial mono-cell batteries (D), type NiCd or NiMH, 1.2 V, with a capacity of 5000 mAh
(min.) to 9000 mAh (max.), paying attention to correct polarity (see markings in the battery
compartments).
Batteries of different types or different capacities must not be used together. Insert
rechargeable batteries only.
•Push the changeover switch for the battery type (Fig. 3/1) to the correct position:
ON = NiMH; OFF = NiCd
•Put the lid on again.
•Fasten it with the four slotted screws.
Primo Star iLED with reflected-light fluorescence illuminator:
•Pull the connector (Fig. 13/5) of the plug-in power unit (Fig. 13/6) out of the connection socket
(Fig. 13/1) of the reflected-light illuminator and insert it into the connection socket of the battery
supply unit (Fig. 13/4). The connector of the reflected-light illuminator (Fig. 13/3) is already connected
to the connection socket of the microscope (Fig. 13/7).
•Insert the connector (Fig. 13/2) of the battery supply unit into the connection socket (Fig. 13/1) of the
reflected-light illuminator.
•Insert the plug-in power unit (Fig. 13/6) into a power outlet.
Fig. 13 Connecting the battery supply unit

Carl Zeiss Start-Up and Operation Primo Star / Primo Star iLED
20 M60-2-0011 v 08/2008
En
g
lish
Primo Star:
•Loosen the set screw (Fig. 13/8) at the rear of the device and pull the connector (Fig. 13/5) of the plug-
in power unit (Fig. 13/6) out of the connection socket (Fig. 13/7) of the microscope.
•Insert the connector of the plug-in power unit into the connection socket of the battery supply unit
(Fig. 13/4).
•Insert the connector of the battery supply unit (Fig. 13/2) into the connection socket (Fig. 13/7) of the
stand and tighten the set screw (Fig. 13/8).
•Insert the plug-in power unit (Fig. 13/6) into a power outlet.
3.1.4 Switching the microscope on / off
Primo Star:
•Switch on the microscope with the rotary knob (Fig. 5/5) and adjust the illuminator to the desired
intensity.
The selected intensity is indicated in five steps by the blue light-emitting diodes (Fig. 16/6) arranged on
both sides of the stand.
•After finishing work, switch off the microscope with the rotary knob and cover it with the dust cover.
•The smoothness of the coarse focusing drive (Fig. 16/25 and Fig. 17/30) is factory-adjusted, but you
can readjust it when required.
Primo Star iLED:
For transmitted-light applications:
Always turn the transmitted light / reflected light changeover switch first upward and then to
the desired position. By using force to turn it downward the reflected-light illuminator will be
damaged.
•Turn the transmitted light / reflected light changeover switch (Fig. 17/5) upward to the transmitted-
light position (Brightfield).
•Switch on the transmitted-light illuminator using the rotary knob (Fig. 17/10) and adjust the desired
illumination intensity.
The selected illumination intensity for transmitted light is indicated in five steps by the blue light-emitting
diodes (Fig. 17/9) arranged on both sides of the stand.
For reflected-light applications (fluorescence):
Always turn the transmitted light / reflected light changeover switch first upward and then to
the desired position. By using force to turn it downward the reflected-light illuminator will be
damaged.
•Turn the transmitted light / reflected light changeover switch (Fig. 17/5) upward to the reflected-light
position (Fluorescence).
•Switch on the reflected-light illuminator using the rotary knob (Fig. 17/6) and adjust the desired
illumination intensity.
This manual suits for next models
1
Table of contents
Languages:
Other Zeizz Microscope manuals