Zelocity PureFlight User manual

Golf Performance Monitors PureFlight™Operating Guide
Version 1.2 www.zelocity.com 1-888-ZELOCITY 1 of 22
PureFlight™
BallFlightMonitor
OperatingGuide

Golf Performance Monitors PureFlight™Operating Guide
Version 1.2 www.zelocity.com 1-888-ZELOCITY 2 of 22
Thank you for choosing the PureFlight™ ball flight monitor by Zelocity, sure to be your
favorite golf partner. Please contact us with any questions at 1.888.ZELOCITY or visit
our website at www.zelocity.com.
Table of Contents
PureFlight™Specifications ................................................................................................. 4
Getting Started.................................................................................................................... 5
PureFlight™Power Management........................................................................................ 7
Operating in MODE 1 and MODE 2.................................................................................. 8
Monitoring Short-Distance Shots in WEDGE Mode........................................................ 13
Customized Use of PureFlight™....................................................................................... 13
Storing Shot Data in the PureFlight™............................................................................... 15
Troubleshooting................................................................................................................ 17
Warranty ........................................................................................................................... 21

Golf Performance Monitors PureFlight™Operating Guide
Version 1.2 www.zelocity.com 1-888-ZELOCITY 3 of 22
***NOTE***
This equipment has been tested and found to comply with the limits for a Class B digital
device, pursuant to Part 15 of the FCC Rules. These limits are designed to provide
reasonable protection against harmful interference in a residential installation. This
equipment generates uses and can radiate radio frequency energy and, if not installed and
used in accordance with the instructions, may cause harmful interference to radio
communications. However, there is no guarantee that interference will not occur in a
particular installation. If this equipment does cause harmful interference to radio or
television reception, which can be determined by turning the equipment off and on, the user is
encouraged to try to correct the interference by one or more of the following measures:
•Reorient the receiving antenna.
•Increase the separation between the equipment and receiver.
•Move the computer away from the receiver.
•Connect the equipment into an outlet on a circuit different from that to which the
receiver is connected.
DECLARATION OF CONFORMITY
We, Zelocity Corporation,
14500 N. Northsight Blvd., Suite 205
Scottsdale, Arizona 85260
Phone 480-556-6007
declare under our sole responsibility that the product
Zelocity PureFlight™
complies with Part 15 of the FCC Rules. Operation is
subject to the following two conditions: (1) this device
may not cause harmful interference, and (2) this device
must accept any interference received, including
interference that may cause undesired operation.

Golf Performance Monitors PureFlight™Operating Guide
Version 1.2 www.zelocity.com 1-888-ZELOCITY 4 of 22
PureFlight™Specifications
General:
•Golf ball flight monitor with integrated Doppler-radar transceiver
•Patented technology, Made in USA, Shot data displayed on unit
•Outputs: Ball Velocity, Club Head Speed, Carry or Carry + Roll Distance, and Power Transfer Ratio %
•Data transferable to user’s personal computer via serial connection (optional)
•Computer software (optional) available for personal practice, club fitting, and golf instruction
oPureFlight™Practice uploads practice results to PC for improvement tracking
oPureFlight™Fitting program displays shot data real-time on computer for club fitting
oSoftware prints distance card by club and performance graphs
Applications: Serious and Avid Golfers, Club Fitting, Instruction, Event Rentals, Driving Ranges, etc.
Performance:
•For right-handed and left-handed golfers
•For all clubs, driver through wedges
•Indoor or outdoor use; No calibration required; Setup time less than 30 seconds
•External microphone for club head speed measurement at impact
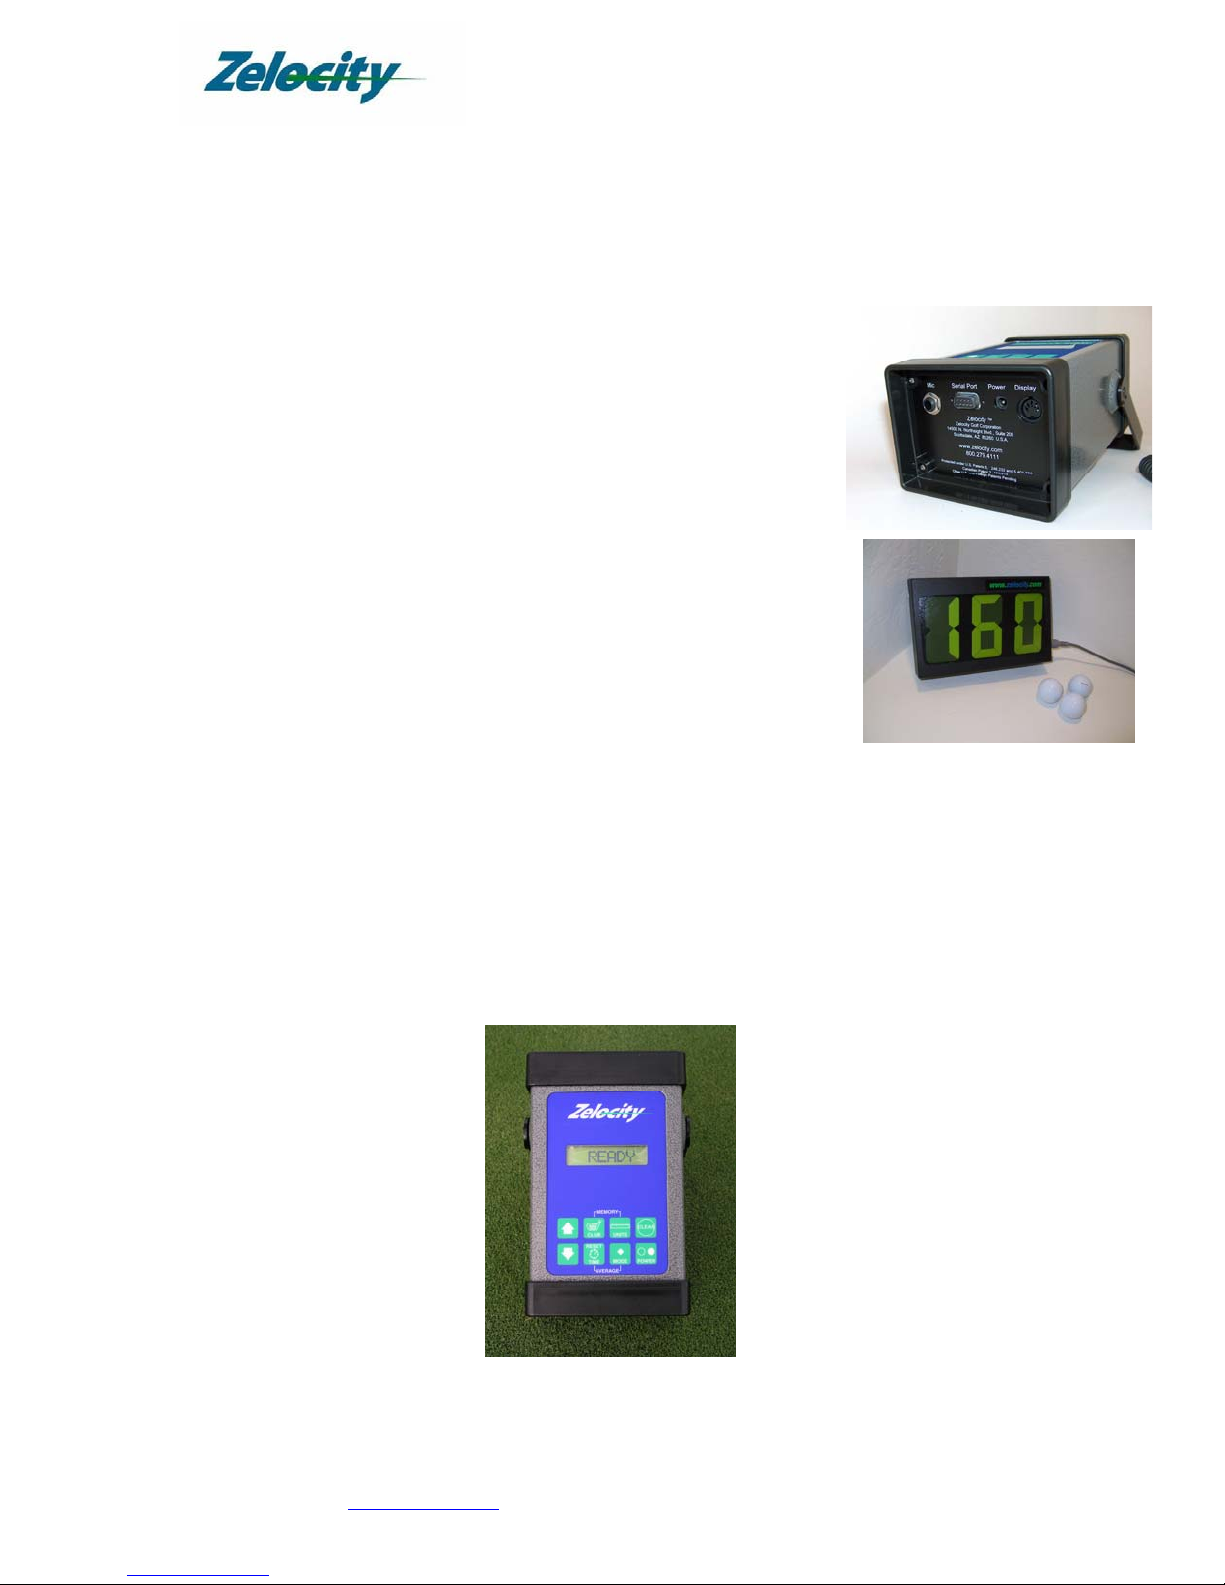
•Communicates with external 4” digital display (optional) for easy viewing
Convenience:
•Portable, compact design
•Comes complete with power supply, microphone, cable and instructions
•Operates using Battery or AC power outlet; Recharge 10 hrs; Avg. Life 3 - 6 hrs
•No maintenance required; One (1) year factory warranty; Repaired at factory
•One (1) year customer support included
Construction:
•Rugged steel case; Touch-sensitive keypad; Serial connector; AC power connector;
External display connector
Power:
•Rechargeable internal 12V DC Ni-Cad batteries
•120V, 25W AC Power Transformer provided for recharging or AC operation
•Input Voltage: 90-135V at 50/60 Hz
Dimensions: PureFlight™unit: (H x W x D): 4” x 5” x 8” Weight: ~3 lbs
Shipping: (H x W x D): 9” x 13” x 11” Weight: ~ 8 lbs

Golf Performance Monitors PureFlight™Operating Guide
Version 1.2 www.zelocity.com 1-888-ZELOCITY 5 of 22
Getting Started
Before using your PureFlight™, ensure all ordered components have been received.
Within your PureFlight™ shipping container you should find the following items.
PureFlight™ Components
1. PureFlight™ unit
2. Power Supply
3. Microphone
4. Mode 2 Microphone Cable
5. Carry Bag
6. PureFlight™ User Manual
Please contact your Zelocity salesperson immediately if you have not received all these
items or any item appears damaged.
Please review these instructions carefully and completely prior to using your new
PureFlight™. You may also wish to keep this guide handy when operating your unit the
first few times.
Carry Bag
Microphone
Mode 2 Microphone
Cable
PureFlight™ Unit
Combination
Carry Handle/Stand
Power Supply
PureFlight
User Manual

Golf Performance Monitors PureFlight™Operating Guide
Version 1.2 www.zelocity.com 1-888-ZELOCITY 6 of 22
PureFlight™ Back Panel
The back panel of the PureFlight™ contains the following:
•Power connection for AC power supply/re-charger
•Display connection for 5-pin display cable. This cable
connects the PureFlight™ to a 4” (size of the digits)
external digital display for easy viewing (shown at right,
sold separately).
•Serial port for connecting PureFlight™ to a personal
computer (PureFlight™ Practice and PureFlight™ fitting
software sold separately)
•Microphone connector to accept microphone (for MODE 1
operation) or MODE 2 microphone cable (for MODE 2
operation)
PureFlight™ Keypad
The PureFlight™ keypad provides you with the ability to operate the unit, set and change
defaults, change modes and more. See the PureFlight™ Keypad Instructions at the end
of this manual for all keypad functions.

Golf Performance Monitors PureFlight™Operating Guide
Version 1.2 www.zelocity.com 1-888-ZELOCITY 7 of 22
PureFlight™Power Management
The PureFlight™ is shipped from the factory with a full charge on the internal battery.
When you initially turn the power on, the READY message will appear for a few
seconds. The display will then switch to a battery level indicator message for a few
seconds before returning to READY. The PureFlight™ will display battery status
approximately every 8 minutes during operation.
There are three possible displays for the battery level depending on the remaining charge:
Charge Life Display
Up to 6 hours remaining BATT OK
15-30 minutes remaining LOW BATT
0 minutes remaining Flashes “RECHARGE” and automatically shuts off
To recharge the PureFlight™ internal battery:
1. Plug the power supply into a surge-protected AC outlet.
2. Plug the power supply’s connector into the “Power” port on the back of the unit.
3. Ensure the PureFlight™ is powered off.
4. Charge the PureFlight™ for a full 4 to 6 hours when the battery gauge displays
LOW BATT or RECHARGE.
The PureFlight™ can also be operated on AC power when the power supply is plugged
into the unit and the unit is powered on.
***ATTENTION***
The unit does not charge the internal batteries while it is operating under AC power. If you wish to
recharge the unit after AC use, leave the unit plugged in and turn the power off. The PureFlight™
will then recharge normally.
A fully charged battery should last approximately 6 hours in MODE 1 with a microphone
(use of microphone in MODE 1 is recommended), 3 to 4 hours in MODE 1 without a
microphone or 3 to 4 hours of MODE 2 operation.
Once your PureFlight™ is charged, it is ready for operation and can be used for either
normal or high trajectory shots in either MODE 1 or MODE 2.
CAUTION: If using the PureFlight™ indoors where static electricity may be present you
should place a mouse pad or other rubber based mat underneath the unit.

Golf Performance Monitors PureFlight™Operating Guide
Version 1.2 www.zelocity.com 1-888-ZELOCITY 8 of 22
Operating in MODE 1 and MODE 2
The PureFlight™ has two different MODES of operation: MODE 1 and MODE 2. For
each mode, there are differences in (a) the handle position, (b) how the unit is set up, and
(c) how the data is displayed.
Handle Positions for MODE 1 and MODE 2
Using the combination Carry Handle/Stand, the PureFlight™ can be used to monitor
shots for all clubs from the driver through wedges in both MODE 1 and MODE 2.
For MODE 1, pull the stand down to its
second stop position, where the handle is
perpendicular to the bottom of unit. The
bottom of the stand is now underneath the unit
and the white face is pointed in the air (see
picture at right). Use this position for all
clubs in MODE 1.
For MODE 2 operation, hold the unit with
keypad facing up and push the handle
towards the front of the unit a few inches
until you feel the handle engage in the
next stop position. The bottom of the
stand is now slightly in front of the white
face of unit (see picture). Use this position
for all clubs in MODE 2.
Refer to the Troubleshooting section for more detail as questions arise.
MODE 1
MODE 2

Golf Performance Monitors PureFlight™Operating Guide
Version 1.2 www.zelocity.com 1-888-ZELOCITY 9 of 22
The following are descriptions of MODE 1 and MODE 2 operation and the variables that
can be controlled by the user.
MODE 1 – Distance Only Operation
PureFlight™ set up for MODE 1:
1. Position the stand under the unit in the high position.
2. Insert the microphone directly into the opening on the back panel. Push all the way
in and gently tug on it to ensure it is locked into place. If the microphone is not
tight, pull it out and re-insert it making sure it is tightly seated in the receptacle.
3. In MODE 1, the PureFlight™ unit is placed as follows:
•Directly alongside and even with the ball (see above picture)
•No more than 6” from the golf ball. If the unit is further away, the readings
may be short. If the unit needs to be positioned 7” – 12” away from the ball,
use the Increase Distance Readings function (see keypad instructions) and set
to 110%
•White face of the unit pointed downrange, along the golf ball flight line
•Swivel the microphone around to point the grey circular pad toward the ball or
a few inches behind the ball
4. After pressing the POWER key, the unit will display “READY” and will be in
MODE 1 (the default).
5. The PureFlight™ unit is now ready for MODE 1 (Distance Only) use.
Unit
Golfer
Down Range
Golf Ball
Unit is 6” - 8” from
ball

Golf Performance Monitors PureFlight™Operating Guide
Version 1.2 www.zelocity.com 1-888-ZELOCITY 10 of 22
Notes on MODE 1 Setup:
a. With the microphone in place, the PureFlight™ waits to “hear” the club
impact the ball before the radar is activated. This is a power-saving
feature designed to save battery charge.
b. Without the microphone, the PureFlight™ unit’s radar is always activated.
It will take measurements and display results just as if the microphone
were present but will discharge the internal battery in approximately 3 to 4
hours. Operating the unit without the microphone increases the possibly
of background noise triggering false readings. If you are getting erroneous
readings, insert the microphone.
User Settings in MODE 1:
•“Yards” is Carry Distance (distance the ball flies in the air before hitting the
ground on its first bounce)
---OR---
•“YardsR” is Carry + Estimated Roll (total distance the ball travels in flight
plus a constant amount of roll). The estimated roll constant for drivers will be
more than for wedges.

Golf Performance Monitors PureFlight™Operating Guide
Version 1.2 www.zelocity.com 1-888-ZELOCITY 11 of 22
MODE 2 – All Parameters (Ball Velocity, Club Head Speed,
Distance, Power Transfer Ratio %)
PureFlight™ set up for MODE 2:
1. Position the stand under the unit in the low position.
2. Insert the microphone into the opening at the end of the “curly” MODE 2 cable.
Push the microphone all the way in and tug on it a little to ensure it is locked into
place. If not, pull the microphone out and re-insert it making sure it is tightly
seated in the cable.
3. Plug the cable connector into the back panel. Push all the way in and tug on it a
little to ensure it is locked into place. If not, pull the cable out and re-insert it
making sure it is tightly seated in the PureFlight™ unit.
Unit
Golfer
Approximately 42”- 45” from front of unit
to microphone
Golf Ball
Microphone & cable is
6”-8” from ball

Golf Performance Monitors PureFlight™Operating Guide
Version 1.2 www.zelocity.com 1-888-ZELOCITY 12 of 22
4. The PureFlight™ unit is placed as follows (see picture on prior page):
•About 42” directly behind ball for drivers, 34” directly behind the ball for
mid-irons, 28” directly behind the ball for short irons and wedges
•White panel pointed downrange, straight down the target line
•Mode 2 microphone cable stretched out toward ball
•End of Microphone 6” from the ball pointed at or slightly behind the ball (you
may wish to tape it or use tee to hold in place).
5. The PureFlight™ units default mode of operation is MODE 1. Therefore, you
must change from MODE 1 to MODE 2 after powering up the unit. After
pressing the POWER key, the unit will display “READY” and it is in MODE 1.
a. To set to MODE 2:
b. Press the MODE key – the unit will display “MODE 1”
c. Press DOWN ARROW – the unit displays “MODE 2”
d. Press MODE key again to lock in the setting – unit displays “READY”
6. The PureFlight™ unit is now ready for MODE 2 use.
Notes on MODE 2 Setup:
a. In MODE 2, the PureFlight™ has an active radar signal at all times. It
waits to “hear” the club impact the ball and then reports club head speed
measured just before impact. Because the radar in MODE 2 is always on,
battery charge life is less than in MODE 1 (when the microphone is
plugged in).
b. The microphone is moisture sensitive, so avoid placing on wet grass.
c. PureFlight™ returns to MODE 1 when power is turned off.
Data Displayed in MODE 2:
Ball flight measurements are displayed in the following order:
•Carry distance (distance the ball flies in the air before hitting the ground
(yrds))
---OR---
•Carry + Roll distance (total distance the ball travels in flight plus a constant
amount of roll (yrdsR))
•Club head speed in miles per hour (CMPH)
•Ball velocity in miles per hour (BMPH)
•Power Transfer Ratio % (PTR%), also known as Smash Factor, is an indicator
of the transfer of energy from the club to the ball. The relationship is
calculated as follows.
PTR% = (Ball Velocity / Club Head Speed) x 100%

Golf Performance Monitors PureFlight™Operating Guide
Version 1.2 www.zelocity.com 1-888-ZELOCITY 13 of 22
Monitoring Short-Distance Shots in WEDGE Mode
The PureFlight™ can be used to monitor shots from 20 yards to 420 yards in carry
distance. When the unit is powered up, the default mode is for longer (greater than 75
yards) shots. If the user desires to monitor short shots between 20 and 75 yards, enter
WEDGE selection mode by pressing the MODE and UP ARROW keys simultaneously.
The unit will respond by flashing “IRON/DRV” in the display window. This means the
unit is currently set for longer shots hit with irons and drivers. To enter WEDGE mode,
press the UP ARROW key. The display will now flash “WEDGE”. Then, to lock in the
selection, press the MODE and UP ARROW keys simultaneously. The unit will stop
flashing and return to the READY prompt.
To go back to monitoring longer shots, either turn the unit off and back on, which resets
to IRON/DRV mode, or re-enter WEDGE selection by pressing the MODE and UP
ARROW simultaneously. The unit will now respond with “WEDGE” flashing in the
display window. Use the UP ARROW to select IRON/DRV mode and lock in the
selection by pressing MODE and UP ARROW keys simultaneously.
NOTE: While there are many types and shapes of short game shots, the PureFlight™
distance is based on an internal model with a given set of flight trajectories, club speeds,
and ball speeds. This model was developed from the results of extensive testing with
robotic equipment and professional golfers. For this reason, short shots that are
significantly different in shape and trajectory from the internal model (such as low punch
shots or fast, high shots) may result in actual yardages that are different from the
displayed distance readings on the PureFlight™.
Customized Settings for the PureFlight™
Some PureFlight™ functions can be customized by the user, depending on specific
requirements and how the unit is being used. These variables include the following:
UNITS key - Unit of Measure: used to set unit of measure to yards, meters, or feet.
RESET TIME key: used to control duration of display of each measurement, from 0 to 60
seconds
CLUB key: when not being used in MEMORY mode, CLUB key used to control scaling
factor for distance measurements, up to 150%. Scaling the distance measurement is
typically used by event planners, and amusement company vendors to display greater
shot distances for their customers. Scaling is not recommended to improve your game.

Golf Performance Monitors PureFlight™Operating Guide
Version 1.2 www.zelocity.com 1-888-ZELOCITY 14 of 22
Customizing the PureFlight™ for Personal Use
The PureFlight ball flight monitor is calibrated at the factory for general use by golfers.
Built in to this calibration are standard values for local conditions such as:
•Elevation Standard: Sea Level
•Wind Standard: No Wind
•Temperature Standard: 70 deg. F
•Barometric Pressure Standard: 31.9 inches mercury
•Relative Humidity Standard: 70%
Specific conditions and situations may vary from the standard settings used for this
general purpose calibration. In these cases, the CLUB key is useful to increase (or
decrease) the distances reported by the device by a specified percentage or scaling factor.
For example, a golfer practicing at high
elevation notices the ball carries
significantly further than the same shot hit
at sea level (see Effect of Altitude table).
The distances displayed by the PureFlight
with standard settings may be below the
actual distance for this situation. In this
case, the golfer may choose to increase the
displayed distance by a corresponding
amount, using the CLUB key. The actual
amount of the percent scaling factor can be determined using various methods, from very
informal (make an educated guess) to very rigorous (measure actual shot distance using a
tape or surveyor’s wheel).
One method Zelocity has used in our own calibration efforts on driving ranges has been
to move to an open area of the tee line, a safe distance away from other golfers’ shots.
Using our surveyor’s wheel (an alternative would be to pace off the distance), we
measure out to our desired hitting distances and mark every 10 yards using landscaper’s
flags (an alternative might be empty range ball buckets). To see carry distance to the first
bounce, it is also helpful to have someone downrange for better visibility of the exact
spot the ball lands.
Then we hit shots and note each reading on the monitor and the corresponding distance
measured on the range. Some distance variation, plus or minus a small percentage, may
be expected due to variation in golf balls, wind, etc. This exercise, however, is intended
to find significant variation in one direction, such as each shot displaying five yards too
short on a consistent basis. Then, we translate this yardage to a percentage and use the
CLUB key to increase the distance by this percentage. In this example, a 3% increase in
the reported distance requires a CLUB setting of 103%.
Effect of Altitude
Launch Velocity = 150 mph;
Launch Angle = 15 deg; Spin Rate = 3000 RPM
Elevation
(Feet) Carry Yards Scaling Factor
0 249 Standard
1000 253 + 1.5%
2000 257 + 3.0%
3000 261 + 4.5%
4000 264 + 6.0%
5000 268 + 7.5%
6000 272 + 9.0%

Golf Performance Monitors PureFlight™Operating Guide
Version 1.2 www.zelocity.com 1-888-ZELOCITY 15 of 22
For reference, the following tables indicate corresponding effects of wind and
temperature on flight distance.
Storing Shot Data in the PureFlight™
The PureFlight™ is a microprocessor based unit with an internal memory that can store
up to 1000 shots, saved in up to 99 sessions. Examples of how a session or set of
sessions can be defined include the following:
•Golfer A hits 10 shots each with 8 different clubs for averages by club on a given
day and saves as Session 1. Then Golfer A hits 10 shots with each of the same
clubs three months later and saves as Session 8 (for example). Golfer A then
compares the two sets of averages to determine any changes in their game.
•Golfer B hits six shots with Driver X in Session 1, then hits six shots with Driver
Y and saves in Session 2 and compares the two sets of averages to judge
comparative performance.
•Golfer C hits six shots with each of their clubs in a single session, uploads the
data to the PureFlight™ Practice program, and prints out average distance by club
on a “bag tag” to carry with them on the course.
Effect of Wind
Launch Velocity = 150 mph;
Launch Angle = 15 deg; Spin Rate = 3000 RPM
Wind Speed
(MPH) Carry Yards Scaling Factor
- 5 (Head wind) 239 - 4%
-10 (Head wind) 257 - 8%
0 (No wind) 249 Standard
+5 (Tail wind) 261 + 4%
+10 (Tail wind) 264 + 8%
Effect of Temperature
Launch Velocity = 150 mph;
Launch Angle = 15 deg; Spin Rate = 3000 RPM
Temperature
(degrees F) Carry Yards Scaling Factor
40 239 -4%
50 242 -3%
60 244 - 2%
70 246 - 1%
80 249 Standard
90 251 +1%
100 253 +2%

Golf Performance Monitors PureFlight™Operating Guide
Version 1.2 www.zelocity.com 1-888-ZELOCITY 16 of 22
Follow these steps to store shots in the PureFlight™:
1. Begin a session.
a. On the key panel, the word MEMORY with lines through it indicates you
should simultaneously press the CLUB and UNITS keys to enter into
MEMORY mode.
b. The PureFlight™ unit will display CONTinue “Y” or “N” with an “up
arrow” and “down arrow.” To add shots to the most recent session,
choose “Y”. To start a new session, choose “N”. (Note: Once you
discontinue a session, you cannot scroll back to the session again later.)
c. Choose the club for which to store data by pressing the CLUB key, then
use the arrows to scroll to the club of your choice. Stop on the club to be
selected, and press the CLUB key again to lock in your selection.
d. The PureFlight™ will continue to display the club you selected. (Note:
The club will be displayed instead of the READY message seen when not
in MEMORY mode).
e. The PureFlight™ is now ready for MEMORY use and will store the shots
in the selected session for the selected club.
2. Begin hitting shots.
a. Measurements will be stored in the PureFlight™ internal memory.
b. If a mis-hit occurs, it can be deleted by pressing the CLEAR key before
the displayed numbers disappear and the unit resets for the next shot.
3. You can see average distance with the AVERAGES function by simultaneously
pressing the RESET TIME and MODE keys.
4. To end a session, press MEMORY again by simultaneously pressing the CLUB
and UNITS keys. The PureFlight™ will display END “Y” or “N”. Choose “Y”
(Up arrow) to end the session.
The shots saved in PureFlight™ memory can be uploaded into the optional PureFlight™
Practice software program for performance analysis and improvement tracking.

Golf Performance Monitors PureFlight™Operating Guide
Version 1.2 www.zelocity.com 1-888-ZELOCITY 17 of 22
Troubleshooting
Problem Resolution
For most common problems,
execute a PureFlight™ self-test
first.
Run the “Full Unit Self-Test”
¾Insert the microphone or microphone/cable combination.
Use “Down Arrow” and “MODE” at the same time to begin
(follow displayed instructions). “SELF TST” will be
displayed, followed by “TST Y or N”. Select “Up Arrow”
for “Y” or “Down Arrow” for “N”.
¾Selecting “Y”, the unit will then go through two tests and
display “PASSED” or “FAILED” at each step. Tests for
radar and microphone functionality during which you will
need to blow into the microphone or clap when prompted.
If the unit passes both self-tests, continue on to the more
specific problems below.
If the unit fails the microphone test when you have the
microphone and cable inserted, try testing without the
cable. This will indicate whether the cable or the
microphone itself is defective.
If either test fails, contact our Support department at
Unit won’t power on.
Make sure you firmly press the power button.
Make sure the battery is charged.
¾Turn the unit off to recharge the battery. Plug in the power
supply to the product and into a surge protected AC outlet
or power strip. Power surges can affect the integrity of the
battery. Use a surge protected power strip if you have
power surges in your area. Charge the battery for 6 to 8
hours to fully charge.
Try powering on with the power supply plugged in.
¾If this works, your battery, the charging circuit, or the unit
itself may be damaged.
Contact our Support department at 888.zelocity or

Golf Performance Monitors PureFlight™Operating Guide
Version 1.2 www.zelocity.com 1-888-ZELOCITY 18 of 22
Immediately after powering on,
the unit displays “RECHARGE” a
few seconds and then powers off.
The battery may need to be recharged.
Try powering on with the power supply plugged in.
¾If PureFlight™ still displays “RECHARGE” right away,
your power supply or the connector on the unit may be
damaged. (see “I think my power supply is bad” below).
Contact our Support department at 888.zelocity or
Unit displays “RECHARGE” after
a few minutes. Charge doesn’t last
for the expected duration.
Make sure the battery is fully charged.
Make sure you have the microphone plugged firmly into all
connections. If the microphone is not plugged in or is loose, the
radar will be on continuously and will discharge the battery
more rapidly (usually 3 to 4 hours or less).
I think my power supply is bad.
To test this you need another working PureFlight™ or another
working power supply.
If you don’t have access to another unit/power supply,
you need to contact our Support department at
Try the suspected “bad” power supply on another PureFlight™,
see if it will charge. If it does, try the other “good” power
supply on the PureFlight™ that had problems.
¾If both power supplies work on one unit, but not the other,
your battery, the charging circuit, or the PureFlight™ unit
itself may be damaged.
¾If both units work with only the “good” power supply, the
“bad” power supply needs to be replaced.
Contact our Support department at 888.zelocity or

Golf Performance Monitors PureFlight™Operating Guide
Version 1.2 www.zelocity.com 1-888-ZELOCITY 19 of 22
Not getting any readings from
shots using woods, long and
medium lofted irons.
Unit displays READY but will not
register golf shots.
Make sure the unit is positioned properly for the mode (1 or 2)
you are using.
¾For MODE 1, position the unit to the side of the tee, 6
inches from the ball with the white front panel of the unit
pointing downrange, parallel with the target line. If you are
using the microphone with MODE 1 (recommended) the
microphone should be plugged directly into the back panel
of the unit and swiveled to point directly at the ball or a few
inches behind the ball.
¾For MODE 2, plug the microphone into the microphone
extension cable and plug the other end of the cable into the
back panel of the unit. The unit should be placed behind the
ball along its intended flight path as indicated (see
PureFlight™ Set Up for MODE 2 instructions), with the
Mode 2 microphone cable stretched towards the ball. The
microphone should be placed 6 inches to the side of the ball,
pointed at the ball. (We recommend anchoring the
microphone with tape or golf tees.)
Make sure you have selected the proper mode.
¾Press the MODE key, then "Down Arrow" or “Up Arrow”
to select the desired mode, then MODE again.
Make sure the microphone is plugged in fully and is positioned
properly.
Unexpected readings appear for
shots hit severely left or right of
the target line.
This can happen if the ball flight path and club head path after
impact are in approximately the same plane.
¾Realign either the golfer’s target line or the unit so that the
white face of the PureFlight™ is aimed along the flight path
the ball is initially traveling.
Unexpected or inaccurate readings
for shots hit normally.
Ensure that the unit is set up properly:
¾Check the handle position matches the mode you are using
¾Check that WEDGE mode is ON for shots 75 yds or less
¾Check that WEDGE mode if OFF for shots over 75 yards
¾Check that the microphone is in
¾If hitting into a net, check that the ball has at least 12 feet of
free flight before being caught in the net

Golf Performance Monitors PureFlight™Operating Guide
Version 1.2 www.zelocity.com 1-888-ZELOCITY 20 of 22
Not getting readings from short
irons or wedge shots.
Unit displays READY but no
measurements reported.
Place the unit in WEDGE mode by simultaneously pressing the
MODE and UP ARROW keys and selecting “WEDGE” (see
Monitoring Short-Distance Shots in WEDGE mode).
Try placing the ball on a tee to ensure solid contact with the
clubface, to provide a loud enough signal to trigger the unit.
The microphone may not always “hear” shots with the shorter
clubs. A “lie board” can also be used to increase the sound
when the ball is struck.
Try using the unit in MODE 1 without the microphone attached
(note that you may see unexpected readings if there is electronic
noise in the area).
Make sure the unit is powered on and positioned properly for
the mode you are using.
¾For MODE 1, position the unit to the side of the tee 6 inches
from the ball with the white front panel of the unit pointing
down the target line. If you are using the microphone with
MODE 1 (recommended), it should be plugged directly into
the back panel of the unit and swiveled to point directly at
or just behind the ball.
¾For MODE 2, plug the microphone into the microphone
extension cable and plug the other end of the cable into the
back panel of the unit. The unit should be placed the
recommended distance behind the ball (see PureFlight™
Set Up for MODE 2 instructions), pointed down the target
line, with the Mode 2 microphone cable stretched towards
the ball. The microphone should be placed 6 inches to the
side of the ball, pointed at the ball. (We recommend
anchoring the microphone with a few golf tees.)
I want to connect the unit to my
computer, but it doesn’t have a
serial port. It just has USB ports.
Purchase a USB-to-Serial port adapter. We recommend the
following two manufacturers.
¾Belkin Part # F5U103, www.belkin.com.
¾Radio Shack Catalog # 26-183, www.radioshack.com.
Table of contents