ZEN In-Home Monitor User manual

ZEN In-Home Monitor
Reference Guide

ZEN In-Home Monitor Reference Guide
© 2012 ZEN Technologies (Power and Energy) Pty Ltd
2
ZEN In-Home Monitor Reference Guide
The presentation, distribution or other dissemination of the information contained in this specification is not a
license, either expressly or implied, to any intellectual property owned or controlled by ZEN Technologies (Power
and Energy) and\or any other third party. ZEN Technologies (Power and Energy) and\or any other third party may
have patents, patent applications, trademarks, copyrights, or other intellectual property rights covering subject
matter in this document. The furnishing of this document does not give you any license to ZEN Technologies
(Power and Energy) or any other third party’s patents, trademarks, copyrights, or other intellectual property. The
example companies, organizations, products, domain names, e-mail addresses, logos, people, places, and events
depicted herein are fictitious. No association with any real company, organization, product, domain name, email
address, logo, person, places, or events is intended or should be inferred.
This specification and the information contained herein is provided on an “AS IS” basis and to the maximum extent
permitted by applicable law, ZEN Technologies (Power and Energy) provides the document AS IS AND WITH ALL
FAULTS, and hereby disclaims all other warranties and conditions, either express, implied or statutory, including,
but not limited to, any (if any) implied warranties, duties or conditions of merchantability, of fitness for a particular
purpose, of accuracy or completeness of responses, of results, of workmanlike effort, of lack of viruses, and of
lack of negligence, all with regard to the document. Also, there is no warranty or condition of title, quiet enjoyment,
quiet possession, correspondence to description or non-infringement of any intellectual property rights with
regard to the document.
In no event will ZEN Technologies (Power and Energy) be liable to any other party for the cost of procuring
substitute goods or services, lost profits, loss of use, loss of data, or any incidental, consequential, direct,
indirect, or special damages whether under contract, tort, warranty, or otherwise, arising in any way out of this
or any other agreement relating to this document, whether or not such party had advance notice of the possibility
of such damages.

ZEN In-Home Monitor Reference Guide
© 2012 ZEN Technologies (Power and Energy) Pty Ltd 3
1. Controls 04
2. Frequently Asked Questions 05
3. Instructions 05
4. Resetting your ZEN In-Home Monitor 06
5. Reconnecting the Monitor to the Inverter 07
5.1 Version A1, D1 Monitor (Most likely) 07
5.2 Version C1, E1 Monitor 08
6. Turning off Event Alerts 10
7. Programming the Annual Yield screen 10
8. Main Menu Information 10
8.1 Main Menu Screen 10
8.2 Complete PV System 10
9. Data Download 11
Table of Contents

ZEN In-Home Monitor Reference Guide
© 2012 ZEN Technologies (Power and Energy) Pty Ltd
4
1. Controls
The ZEN In-Home Monitor has a dial on the right hand
side of the monitor which can be turned, and/or clicked
by pressing it inwards.
FIG 1. ZEN In-Home Monitor
Moving the selection frame
The selection frame indicates which menu item is
currently selected. By turning the push button, you can
move the selection frame to the next menu item or the
previous menu item.
FIG 2. Selection frame
When the selection frame is placed over a menu item,
you can open the menu item by clicking the dial.
Selecting a button
When the selection frame is placed over a button the
button becomes dark (see FIG 3.)
FIG 3. Forward (Fwd) key before and after selection
The Forward (Fwd) key will usually appear in the bottom
right hand corner of the screen and is used to move you
on to the next screen.
Navigating backwards in the menu
Using the arrow icon you can go backwards in the menu
until the main menu is displayed. This icon usually
appears in the top left hand corner of your screen.
By selecting the house icon, you will go straight to the
main menu. This icon normally appears in the top right
hand corner of your screen.

ZEN In-Home Monitor Reference Guide
© 2012 ZEN Technologies (Power and Energy) Pty Ltd 5
2. Frequently Asked Questions
Q. I changed the batteries in my ZEN In-Home Monitor.
How do I reset it?
A. The batteries in a ZEN In-Home Monitor should last
over 12 months if your monitor is positioned next to a
window. If the batteries do go flat more regularly than
12 months, please have a look at where the monitor is
positioned and check whether the monitor is receiving
regular exposure to sunlight. Only rechargeable AA
batteries should be used in a ZEN In-Home Monitor,
and these can be purchased from any supermarket.
Your ZEN In-Home Monitor will need to be reset after
changing the batteries. Please use the steps in section
5 to reconnect your ZEN In-Home Monitor.
Q. My ZEN In-Home Monitor has lost all its data,
or has lost connection. What do I do?
A. The Bluetooth connection between the ZEN In-
Home Monitor and the inverter can only reach up to a
certain distance, and can be interrupted by numerous
obstacles. Some things that may obstruct the Bluetooth
signal include: iron/steel clad walls, solid brick/stone
walls, and most commonly distances.
If the Bluetooth connection is broken, please use the
steps in section 5 to reconnect your ZEN In-Home
Monitor.
Q. My ZEN In-Home Monitor is telling me that I should
have received more Revenue from my system than I
actually received. Is something wrong?
A. The ZEN In-Home Monitor ‘Revenue’ screen displays
the amount you would receive if the Feed In Tariff (FIT)
is GROSS. Most states in Australia have a NET Feed In
Tariff (FIT). Definitions of each FIT are below for your
reference.
NET FIT: Your house will use the kilowatt hours (kWh)
produced by your system first, and then anything left
over will be exported back into the grid. You get paid for
the kWh’s that are exported back into the grid.
GROSS FIT: All the kilowatt hours (kWh) produced
by your system are exported back into the grid, and
your house uses electricity from the national grid as it
normally would. You are paid for all the kWh’s that your
system produces.
Q. My ZEN In-Home Monitor is beeping all the time.
How do I make it stop?
A. Sometimes when the ZEN In-Home Monitor records
an ‘Event’ (i.e. a grid disturbance, blackout, warning,
etc) it will alert you with a regular beep. If this alert
beep continues to repeat for a long period, it may flatten
the batteries in the ZEN In-Home Monitor. Please
ensure the batteries are replaced/recharged before
following the instructions in Turning off Event Alerts in
Section 6 to turn off the alert beep.
These instructions are current as of Oct 2012 and are subject to change without notice. Please call ZEN
Home Energy if you have any questions or concerns in regard to your In-Home Monitor.
Things to remember when using any of the following instructions:
1. Please stand as close to the inverter as possible when reconnecting monitor, to ensure strong signal.
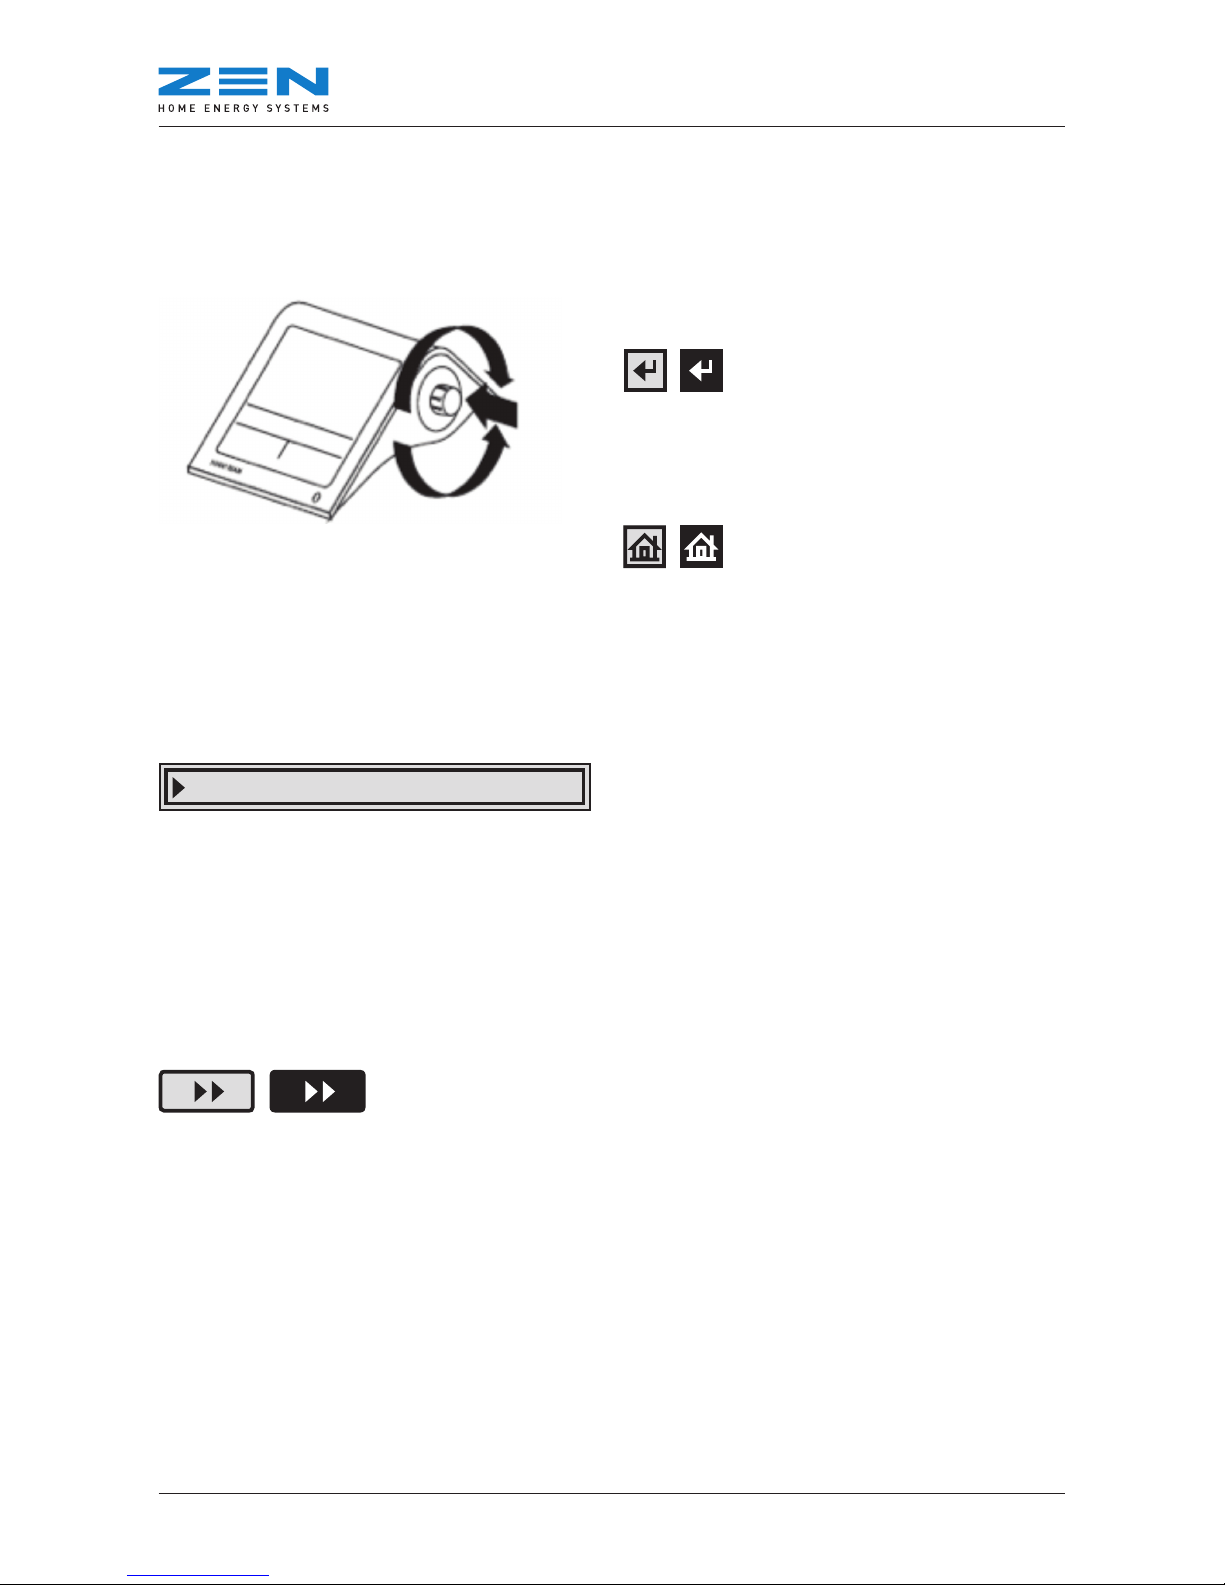
2. Monitor will go into ‘power-saving mode’ after 1min of in-action. If waiting for something to load, please
turn the dial occasionally to keep the screen ‘awake’.
3. A button will turn black when highlighted. Eg.
Fwd key when unselected
Fwd key when selected
4. To scroll ‘upwards’ or ‘up’, turn the dial away from you (clockwise).
5. To scroll ‘downwards’ or ‘down’, turn the dial towards you (anti-clockwise).
6. To ‘click’, press the dial in and then release.
3. Instructions

ZEN In-Home Monitor Reference Guide
© 2012 ZEN Technologies (Power and Energy) Pty Ltd
6
CAUTION: Always try reconnection to inverter before trying to reset (Section 5). A reset takes the monitor
back to its factory settings and in most cases any data that has built up over time will be lost.
Step 1. Reset Device
• Click to turn on screen (if in power-saving mode)
• Click to open Main Menu screen
• Scroll downwards to Service and click once
• Scroll downwards to Reset and click once
• Scroll downwards to Yes
• Wait until screen goes blank (may take a few minutes)
• Once screen goes black, wait a few more seconds
and then click ONCE
Step 2. Reset Language
• SMA logo will appear
• WAIT
• Language screen will appear
• Click once on Deutsch to highlight it
• Scroll upwards until you get to English (Australia)
and click once to set language
• Scroll downwards to highlight the Fwd key
and click once
Step 3. Reset Time Zone, Date and Time
• Time zone menu will appear
• Click once
• Scroll upwards until you get to +10 Canberra, Melbourne,
Sydney and click once
• Check date is correct (if not - click to select day, scroll dial
to adjust, click to move to month, repeat for all options,
then click until nothing is highlighted)
• Scroll downwards to Daylight Saving Time and click once to
tick box (leave un-ticked if not currently daylight savings).
• Check time is correct (if not - click to select, scroll dial to
adjust, click to move to next, repeat for all options, then
click until nothing is highlighted)
• Scroll down to Fwd key and click once.
Step 4. Reconnect Device to System
• System Search menu will appear and Start Detection
will be highlighted
• Click once and wait
• Systems found menu will appear and should read
NetID 2 (if more than one system is found, check
serial no. on right hand side of inverter)
• Click once and wait
• Devices found menu will appear
• Scroll down to OK and click once
• Wait (may take a few minutes)
• Devices Connected menu will appear
• Scroll down to OK and click once (May take some time for
the system data to load again)
4. Resetting your ZEN In-Home Monitor

ZEN In-Home Monitor Reference Guide
© 2012 ZEN Technologies (Power and Energy) Pty Ltd 7
5.1 Version A1, D1 Monitor (most likely)
Version number can be verified by looking at the bottom of the monitor. Note: Monitor Versions are essentially
the same only wording and set up are different. Ensure that you are within a couple of meters range of where
the inverter is located.
• Click to turn on Monitor (if in power-saving mode)
• Power Today Screen will appear (Note: If batteries have
been removed and replaced the first screen that may
appear will be the SMA screen then the language screen.)
• Click to open Main Menu screen
• Scroll downwards to Settings
• Click Settings
• Scroll downwards to PV Plant (Bottom of list)
• Click PV Plant
• Scroll downwards to New plant search (2nd down on list)
• Click New plant search
PV Plant Screen will appear
(similar in appearance to above screens)
• Scroll downwards until Start Detection box
is highlighted in black
• Click Start Detection
• Wait - Detecting all systems within range… (If Detecting
all plants within range… appears instead of systems
please go down to Section Version C1 Monitor)
• If detection failed appears ensure you are within a couple of
meters to the inverter and move closer if necessary.
• Systems found menu will appear and should read NetID
followed by a number (if more than one system is found,
check serial no. on right hand side of inverter)
• Click NetID
• Wait Establishing Connection scroll bar will appear
• Devices found menu will appear
• Scroll down to OK so box is highlighted in black
• Click OK
• Wait Establishing Connection scroll bar will appear
with dates (Note: This section may take some time for
the system data to load again especially if the monitor
has been disconnected for a period of time)
• Devices Connected menu will appear
Note: System Password is not required
• OK will already be highlighted
• Click OK
• Power Today Screen should now be showing
information in the graph and E-Today sections.
5. Reconnecting the Monitor to the Inverter

ZEN In-Home Monitor Reference Guide
© 2012 ZEN Technologies (Power and Energy) Pty Ltd
8
5.2 Version C1, E1 Monitor
• Click to turn on Monitor (if in power-saving mode)
• Power Today Screen will appear
• Click to open Main Menu screen
• Scroll downwards to Settings
• Click Settings
• Scroll downwards to PV Plant (Bottom of list)
• Click PV Plant
• Scroll downwards to New plant search (2nd down on list)
• Click New plant search
PV Plant Screen will appear
(similar in appearance to above screens)
• Scroll downwards until Start Detection box
is highlighted in black
• Click Start Detection
• Wait - Detecting all plants within range…
(If Detecting all systems within range… appears instead
of plants please go back to Section Version A1, D1 Monitor)
• If detection failed appears please move closer to the
inverter if necessary.
• Plants found menu will appear and should read NetID
followed by a number (If detection failed appears ensure
you are within a couple of meters of the inverter and move
closer if necessary and retry connection)
• Click NetID
• Wait - Establishing Connection to the plant with the
following NetID scroll bar will appear
Establishing connection screen with scroll bar.
• Devices found menu will appear
• Scroll down to OK so box is highlighted in black
• Click OK
• Data Administration Screen will appear
• Completely re-collect all data?
• Scroll down to empty box and click so tick appears in box
• Scroll down to Arrow key so the box is highlighted in black
• Click
Data Administration Screen will appear which asks if you
want to Completely re-collect all data?
• Wait - Establishing Connection to the Devices
scroll bar will appear
Establishing Connection to the Devices
• Devices Connected menu will appear (Note: System
Password is not required)
• OK will all ready be highlighted
• Click OK

ZEN In-Home Monitor Reference Guide
© 2012 ZEN Technologies (Power and Energy) Pty Ltd 9
• Wait - Establishing Connection scroll bar will appear
this time with dates (Note: This section may take some time
for the system data to load again especially if the monitor
has been disconnected for a period of time)
• Time Zone – Click on the Time Zone so it highlights in black
and Scroll away from you until you come to +10 Canberra,
Melbourne, Sydney and then click the button in to set (box
will un highlight) (Note: This is the only Australian Time
Zone available)
• Scroll down to Arrow key so the box is highlighted in black
• Click
• Date & Time
• Click on Date, this will highlight the day and
scroll to the correct day
• Click once to select month and scroll to the correct month
• Click once to select year and scroll to the correct year
• Click once to un highlight Date
• Scroll down to Daylight Saving Time
• Click once to select Daylight savings – tick will appear
• Scroll down to Time and click, this will highlight the hour
• Scroll to correct hour
• Click once to select minute and scroll to correct minute
• Click once to un highlight Time
• Scroll down to Arrow key so the box is highlighted in black
• Click
• Plant Power Screen
• Enter the Plant power in kWp
• Enter kW size of system using the following steps: (panel
size x number of panels divide 1000. E.g. 190W x 10 panels
= 1900W. Divide by 1000 = 1.9kW)
• Scroll to change highlighted number
• Click to move to next number (number should look like
: 001.90 for a 1.9kW system)
• When you reach last number, click once to set
• Scroll down to Arrow key so the box is highlighted in black
• Click
• Power Today Screen should now be showing information in
the graph and E-Today sections.

ZEN In-Home Monitor Reference Guide
© 2012 ZEN Technologies (Power and Energy) Pty Ltd
10
• Click to turn on screen (if in power-saving mode)
• Click to open Main Menu screen
• Scroll downwards to Settings and click once
• Scroll downwards to Alerts and click once
• Scroll downwards to Signal every and click once
• Scroll to change the length of time between alert
beeps (select --- to turn alerts off)
• Click once to set
7. Programming the Annual
Yield screen
• Click to turn on screen (if in power-saving mode)
• Click to open Main Menu screen
• Scroll downwards to Settings and click once
• Scroll downwards to PV Plant and click once
• Scroll downwards to Plant power in kWp and
click once
• Enter kW size of system using the following steps:
(panel size x number of panels divide 1000. E.g. 190W
x 10 panels = 1900W. Divide by 1000 = 1.9kW)
• Scroll to change highlighted number
• Click to move to next number (number should look
like : 001.90 for a 1.9kW system)
• Once you reach last number, click once to set
• Return to Main Menu by highlighting and clicking the
house icon in the top right hand corner
• Select Complete PV System
• Scroll through to Specific annual yield
• Data should now appear
8. Main Menu Information
8.1 Main Menu Screen
• Click once to turn the ZEN In-Home Monitor screen
on (if in power-saving mode)
• Click once to get to the Main Menu screen
In order to select any of the options in the Main Menu,
scroll up or down to highlight the relevant screen and
click once to select.
8.2 Complete PV System
Scroll downwards to get to the next screen,
upwards to go back to the previous screen.
First Screen: Power today
Shows the amount of power generated so
far for that day.
Second Screen: Power yesterday
Shows the amount of power generated yesterday.
Third Screen: Yield values of last 31 days
Shows the amount of kWh’s generated for
the last 31 days.
Fourth Screen: Yield values of last 12 months
Shows the amount of kWh’s generated for
the last 12 months.
Fifth Screen: Specific annual yield
Once programmed, shows the peak power of your
specific system (i.e. 2kW, 3kW, 4kW, etc)
(Please see Programming Specific Annual Yield to
program in this info).
Sixth Screen: Revenue
Revenue made on GROSS FIT scheme (Currently
NOT applicable for ANY installations in Australia).
Seventh Screen: CO2avoided
Shows kilograms of CO2avoided by not using
normal electricity from the mains grid.
No. of inverters
Shows each inverter connected to the ZEN In-Home
Monitor. Select and click each serial number to see the
information specific to that inverter.
Events
Shows a list of the 25 most recent ‘Events’. When
a warning or fault has occurred, the ZEN In-Home
Monitor will record an event. Scroll to select, and then
click to see details of a specific event.
6. Turning off Event Alerts

ZEN In-Home Monitor Reference Guide
© 2012 ZEN Technologies (Power and Energy) Pty Ltd 11
Settings
Display options
Shows options for changing the display settings.
Alerts
Shows options for setting/editing/deleting alerts.
Date & Time
Shows options for updating the date/time/time zone.
Data query
Shows options for data updating and overnight
shutdown.
Country settings
Shows options for updating currency, language
and other country specific data.
PV plant
Shows options for connecting the ZEN In-Home
Monitor to various devices.
Service
Diagnosis
Shows information about connection quality
and general device info.
Update
Updates the ZEN In-Home Monitor via PC.
Reset
Resets the ZEN In-Home Monitor and removes
all previous data.
9. Data Download
To download the data from the ZEN In-Home Monitor
please read the following instructions:
If you have any issues with downloading of information
please contact SMA directly on their toll free no. 1800
762 287.
Connect the ZEN In-Home monitor to the computer
with the supplied USB connection cable. No software
is required.
The monitor registers on the computer as a USB device.
A drive is added to the computer which should appear
automatically. SBEAM 2 DAT.
If file does not come up automatically please open
manually from My Computer.
Open folder to view files.
This will bring up a file with two folders
Open the SBEAM folder.
Folder will contain CSV files which you can copy to your
computer and open/save in an excel file format to view
data and create charts.
Files are in date order.
Day 01-01-01
Month 2001-01 (usually at the end of the list)
The monitor cannot download the current days
production data and will register this with an ‘Error’
Please ensure that you safely remove/eject the monitor
before unplugging or you may lose data/require the in
home monitor to be reset.

ZEN Home Energy Systems
33 King Street, Norwood
South Australia 5067
Sales 1300 936 466
Telephone +61 8 8211 0600
Fax +61 8 8363 4110
zenhomeenergy.com.au
MEMBER
Table of contents