ZENEC Z-EACC-DAB1 User manual

1
Z-EACC-DAB1Z-EACC-DAB1
INSTALLATION MANUAL
EN
DAB+ WINDOW MOUNT FOIL ANTENNA

2 3
CAUTION
● TheDAB+windowmountfoilantennahasbeendevelopedexclusivelyforuseinsidethevehicle.
● Theantennamustnotadvereslyaffectthedriver’seldofvision.
● Ifyourvehicleisequippedwithasideairbag,theantennamustnotinterferewiththeairbagfunctionsin
anyway.
● Theantennamustnotbeinstalledonmovableglasssurfacessuchasthesidewindowsorrearwindow.
● Donotbendordamagethefoilantenna.
● TheZENECsystemshouldbeinstalledbyanauthorisedspecialistdealer.
Specicknowledgeandtoolsarerequiredforinstallation.Incorrectinstallationcandamagethevehicle
andtheZENECsystem.
●Plasticlevertool
●Optional:cross-headscrewdriver(Phillips)
●Optional:flat-bladescrewdriver
●Optional:Torxscrewdriver(T20)
●Cableties
NOTE
● Thestrengthofsignalreceptionmaybeimpairedifyouinstalltheantennaoninfraredreectiveglass,
thermalinsulationglass,oronsurfacescoveredwithreectivelm.
● Thesignalstrengthalsodecreasesiftheantennaoverlapswithanotherantenna,orifitisnearawindow
heatingwire.
● IfyouhaveanyquestionsorproblemswiththeZENECsystem,pleasecontacttheretailerwhereyou
purchasedit.
TOOLS REQUIRED
No. Item Quantity
1Foilantenna 1
2Amplierunit(cablelength3.0m) 1
3Cleaningcloth 1
SUPPLIED ITEMS
WORKING OUT THE INSTALLATION POSITION OF THE ANTENNA
min. 150 mm
min. 150 mm
A
B
B
Installingtheantennaontheleft-handside Installingtheantennaontheright-handside
(A)=Ceramicline(B)=Earthingfoil
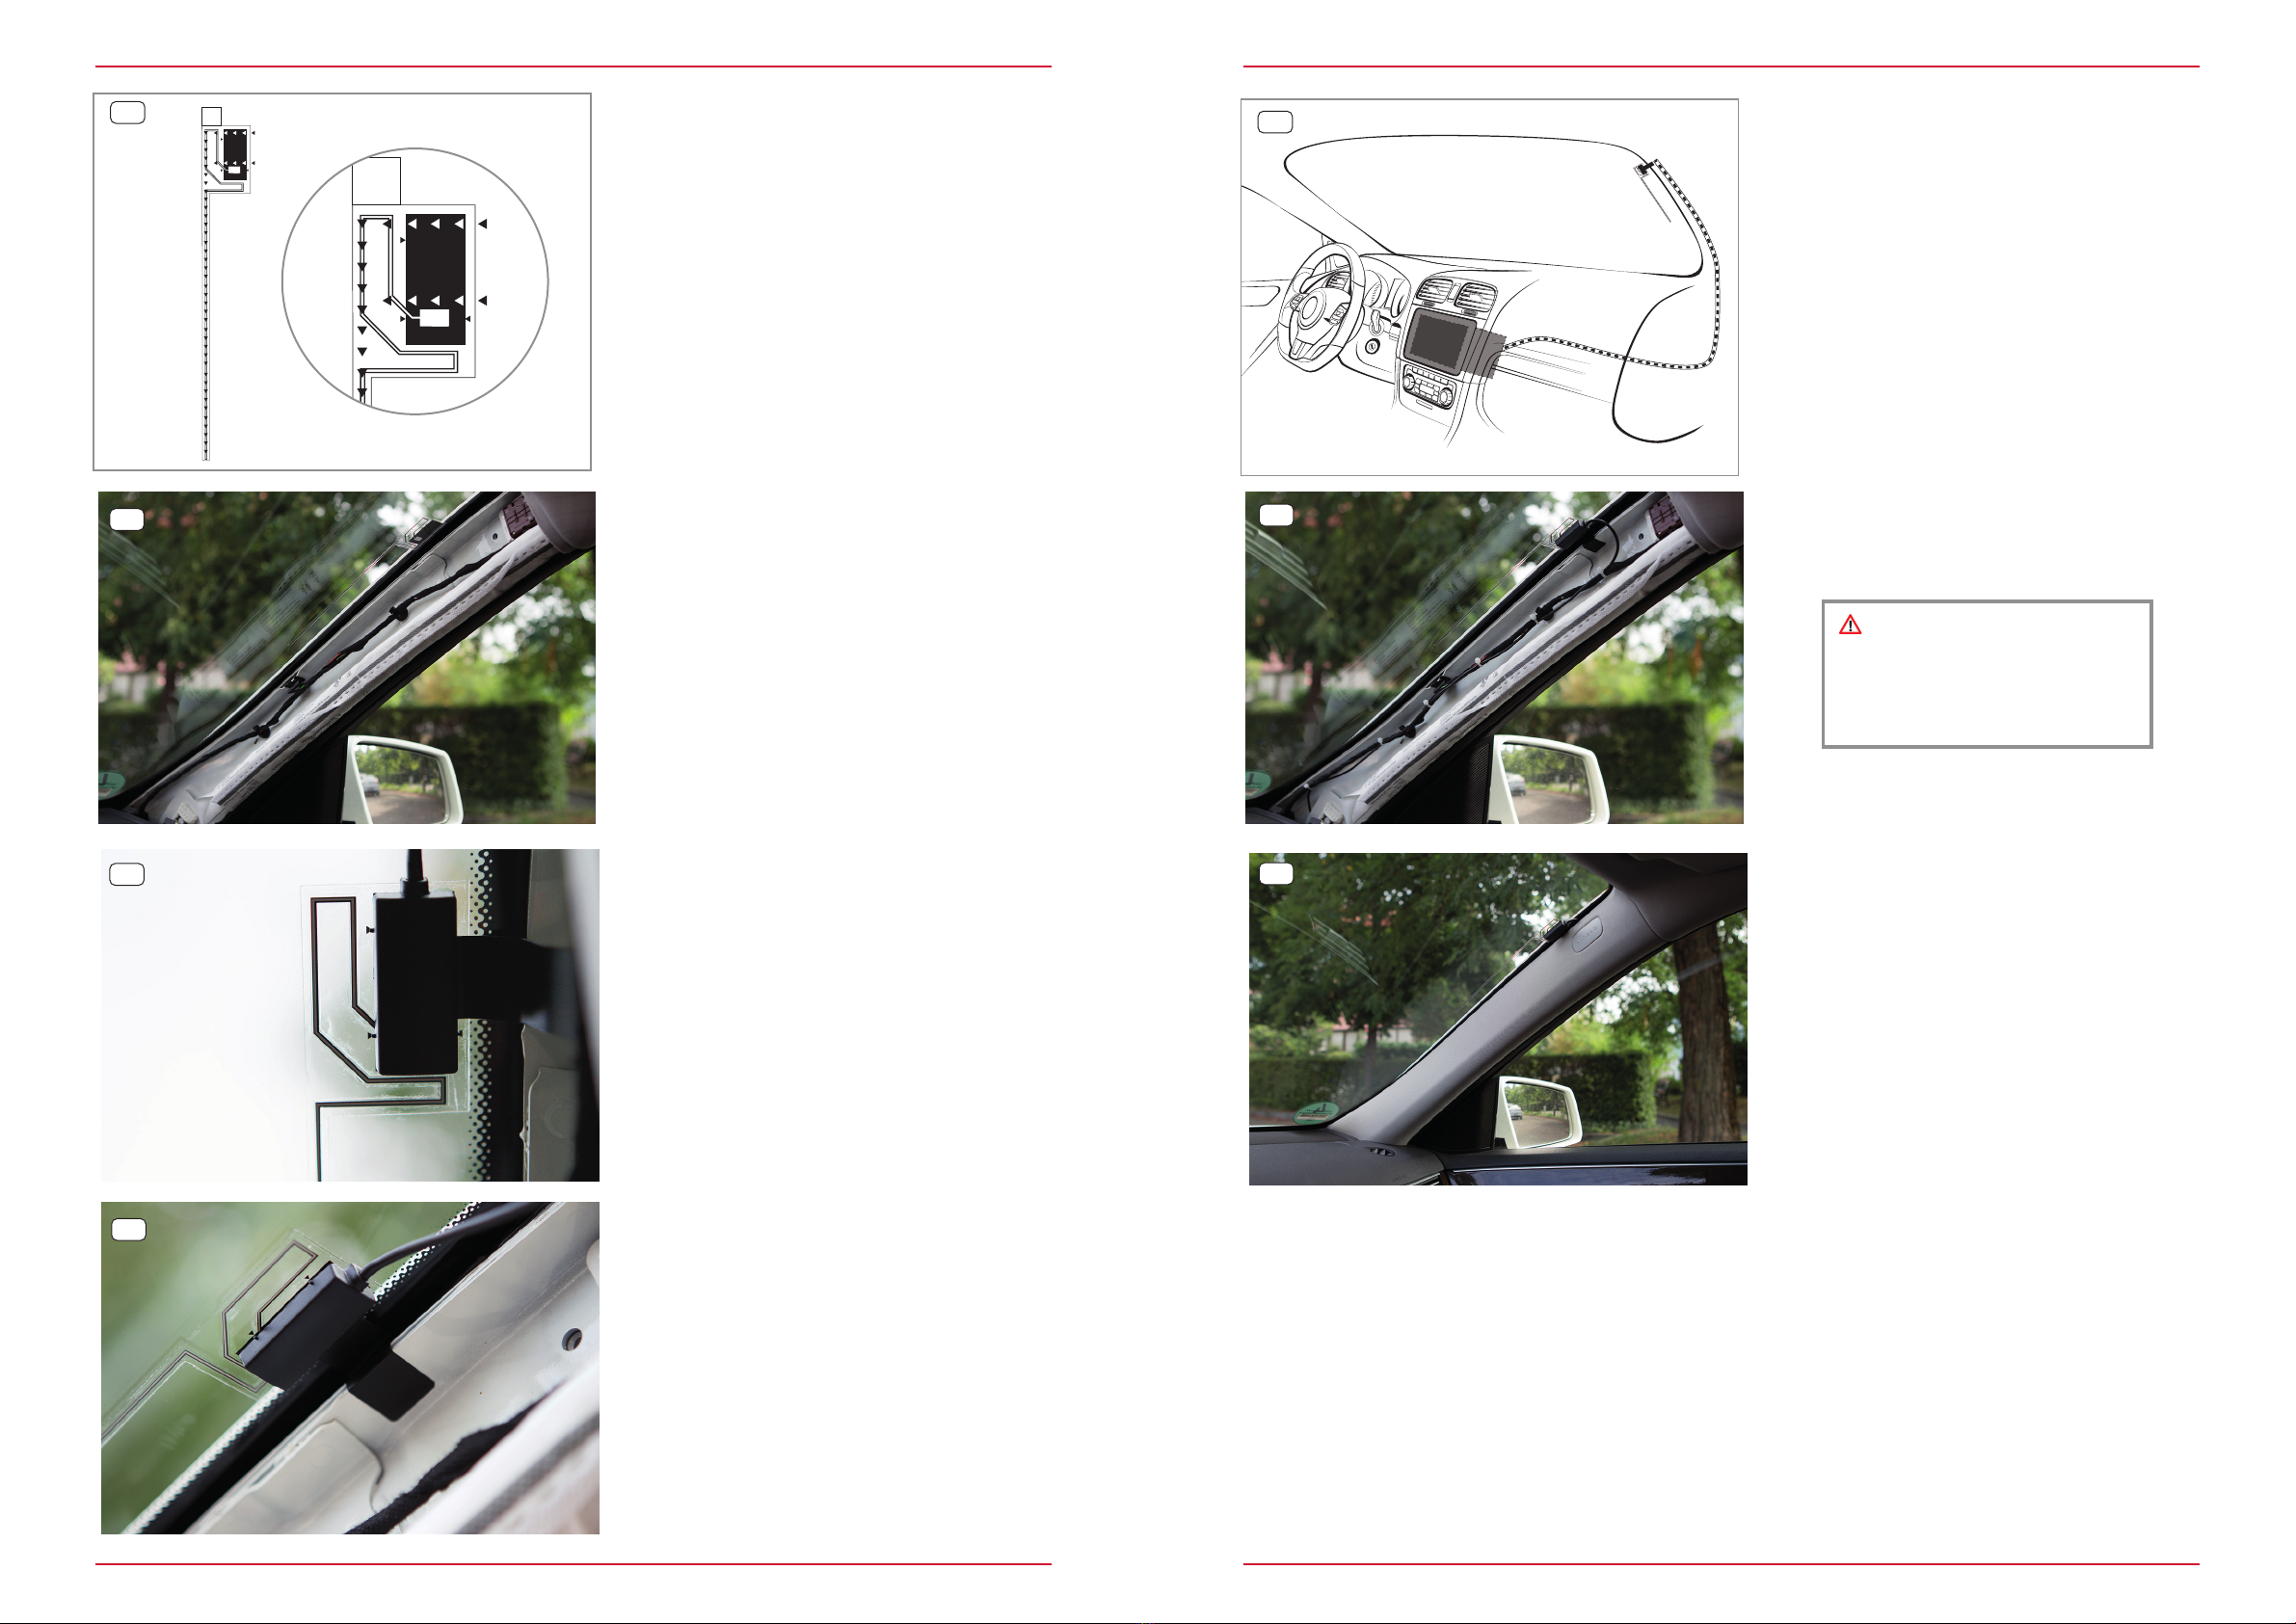
Installation:
1. RemovetheA-pillarcoverinyour
vehicle.Thecoverissecuredwith
specialclips.
Ascrewisusuallyconcealedbehinda
coverintheupperareaoftheA-pillar.
Youcancarefullyprisethecoveroff
withaplasticwedgeoraflat-head
screwdriver.
CAUTION
● Ifyourvehicleisttedwithaside
airbag,youmustleavetheignition
switchedoffforthedurationof
theinstallation,andproceedwith
extremecaution.
2. Cleantheselectedadhesiveareaon
thewindscreenusingthecleaningcloth
provided(No.3).
Waituntiltheglasssurfacehasdried
completely.
3. Removethebackingsheet(flag1)from
thefoilantenna(No.1)andattachitso
itisflushwiththeceramicline.
Paycloseattentiontotheinstallation
positionoftheantenna,whichis
explainedatthebeginningofthe
manual.
1
3
2

4 5
4. Carefullyrubthefoilantenna(No.1)
ontothewindscreen,followingthe
arrows(diagramontheleft)toensure
thatitisaffixedsecurely.
8. Routetheantennacabledownwards
alongtheA-pillar,alongthedashboard
andintotheradiobay.
5. Carefullyremovethesecondbacking
sheet(flag2)onthefoilantenna(No.
1).
9. Usecabletiestoattachtheantenna
cabletotheexistingwiringharnessesin
thevehicle.
6. Removetheprotectivefilmfromthe
amplifierunit(No.2)andattachittothe
foilantenna(No.1).
Ensurethatall3arrowsareontopof
eachother.
10.Reattachyourvehicle’sA-pillarcoverin
itsoriginalposition.
Ensurethatyoudonotdamagethe
earthingfoilandtheamplifierunit.
7. Removetheprotectivefilmfromthe
earthingfoilandstickitontotheA-pillar
(metalpart).
Leavesufficientspacefortheearthing
foilsoyoucaninstalltheA-pillarcover
againlaterwithoutanyproblems.
11.(Nopicture)
ConnecttheDABantenna(SMB
connector)toyourDABradio.
12.(Nopicture)
Startup:Turnonyourradioandactivate
theDAB+antennavoltage(12V)inthe
settings.
Onceconnected,performaDAB+search
onyourradio.
ATTENTION
● Payparticularattentiontoen-
surethatyoudonotadversely
affectthefunctionoftheairbag
inanyway.
7
610
9
2
2
4
5
8

Technicalmodificationsexcepted.Noliabilityacceptedforprintingerrors.
©Copyright2023·RevC/copydeadline:Q2-2023 ·English
Product Description
Activefoilantennaformountingontheinsideofthewindscreen:Duetotheblackcoloroftheantennawirein
thefoil,themountedantennabecomesalmostastealthpart.
Key Features
• ActiveDAB+foilantennaforeasymountingontheinnersideofthewindshield
• 90°SMBantennaconnector(f),3.0mcablelength
• Inconspicuous,theantennawireinthefoilisinblackcolor
• ESDprotected
Technical Specifications
Receptionfrequencyrange: BandIII,174~240MHz(noL-Bandcoverage)
Antennaimpedance: 50Ohm
Antennagain: 15dB±2dB
Operatingvoltage: 9~16V
Currentconsumption@12V: 26mA
Powerconsumption@12V: 312mW
Operating / receiving frequency
ThisproductcontainsanamplifiermoduleforthefrequencyspectrumreceivedbytheantennainbandIII,from
174-274MHz.
Radio Frequency Exposure Information
ThisdevicecomplieswithEUrequirements(2014/53/EUArticle3.1a)tolimitexposureofthegeneralpublicto
electromagneticfieldsforhealthprotection.
Donotusethedeviceinlocationswherewirelessdevicesarenotallowed.
ZENECcannotguaranteethataccidentsordamagewillnotoccurduetoimproperuseofthedevice.Usethis
productwithcareandatyourownrisk.
Conformity with radio equipment
Hereby,ACRBrändli+VögeliAGdeclaresthatthetypeofradioequipmentZ-EACC-DAB1complieswiththe
2014/53/EUDirective.ThefulltextoftheEUDeclarationofConformityisavailableatthefollowingInternet
address:http://www.zenec.com(seelink"ProductConformityDocuments"inthefooterareaofthepage).
Recycling Notes
ThisproductbearsthesymbolforselectivesortingofWasteElectricalandElectronicEquipment(WEEE).
ThismeansthatthisproductmustbetreatedinaccordancewithEuropeanDirective2012/19/EUinorderto
berecycledordismantledtominimizeitsimpactontheenvironment.Theuserhasthechoicetohandoverhis
producttoacompetentrecyclingorganizationortotheretailerwhenanewelectricalorelectronicdeviceis
purchased.
UKAuthorisedRepresentative
(forauthoritiesonly)
ProductIP(UK)Ltd.
8,NorthumberlandAv.
LondonWC2N5BY
MADE IN CHINA
Manufacturer:ACRAG∙Bohrturmweg1∙CH-5330BadZurzach∙Switzerland
LegalrepresentativeinEU:ACRS&VGmbH∙Industriestraße35∙D-79787Lauchringen∙Germany
www.zenec.com
Other ZENEC Antenna manuals
Popular Antenna manuals by other brands

Andrew
Andrew 960 .96 Meter Class II Assembly instructions

Maco Antennas
Maco Antennas Comet Assembly instructions

One Forall
One Forall 17421 Quick installation guide

Rocket Fish
Rocket Fish RF-ANT50UD Quick setup guide

One Forall
One Forall 703988 instruction manual

AL Tech
AL Tech HALO 85cm DISH quick start guide