Zennox Simple Mobile B800 User manual

Simple Mobile B800 (D3880)
Instruction Manual
Before use, read these instructions carefully and keep in a
safe place for future reference.

1
IMPORTANT – Your handset is not supplied with a SIM
card. The B800 GSM will work on all UK GSM mobile
networks except “3G”(because it is a UMTS network
instead of GSM), and you will need to insert a SIM card
for the handset to work correctly.
Network Services – The B800 GSM is approved for use
on the GSM900 and GSM1800 networks. Check with your
mobile phone service provider to see if you can use the
Dualband feature or other Network Services described in
this guide. Some networks may not support all language
dependent characters and/or services.
Unpacking your B800 GSM Mobile
In the box are:
•the mobile handset
•a mains power adaptor
•the handset back cover and card
•a rechargeable battery pack
•this user guide
•a charger pod
Keep the packing materials for future use.
Keep your sales receipt - it is your guarantee.
LASER RADIATION
DO NOT STARE INTO BEAM OR VIEW
DIRECTLY WITH OPTICAL INSTRUMENTS
CLASS 2 M LASER PRODUCTS

2
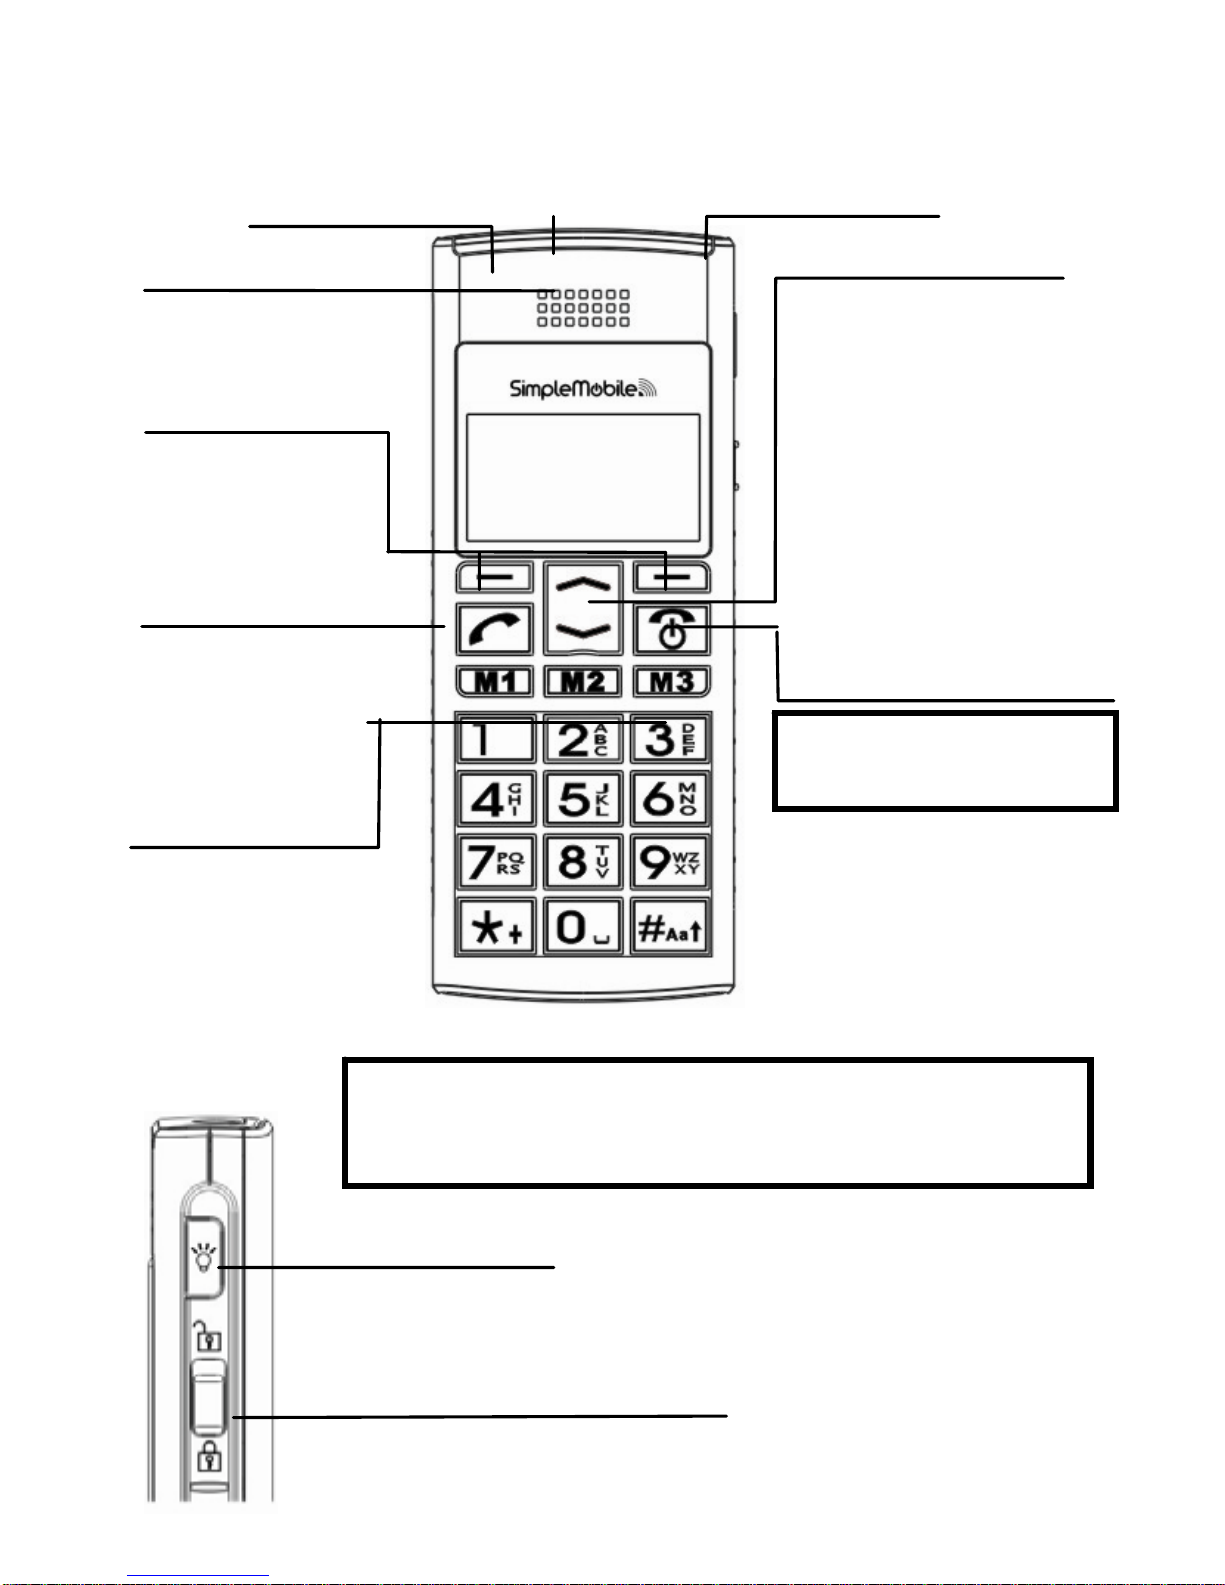
Where to find it…………………..…………..………… 3
Symbols on the display ………..………………….… 4
Menu Operation …………….…..………………..…… 5
Read these notes first……....……….………….…… 5
Installation and setup………………………..….…… 7
Switching On and Off …………………..……..…..… 10
Making & answering calls…………………………… 11
Using the Phone Book & Fast keys (M1-M3)… 14
Call log……………………………………………….…. 14
SMS text messaging……………………………….… 15
Settings…………………………..…………………..… 17
Phone Settings (Language, Display, Security, Reset)… 17
Clock settings………………………..……………………. 17
Network Settings ……………………..…………………. 17
Call Settings ……………………………………………… 18
Sound profiles……………………………………………. 18
Alarm Clock…………………………..……………….. 18
Torch Operation……………………..……………….. 18
Troubleshooting……………………………………… 19
Guarantee ……………………………………………… 20
Battery Information…………………………………… 21
Additional Safety Information………………………. 21
Declaration of Conformity………….………………..23-24
Getting started with Orange sim card…………….. 26
Contents

3
Where to find it
Earpiece
Press to end or reject a call. Press
to return to standb
y
mode
Visual Ringer Torch beam
Press and hold to switch the Torch on
Torch button
Select buttons
(Left/Right soft keys)
Perform functions
indicated by the
display text above
Talk button
Press to answer a
phone call.
Press to enter
redial list
Slide up to unlock and down to lock the keypad
Key Lock/Unlock button
Memory buttons
(
M1, M2, M3
)
3 fast key memory
locations for direct
dial out
Up/Down buttons
Press to adjust receiving
volume in talk and
speakerphone modes.
Press to scroll through
names, phone numbers,
menus and settings.
Standby mode shortcuts:
Up - to Sound Profiles
Down - to Phonebook
Press and hold to switch
the
p
hone on or of
f
Warning! The torch uses a high-brightness LED and
you should not point the beam directly into eyes, or
view with optical instruments.
Wrist strap holes
End Call / Power On-Off
button

4
Symbols on the display
1 - The left selection key in the standby mode is Menu.
2 - The right selection key in the standby mode is SMS.
The Soft keys change to different functions in other modes.
Radio link/signal level - On steady when linked
and shows the signal strength. Flashes if handset
is trying to establish a link.
Battery charge level - Charge handset as soon as
possible if it shows nearly empty. While the
batteries are being charged, the changing bar will
move up and down.
Call Divert - On if call divert unconditional is set.
Alarm - On if an alarm is set.
Ringer Off - On if handset's ringer is turned off.
Headset - On when a headset is plugged in.
New SMS - Indicates you have new text messages.
Lock - On when the handset's keypad is locked.
Vibrator - On if the vibrating ring alert is on.
Missed Call - On if you have missed Call records.
Speakerphone - On if handset loudspeaker is on.
Mute - On if the handset microphone is muted.
The network name or logo in
service
(
If displa
y
option set
)
1 2
XXXXXX

5
Menu Operation
Menu lists are used for set up and operation.
The left and right soft keys initially are Menu and SMS.
Press Menu ( ) and the display changes and the soft
keys become Select and Back.
Use Up or Down to move up or down menu lists, and
Select or Back for the next or previous display.
When writing text, use the #key to switch cases:
Upper case (ABC), Title case (Abc), Lower case (abc) or
Numerals (123).
Use Up or Down to move the cursor, and Cancel to
delete letters.
Read these notes first
Your phone is an electronic product and should be treated
with care to meet any warranty and safety obligations.
•SWITCH ON SAFELY – Don’t use when mobile
phones are prohibited, or it may cause interference/
danger.
•TORCH APPLICATION – Do not stare into the beam
or point directly into eyes.
•HEARING AID COMPATIBILITY – With the hearing
aid set to normal, adjust the phone volume. If this fails,
try the hearing aid in the ‘T’ position.
•WATER-RESISTANCE – Keep it dry. The phone is
not water-resistant.
•TEMPERATURE RANGE – Operating 0°C to 40°C.
Storage -20°C to 60°C.

6
•CARE & CLEANING - Do not drop or knock the phone
excessively, and keep it clean using a damp cloth if
necessary - do not use chemicals, cleaning solvents,
or strong detergents.

7
Installation and setup
Before operating the B800 GSM a SIM card must be
installed. Keep the SIM card out of small children’s reach.
The SIM card and its contacts can be damaged easily by
scratches or bending, so handle the card carefully.
Install the SIM card and battery
1.Switch off the phone, disconnect the
power adaptor and remove the battery.
2.To remove the back cover, push from
the top of the back cover.
3.Remove the battery by lifting from the
top edge.
4.Carefully slide the SIM card into the
holder with the gold connectors
face down and angled corner top
right.
5.Replace the battery by aligning the
gold connectors on the battery with
those on the phone, and push the
top end of the battery down until
it clicks into place.
6.Replace the back cover by
placing it flat on the back of the
handset and sliding up until it
clicks into place.

8
Charge the battery
Warning! Use only batteries and chargers supplied with
or approved by Zennox for this B800. Use of others will
invalidate approvals or warranty and may be dangerous.
Do not charge the battery with the back cover removed.
1.Connect the charger lead firmly into the socket on the
side of the handset.
2.Plug the charger into an AC mains socket. The battery
indicator bar scrolls and “Charging…” is displayed.
3.Charging the battery may take up to 15 hours.
4.If No charging is displayed, disconnect the charger,
and retry. If charging still fails, contact the helpline.
5.The battery is fully charged when the bar stops scrolling.
Disconnect the charger from the phone and the AC
outlet.
Connect a compatible headset (Optional)
You can use the B800 GSM with a headset (not supplied).
The connector must be a 2.5mm 3-pole jack plug that
inserts in the Power/Headset socket on the left side of the
handset.
When connecting a headset, including those approved by
Zennox for use with this device, pay special attention to
volume levels. Read its user guide for detailed safety
instructions. Do not connect incompatible products.
When correctly inserted the headset icon will show on
the handset display.

9
Headset / Charging Connector
Plug in power adapter to charge battery.
Plug in headset accessory (not supplied) for headset use.

10
Switching On and Off
To switch the phone on and off
To switch off, press and hold End Call until the
display clears.
To switch back on, press and hold End Call until the
display turns on.
Warning! Do not switch on when mobile phone use is
prohibited or it may cause interference or danger.
To lock the handset keypad
Push the slide switch at the right hand side down to
the LOCK position Îthe display shows
To unlock the keypad push the slide switch at the
right hand side up to the UNLOCK position.
Note: When the keypad is locked, you can answer, end
or reject a call in the normal way. During a call, you
can operate the phone as usual.
To use the torch
Press and hold the TORCH button on the side of
the handset to switch on the light at the top.
To switch off the torch release the TORCH button.
Note: You can also set the torch on permanently from the
main menu, see page 18.
Warning! The torch uses a high-brightness LED and
you should not point the beam directly into eyes,
or view with optical instruments.

11
Making & Answering calls
To make a call
Ensure the phone is switched on and in service.
Key in the telephone number including area code.
(To add prefix "+" press the “*” key twice quickly)
Press Talk to dial the number on the display.
To end calls press the End Call button.
To make a call from fast key Memories (M1–M3)
M1/ M2/M3 Press the Memory button to dial out the number.
(For how to program a fast key, see page 14.)
Last Number Redial
In standby mode, press Talk to see the last 10 numbers &
press Up / Down to go to the number
Press Talk to dial the number.
To answer a call
When the phone rings, press Talk to answer it.
Earpiece volume
During a call, press Up / Down to alter the volume. The
volume level displays, & stays for future calls.
To switch to speakerphone
During a call, press Options & Down to go to
Speakerphone, & Select Æthe display shows .
To end the call press End Call, or to return to normal handset
use, press Options again then select Speakerphone Off.

12
To mute the microphone
During a call, press Options & Down to go to Mute,
& then Select Æthe display shows .
To unmute, press Options and select Unmute.
To make a conference call
Conference call is a Network Service that lets up to
four parties talk together. (Check with your provider)
1. Make a call to the first person.
2. Press the Hold button, to put the call on hold.
3. Make a call to the second person.
4. When the new call answers, press Options and
select Conference to connect all parties.
(Note: Or press Swap to switch between the two calls.)
Press the End Call button to end the call.
Using the Phone Book
You can store names and phone numbers in the Internal
phone book (up to 250) and in the SIM phone book.
To access the phonebook
In standby mode, press Down.
In a call, select Options,Main Menu, and
Phonebook.
Note: Indicates entries in SIM phone book,
Indicates entries in the Internal phone book.
To review the Used Space
To check how many names and numbers are saved:
Select Menu,Phonebook,Used space to show the
phone and SIM memory being used.

13
To add a new Phone Book entry
Press Down to open the phonebook
Select Options, New & select Save to SIM or Save
to phone, then enter the letters for the Name
Press Next & key in the digits for the Number
Press Save to save the new contact.
To call a stored number
Press Down to open the phonebook
Press Up / Down to find the name you want, or key
the first letter of the name then Up / Down.
Press Talk to dial the number.
To edit (change) a Phone Book entry
Find the entry to edit, select Options, Edit then
modify the name, select Next & modify the number.
Press Save to save the change(s).
To view the details of a stored number
Find the entry to edit, select Options, Details
To delete a Phone Book entry
Find the entry to edit, select Options, Delete, Yes
To delete all entries from the phone or SIM card
Select Menu,Phonebook,Delete all
Select All in Phone or All in SIM ÆDelete all
Press Select again to confirm
To copy all entries from the phone or SIM card
Select Menu,Phonebook,Copy all
Select SIM to Phone or Phone to SIM
Press Select to confirm the copying

14
Store a Phone Book entry to a fast key (M1– M3)
Press Down to open the phonebook
Press Up or Down to find the entry to save
Select Options, Set to fast key
Key in the Password (default is 0000)
Select OK Æthe display shows M1, M2, M3
Press Up or Down to choose the key to save to
Press Select to confirm the memory entry.
Call log
Indicates new missed entries in the Call Log. If a
call is not answered, “1 Missed Call” displays until
Select (to view) or Cancel (to clear) is pressed.
To review the call log entries
Select Menu, then Down to Call log & then Select
Press Up / Down to Received calls, Dialled calls
or Missed calls, then press Select to view that list,
or select Call duration to see the last call duration.
Or: (from standby mode)
Simply press Talk to show received calls ( ) dialed
calls ( ) & missed calls ( )
Note: When in a list, press Options to see Details of it,
Call to dial it, Edit before call to edit it, Send
message to send SMS to it, Save to save to
phonebook, Delete or Delete all to delete entries.

15
SMS text messaging
Send & receive text messages. These are saved in the
phone memory (max. 100) or on the SIM card.
Received SMS are stored in the Inbox and the icon
indicates new messages. Also “1 New message” displays
until Select (to view) or Cancel (to clear) is pressed.
To access the SMS Menu
Press SMS to display the options:
New – to write a new message
Inbox – to go to your inbox
Outbox – to go to your outbox
Draft box – to go to your draft box
Msg settings – for the SMS settings
Used space – to see phone/SIM SMS space
Delete all – to delete all messages
To write and send a text message
Select SMS, New, as above, to display Text
Write your message using the digit / letter keys.
To send, press Options, Select (Send) to display
Number. Enter the full number, including area code.
Press Select to display Sending message…
Note: This sends it without saving it, but you can also:
Save to draft - save in draft box without sending
Send and save - send but also save in the outbox.
Note: For a number from the Phone Book you can also
press Contacts and Select the entry you want.
Note: If the message send fails, it returns to writing mode.

16
To read your messages
Select SMS, Inbox to display the message list, and
use Up / Down to scroll through them.
Press Select and Up / Down to display the full text
and received date and time of the message.
Press Options to display:
Delete – delete the message from the Inbox
Reply – reply to the sender of the message
Forward – send the message to another number
Call Sender – make a call to the sender
Extract No. – extract the phone number to save
Select the option required and follow the menus.
To review the Draft box, Outbox or Used Space
Select SMS,and then follow the menus.
To delete all Messages
Select SMS,Delete all to display Delete all, Delete
inbox, Delete outbox, Delete draftbox
Select the option to delete the required messages.
To change the SMS message centre settings
Select SMS,Msg Settings to display
Message centre – the SMS service number
Message validity** – the SMS storage time
Status report** – to request send delivery reports
Select the option required and follow the menus.
Message centre - Your B800 GSM reads the service
number from the SIM card. If it has been accidentally
changed, you’ll need to get the correct number and
reprogram it.
(** These Network Service features may not be available)

17
Settings
Allows you to adjust various settings on the phone, and
also to reset them to their factory default values.
Press Menu, then press Down to go to Settings,
and Select to display the list of settings available.
Phone Settings
Language – language used on the display
Display settings – display contrast, backlight, idle view
Security settings – to need a PIN before allowing use
(Note: some SIM cards don’t allow it turned off)
Warning: if you enter an incorrect PIN three times
the SIM card is blocked, and you must enter the
PUK number or contact your service provider,
to unblock it and set a new PIN code.
PIN and PUK numbers come with your SIM card.
Factory reset – default values for phone settings. This
requires a Password. (Default password = 1234)
Clock settings
Date & Time – the displayed date and time
Date Format - UK or US
Time Format – 12 hour or 24 hour
Clock Type - analogue or digital style
World Time - a second time zone.
Network Settings – check with your service provider.
Call waiting – press Talk to answer 2nd call / hold 1st
Diverts – to set different incoming call diverts
Call Barring – to restrict making and receiving calls
Network select – to select a different network

18
Call Settings – (some network services may not be available)
Auto redial – auto-dial up to 10 redial attempts
Any key answer – so any key press will answer a call
Send own number – withhold your number
Sound profiles –
Five sound profiles for quick changes to the phone sounds
when in different places. The profile names General,
Meeting, Outdoor, Silent and Customise can be
changed and each profile can be personalised to give a
different Ring tone, Message tone, Call alert, Ring volume,
Keytone volume, Vibrator on/off and Alarm tone.
Alarm Clock
You can set three alarms to alert once only or on selected
days. When it sounds, press Cancel to stop it, or Snooze
to delay the alarm for another five minutes.
To set alarm
Press Menu,then Down to Alarm clock & Select
Select from Alarm 1, Alarm 2 or Alarm 3
Select On or Off – the current selection is ticked
If On is selected, set the time & One shot or
Weekly where each day can be selected using the
Talk key.
The icon will appear on the display.
Torch
To switch the torch on steady, instead of holding down.
Press Menu,then Up to Torch & Select
Select Latch or Off – the current selection is ticked

19
Troubleshooting
“Call failed” appears Check dialled number is correct, with full area code
SIM card fitted – only
makes emergency call Some SIM cards are thinner than others. Lightly press the
SIM card holder to ensure a proper contact is made.
The phone is in energy saving mode and the display has
switched off (Note: You can still receive calls). Press any key
and the display will switch back on.
The mobile phone
display is blank
(screen off) The phone is switched off. Press Power On/Off for 3
seconds to switch it on again.
If you are away from your network provider, your phone may
link with another GSM network.
Phoning outside your
own country Contact your network provider for additional costs incurred
using the phone abroad.
You cannot make a call if the phone has no signal.
If your display says Limited Service or SOS, the phone
cannot receive a signal from your network, or has run out of
credit, so can only call the emergency number 112 (or 999).
Can an emergency
call be made without a
signal or credit?
You can call 112 (or 999) if there is no credit on your phone.
How can reception be
improved? If the signal is weak, try another location to make or continue
with a call, e.g. when indoors move towards a window.
Reception is often poor in elevators, tunnels or underground
railways and car parks.
Can I suppress /
withhold my telephone
number?
If you want to withhold your phone telephone number, use
the main menu under Call settings/ Send own number. (This
network service may not be available)
displayed, unit
does not respond. Slide the switch on the right hand side of the phone upwards
in the direction of the “open lock” symbol.
What is the SMS
service centre
number?
A number for the short message service usually stored on
the SIM card by the operator and should not need to be
entered or changed.
When do I start to
incur call charges? Charges start when a call connects to a person or an
answering machine. There is no charge for writing or
receiving an SMS, only when sending an SMS, and none for
using phone features e.g. alarm clock.
Did I successfully send
my SMS? If your SMS is in the SMS Outbox then it was OK, or you can
get confirmation after the SMS is delivered – contact your
operator for details.
This manual suits for next models
1
Table of contents
Other Zennox Cell Phone manuals