Zensol TAP-4 User manual

Zensol Automation Inc. www.zensol.com
COMPUTERIZED TEST EQUIPMENT
ZENSOL
ON LOAD TAP CHANGER ANALYZER
OpenZen
Universal Data Recording So tware
Quick Setup Guide
TAP-4
August 13th, 2013

QUICK SETUP GUIDE
QUICK SETUP GUIDEQUICK SETUP GUIDE
QUICK SETUP GUIDE
Zensol Automation Inc.
www.zensol.com
1
CONTENT
CONTENT ............................................................................................................................................. 1
STEP 1 – REQUIRED HARDWARE ........................................................................................................... 2
S
TEP
1
A
–
A
CCESSORIES
..................................................................................................................................... 3
STEP 2- CONNECTIONS.......................................................................................................................... 4
S
TEP
2
A
-
T
AP
-4
CHANNELS CONFIGURATION
......................................................................................................... 4
S
TEP
2
B
–
C
ONNECTIONS TO THE TAP
-
CHANGER
..................................................................................................... 5
STEP 3 – SOFTWARE INSTA ATION AND FO DER STRUCTURE .............................................................. 6
S
TEP
3
A
–
D
OWNLOADING THE APPLICATION FROM THE
Z
ENSOL WEBSITE
.................................................................... 6
S
TEP
3
B
-
D
ECOMPRESSING AND INSTALLING ON
W
INDOWS
XP
METHOD
1):.............................................................. 7
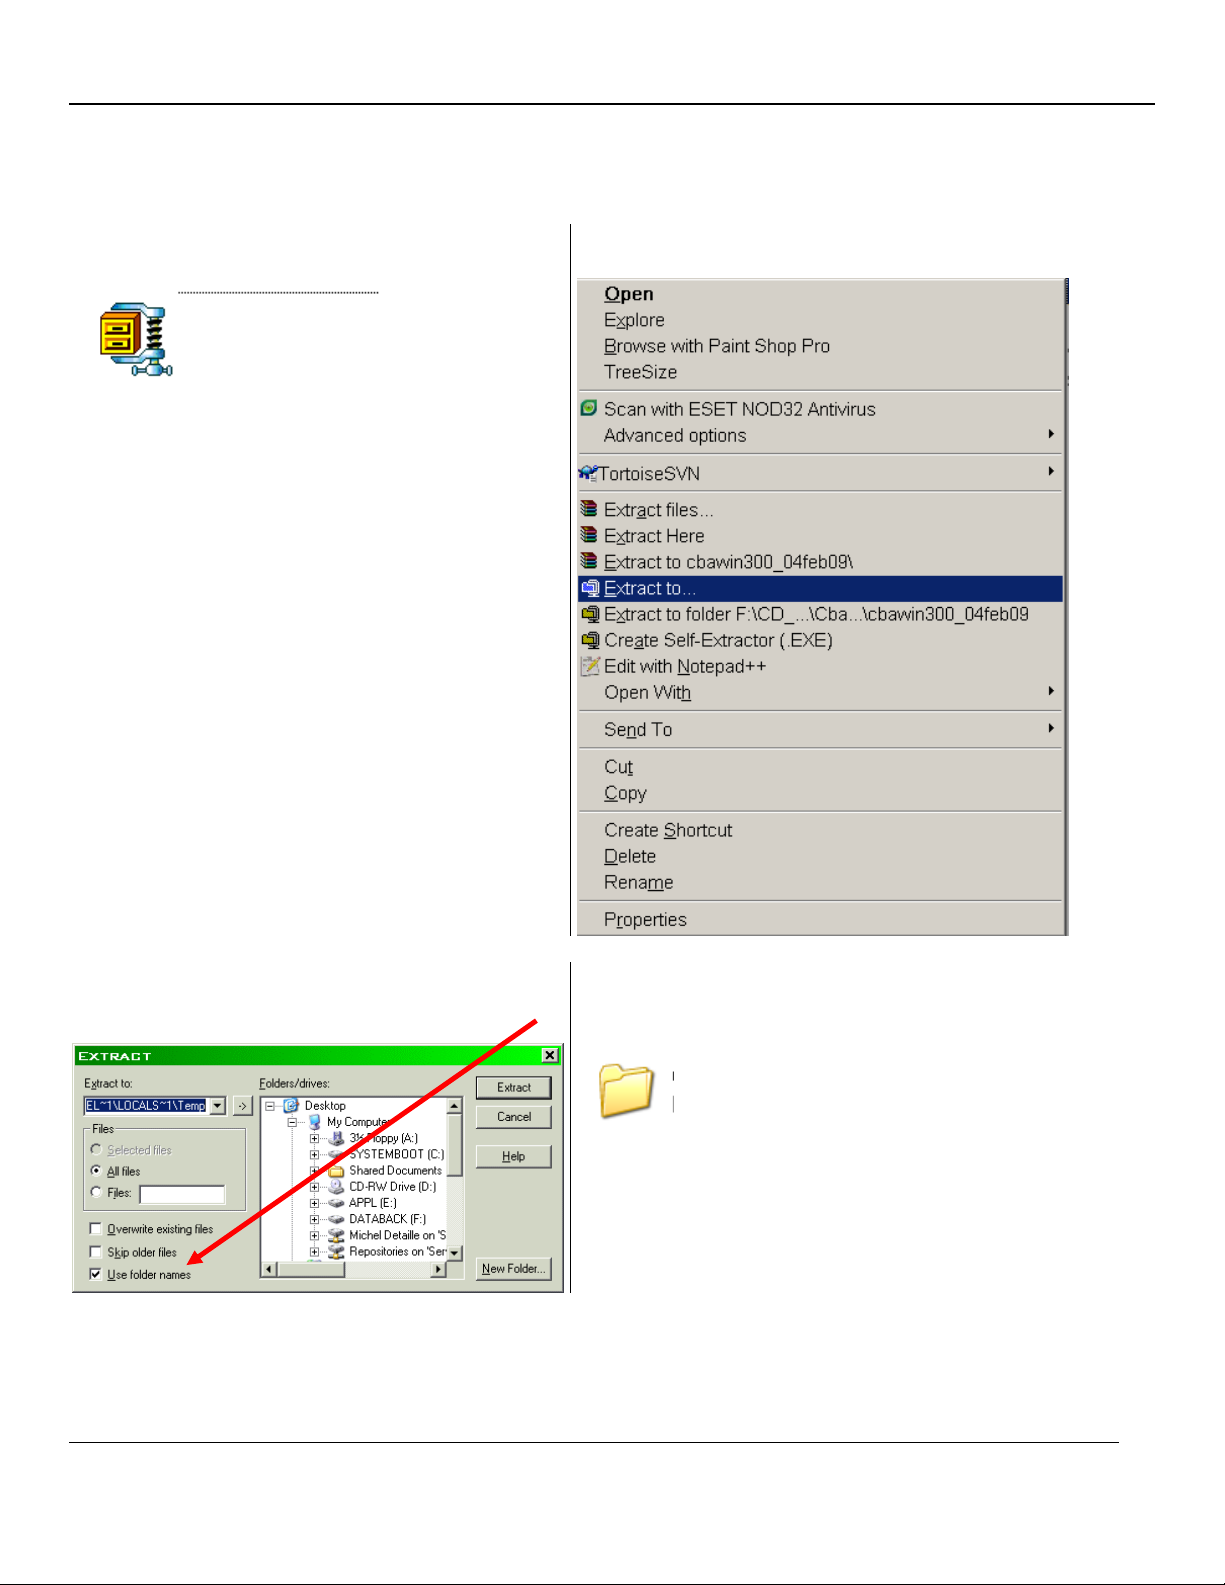
S
TEP
3
C
-
D
ECOMPRESSING AND INSTALLING ON
W
INDOWS
XP
METHOD
2):.............................................................. 8
S
TEP
3
D
-
D
ECOMPRESSING AND INSTALLING ON
W
INDOWS
V
ISTA
/
7
/
8................................................................... 9
S
TEP
3
E
–
C
ONTENTS OF THE
O
PEN
Z
EN FOLDER
................................................................................................... 10
STEP 4 – COMMUNICATION (USB DRIVER INSTA ATION OR FIBER OPTIC INSTA ATION)....................11
S
TEP
4
A
-
F
IRST INSTALLATION
.......................................................................................................................... 11
S
TEP
4
B
–
I
F THE
“F
OUND
N
EW
H
ARDWARE
W
IZARD
”
WINDOW IS NOT LAUNCHED
: ................................................... 12
S
TEP
4
C
–
WINDOWS
7
AND
8
NOTICE
................................................................................................................ 13
S
TEP
4
D
-
I
N CASE OF A PROBLEM DURING THE DRIVER INSTALLATION
........................................................................ 14
STEP 5 – STARTING WITH THE SOFTWARE............................................................................................15
S
TEP
5
A
–L
ANGUAGE CONFIGURATION
............................................................................................................... 15
S
TEP
5
B
–
M
AIN WINDOW
............................................................................................................................... 16
S
TEP
5
C
–
D
ATA STRUCTURE
............................................................................................................................. 18
S
TEP
5
D
–
C
ALIBRATION CHECKUP
...................................................................................................................... 19
S
TEP
5
E
-
T
ESTING THE COMMUNICATION
............................................................................................................ 19
S
TEP
5
F
–
C
REATING A NEW TEST PLAN
............................................................................................................... 20
S
TEP
5
G
–
A
NALOG INPUTS CONFIGURATION
........................................................................................................ 21
S
TEP
5
H
–
E
XECUTING A TEST
............................................................................................................................ 23
S
TEP
5
I
–
S
AVING THE TESTS
............................................................................................................................. 24
S
TEP
5
J
–
E
XCEL EXPORT EXAMPLE
..................................................................................................................... 25
STEP 6 – TEST P AN EXAMP E: CHECK_TAP.WCF..................................................................................26
STEP 7 – SYMBO IC CIRCUIT DIAGRAM ................................................................................................28

QUICK SETUP GUIDE
QUICK SETUP GUIDEQUICK SETUP GUIDE
QUICK SETUP GUIDE
Zensol Automation Inc.
www.zensol.com
2
STEP 1 – REQUIRED HARDWARE
TAP-4 Power cable
USB cable
Ground cable
Accelerometer with
calibration card
10-32 cable
BNC cable male-female
AC/DC current clamp
Crazy Glue and studs

QUICK SETUP GUIDE
QUICK SETUP GUIDEQUICK SETUP GUIDE
QUICK SETUP GUIDE
Zensol Automation Inc.
www.zensol.com
3
Step 1a – Accessories
Current Clamp
In input #1, plug the AC/DC current clamp and install it on a current wire from the tap changers motor as
shown on the following picture:
Accelerometers
In the other inputs, you can plug the accelerometers which are glued to the tap changer. Below an
example of the accelerometer location:

QUICK SETUP GUIDE
QUICK SETUP GUIDEQUICK SETUP GUIDE
QUICK SETUP GUIDE
Zensol Automation Inc.
www.zensol.com
4
STEP 2- CONNECTIONS
Step 2a - Tap-4 channels configuration
RAW Signals
1: Current
2: Accelerometer 1
3: Accelerometer 2
4: Accelerometer 3
Envelopes Signals
100: Current
101: High Frequency Envelope Accelerometer 1
102: ow Frequency Envelope Accelerometer 1
103: High Frequency Envelope Accelerometer 2
104: ow Frequency Envelope Accelerometer 2
105: High Frequency Envelope Accelerometer 3
106:
ow Frequency Envelope Accelerometer 3

QUICK SETUP GUIDE
QUICK SETUP GUIDEQUICK SETUP GUIDE
QUICK SETUP GUIDE
Zensol Automation Inc.
www.zensol.com
5
Step 2b – Connections to the tap-changer

Q
QQ
QUICK SETUP GUIDE
UICK SETUP GUIDEUICK SETUP GUIDE
UICK SETUP GUIDE
Zensol Automation Inc.
www.zensol.com
6
STEP 3 – SOFTWARE INSTA ATION AND FO DER STRUCTURE
Step 3a – Downloading the application from the Zensol website
Go to www.zensol.com and in the products menu, select TAP-4 O TC Analyzer.
In the product page of the TAP-4, scroll
down to the “CUSTOMERS” section and
click on the "OpenZen Software" link.
Enter your username and password when prompted.
Save the ZIP file on your computer at the location of your choice.

Q
QQ
QUICK SETUP GUIDE
UICK SETUP GUIDEUICK SETUP GUIDE
UICK SETUP GUIDE
Zensol Automation Inc.
www.zensol.com
7
Step 3b - Decompressing and installing on Windows XP (method 1):
Right-click on the icon for the file you downloaded: Select "Extract to…" note: this example uses WinZip –
other extractors may vary in their method):
or file for latest version and date)
Select the folder of your choice, and before
proceeding, make sure that the option "Use folder
names" is selected:
A new folder will appear at the location specified in
the previous step example folder name):
OpenZEN.zip
OpenZen

Q
QQ
QUICK SETUP GUIDE
UICK SETUP GUIDEUICK SETUP GUIDE
UICK SETUP GUIDE
Zensol Automation Inc.
www.zensol.com
8
Step 3c - Decompressing and installing on Windows XP (method 2):
Use this method in case the one in Step 2b fails or cannot be executed.
Double-click on the icon for the file you just downloaded:
or file for latest version and date)
Click the "Extract" button note: this example uses WinZip – other extractors may vary in their method):
Select the folder of your choice, and before
proceeding, make sure that the option "Use
folder names" is selected:
A new folder will appear at the location specified
in the previous step example folder name):
OpenZEN.zip
OpenZen

Q
QQ
QUICK SETUP GUIDE
UICK SETUP GUIDEUICK SETUP GUIDE
UICK SETUP GUIDE
Zensol Automation Inc.
www.zensol.com
9
Step 3d - Decompressing and installing on Windows Vista / 7 / 8
Right-click on the icon for the file you just downloaded exact file name will depend on version downloaded):
Enter the destination folder where you want the files decompressed click on Browse to search for a suitable
folder – example folder name shown – or type in an absolute path, such as C:\OpenZEN ):
OpenZen

Q
QQ
QUICK SETUP GUIDE
UICK SETUP GUIDEUICK SETUP GUIDE
UICK SETUP GUIDE
Zensol Automation Inc.
www.zensol.com
10
Step 3e – Contents of the OpenZen folder
Here are some explanations on the contents of the OpenZEN folder. This folder contains all the data and files
required by the TAP-4.
You should see the following files and subfolders (partial list shown for clarity) if the installation was
successful:
Main folder: It contains the program, the USB driver, a reference file
cbawxwin.cba), default test plans default.wcf), calculation files
cbacal###.cal).
Calibration folder: This contains the calibration file.
Docs folder: This folder contains manuals and job aid of the
software.
Examples folder: This folder contains data and excel export
examples.
Help folders: These contain the software's online help files.
Plugins folder:
This contains useful applications used by OpenZen.
USB folder: This contains the USB driver installation and help files, if required.
TIP:
For quicker
access, right
click on your OpenZen.exe file
and select Send to…
Desktop as a shortcut)

Q
QQ
QUICK SETUP GUIDE
UICK SETUP GUIDEUICK SETUP GUIDE
UICK SETUP GUIDE
Zensol Automation Inc.
www.zensol.com
11
STEP 4 – COMMUNICATION (usb driver installation or fiber optic
installation)
Step 4a - First installation
Note: In the case where Windows would ask you to install the driver twice, please follow the procedure once
again to finish the installation.
Plug the TAP-
4 into a free USB
port.
In this window, select "
Install
from a list or specific location
"
and click Next.
Now
, select "Search for the best driver in these locations"
and "Include this location in the search
". Then click
"Browse". In the OpenZEN folder, go into the USB folder
and go into the folder CDM 2.08.02… then click OK.
If, during the process, a "Hardware
installation" window appears, click on
"Continue" this may appear more than once).
Then, connect your TAP-
4 to a
power outlet and start it.
Windows should now recognize
the unit and display a window
about it.

Q
QQ
QUICK SETUP GUIDE
UICK SETUP GUIDEUICK SETUP GUIDE
UICK SETUP GUIDE
Zensol Automation Inc.
www.zensol.com
12
Step 4b – If the “Found New Hardware Wizard” window is not launched:
Click Windows button bottom left of your desk, then control panel in the right row.
This window appears:
Select Device Manager, then click right on USB Serial Port:
Choose to Update Driver,
and then Search for a
driver on my computer and
then click Browse. In the
OpenZEN folder, go into
the USB folder and go into
the folder
CDM 2.08.02… finally click
OK.

Q
QQ
QUICK SETUP GUIDE
UICK SETUP GUIDEUICK SETUP GUIDE
UICK SETUP GUIDE
Zensol Automation Inc.
www.zensol.com
13
Step 4c – Windows 7 and 8 notice
To make sure that you will not run into problems with the driver, it is better to deactivate a feature of the
driver, the virtual COM port which is not necessary for our application.
Go into the device manager as seen in previous page) and locate your device under the USB branch. Double-
click on it and go into the Advanced tab.
Uncheck the Virtual COM Port configuration so that only a USB driver will be seen by Windows.
Disconnect and reconnect your USB cable, you should now only see the driver under the USB Controller
branch.
Uncheck

Q
QQ
QUICK SETUP GUIDE
UICK SETUP GUIDEUICK SETUP GUIDE
UICK SETUP GUIDE
Zensol Automation Inc.
www.zensol.com
14
Step 4d - In case of a problem during the driver installation
If the driver installation fails, you will need to re-install it from the “Device Manager” of Windows, located in
the systems properties.
To get to the device manager:
• Go into the control panel of Windows.
• Double-click on the icon “System”.
• Go into the tab “Hardware”.
• Click on the button “Device manager”.
Now find the USB device under “USB bus controller”. Then, all you have to do is right click on the new device
and choose uninstall.
Now you can repeat step 4a one more time.

Q
QQ
QUICK SETUP GUIDE
UICK SETUP GUIDEUICK SETUP GUIDE
UICK SETUP GUIDE
Zensol Automation Inc.
www.zensol.com
15
STEP 5 – STARTING WITH THE SOFTWARE
Step 5a – anguage configuration
Run the executable file OpenZEN-TAP.EXE or file of latest version). The first time it is run, you will be
prompted to choose for the default language:
Select "English" and click OK. The software will now start.
To change the language at a later time, in the menu, go to File
Preferences
anguage to open the language
selection window:

Q
QQ
QUICK SETUP GUIDE
UICK SETUP GUIDEUICK SETUP GUIDE
UICK SETUP GUIDE
Zensol Automation Inc.
www.zensol.com
16
Step 5b – Main window
Toolbar
Number and Name of the Test.
Number and Name of the Page.
File name.
Signals’
information
Calculus related to
data
Information about the
plan and current test
Envelopes

Q
QQ
QUICK SETUP GUIDE
UICK SETUP GUIDEUICK SETUP GUIDE
UICK SETUP GUIDE
Zensol Automation Inc.
www.zensol.com
17
Toolbar:
Files manipulation Test plan configuration In the field executions Data analysis tools
Assistant
mode Test configuration Check setup
Previous graphic
page
Open plan Informations Previous Test Next graphic page
Save raw data
only Analog inputs Next Test
Examine
time/amplitude
Save Hydro-
Quebec
envelopes only
Processing Connections /
information
Expand timing scale
Export Test link Vertical scale
Print displayed
report
Execute test
Graphic report
design
Execute batch test
Advanced graphic
report design
Export to excel

Q
QQ
QUICK SETUP GUIDE
UICK SETUP GUIDEUICK SETUP GUIDE
UICK SETUP GUIDE
Zensol Automation Inc.
www.zensol.com
18
Step 5c – Data structure
RAW DATA
DEFAULT_CHECK_TAP4.wdt
EXCE
TAP
-
Report_English.xls
TEST P AN
DEFAULT_CHECK_TAP4.wcf
CA CU US
CBACAL7
0.c
al
ENVE OPES
DEFAULT_CHECK_TAP4_env.wdt

Q
QQ
QUICK SETUP GUIDE
UICK SETUP GUIDEUICK SETUP GUIDE
UICK SETUP GUIDE
Zensol Automation Inc.
www.zensol.com
19
Step 5d – Calibration checkup
Once the “Verification” button is pressed, the software connects to your instrument, reads the calibration
data and applies it to your test plan. It has to be done every time you open a new blank test plan.
Step 5e - Testing the communication
Other manuals for TAP-4
1
Table of contents
Other Zensol Measuring Instrument manuals
Popular Measuring Instrument manuals by other brands

KROHNE
KROHNE OPTISWITCH 3300 C operating instructions

ABB
ABB Relion 670 series Product guide

Trane
Trane E50 Series Installation, operation and maintenance

Leica
Leica Viva TS16 user manual

Screening Eagle
Screening Eagle Profometer PM8000 Pro user manual

GEM
GEM 1230 Installation, operating and maintenance instructions