Zentech DF2000 User manual

entech
anufacturing,
nc.
DF2000 / DF2009
EZTV USER MANUAL
(ATSC Converter Box)

- 1 -
TABLE OFCONTENTS
1. IMPORTANT INFORMATION ............................................................................................... - 2 -
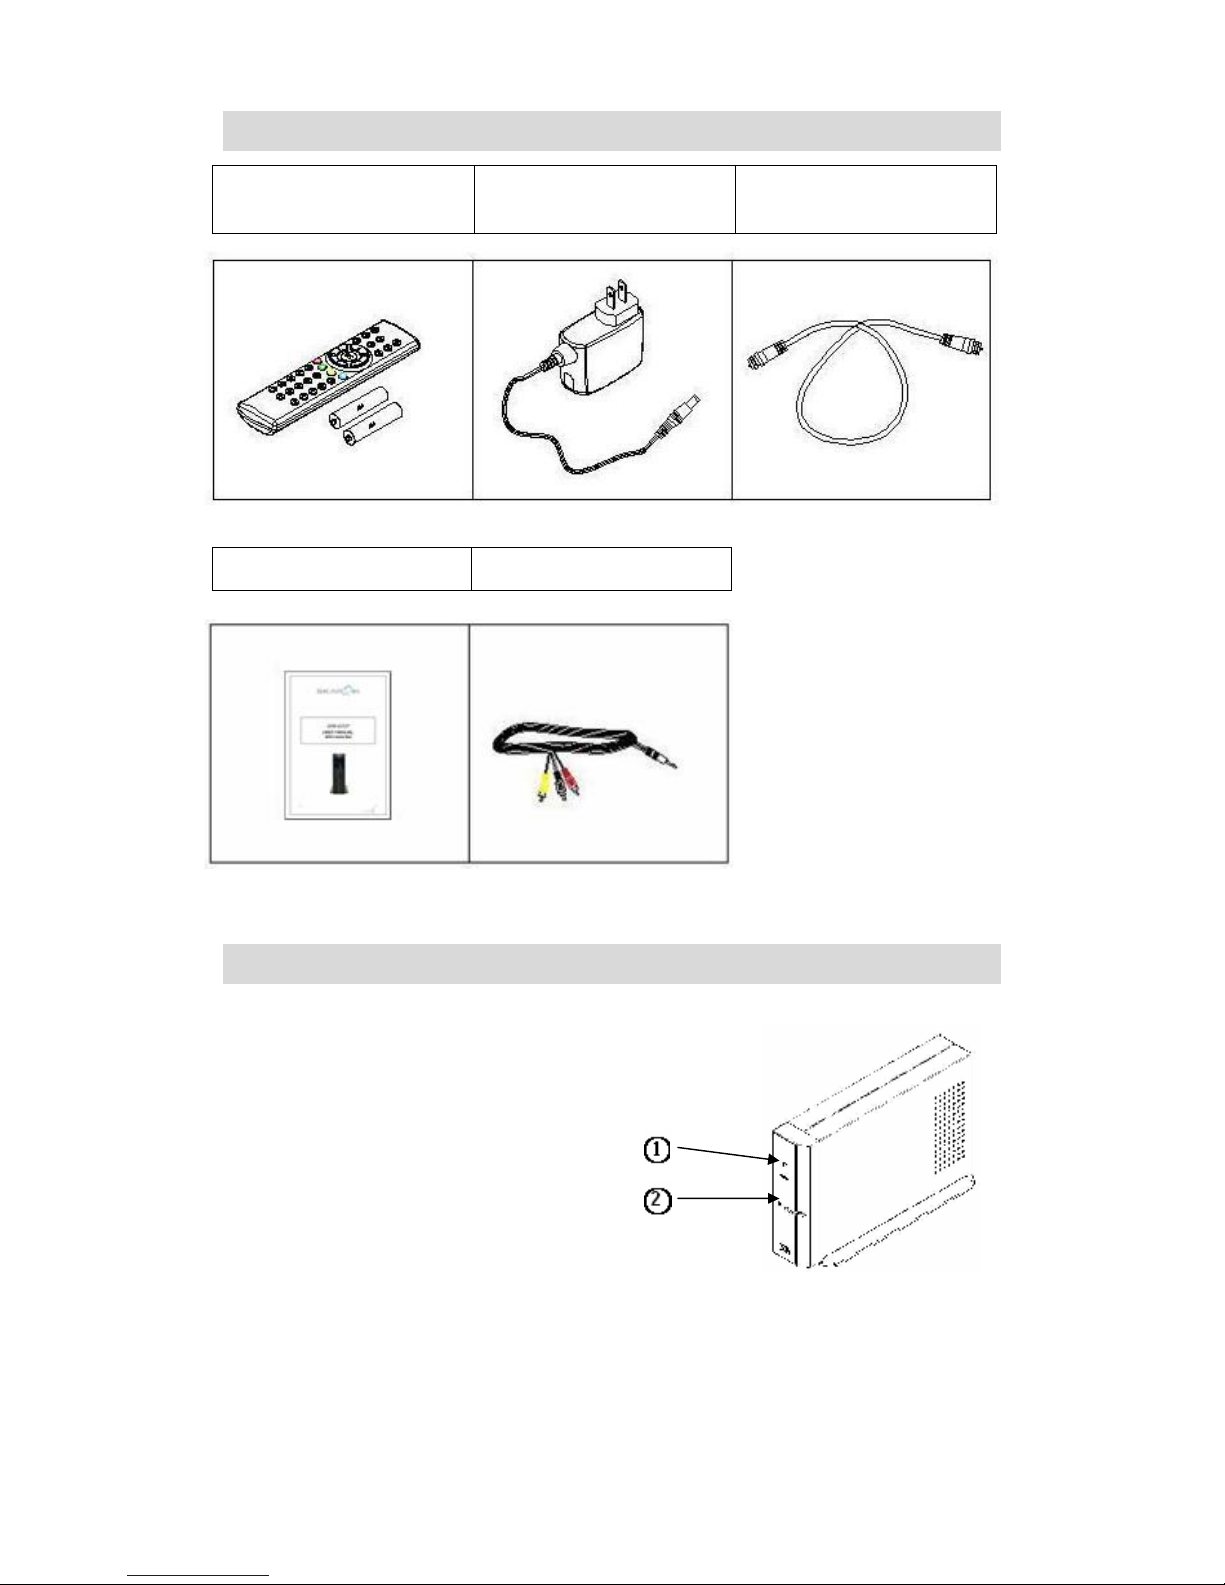
2. ACCESSORIES...................................................................................................................... - 2 -
3. FRONT PANEL ...................................................................................................................... - 2 -
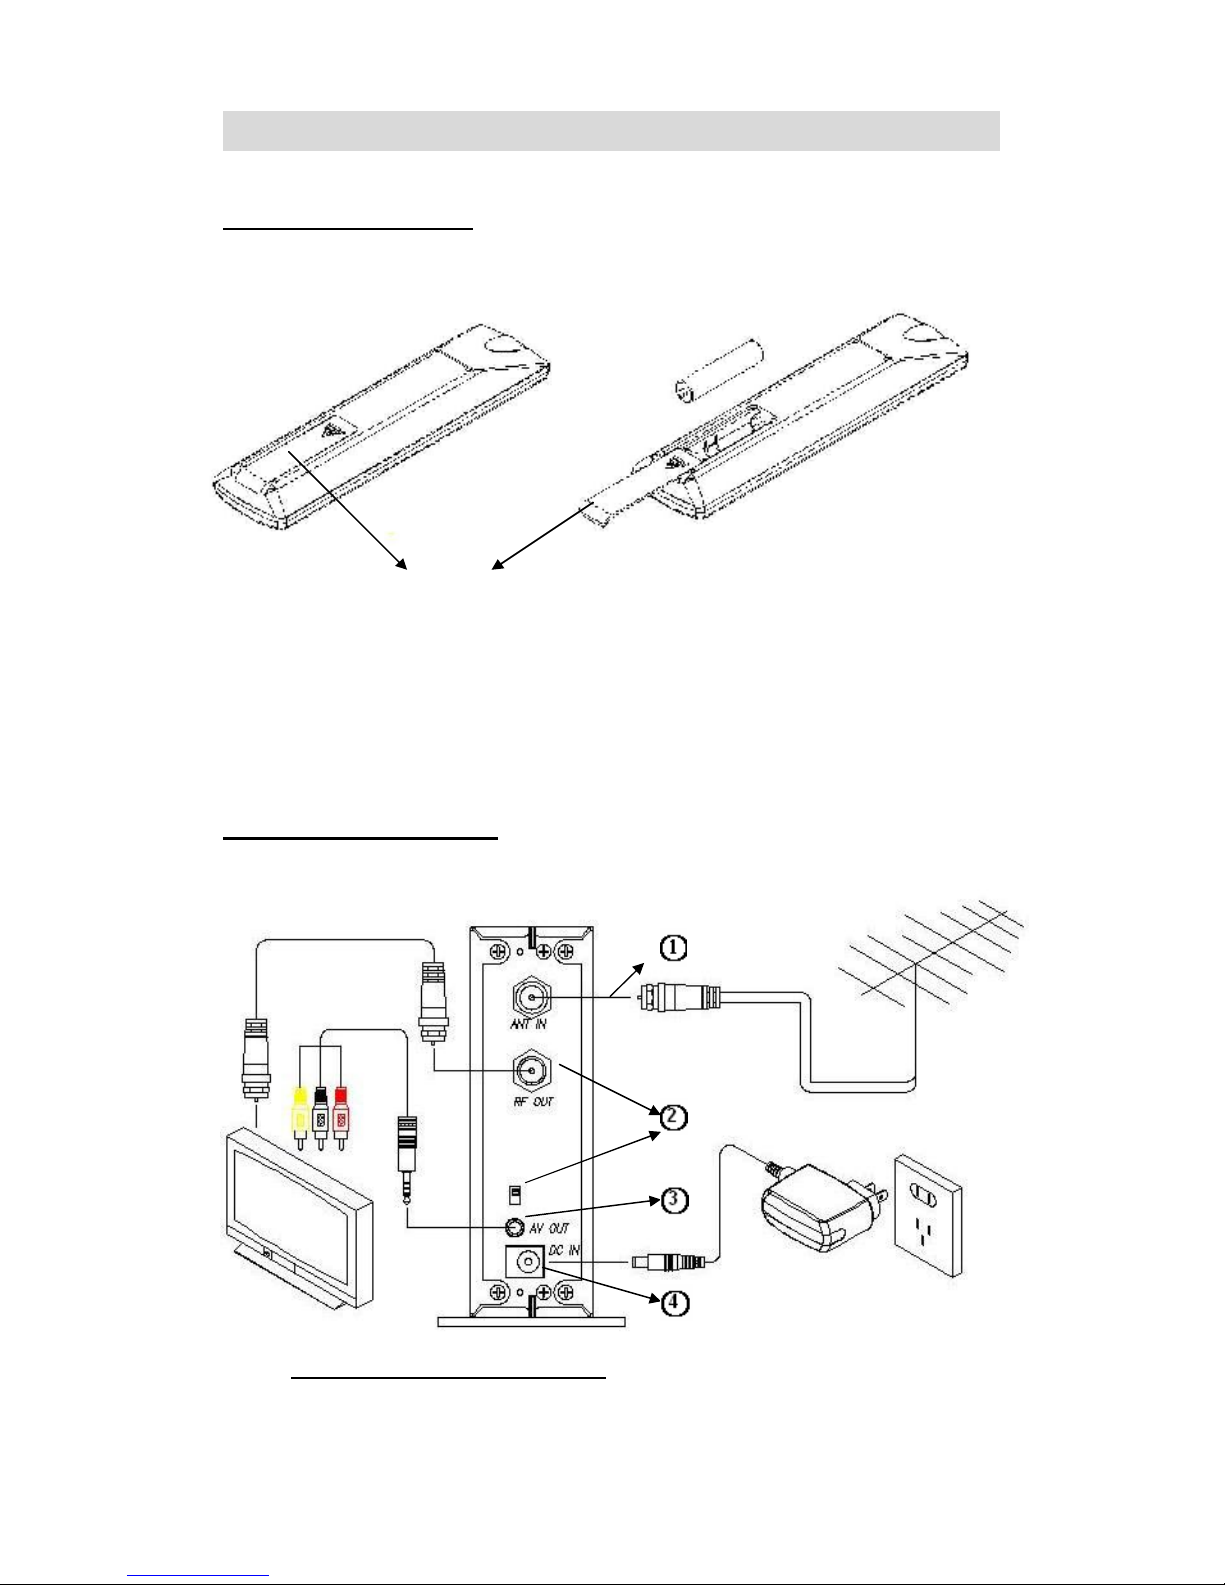
4. REAR PANEL......................................................................................................................... - 2 -
5. REMOTE CONTROL ............................................................................................................. - 2 -
5-1. BUTTON DESCRIPTIONS ....................................................................................................-2-
5-2. REMOTE CONTROL CODE .................................................................................................-2-
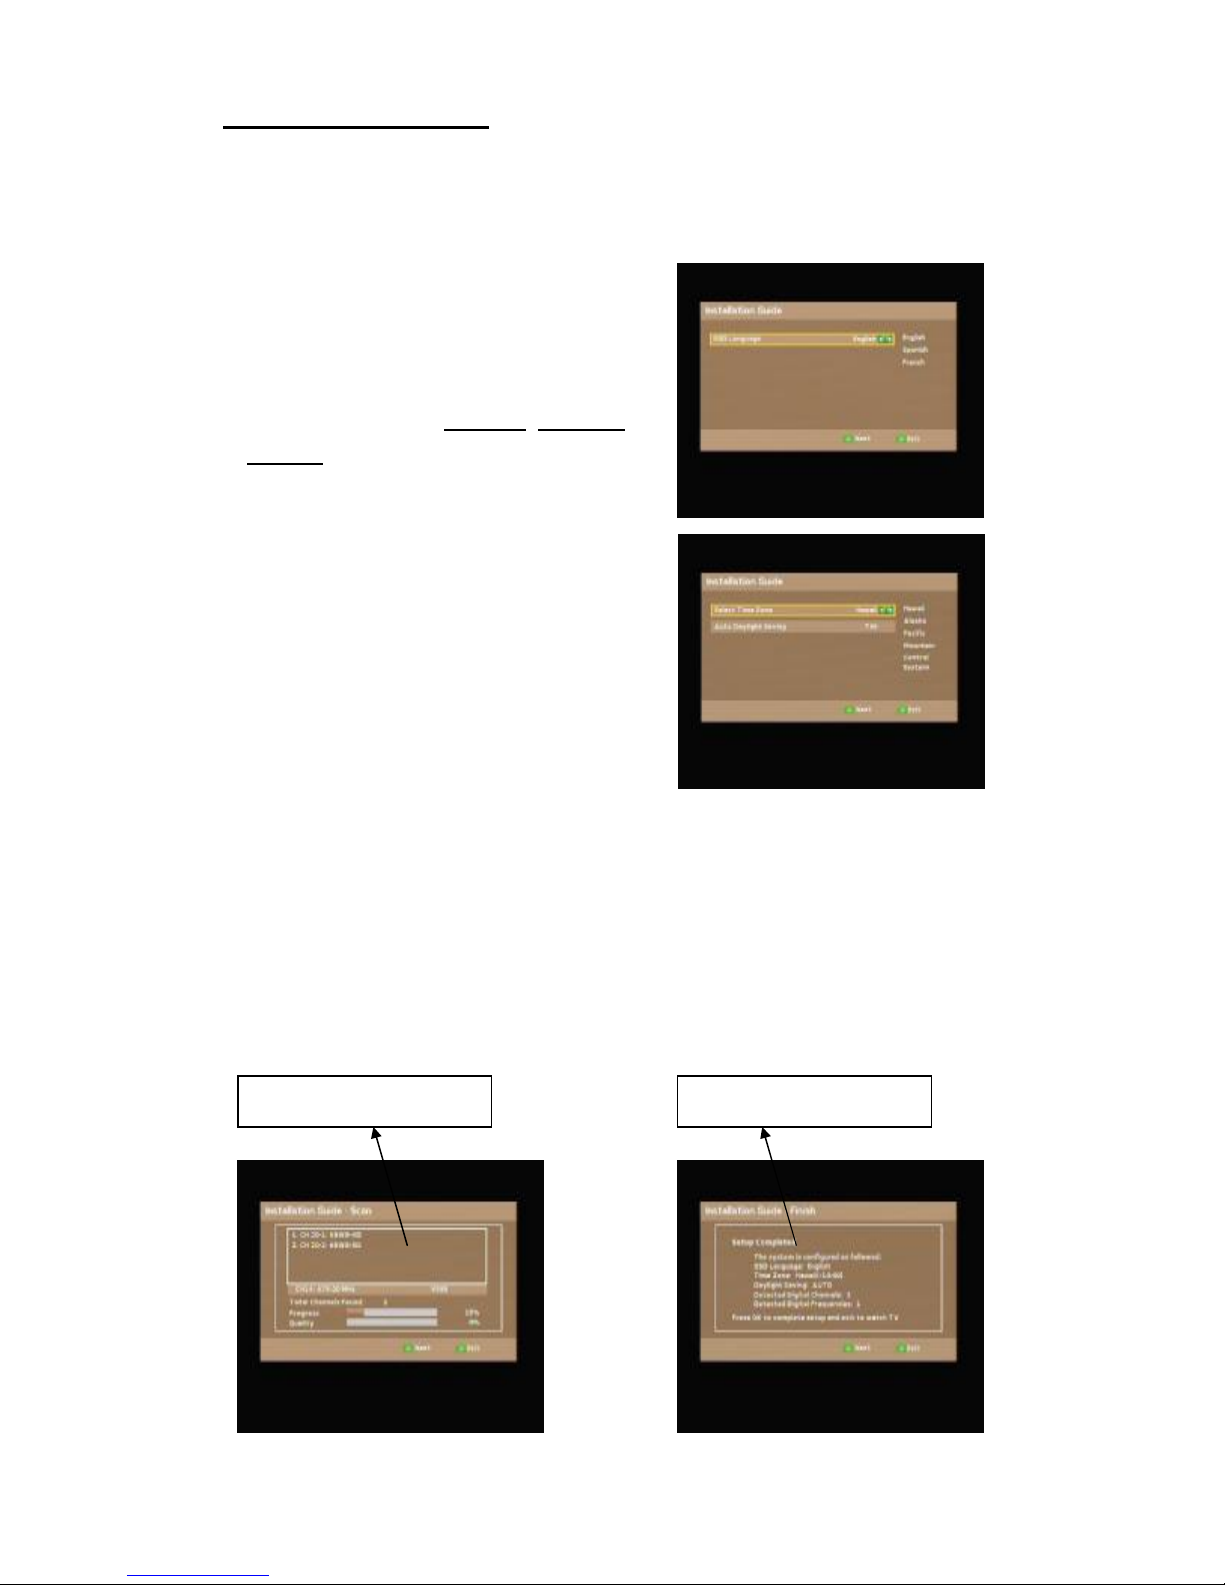
6. SETUP .................................................................................................................................... - 2 -
6-1. REMOTE CONTROL ...........................................................................................................-2-
6-2. BASIC CONNECTION..........................................................................................................-2-
6-3. START UP ..........................................................................................................................-2-
7. BASIC OPERATION (NON MENU MODE) ......................................................................... - 2 -
8. MENUS ................................................................................................................................... - 2 -
8-1. MENU/CHANNEL/FAVORITE LIST EDITOR:.........................................................................-2-
8-2. MENU/SCAN/AUTO SCAN ..................................................................................................-2-
8-3. MENU/SCAN/MANUAL SCAN .............................................................................................-2-
8-4. MENU/SETUP/SCREEN SETTING .......................................................................................-2-
8-5. MENU/SETUP/SYSTEM SETTING........................................................................................-2-
8-6. MENU/SETUP/PARENTAL CONTROL (V-CHIP) ..................................................................-2-
8-7. MENU/SETUP/CLOSED CAPTION .......................................................................................-2-
8-8. MENU/SETUP/TIME ZONE..................................................................................................-2-
8-9. MENU/SETUP/FACTORY DEFAULT .....................................................................................-2-
8-10 MENU/SETUP/INFO/SYSTEM INFORMATION ......................................................................-2-
9. SPECIFICATIONS.................................................................................................................. - 2 -
10. CUSTOMER SERVICE........................................................................................................ - 2 -
10.1 INTERNET SUPPORT .........................................................................................................-2-
10.2 PHONE SUPPORT .............................................................................................................-2-
11. LIMITED WARRANTY ......................................................................................................... - 2 -
11.1 LIMITED WARRANTY..........................................................................................................-2-
11.2 LIMITED WARRANTY COVERAGE........................................................................................-2-
11.3 MAIL-IN SERVICE..............................................................................................................-2-
12. TROUBLESHOOTING ........................................................................................................ - 2 -

- 2 -
1. IMPORTANT INFORMATION
WARNING: Do not use this product where contact with or immersion in water is a possibility.
Do not use nearflower vase, washbowls, kitchen sinks, laundry tubs, swimming pools, etc.
WARNING: Do not put a candle or lamp stand on the cabinet as this creates a fire hazard.
WARNING:
The
unit
should
be
connected
to
a
power
supply
other than the
type
described
in
the
operating instructions
or
as
marked
on
the
unit.
If
you
are
not
sure
of
the
type
of
power
supply
(for
example,
120
or 230
V)
to
your
home,
consult
your
local
dealer
or
local
power
company.
WARNING: Diodes are used in this product. To avoid direct exposure to radiation, do not
open the cabinet or touch any parts in the inner mechanism. Consult your local dealer for
technical service if opening is required.
Note: To ensure proper use of this product, please read this User Manual carefully and
retain for further reference.
Unit Cleaning: After the unit power is turned off, you can clean the cabinet, panel and remote
control with a soft cloth lightly moistened with a mild detergent solution.
Attachments: Never add any attachments and/or equipment without the manufacturer’s
consent as such additions may result in the risk of fire, electric shock, or other personal
injury.
Locating:
Slots
and
openings
in
the
cabinet
are
provided
for
ventilation
to
protect
it
from
overheating.
Do
not block
these
openings
or
allow
them
to
be
blocked
by
placing
the
unit
on
a
bed,
sofa,
or
other
similar
surface, nor
should
it
be
placed
over
a
radiator
or
heat
register
.
Power-Cord Protection:
Place
the
power-supply
cord
out
of
the
way,
where
it
will
not
be
walked
on.
Please pay
special
attention
to
cords
and
plugs at
the
poin
ts
where
they
make their
connections
.
CAUTION
RISK OF ELECTRIC SHOCK
DO NOT OPEN
WARNING: HIGH VOLTAGE INSIDE. TO PREVENT
ELECTRICAL SHOCK, DO NOT REMOVE ANY COVER OR
SCREWS. REFER ALL SERVICING TO QUALIFIED
SERVICE PERSONNEL. DO NOT ALLOW THIS PRODUCT
TO BE EXPOSED TO RAIN OR MOISTURE. DISCONNECT
THE MAIN PLUG FROM THE SUPPLY SOCKET WHEN
NOT IN USE.

- 3 -
Object and Liquid Entry: Never put objects of any kind into this unit through openings, as
they may touch dangerous voltage points or short-out parts that could result in a fire or
electric shock. Never pour or spill any liquid on the unit.
Note: Moisture may be formed on the power indicator lens under the following conditions:
when the unit is suddenly moved from a cold environment or an
air-condition room to a warm place.
immediately after a heater has been turned on.
in a steamy or very humid room.
If moisture forms insidethe unit, it may not operate properly. To correct this problem, turn
on the power and wait for about two hours for the moisture to evaporate.
Parts Replacement:
If any component parts in the unit need
to
be
replaced,
the
user
should
make
sure
the
service
technician uses
replacement
parts
specified
by
the
manufacturer
or
having
the
same characteristics
as
the
original part.
Unauthorized
replacement
may
put
the
unit
under
the
risk
of
fire,
electric
shock
or
other
hazards.
Safety Check:
After
all
maintenances
and
repairs
are
done,
the
user should
request
that
the
service technician
conduct
an
overall
safety
check
to
ensure
the
unit
is
safe to operate
under
normal
conditions.
FCC:
This device complies with part 15 of the FCC Rules. Operation is subject to the following two
conditions: (1) This device may not cause harmful interference, and (2) this device must accept
any interference received, including interference that may cause undesired operation
The power supply for this device is UL Approved.
This device meets the ENERGY STAR guidelines for energy efficiency.
ENERGY STAR is a U.S. registered mark.

- 4 -
2. ACCESSORIES
Remote Control and
two Batteries
AC Adapter
110V~120V
RF Cable
User Manual AV Cable
3. FRONT PANEL
1. Power Indicator:
Green light means ON.
Red light means STANDBY.
No light means OFF.
2. Power button:
Press ON
Press OFF

- 5 -
4. REAR PANEL
1. ANT IN: Coax cable input.
2. Antenna Coax cable output.
RF OUT:
RF Audio/Video
cable connection to the TV.
3. CH3/CH4 Switch:
Switch RF OUT channel
4. AV:
Audio/Video connection to the
TV.
5. DC 12V 1A:
AC adapter input.
5. REMOTE CONTROL
5-1. Button Descriptions
1. MUTE: Mute or restore the sound.
2. CC: Close Caption on/off.
3. AUDIO: Toggle preferred audio language.
4. EPG: Electronic Program Guide
Displays a program guide if pressed
when not in “Menu” mode.
5. OK: Activates the highlighted MENU item.
Activates the Quick Channel list if pressed
when not in “Menu” mode.
6. / Left/Right: Increase/decrease the
volume level if pressed when not in “Menu”
mode.
Moves the cursor to the left/right if pressed
in “Menu” mode.
7. FUNC: Used for special Functions in Menu
mode based on color code.
8. Exit: Exits from the menu or sub-menu and
Cancels any functions in progress.
9. NUMERIC KEY (0-9): Controls numerical
operations and used to change channels

- 6 -
directly.
10. : Used to enter a dash “-“ in the channel
number.
11. POWER on/off: Turns the receiver ON/OFF.
12. ZOOM: Switch the screen format (Full/Letter/Center).
13. SIGNAL: Activates the “signal strength” meter.
14. FAV: Shows the current list of favorite channels.
Press multiple times to scroll through lists.
15. / UP/Down: Change the current channel to the previous/next
channel when not in “Menu” mode. Moves the cursor up/down in
Menu mode.
16. MENU: Shows the Menu or sub-menu and Cancels any other function
in progress.
17. Info: Activates the Info banner.
18. Recall: Returns to the last channel.
5-2. Remote Control Code
1. Universal Remote Control setting:
The remote control that comes with the device is pre-programmed to
work with this converter box. If you want to set-up your own
universal remote control so that it will control this converter box, you
can setyour universal remote to work a model NEC0024 device. After
programming your universal remote with code NEC0024, you can use
the Power, Channel UP, Channel Down and Volume buttons
on the universal remote control.
Key codes are listed here for reference.
Brand Name /
Model Number
Protocol Function Customer
Code
Key Code
Power 0xE718 0x08
Channel Up 0xE718 0x00
Channel Down 0xE718 0x01
Volume Up 0xE718 0x02
NEC / 0024
NEC
Volume Down 0xE718 0x03

- 7 -
6. SETUP
6-1. Remote Control
Open the Battery Cover and insert batteries into the controller.
Note: Be sure to inset batteries according to the polarity +/-
marks inside the remote control (positive end pointing to the
bottom of the remote).
6-2. Basic Connection
Please perform the following steps to connect your device.
1. Outdoor Antenna Connection
Connect a cable from your antenna (outdoor or rabbit-ears) to the
F-Type “ANT IN” connector.
Battery Cover

- 8 -
2. Make a connection to the TV using either step 2.1 or step 2.2
2.1 RF AV Cable Connection (not required if you use the AV Cable in 2.2)
Use the supplied RF cable to plug into the “RF OUT” terminal on
the device. Plug the other end of the cable into the TV set. Be sure
to set the CH3/CH4 SWITCH on the device to match the same
channel you select on the TV set. If you set the CH3/CH4 switch on
the device to CH3, please change your TV set to channel 3. If you
set the switch to CH4, please change the channel on your TV set to
channel 4. Keep your TV on channel 3 or 4 (as selected above).
To watch different channels, use the supplied remote control to
change channels. If you change the channel on your TV set from
channel 3 or 4, you will not be able to see any TV signals.
2.2 AV Cable Connection (not required if you use the RF Cable in 2.1)
Plug the black end of the supplied AV cable into the device “AV
OUT” connector, and plug the other ends of thecable into your TV,
YELLOW terminal for VIDEO IN, RED terminal to AUDIO IN (RIGHT),
WHITE terminal to AUDIO IN (LEFT). Set the Input using your TV or
TV remote to the corresponding Video Input mode (It doesn’t matter
which channel your TV is set to when using the AV input mode).
3. Power Adapter Connection
Plug the power adapter into a wall outlet. Connect the other end to the
“DC IN” Jack on the device.
6-3. Start up
Ensure that your device is properly connected to your television as
described in 6.2 above, that you have inserted the batteries into the
remote and that your antenna is fully extended. Press the power
button on the device or remote control to activate the device.
Power Button

- 9 -
6-4 Installation Guide
When the device is first used, the Installation Guide will be displayed.
Follow the Installation Guide (shown next) to set the parameters and
perform channel scanning as described below:
1. Select your Language.
The default language for the On
Screen Menu (OSM) is set to English.
Press Left/Right to choose another
display language: English, Spanish,
French.
Press OK to go the next page.
2. Select the Time Zone.
Press the Left/Right button to select
your time zone. The unit will
automatically display the correct time
for your selected time zone.
2.a. Set the Auto Daylight Saving.
The default setting of the Auto
Daylight is “YES.” Press the Left/Right
button to enable/disable the Auto Daylight saving feature.
Press OK to go to the next page.
3. Auto Channel Scan.
Channel scanning will start automatically and take several minutes.
Please wait until the “Finish” dialog box is displayed.
Press OK to watch the programs.
Scanned channels Finish Dialog

- 10 -
Note: This converter boxsearches all the frequencies that are assigned
to digital television stations in North America. TV stations can send
more than one signal on their assigned frequency. Therefore, digital TV
stations require the use of sub-channels or “dash” numbers. This is
called “multi-cast.” Through the use of “Virtual Channels,” in most
cases, you can find your old favorite TV channels by simply adding a -1
(dash 1) to the end of the old analog channel number. The “-“ (dash)
button is located on the bottom left corner of the remote control. So for
example, to tune your converter box to watch channel 11, you will need
to press four key strokes on your remote control: “1”, “1”, “–“, and “1”
(11-1).

- 11 -
7. Basic Operation (non Menu mode)
While viewing TV (or Radio) channels, various functions can be
performed using your remote control. Following is an explanation of the
buttons on your Remote Control and the corresponding functions:
A. Power:
Turns the receiver ON/OFF.
B. Mute:
Mutes audio output of the receiver.
C. Numeric keys (0-9):
Change the channel directly by pressing the channel number.
D. RECALL:
Recall the last channel.
E. / UP/Down (Channel):
Press / to change the channel.
F. / Left/Right (Volume):
Press / to decrease /increase the Volume.
G. OK:
Press OK to activate the
“Quick Channel List.”
See the picture to the right.
Press the Red key to go to the previous
page.
Press the Green key to go to the next
page.
Press the UP/Down key to move the
cursor.
Press OK to view the selected channel.

- 12 -
H. INFO:
Press INFO to activate the Info Bar.
I. Signal:
Press Signal to activate the Signal Strength Meter. You can use this
feature to show the signal strength as you change the position of
your antenna to try and find the ideal position of your antenna.
J. Audio:
Press Audio to change the Audio language.
K. Zoom:
Change the screen format.
L. FAV:
Press FAV to activate the
“Favorite Channel list.” You can use
the Favorite Lists to organize your
favorite channels for simple and fast
access.
Note: You must use the Menu feature
to add channels to the favorite list
before any channels will be shown on
the lists.
Date and TimeChannel name
Signal Indication
Channel name
Date and Time
Audio Language
High Definition Channel
Close Caption Channel Type
DRRT Info

- 13 -
Press / to change the favorite group.
Press / to move the cursor.
Press OK to view the selected channel.
Press the Red key to return to the previous page.
Press the Green key to go to the next page.
M. CC:
Press CC to toggle the Closed Caption service:
OFF Service1 Service2 Service3 Service4 Service5 Service6
CC1 CC2 CC3 CC4 TT1 TT2 TT3 TT4 OFF
N. EPG (Electronic Program Guide):
Press EPG to activate the EPG menu. In this menu, you can see the
program guide for every channel.
Press the Red key to return to the previous day.
Press the Green key to go to the next day.
Press the OK key to scroll the text for theselected program.
Press the / keys to change channels.
Press the / to change programs.
O. Red key (Rating Info):
Press the red key to activate the Rating info menu. In this menu you
can see the V-Chip info.
Red key: previous page.
Green key: next page.
Exit key: exit this menu.
Date
Program Name
Program Description
TV Rating
Closed Caption
Channel name

- 14 -
8. Menus
Press the Menu button on the remote control to display the On
Screen Menu (OSM) on your TV screen.
8-1. Menu/Channel/Favorite List Editor:
In this menu, you can add, and remove channels from the favorite list
groups.
There are 17 favorite groups:
Main Stations, Adult, Animal, Business, Cartoon, Education,
Entertainment, International, Kids, Movie, Music, News, Politics,
Religious, Sports, Technology and Wildlife.
Press the Yellow key to add (or remove) a channel in the shown
favorite group.
Press the / keys to switch favorite groups.
Press the / keys to change the channel.
Press the Red key to return to the previous page.
Press the Green key to go to next page.
Channel list
Favorite Group Name

- 15 -
8-2. Menu/Scan/Auto Scan
In this menu, you can scan available channels. Caution: Pressing
“Auto Scan” will erase all previously scanned channels, TV Channel
Lists and Favorite Lists (a new list of channels will be created).
Press OK to start and stop the Auto Scan at any time.
8-3. Menu/Scan/Manual Scan
From this menu, you can scan for channels one at a time without
removing the previously auto scanned channels. If during the auto
scan, some of the channels that you like to watch were not found, you
can attempt to find additional channels by changing the position of your
antenna and performing a “Manual Scan” for individual channels.
Note: You can tell which channels were found during Auto Scan by
checking to see if there isa number next to “Programs” under the quality
indicator.
Note: TV stations will have a new digital channel numbers that is
different from their old analog channel number that you were used to
watching. Instead of finding your old favorite channel by scanning the
old analog channel number, you will need to scan using the new digital
channel number or frequency. To simplify the transition, most TV
Stations are being allowed to use the same old analog channel number
(virtual channel number) followed by a -1 (dash 1). However, you must
Scanned Channel
Located Frequency
Scanned % completion
Quality indicator
Selected Channel
Channel list
Channels found
during Auto Scan

- 16 -
first scan the new digital channel number before using the virtual
number. Contact your local TV station to find their digital channel
number or frequency.
Press / to select a specific channel / frequency.
Press OK to start the Manual Scan.
You can adjust the position of the antenna during the scan in order
to find the optimal antenna position for the selected channel/frequency.
‘No Signal’ will be displayed if the signal is too weak; otherwise, the
newly scanned channel will be added to the channel list.
8-4. Menu/Setup/Screen Setting
In this menu, you can select the screen format: FULL, Letter, Center.
Press the / keys to switch Screen Formats.
Press OK to confirm the selection.
Screen Format
List
White Line is TV.
Gray rectangle is
the content.

- 17 -
8-5. Menu/Setup/System Setting
In this menu, you can change the OSD (On-Screen Display) Language,
OSD Opacity, Audio Language, Auto Sleep, etc…
1. OSD Language:
Press the / key to select either:
English, Spanish, or French.
2. Audio Language:
Press the / key to select either:
English, Spanish, or French.
3. Sound Output:
Select one of 4 settings: Normal, Left, Right, Mixed.
4. Auto Sleep:
Use this menu to set the default “sleep” time-out period. The
converter box will turn off automatically if there is no user interaction
within the specified time. There are several settings: OFF, 15 Minutes,
30 Minutes, 1 Hour, 2 Hours, and 4 Hours.
Press the / keys to switch between the settings.
Press the / keys to move focus to a different function.

- 18 -
8-6. Menu/Setup/Parental Control (V-CHIP)
From this menu, you can select: Lock System, Country, Rating Control,
and Change Password. The default
password is set to “1234.”
1. Lock System:
You can set ON/OFF to enable / disable
the Parental Control lock system.
2. County:
You can set the country of the ratting
(USA/Canada).
3. Rating Control: (V-Chip)
You can set the Rating Controls. The TV Rating/MPAA Rating is for
USA.
The English Rating/ French Rating is for
Canada.
Press the / keys to move focus.
Press OK to confirm the selection.
3.1 TV Rating
The television industry has adopted
voluntary ratings for TV programs.
Select “Allow All” to allow all the TV
ratings.
Select Block All to block all the TV
ratings.
To control or change blocking for
any specific setting, Press the /
/ keys to move to any box and
Press OK to confirm the selection.
3.2 MPAA Rating
MPAA Ratings are for motion
pictures.
Press the / / keys to move
focus.
Press OK to confirm the selection.

- 19 -
TV Parental Guidelines
TV-Y All children
TV-Y7 Direct to older children
TV-G GENERAL AUDIENCE
TV-PG PARENTAL GUIDANCE
SUGGESTED
TV-14 PARENTS STRONGLY CAUTIONED
Age
Based
TV-MA MATURE AUDIENCE ONLY
FV FANTASY VIOLENCE SCENE
V VIOLENCE SCENE
S SEXUAL SITUATION
L ADULT LANGUAGE
Content
Based
D SEXUALLY SUGGESTIVE DIALOG
MPAA RATING
G General
audiences
All ages admitted
PG
Parental guidance
suggested
Some material may not be
suitable for children
PG-13
PARENTS STRONGLY
CAUTIONED
SOME MATERIAL MAY NOT BE
SUITABLE FOR CHILDREN UNDER 13
R RESTRICTED UNDER 17 REQUIRES
ACCOMPANYING PARENT OR ADULT
GUARDIAN
NC-17 NO ONE 17 AND UNDER ADMITTED
X UNIFIED WITH NC-17
NR NOT RATED
This manual suits for next models
1
Table of contents