Zeppelin Design Labs Altura Theremin User manual


2
ALTURA
THEREMIN MIDI CONTROLLER
Quick Start Guide and Reference Manual
© 2017 ZEPPELIN DESIGN LABS. NO PART OF THIS DOCUMENT MAY BE REPRODUCED WITHOUT WRITTEN PERMISSION FROM THE AUTHOR. ZEPPELIN DESIGN LABS TAKES
NO RESPONSIBILITY FOR ANY DAMAGE OR HARM THAT MAY COME TO ANYONE OR ANYTHING THROUGH THEIR PRODUCTS. THE ALTURA SOFTWARE IS DISTRIBUTED
UNDER THE CREATIVE COMMONS SHARE-ALIKE / ATTRIBUTION / NON-COMMERCIAL LICENSE. YOU ARE FREE TO ADD TO OR BUILD UPON THIS SOFTWARE IN ANY WAY
YOUR CREATIVITY ALLOWS, BUT ANY DERIVATIVES MUST BE SHARED USING THE SAME LICENSE.
111717
QUICK START GUIDE ................................................................................................ 3
REFERENCE MANUAL............................................................................................... 8
INTRODUCTION.................................................................................................. 8
BACKGROUND..................................................................................................8
HOW IT WORKS................................................................................................9
FEATURE LIST ..................................................................................................... 10
REAR PANEL.....................................................................................................10
TOP PANEL ......................................................................................................10
ON THE PCB....................................................................................................11
REAR PANEL FEATURES....................................................................................... 12
9V DC Power Input ...........................................................................................12
Power On/Off..................................................................................................12
MIDI Out..........................................................................................................12
TOP PANEL FEATURES ........................................................................................ 12
Power On Indicator...........................................................................................12
3-Digit Display..................................................................................................13
Distance Sensors - General.................................................................................13
Left Distance Sensor – MIDI Control Functions .......................................................14
Right Sensor - MIDI Pitch ....................................................................................14
Data Far and Near Adjust..................................................................................15
MIDI Function Select..........................................................................................16
Key (Root Note) Select.......................................................................................20
Scale (Mode) Select ..........................................................................................20
Octave Near and Octave Far Select....................................................................21
ON THE PCB ..................................................................................................... 22
Battery Holder ..................................................................................................22
ISP Header.......................................................................................................22
Articulation Adjust.............................................................................................22
PROGRAMMING THE ALTURA THEREMIN MIDI CONTROLLER .................................... 23
PRESETS................................................................................................................. 24

3
QUICK START GUIDE
Look for the companion demo video at http://zeppelindesignlabs.com/product/altura/ or on our
YouTube channel.
The ALTURA is a MIDI controller that emulates the classic theremin. The right sensor transmits note data
to set the pitch. The left sensor transmits a variety of MIDI controller data to influence the sound in many
ways. In X-Y mode, the right sensor mimics the left: both sensors transmit control data of your choosing.
The ALTURA’s memory is volatile: most of your setup will vanish when you turn off the power.
1. POWER UP Use a 9V DC power supply or a battery.
• 9V DC power supply (“wall wart”): Must be
rated for 200 mA minimum, with center-negative
polarity, such as a typical guitar pedal supply.
Look for this graphic on the power supply. (Your
controller won’t work with a center-positive
power supply.) Plugging in the power supply
disconnects the battery.
• 9V battery: Use a high-quality alkaline battery, like Energizer. (Don’t waste your money on
cheap batteries!) Open your cabinet; insert the battery into its holder; snap the contacts into
place; and then push down to snap the battery into the holder.
2. CONNECT A MIDI DEVICE Plug a standard MIDI cable into the Altura’s MIDI OUT jack, and
connect it to the MIDI IN of your Macchiato Mini Synth or any other device; or plug into a MIDI
patch bay or other port device; or use a MIDI-to-USB cable to plug into your computer.
3. SET THE KNOBS to the following default positions, just for this tutorial, until you become familiar
with their functions:
DATA
FAR
DATA
NEAR FUNCTION KEY SCALE
OCTAVE
NEAR
OCTAVE
FAR
Right Right Left Left Left Straiht up Straight up
4. TURN ON YOUR SYNTH If you are using a Macchiato Mini Synth, set it for short attack, long
release, and a deep LFO. If you are using a different synth, set its receive channel to 1 or Omni.
(By default, the Altura transmits on Channel 1. You will learn how to change this shortly.)
5. TURN ON YOUR ALTURA Press the red power button on the back of the Altura. If you built a
card stock case, be careful how you squeeze your theremin; you don’t want to crush the cabinet.
The display will show “C 1“, indicating the C Major scale. More on key and scale in a moment.
6. WAVE YOUR RIGHT HAND The right sensor selects the pitch to transmit to your synth. As you
wave your hand, you should hear notes coming out of your synth! The sensor is sensitive: hold
your hand steady and flat; move it steadily in and out from the Altura until you learn where the
beam is pointing. There is much more information in the Reference Manual.
OUTER BARREL
POSTIVE
CENTER PIN
NEGATIVE
200mA MINIMUM
+
-

4
7. WAVE YOUR LEFT HAND The left sensor sends Control Change data to your synth to influence
the sound in a variety of ways. It is presently in Function 1: Pitch Bend mode. Play a steady note
with your right hand, and also wave your left hand. The display will show a cute spinny-graphic
that represents Bend Up and Bend Down – try it!
8. CHANGE THE FUNCTION Turn the FUNCTION knob to display numbers 1 - 7, corresponding
to the functions shown in the table below, and on a label on the bottom of your Altura. After
the table there’s a brief description of each function, with much more to learn in the Reference
Manual.
FUNCTION
NUMBER NAME
CONTROLLER
NUMBER DATA FAR DATA NEAR
1 Pitch Bend 1 Adjust size of neutral zone Max. pitch bend range
(Macchiato only)
2 Modulation 2 Modulation maximum and minimum values
3Note-On
Velocity n/a Velocity maximum and minimum values
4Channel
Volume 5 Volume maximum and minimum values
5Portamento
Time 7 Portamento Time maximum and minimum values
6 X-Y Mode User Defined
The DATA and OCTAVE knobs set the max and min
values transmitted by left and right sensors. KEY and
SCALE set the left and right CC#.
7Send Channel
Select n/a DATA FAR sets the MIDI Send channel (default 1)
• Function 1: Pitch Bend
Wave your hand in front of the left sensor. The display shows a cute spinny-thing to
represent Pitch Bend Up and Down. As you move your hand, the display spins and the
pitch bends. When you lock into the fully-bent pitch, either up or down, this symbol
appears: “ 0. ” Remove your hand to snap back to the “Neutral”, or “No Bend” position,
indicated with “f”.
Turn the DATA FAR knob to display numbers 0 - 12. With a Macchiato Mini Synth, this sets
the number of semitones the pitch will change at maximum bend. On other devices, this
knob will have no effect or an unpredictable effect. Set to 0to disable Pitch Bend.
Turn the DATA NEAR knob to display numbers 0 - 127. This changes the size of the
Neutral Zone in the air, separating the Bend Up and Bend Down zones. On startup, the
zone was set to 127: you will find a large piece of air where the pitch remains unaffected.
Change it to zero and the Neutral Zone diminishes.
"NEUTRAL” OR
NO BEND FULL BEND
UP
FULL BEND
DOWN

5
• Function 2: Modulation
Turn DATA FAR to 0and DATA NEAR to 127. The DATA knobs set the maximum and
minimum MIDI value to be transmitted when your left hand is near to or far from the left
sensor. Wave your left hand, and as the number rises you should hear note modulation,
usually a tremolo effect. As the number falls, the effect fades away. You can reverse the
effect by swapping the NEAR and FAR numbers. The controller acts like a mid-air slider:
move your hand to the desired value; remove it and the value will “stick”. This behavior is
the same across Functions 2 – 6.
On the Macchiato Mini Synth, Modulation controls the depth of the Low Frequency
Oscillator (LFO). Touching the Depth knob on the Macchiato will override the Altura. Using
the Altura will override the knob on the Macchiato.
• Function 3: Note-On Velocity
The Note-On Velocity defaults to 127 upon startup. Use the DATA NEAR and FAR knobs
to set maximum and minimum values for Velocity. (Keeping a minimum velocity around 30
will prevent you from accidentally silencing your Altura!) This affects the starting velocity of
each new note. Velocity usually impacts the volume of the note, but your synth might use
this to influence other effects, such as brightness.
• Function 4: Channel Volume
The Channel Volume defaults to 127 upon startup. This function affects the overall output
volume of your synth, and is useful for swells while a note sustains.
• Function 5: Portamento
“Portamento” refers to notes gliding smoothly from one pitch to the next. This effect
emulates the classic sound of a theremin. The left sensor sets the Portamento Time: small
numbers mean short, fast glides; higher numbers mean long, slow glides. Set the DATA FAR
knob to about 10 or 20. Set the DATA NEAR knob to around 80. Play your Altura with a
Macchiato Mini Synth and you will hear that spooky theremin sound! Setting Time = 0 will
turn Portamento off.
Some synthesizers will respond to Portamento as readily as the Macchiato; others may only
respond with a bit of coaxing; and many synthesizers do not support Portamento at all.
Consult your synthesizer’s documentation, and the Altura Reference Manual.

6
• Function 6: X-Y Mode
In this mode, the right sensor behaves like the left. Each sensor sends MIDI values from 0
– 127 to a different Control Change number. Select left and right CC#’s with the KEY and
SCALE knobs. Set the right sensor MIDI max and min with the OCTAVE knobs.
DATA
FAR
DATA
NEAR FUNCTION KEY SCALE
OCTAVE
NEAR
OCTAVE
FAR
Left Sensor MIDI Max
and Min
Function
Select
Left CC#
Select
Right CC#
Select
Right Sensor MIDI Max
and Min
Since this mode does not trigger notes, use it with a drone synth or a sequencer. The Altura
defaults to CC#’s 85 & 86 on startup, which are undefined. Consult the CC# chart of your
synthesizer to select suitable controller numbers. This function is not recommended for use
with the Macchiato Mini Synth.
Here’s what the display is telling you:
0 - 127 When just one sensor is active, this is the MIDI number being transmitted.
--- Both sensors idle
z-x Both sensors transmitting.
• Function 7: Send Channel Select
The Altura defaults to MIDI Send Channel 1. Use DATA FAR knob to change the send
channel.

7
9. CHANGE THE KEY AND SCALE Set FUNCTION to any value from 1 to 4. Now turn the KEY
knob slowly to the right while playing notes with your right hand. The display will move through
the twelve root notes of the Western scale, with a decimal indicating Sharp:
C C. D D. E F F. G G. A A. B
Turn the SCALE knob slowly to the right while playing notes. The display will show 1 - 12. These
numbers are keyed to the label on the bottom of your Altura. The Altura plays a wide variety of
scales and modes. See the Reference Manual for more details.
Playing your scales was never so easy!
10. TRANSPOSE THE OCTAVE Turn the OCTAVE NEAR knob just enough to cause the display to
appear. You should see 5 5 . This means near the sensor, you are playing in Octave 5 (out of
a range of 1 – 8), and far from the sensor, you are still playing in Octave 5 – a range of one
octave, probably descending as you move from near to far.
a. Turn the OCTAVE FAR knob left until the display shows 5 4. Now your hand covers two
octaves descending: Octave 5 near the sensor, Octave 4 far from the sensor.
b. Turn the OCTAVE FAR knob right until the display shows 5 6. Now your hand covers two
octaves ascending: Octave 5 near the sensor, Octave 6 far from the sensor.
c. Turn the OCTAVE FAR knob left until the display shows 5 5 again. Now this one-octave
range is
ascending!
Remember it used to be
descending?
Whenever you set the Altura to
cover one octave, that one octave will ascend if the previous range was ascending, and
descend if the previous range was descending.
11. ARTICULATION It is possible to adjust the minimum time between notes, somewhat similar to the
Quantize function in a sequencer. This serves to strike a balance between responsiveness and
stability. See the Reference Manual for details.

8
REFERENCE MANUAL
INTRODUCTION
The Altura Theremin MIDI Controller by Zeppelin Design
Labs emulates the behavior of the early electronic instrument
invented by Russian physicist Léon Theremin in 1920. Léon’s
device features a pair of antennae that act as plates of two
capacitors. The player’s hands serve as the capacitors’ ground
plates. As the player moves his right hand closer to one
antenna, the device emits an eerie tone that rises in pitch. As
the player moves his left hand farther away from the other
antenna, the tone becomes louder. The device is very sensitive
and responsive, and makes wonderful, spooky music – but it is
very tricky to play. The performer can only play by ear: there
are no frets in mid-air!
BACKGROUND
Léon Theremin (1896 - 1993) was working on early
radio designs for the Soviet government when in 1920 he
accidentally built a device that emitted a weird but pleasant sound. He developed it into a musical
instrument which he initially called the Thereminvox. In 1927 he left the USSR to tour Europe in
promotion of his invention, performing to large audiences and receiving mixed reactions. His tour took
him and his wife Katia to New York where he opened a laboratory and studio, patented the Theremin,
licensed its manufacture to RCA, performed with the New York Philharmonic Orchestra, performed at
Carnegie Hall with a theremin ensemble, and invented an electronic cello. In 1930 he conducted the
first-ever concert of an electronic orchestra.
In the early 1930’s the Soviet consulate demanded Theremin
divorce Katia (?!). He proposed to his young and beautiful protégé
Clara Rockmore; she turned him down and Theremin instead
married Lavinia Williams, a young and beautiful dancer in his
employ. In 1938 he suddenly disappeared -- his wife said he had
been kidnapped by Russian agents.
Clara Rockmore rose to prominence as the world’s pre-eminent
thereminist; in the 40’s a podiatrist-thereminist named Hoffman
made a living cutting records and performing the soundtracks
for such classic films as “The Day The Earth Stood Still”; in the
50’s a trombonist named Tanner put Hoffman out of work with
his electro-theremin, a different device that sounded similar but
was much easier to play; in ‘66. Brian Wilson of the Beach Boys
Alexandra Stepanoff playing the theremin
on NBC Radio, 1930

9
hired Tanner to perform on “Good Vibrations”, unaware that the instrument used was not actually a
theremin; Tanner’s device was destroyed by an earthquake; Theremin’s second wife Lavinia died in
Haiti of food poisoning; and Bob Moog spent his youth building theremins and selling DIY kits! (Our
hero.)
Meanwhile, some time in the 1950’s, Rockmore and her husband visited Moscow and they made
contact with Theremin by a bizarre chance encounter. After 25 years of silence and mystery, she
received a message to meet Léon on a subway platform, where they spoke for a few minutes.
It turns out Theremin’s disappearance may have had more to do with the IRS than the KGB. What is
known for sure is that when Theremin returned to Russia, he was arrested and dispatched to a series
of labor camps. He wound up in a secret Soviet laboratory where he developed spy gear for the KGB.
He was sort of released in 1947 but “volunteered” to keep working with the KGB until 1966.
Nothing much happened with Theremin or theremins during the 1970’s and 1980’s. In 1991 Léon,
now 95 years old, returned to New York where he gave concerts, received awards, was chauffeured
around in a limousine, and was reunited with Clara Rockmore. It is not clear that he remembered her.
He died in Moscow in 1993, aged 97.
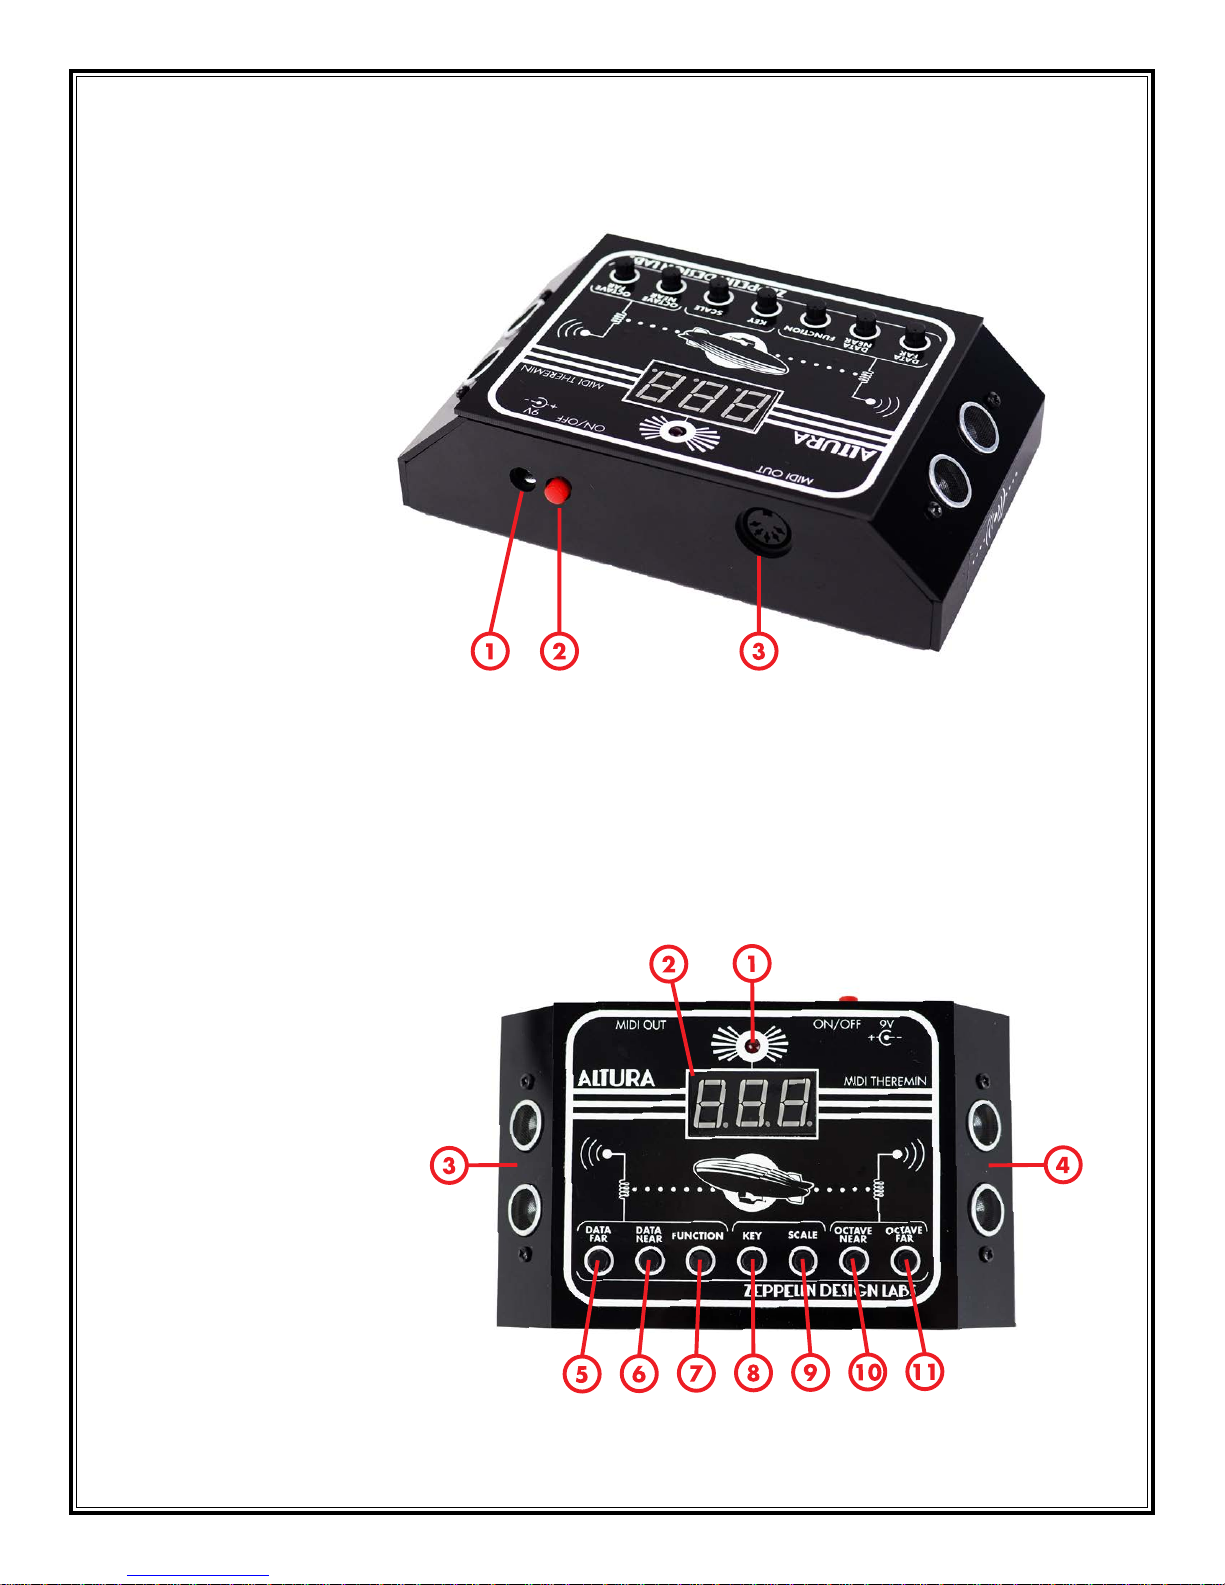
HOW IT WORKS
Our MIDI (Musical Instrument Digital Interface) version of Léon’s classic device uses sonar range finders
in place of antennae, and rather than producing sound directly, the Altura emits discreet packets of
digital data that are read and interpreted by a separate synthesizer. The Altura’s right-hand sensor
ranges your hand and transmits a Note-On message to start a specific note, thus controlling pitch.
The left sensor transmits Channel Volume data, thus controlling volume. But this is just the start! The
left sensor can be set to perform many MIDI functions, like pitch bend, modulation, note velocity, and
portamento time. The Portamento function causes one note to glide smoothly to the next, emulating that
spooky Theremin sound; but the device is always gliding to a specific note within a key and scale you
designate. As a result, the Altura always plays in tune!
The Altura was designed as a companion to the Macchiato Mini Synth
by Zeppelin Design Labs. There are a few special features that will
only work well when paired with the Macchiato. Otherwise, the Altura
conforms with General MIDI specifications and should easily control any
device bearing this mark. Many devices do not conform to the General
MIDI specification. These devices will not necessarily respond to the Altura as described herein. In
these cases, you may need to fiddle with your synthesizer some to get it to behave. Alternatively, you
can route your Altura controller through a software application that will enable you to redirect its data
as needed.
The Altura comes as an easy do-it-yourself kit, or assembled and ready-to-use. You can make your own
case from card stock or from a cereal box using the provided template, or you can get a shiny black
acrylic case. The acrylic case also comes as a super-easy kit or ready-to-use.
Connect with your music like never before: build your own gear!

10
FEATURE LIST
REAR PANEL
1. 9V DC Power Input
2. Power On/Off
3. MIDI Out
TOP PANEL
1. Power On Indicator
2. 3-Digit Display
3. Left Distance Sensor – MIDI Control Functions
4. Right Sensor – MIDI Pitch
5. DATA FAR Adjust
6. DATA NEAR Adjust
7. FUNCTION Select
8. KEY (Root Note) Select
9. SCALE (Mode) Select
10. OCTAVE NEAR Select
11. OCTAVE FAR Select

11
ON THE PCB
1. Battery Holder
2. ISP Header
3. Articulation Adjust

12
REAR PANEL FEATURES
1. 9V DC POWER INPUT
You can power your Altura with a 9V DC power supply
(“wall wart”). It must be rated for 200 mA minimum, with
center-negative polarity, such as a typical guitar pedal
supply. Look for this graphic on the power supply. Your
controller won’t work with a center-positive power supply.
Zeppelin Design Labs offers a suitable power supply as an
accessory. Simply plug the cable into the back of your Altura under the “9V” label. This disconnects
the battery. It does not matter if you leave the battery inside. The only concern is if years go by and
you forget the battery is there, and it leaks all over your Altura.
2. POWER ON/OFF
Push the red button to switch the Altura on. The red LED on top lights up. Push the button again to
switch it off.
3. MIDI OUT
The Altura transmits data along one pin of a standard MIDI cable. We recommend you connect all
your MIDI cables before turning anything on. To use the Altura, simply plug a cable from MIDI OUT
to MIDI IN of any MIDI device; or use a MIDI-to-USB converter or other interface device to send the
Altura’s data directly into your computer. See also “Function 7: Channel Select” on page 19 below.
TOP PANEL FEATURES
1. POWER ON INDICATOR
This lights up when the power is on; off when it’s off. This is a reliable indicator of whether your power
supply is working or not. If you run the Altura from a battery, this light will get considerably dimmer
rather suddenly when the battery is near the end of its life. Time for a new battery.
OUTER BARREL
POSTIVE
CENTER PIN
NEGATIVE
200mA MINIMUM
+
-

13
2. 3-DIGIT DISPLAY
Depending on conditions, this display shows a variety of information. It times out after 60 seconds
and turns itself off, to spare your battery. To reactivate it, just turn any knob, or wave a hand in front
of either sensor.
Here is a summary of what you might see on the display, and what it means. Each section in the
Manual also has its own explanation of what the display is displaying.
IF YOU
SEE:
FOR
EXAMPLE: IT MEANS:
A letter and
a number D 3
This is the KEY (letter) and the SCALE (number). See those sections
below for details. When not in X-Y mode, the display defaults to
this after 3 seconds.
Two
separate
numbers
5 4
These are the Octaves. The left number is the octave active NEAR
the right sensor; the right number is the octave active FAR from the
sensor. See OCTAVE SELECT below.
A one-,
two- or
three-digit
number
8
67
122
While turning the DATA knobs, this is the limiting value of MIDI
data the left sensor will transmit. See the various FUNCTIONS for
details.
While waving your hand in front of the left sensor (or the right
sensor when in X-Y mode), this is the MIDI data value the Altura is
transmitting.
A dynamic,
spinning
symbol
0.0a@sdf
fghjk00
Indicates amount of pitch bend, from “f“ (no bend) to “0.”
(maximum bend). See PITCH BEND.
Dashes - - - X-Y mode Idle: no data transmitting from either sensor.
This thing: z - x X-Y mode Active: both sensors transmitting data.
DISTANCE SENSORS - GENERAL
The distance sensors are ultrasonic ranging devices. One of those eyeballs is a speaker, the other is a
microphone. Several times a second, the speaker emits a high-frequency chirp; the microphone listens
for an echo. If it fails to hear an echo before a preset timeout, the sensor returns a null value. The
Altura software attempts to distinguish between a timeout because there is truly nothing there, versus a
timeout because it simply missed a chirp or two while your hand wiggled around. If the sensor hears
an echo before the timeout, it returns the elapsed time in microseconds. The Altura software uses this
time to calculate how far away your hand is, and decides what particular data this represents – a note
number or a control change value. That data is worked into a standard MIDI message, which is then
sent to the MIDI OUT cable.
The sensors monitor a cone-shaped space. They are terrific at identifying things like walls. To spot your
hand, you will have to learn exactly where the sensor is looking. This takes practice, as any fretless
instrument requires.

14
When most people play with an Altura for the first time, their instinct is to wiggle their fingers and flap
their hands. This will produce chaotic results, which may be what you are after. However, for precise
melodic control, you must hold your hand flat and steady, and perpendicular to the axis of the sensor.
For stage drama, you might want to perform with paddles or dinner plates strapped to your hands.
We have pre-set the minimum and maximum distance over which the sensor is active, to optimize
playability and reliability. It is active from about 3” – 40” (8 – 100 cm). Any object in this range can
trigger the Altura: dangling cables, a passing guitar neck, a Marshall stack. Keep the play-zone clear!
Since the Altura uses sonar, and measures the speed of sound in air, its performance is somewhat
subject to atmospheric conditions. The active range will vary a little if you move between extreme
climates. These default range values can be changed if you hack the open-source software. See
“Programming The Altura” below. The sensors actually have a maximum range of about 4 meters! You
could use the Altura as a door bell, a motion-sensor alarm, or part of an interactive installation, where
Alturas are triggered by participants moving about the display space.
3. LEFT DISTANCE SENSOR – MIDI CONTROL FUNCTIONS
The left sensor generally determines a MIDI data value to send to the MIDI OUT. The data it sends is
determined by the FUNCTION currently selected. See “MIDI Function Select” on page 16.
When using Pitch Bend, removing your hand snaps the pitch back to No Bend, just like when you
release the Pitch Bend wheel on a conventional controller. When using the other functions, however,
removing your hand will fix the controller at the current value, like a slider. You set maximum and
minimum values with the DATA NEAR and DATA FAR knobs. See each FUNCTION section below for
details.
4. RIGHT SENSOR - MIDI PITCH
In Functions 1 - 5, the right sensor transmits Note-On messages. Whenever the Altura detects a new
note to send, it first turns off the current note by transmitting a “Note On, Velocity 0”message.
The minimum and maximum distance over which the sensor is sensitive is pre-set to about 3” – 40” (8
cm - 100 cm). You can alter this by hacking the open-source software. See “Programming the Altura”
below. Holding your hand closer than the minimum distance can confuse the sensor and produce
unexpected behavior.
You can control how many octaves of notes are covered in the active range, from one to eight, using
the OCTAVE NEAR and OCTAVE FAR knobs. You can determine which way the notes range – from
low to high or high to low. See “Octave Near and Octave Far Select” on page 21 below. The more
octaves you select, the smaller the piece of air available for any one particular note. At one octave of
a pentatonic scale, each note gets about 6” (15 cm) of air, and they are quite easy to find. Six octaves
of a diatonic scale leaves only about ½” (1 cm) per note! The Altura software uses some clever trickery
to stabilize note selection, and minimize random fluctuations between notes. Nonetheless, you will
discover some practical limitations. There are more details in the OCTAVE section below.

15
You can set the key and scale in which the Altura will play. This restricts the MIDI note numbers to those
within the selected key signature. See the KEY and SCALE sections, below.
Another trick the Altura uses to stabilize note selection is what we call Articulation. This limits how
frequently the device will update the note being played. See “Articulation Adjust” on page 22
below.
In Function 6 - X-Y Mode, the right sensor emulates the left sensor and transmits user-defined control
change data. See “Function 6: X-Y Mode” on page 19 below. In this capacity, your Altura may
require a very low value for Articulation for the right sensor to perform well. See “Articulation Adjust”
on page 22.
5, 6. DATA FAR AND NEAR ADJUST
The DATA knobs have slightly different functions depending on the FUNCTION knob setting. These
behaviors are summarized in this section, but please see the respective Function sections below for
more details.
Function 1 – Pitch Bend: The DATA FAR knob controls the size of what we call the Neutral Zone, where
the pitch remains unbent. The DATA NEAR knob sets the maximum semitones of bend when used with
a Macchiato Mini Synth.
Functions 2 – 6: The left sensor behaves much like the Data slider found on most MIDI controllers. You
use the DATA knobs to set the maximum and minimum values produced by the slider. DATA NEAR sets
the limiting value the Altura will transmit when your hand is near the sensor – any value from 0 – 127.
DATA FAR sets the limiting value far from the sensor, also any value from 0 – 127. By swapping values,
you can make the Altura transmit values that either ascend or descend. Adjusting the DATA knobs does
not cause any Controller message to be transmitted. No message is actually sent until you stick your
hand in front of the sensor.
For Function 7: Channel Select, the DATA FAR knob sets the MIDI Send channel. The DATA NEAR knob
has no function.
When you use the left sensor to send a MIDI control change message, that control value will “stick”
even when you change functions. For example, you might wave your hand to set Modulation = 30 and
then change to Function 5 to work with Portamento effects. The Modulation effect will remain active at
value 30. However, when you return to Function 2 – Modulation, the old values of Modulation Near
and Far will be overwritten by the current knob positions. You will continue to hear modulation at value
30 until you use your left hand to change it, but the Near and Far limiting values may have changed!
Be aware of this behavior in a live performance situation.

16
7. MIDI FUNCTION SELECT
The FUNCTION knob determines what type of MIDI data the left sensor will produce. The available
functions are:
1. Pitch Bend
2. Modulation
3. Note-On Velocity
4. Channel Volume
5. Portamento Time
6. X-Y Mode
7. Channel Select
A label on the bottom of your Altura reminds you of these functions. The order of the functions can be
rearranged by hacking the open-source code. See “Programming the Altura”.
Following is detailed information about each MIDI function. Please also see the sections “Left Distance
Sensor – MIDI Control Functions” on page 14 and “Data Far and Near Adjust” on page 15 for
general notes applicable to all functions.
FUNCTION 1: PITCH BEND
Function 1 emulates the Pitch Bend wheel on a conventional MIDI controller. The Altura sends
MIDI values of -8184 to +8184 based on left sensor readings, tagged as Pitch Bend data
(Controller #1) on the currently-selected Send channel. When you wave your hand in front of the
left sensor in Pitch Bend mode, the display shows a cute spinny-thing to represent Pitch Bend
Down and Pitch Bend Up.
At the neutral zone, or No Bend position, the display shows “f”. As you move your hand in, or
Near to the sensor, the pitch bends up and the display spins clockwise. As you move your hand
away, or Far from the sensor, the pitch bends down and the display spins counter clockwise. At
Maximum Bend, either up or down, the display forms a complete “ 0”. When you lock in to the
fully-bent pitch, a decimal appears: “ 0. ”
Turn the DATA FAR knob to display numbers 0 - 12. If you are using a Macchiato Mini Synth by
Zeppelin Design Labs, this will set the number of semitones the pitch will change at maximum
bend up and down. On other devices, this knob will have no effect or an unpredictable effect.
The Altura is passing data to the Macchiato using unassigned Controller #20. If your synthesizer
happens to use this controller for something, as does the Korg Monologue for instance, then
"NEUTRAL” OR
NO BEND FULL BEND
UP
FULL BEND
DOWN

17
something unexpected will happen. You will have to route the Altura through software to redirect
this control number, or avoid touching this knob when in Pitch Bend function.
Turn the DATA NEAR knob to display numbers 0 - 127. This changes the size of the Neutral
Zone that separates the Bend Up zone from the Bend Down zone. On startup, the Altura
defaults to Function 1: Pitch Bend, and the neutral zone will default based on the physical
position of the DATA NEAR knob. At 127, you will find a large piece of air where the pitch
remains unaffected. Change it to zero and the neutral zone will essentially disappear: you will
find it difficult to return a bent note to its original pitch, except by simply removing your left hand.
When using the Altura in Pitch Bend mode, set the neutral zone to whatever value suits your
need.
You will find the Altura lacks the resolution to use the Pitch Bend to produce precise, subtle
vibrato effects characteristic of the original theremin. Use the Modulation effect for this instead.
FUNCTION 2: MODULATION
Function 2 emulates the behavior of the Mod Wheel on a conventional MIDI controller. It
transmits a value from 0 – 127, as determined by the left sensor, to Control #2 on the currently
selected Send channel.
Turn DATA FAR all the way left to display 0. Turn DATA NEAR all the way right to display 127.
Move your hand near, the number rises, and you should hear note modulation, usually a tremolo
effect. Move your hand far away, the number falls, and the effect diminishes. You can reverse the
effect by swapping the numbers. The controller acts like a mid-air slider: move your hand to the
desired value; remove it and the value will “stick”. This behavior is the same across Functions 2 –
6. Note that changing the Data knob values will have no effect until you wave your hand in front
of the left sensor. Only this will trigger transmission of a MIDI message.
On the Macchiato Mini Synth, Modulation controls the Depth of the Low Frequency Oscillator
(LFO). (You won’t hear any effect if the Rate knob is set to Minimum!) Touching the Depth
knob on the Macchiato will override the Altura. Using the Altura will override the knob on the
Macchiato.
FUNCTION 3: NOTE-ON VELOCITY
This function emulates the role of key velocity on a conventional keyboard. The Altura reads
values 0 – 127 as determined by the left sensor, and combines this with pitch data from the right
sensor. Whenever the Altura detects it is time to transmit a new Note On message, it combines
the current Velocity value with the current Pitch value into a single Note On message transmitted
on the currently selected Send channel. The Note On Velocity defaults to 127 upon startup of the
Altura. Use the DATA NEAR and FAR knobs to set a maximum and minimum value for Velocity.
(Keeping a minimum velocity around 30 will prevent you from accidentally silencing your Altura!)
You won’t actually hear an effect until you wave your hands in front of both sensors.

18
Velocity usually impacts the volume of the note, but your synth might use this data to influence
other effects, such as brightness or voice switching. This controller acts like a slider: Set Velocity
to a particular number; remove your hand and that number will “stick”. All notes will now play
with that velocity value. You can now switch to another function and the velocity will continue
unchanged.
FUNCTION 4: CHANNEL VOLUME
The Channel Volume emulates the Master Volume slider found on many MIDI controllers. Channel
Volume defaults to 127 upon startup. Use the DATA NEAR and FAR knobs to set a maximum
and minimum value for Volume. (Keeping a minimum volume of at least 30 will prevent you
from accidentally silencing your Altura!) This affects the overall output volume of your synth, and
is most useful for creating swells as a note sustains. This function lacks the resolution for subtle
tremolo effects. It is better to use your Modulation effect for that.
FUNCTION 5: PORTAMENTO
Portamento means a smooth glide between notes. When you play a slide flute or trombone, you
can portamento all the time. This glide effect is what you need to emulate that good ol’ theremin
sound. We designed the Altura’s Portamento function to work well with the Macchiato Mini
Synth. Many synthesizers do not implement Portamento at all. Some only implement it with a few
voices. Some allow you to edit portamento behavior, more or less easily. We have tested the
Altura on some Korgs, for instance, that responded immediately, with fantastic results; and other
Korgs that did not respond at all, and could not easily be made to do so. You may need to do
some fiddling with your synth or your DAW software to get results with this feature.
When the FUNCTION knob is set to 5, and Portamento Time is other than zero, the Altura sends
a “Portamento ON” message (Control 65, value 127, on the currently selected Send channel).
If you send a Portamento Time = 0 message, or if you send any Pitch Bend messages, the Altura
will send a “Portamento OFF” message (control 65, value 0, current Send channel).
Waving your hand in front of the left sensor transmits a Portamento Time message (control 7,
value 0 – 127, current Send channel). Zero represents an infinitely short glide from note to
note, which is the same as no glide at all; that’s why Portamento Time = 0 will switch off the
effect. Portamento Time = 1 means a very fast glide between notes, almost too fast to perceive.
Portamento Time = 127 produces a glide about 1 second long. Intermediate numbers produce
glide times along a linear interpolation. It is an absolute time: the glide will last the same number
of milliseconds whether the interval is one semitone or six octaves. For pleasant melodic playing
reminiscent of 70’s classic pop and progressive rock sounds, you will need Time values below
about 20. The Altura sounds most like a theremin at Time values around 30. Higher numbers
give you the long, dramatic sweep you remember from REO Speedwagon’s live “Riding The
Storm Out” and Styx “Suite: Madame Blue”. Set the DATA FAR knob to the slowest effect you
want to hear, and DATA NEAR knob to the fasted. See the section “PRESETS” on page 24 for
suggestions on how to achieve the most faithful emulation of a theremin, as well as some other
sounds.

19
FUNCTION 6: X-Y MODE
This function causes the right sensor to emulate the left sensor: it no longer sends Note On
messages. It sends control change messages of your choosing, just like the left sensor. You
would use this mode not to create melodies, but to shape the sound already being produced by
a synthesizer. A typical use would be to assign two different filter sweeps to the left and right
sensors, or a filter sweep to one and resonance to the other.
With FUNCTION knob set to 6, the DATA FAR and NEAR knobs serve to set the limiting MIDI
values produced by the left sensor. The OCTAVE FAR and NEAR knobs do the same for the right
sensor. In this mode, key signature has no meaning, so use the KEY knob to select the Control
Change Number (CC#) for the left sensor, 0 – 127, and use the SCALE knob to select the right-
sensor CC#. On startup, these default to CC# 85 & 86, which are undefined. Your synth may
respond immediately to many of the standard MIDI-defined controllers. See your synthesizer’s
documentation for a table of available CC’s. By using one of the many undefined CC#’s, you
can route the Altura through performance software and redirect the data any way you wish,
assigning it to any function.
DATA
FAR
DATA
NEAR FUNCTION KEY SCALE
OCTAVE
NEAR
OCTAVE
FAR
Left Sensor MIDI Max
and Min
Function
Select
Left CC#
Select
Right CC#
Select
Right Sensor MIDI Max
and Min
For the right sensor to perform its best in X-Y mode, the Articulation must be set to a very low
value, like 0 or 15. See “Articulation Adjust” on page 22.
FUNCTION 7: CHANNEL SELECT
Turn the DATA FAR knob to set the channel on which the Altura sends MIDI messages. Only
devices downstream set to the same channel will respond to the Altura. This lets you daisy-chain
scads of devices without ever using control software. Old school!! The Altura defaults to Channel
1 on startup.

20
8. KEY (ROOT NOTE) SELECT
The KEY knob sets the root note of the scale you are playing. Turn the KEY knob and the display will
show a letter and a number, i.e. D 4. The letter will change as you turn. It will display the twelve notes
of the Western scale, with a decimal to indicate sharps:
C C. D D. E F F. G G. A A. B
This note will always play at the nearest and farthest points on the right sensor. For instance, if you set
KEY to “F.”, then the nearest and farthest notes your right hand can find will always be F-Sharps. Which
F-Sharps depends on the OCTAVE NEAR and OCTAVE FAR settings.
9. SCALE (MODE) SELECT
The SCALE knob selects from one of a dozen pre-programmed scales, or modes. These scales are listed
on a label on the bottom of your Altura for easy reference. We have selected a variety of common and
not-so-common scales, including a couple of pentatonic scales popular with guitarists. We have also
included the Chromatic scale, which includes all twelve notes in the Western scale.
A “scale” is defined by the intervals between adjacent notes as you make your way up an octave from
one root note to the next. The following table describes the interval formulae we used in programming
the Altura. You can change this easily to add your own scale by hacking the open-source software. See
“Programming the Altura”, below.
MODE SEMITONES
Ionian (Major) 2212221
Dorian 2122212
Phrygian 1222122
Lydian 2221221
Mixolydian 2212212
Aeolian (Natural Minor) 2122122
Locrian 1221222
Harmonic Minor 2 1 2 2 1 3 1
Major Pentatonic 2 2 3 2 3
Minor Pentatonic 3 2 2 3 2
Whole Tone 2 2 2 2 2 2
Chromatic 111111111111
You cannot program non-Western pitches with the Altura. Each key on the piano has its own standard
MIDI number, ranging from 1 – 127. The pitches associated with each is a universal standard. To detune
these frequencies to match non-Western music can only be done inside a synthesizer or sometimes with
intermediate control software. It’s probably easiest to change with “soft-synths”: synthesizers that only
exist as software in your computer.
Other manuals for Altura Theremin
1
Table of contents
Other Zeppelin Design Labs Recording Equipment manuals
Popular Recording Equipment manuals by other brands

Tektronix
Tektronix 7S14 instruction manual

Dspecialists
Dspecialists ISOSTEM Expert user manual

Meinberg
Meinberg microSync RX201/AD10DC20 Technical reference

Solidyne
Solidyne Audimax 362 HD owner's manual

Eventide
Eventide RIPTIDE Quick reference guide

Omega
Omega Carlink OMEGA-CARLINK Installation & Testing Booklet