Zipato ZIPATILE User manual

Zipatile User’s Manual
Version 1.0

General
User's guide
Zipatile User's Manual
Copyright © 2016 Tri plus grupa d.o.o. All Rights Reserved. Copyright by Tri plus grupa d.o.o. (later
referred to as: TPG). No part of this manual may be reproduced or transmitted in any form without the
expressed, written permission of TPG.
Trademarks Zipato, and the Zipato logo are registered Trademarks. All other product names mentioned
herein may be trademarks or registered trademarks of their respective companies.
Notice Although TPG has attempted to ensure the accuracy of the content of this manual, it is possible
that this document may contain technical inaccuracies, typographical, or other errors. TPG assumes no
liability for any error in this publication, and for damages, whether direct, indirect, incidental,
consequential or otherwise, that may result from such error, including, but not limited to loss of data or
profits.
TPG provides this publication "as is" without warranty of any kind, either express or implied, including,
but not limited to implied warranties of merchantability or fitness for a particular purpose.
The published information in the manual is subject to change without notice. TPG reserves the right to
make changes in the product design, layout, and driver revisions without notification to its users. This
version of the Product Manual supersedes all previous versions.
Recommendations In this Product Manual, the appearance of products made by other companies,
including, but not limited to software and devices, is for the purpose of illustration and explanation only.
TPG does not recommend, endorse, prefer, or support any product made by another manufacturer.
About this manual
This Product Manual describes how to setup, use, and maintain the ZipaTile. It also describes how to use
the Zipato automation software. This manual includes a full table of contents, chapter task lists, and
numerous cross-references to help you find the specific information you are looking for. Also included are
2 levels of notices:
A Note provides helpful information such as hints or alternative ways of doing a task.
A Caution informs you of possible equipment damage or loss of data and how to avoid them.

Introduction
ZipaTile is the complete home control and automation system in a form of a single device. It can be easily
mounted on any wall, in any home. Featuring large number of built-in sensors and hardware modules,
ZipaTile replaces numerous home devices such as security system, thermostat, automation controller, IP
camera, alarm siren or intercom and bring them all together in one, smart and beautiful device.
Architecture
ZipaTile is based on ARM Cortex-A9, Quad-core 1.6 GHz CPU with 1 GB of RAM and 8 GB of FLASH.
Operating system is Android 5.0.
Sensors
Sensors built into ZipaTile are: Noise, Illuminance, Humidity, Temperature, Motion and Shock sensor.
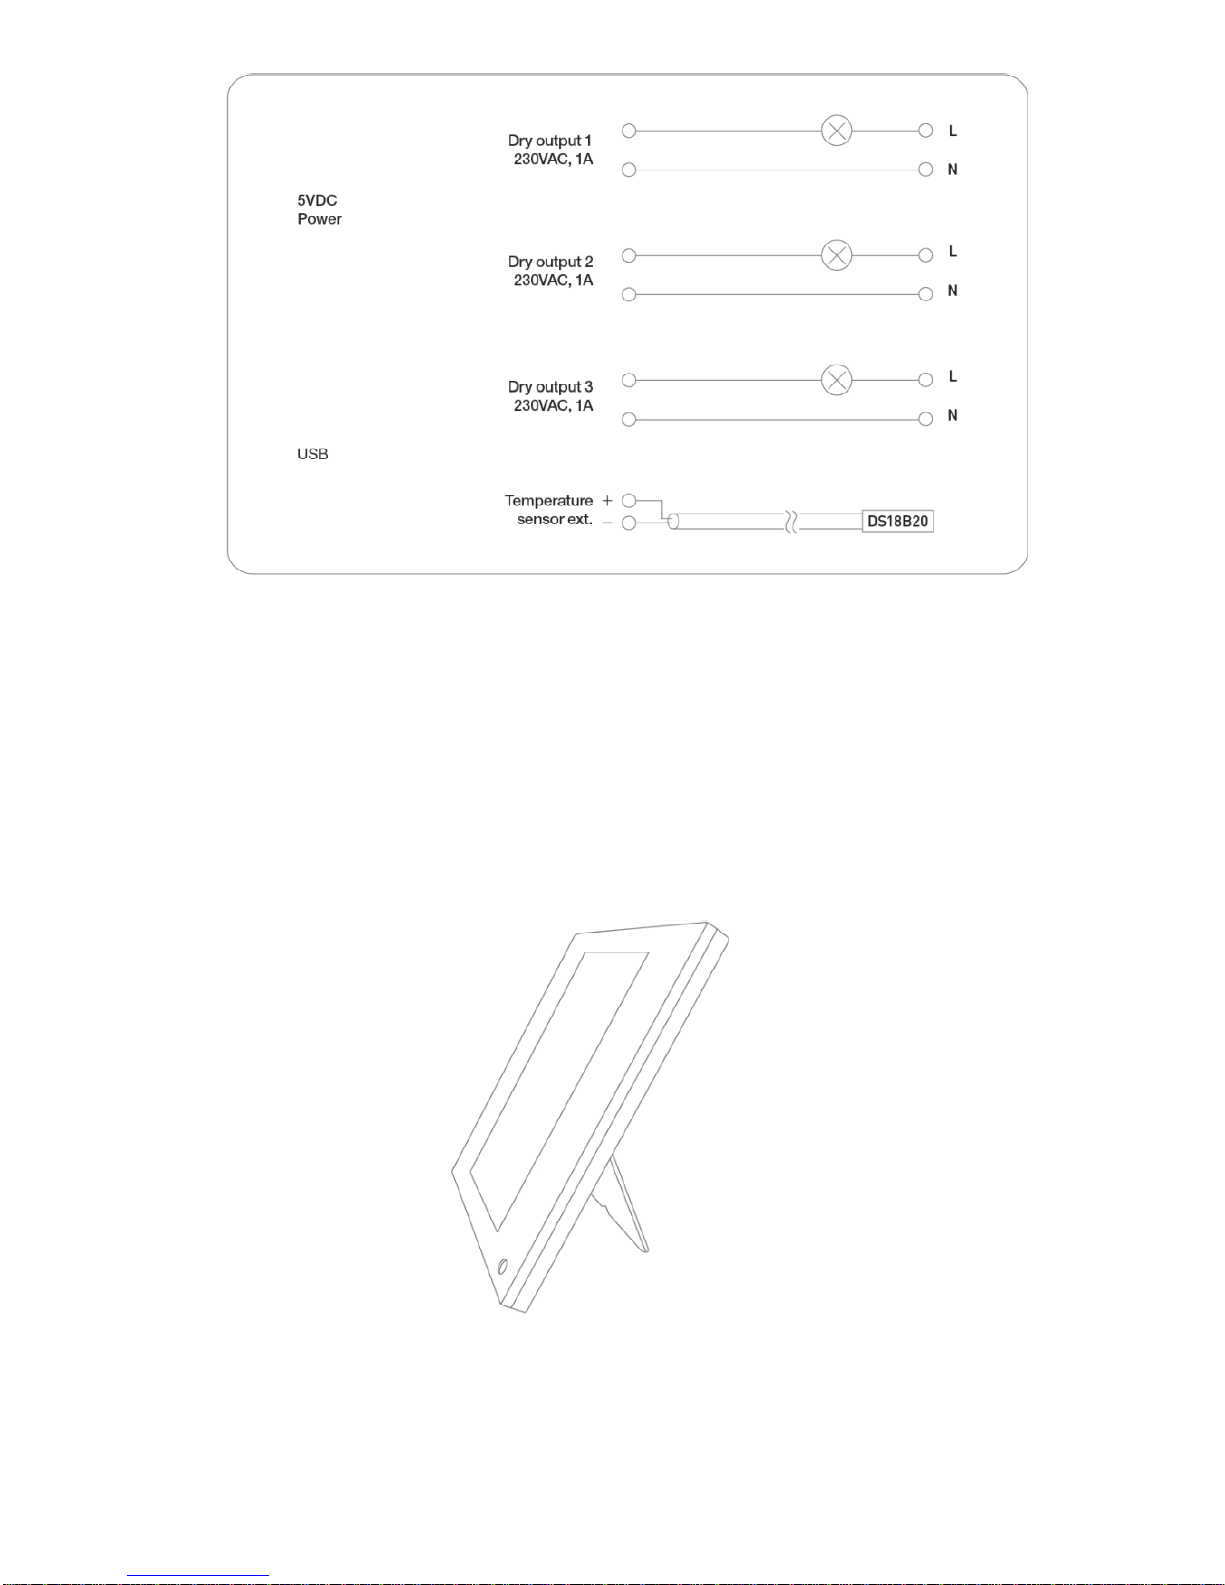
I/O components
Touch sensitive 8" screen (800 ~1280px), 6 programmable scene buttons, dual dry output (max 230VAC
1A), dry input (12-24VDC), connector for an external temperature sensor (1-Wire DS18B20), 2MP video
camera, multi-sound alarm siren, SD card slot, speaker 8Ħ/1.5W, microphone.
Use cases
Security
ZipaTile is the complete security system in a single device. Besides being security control panel itself, it has
also motion detector, noise sensor, shock sensor and a siren integrated inside. Furthermore, it is
constantly supervised by 24/7 free monitoring station, which will alert you in case of any incident. Also it
has a built in IP camera, which will send you a photo or a video, in order to provide more reliable info
about the incident. ZipaTile can be further expanded by using many additional sensors which are
communicating through some of supported protocols.
Safety
ZipaTile comes with the special noise sensor which can detect safety alarms produced by standard smoke,
gas or fire sensors. In case of such an alarm, ZipaTile will forward this information to Zipato server which
will immediately send an alert message to you or anyone else.
Elderly Care
Besides for intruder detection and safety alarm, ZipaTile has built in an additional alarm logic, in order to
be used as an activity alarm for Elderly care. Once activated, ZipaTile will trigger an alarm whenever there
is no motion or some other activity for the certain period of time.
Smart Thermostat
ZipaTile can be used as a Smart Thermostat. It has support for 4 modes of temperature settings (comfort,
economy, away, night), relays for boiler control or floor heating valve, as well as connector for external
temperature sensor. Furthermore, it is completely accessible remotely from any smart phone.

Control panel
ZipaTile provides the most convenient ways to control any home. Besides HD touch screen with beautiful
device control applications, ZipaTile has 6 buttons and each button has 3 input types (touch, double touch
and touch and hold). Of course, buttons are active no matter whether the screen is ON or OFF.
Additional control input are GESTURES. While screen is off, ZipaTile will recognize up to 50 gestures
which you can program by using Zipato rule creator or even easier in app settings in Zipato application.
Automation
ZipaTile has complete Zipato automation functionality. Zipato graphical rule creator will make a powerful
automation programming to be "peace of cake" for anyone without any previous programming experience.
Intercom
You can use your ZipaTile as internal door phone station with most of SIP based outdoor door phone units.
Being supported by the Zipato server, ZipaTile will forward any call from the outdoor unit to your mobile
phone wherever you are, or you can just use ZipaTile to answer the call. Furthermore, if you have more
than one ZipaTile in your home, you can use them for fast and easy communication between rooms.
Also, ZipaTile SIP server is integrated with Zipato system, so you can create various automation rules
within Zipato Rule Creator, based on SIP server events.
Intercom function is not availabe yet. Once it is ready, we will upgrade the sofware remotely, and enable
it automatically.
Info panel
Featuring 8" IPS HD display, constant Internet connection and Android 5.0 operation system, ZipaTile
will stand for an amazing information panel on your wall. You can check the internal temperature and
humidity, as well as outdoor environmental conditions, news, stocks, tasks and various different
informations. Additionally, ZipaTile comes with the Zipato home control application which allows you to
control all your lighting, sun shedding, scenes etc...
Gateway
Depends of which model of ZipaTile you have, you can connect various devices by using various
communication protocols, and automate them by using Zipato automation tools or just control them from
your mobile phone no matter where you are. Please check the technical specification of you ZipaTile to
learn which network modules are integrated inside.
Installation and Setup
Unpacking the ZipaTile
The ZipaTile packaging contains the following items:
•ZipaTile
•ZipaTile wall holder (attached to the ZipaTile)
oAC/DC Power supply
oPlug in extension for a wall socket
•Wall mounting kit: Four screws and screw anchors, H7 plug with optional separate wire
•terminals (2 male and 2 female), zip ties
•Quick installation guide
•Installation of in-wall power adapter has to be carried out by a professional electrician.

Optional Tools which may be needed:
•Screwdrivers: Flathead and Philips
•Pliers
•Wire stripper
•Non-contact voltage detector
•Wire cutter
•Electrical tape
•Drill and drill bits appropriate for the wall type
Overview
Figure 1. ZipaTile front view

Figure 2. ZipaTile rear view
Figure 3. ZipaTile top view
Figure 4. Wiring diagram (EU RU IN)

Figure 5. Wiring diagram (US IS AU)
Mounting
Table top
ZipaTile is primarily intended for on-wall mounting, but it can be used on table top as well. In this case,
please keep the wall holder affixed to ZipaTile and use the built-in table top stand at the back of the wall
holder. Just plug AC/DC adapter into free electrical socket and other side into the ZipaTile.
•ZipaTile is primarily made for on-wall usage. Table top holder can’t resist strong touch pressure.
Figure 6. Zipatile table top mounted

Wall mount with built in power supply
This is a default way of using ZipaTile. It requires usage of in-wall power supply and a wall hole with the
110-220V power wire at the place where you want to mount the ZipaTile.
Press firmly wire socket to charger pins, clamps inside the wire socket need to be widened with pins by
hand pressure for tight fit.
Figure 7. Installing the wall holder
Before performing any electrical work turn OFF the power to the AC wires leading into in-wall box at the
main power source. Before starting installation make sure the power is really off by using a non-contact
voltage detector.
Installations should be performed in accordance with all national and local electrical codes. If you are
unsure or have questions about the installation, please seek an advice of a qualified electrician. Do not
apply power to the ZipaTile before completing installation. Please make sure that a proper power cut-off
device is part of your power supply circuit (electrical fuse).

Wall mount with plug-in power supply
If there is no in-wall box at desired mounting location, please use the wire channel at the back of the wall
holder to place the power wires behind the ZipaTile and use the bundled plug-in power supply to connect
to the wall socket.
Figure 8. Powering the ZipaTile with plug-in power supply
Screen Protector Once after you are done with the installation, you can peel off the screen protection
foil before the first use of ZipaTile.

Setting up your ZipaTile
Turn on the ZipaTile
Press and hold (3 sec) the power button on top of the ZipaTile. Booth process will start with the Zipato
logo on the screen and it will finish when you see the ZipaTile lock screen.
Figure 9. Lock screen
To unlock the device, just swipe up from bottom of your screen.
You can add more users within ZipaTile Settings, and change your password. This way, each user can have
it’s own look and feel of the ZipaTile. You can set special profiles for your family members, cleaning staff
etc.

WiFi Internet connection
In order to configure your ZipaTile properly, ZipaTile has to be connected to Internet router over the WiFi.
Figure 10. Settings screen
1. Open the Settings app.
2. Choose Wi-Fi. Choose Wi-Fi to view a list of available Wi-Fi networks on the right side of the screen.
3. Otherwise, the list shows up full screen.
4. Choose a wireless network from the list. When no wireless networks are listed, you’re sort of out of
5. luck regarding Wi-Fi access from your current location.
6. If prompted, type the network password.
7. Touch the Show Password checkbox so that you can see what you’re typing; some of those network
8. passwords can be long.
9. Press the Connect button. The network is connected immediately. If not, try the password again.
When the tablet is connected to a wireless network, you see the Wi-Fi Connected status icon. This icon
indicates that the tablet’s Wi-Fi is on, connected, and communicating with a Wi-Fi network.
Some wireless networks don’t broadcast their names, which adds security but also makes connecting more
difficult. In this case, touch the Add icon. This icon might also be labeled Add Wi-Fi or Manually Connect.
To make the connection, type the network name, or SSID, and choose the type of security.

Zipato registration
At the home page, start ZIPATO application and select REGISTER. You will need to confirm your email
address, and login to Zipato app afterwards.
Figure 11. Registration
When login first time to Zipato application, you will be required to enter your mobile number and choose
your location. This way you will be able to receive phone and SMS security alerts, as well as to get the
local
weather information on your ZipaTile.
Once registered and logged in to the Zipato application, ZipaTile will be automatically configured, and
you
will be able to see the thermostat, security and weather information on the home screen.
If you want to unregister yourself and restart the ZipaTile to factory default settings, go to ZIPATO
APPLICATION > SETTINGS > MASTER RESET
After registration Zipatile will automatically self-configure and this process may cause lack of certain
information within a first 10-20 minutes of using Zipatile.

Aplications
ZipaTile is an Android based device, which means that you can install practically any Android based
application on it. However, due to the security and reliability of the device, it is highly recommended not to
install any third party applications on ZipaTile.
Home page
Home page is showing the most important information regarding internal and external conditions,
security alarm state and time, as well as links to essential ZipaTile applications.
Figure 12. Lock screen
1. Security widget Showing the status of the Zipato security partition. You can change the status by pressing
it, or by pressing the button aside of Security widget
2. Thermostat widget Showing the status of the Zipato thermostat. You can change the status by pressing it,
or by pressing the button aside of Thermostat widget
3. Clock widget You can set alarm or changing parameters of the clock, by just pressing it once, or by
pressing the button aside.
4. Weather widget Showing the current weather condition outside. You can check more details related to
current weather and weather forecast by just pressing it or by just pressing the button aside.
5. Calendar widget Showing current date and day. Pressing it will open up the calendar application where you
can manage your activities and reminders.

6. Music widget It shows the song which is currently playing, and you can play, stop or skip the song right
from the home page.
Intruder alarm
ZipaTile has the Intruder alarm system built in. Once activated, Intruder alarm will activate the siren and
send alert messages to your phone and email whenever ZONE (sensor) has been triggered.
You can start using Intruder alarm immediately upon ZipaTile installation, as all sensors within ZipaTile
are already included in it as ZONES (motion sensor, noise sensor level > 3).
Also, you can add any number of additional sensors as ZONES into your Intruder alarm system later on.
In order to add sensor as a ZONE in your Intruder alarm system, you have to first add sensor into your
Zipato system (go to ADD NEW DEVICES wizard).
Controlling
Your can control the Intruder alarm from within Home page (press the current status of Intruder alarm) or
through Devices application:
•ARM AWAY - activates the system when leaving home. In this case any ZONE (sensor) will activate an
alarm when it triggers.
•ARM HOME - activates the system while staying at home. In this case only ZONES (sensors) which are set
as PERIMETER (ordinary door/window sensors) will activate the alarm when they trigger.
•INDOOR sensors (mainly motion sensors) will not trigger an alarm, so users can freely walk within home.
•DISARM - deactivates the system. In this case no ZONE will activate the alarm.
In order to control Intruder alarm, you have to enter PIN code. Default PIN code is 0000. You can change
your PIN code if you go to Intruder alarm settings.
Alerting
When Intruder alarm has been triggered, siren will be activated in order to warn the intruder and you will
be alerted by an emergency PHONE CALL (your mobile number will be used). At the same time, you will
get an EMAIL ALERT with 2 photos attached from the built in camera. You can change alerting setup from
within Intruder alarm settings.
Alerting messages will only be sent if ZipaTile is connected to the Internet.
Settings
You will find Intruder alarm settings within Zipato admin portal at my.zipato.com > Security > Intruder
alarm. In order to setup your system properly, you have to have an active Internet connection.
Safety alarm
ZipaTile has the Safety alarm system built in already. Comparing with the Intruder alarm, Safety alarm is
ARMED all the time and it should be only DISARMED for the service and maintenance purposes.
ZipaTile’s built-in NOISE SENSOR is pre-configured as a ZONE, so when noise level reaches 7 for more than
15 seconds, Safety alarm will be triggered. This way, you can rely on any of your existing SMOKE or other
safety sensors which have SIREN built in.
You can add additional safety sensors as ZONES into your Safety alarm. However, in order to add sensor as
a ZONE in your Safety alarm system, you have to first add sensor into your Zipato system (go to ADD NEW
DEVICES wizard).

Alerting
When Safety alarm has been triggered you will be alerted by an emergency PHONE CALL (your mobile number
will be used). At the same time, you will get an EMAIL ALERT with 2 photos attached from the built in camera.
You can change alerting setup from within Safety alarm settings.
Alerting messages will only be sent if ZipaTile is connected to the Internet.
Settings
Safety alarm settings you can find within Zipato admin portal at my.zipato.com. Go to Security > Safety
alarm. In order to setup your system properly, you have to have an active Internet connection.
Elderly care alarm
Elderly care alarm is working quite similar to Intruder alarm. However, compared to the Intruder alarm, Elderly
care alarm system is triggered in an opposite way. Instead of being triggered when a ZONE detects some activity,
Elderly care alarm will be triggered when not even one zone detects any activity for a certain period of time
(default period of time is 15 minutes).
Alerting messages will only be sent if ZipaTile is connected to the Internet.
Settings
Safety alarm settings you can find within Zipato admin portal at my.zipato.com. Go to Security > Safety
alarm. In order to setup your system properly, you have to have an active Internet connection.
Smart Thermostat
ZipaTile is the fully featured thermostat unit. However, since there are many types of heating/cooling
systems out there, ZipaTile should be specially adjusted for each particular setup.
Device Manager
Depending on the communication protocol supported (ZigBee, Z-Wave…), ZipaTile can connect and control
various smart devices in your home. This way you can use ZipaTile to control your lights, blinds, curtains, read
status of meters, sensors etc…
You can also create ROOMS in Zipato DEVICES and assign a room to each device. This way you can easily find and
manage devices within one room.
GO TO HOME PAGE > DEVICES
or
GO TO HOME PAGE > ROOMS
In order to connect smart device based on certain communication protocol (Z-Wave, ZigBee…) go to
DEVICES -> SETTINGS -> ADD NEW DEVICE
Scenes
When using your ZipaTile for controller your lights, curtains, blinds etc…, you can use SCENES application in
order to control your devices faster and easier.

Scenes are the most basic level of automation. Scene is just a group of devices set to the certain state (on,
off, 30%, etc…). Once you call the scene by pressing the scene button, all devices in that group will go to
that certain state. You can create a scene if you go to HOME PAGE -> SCENES -> ADD NEW SCENE
Rules
Rules are advanced and powerful automation option. Zipato Rule Creator is a programming language specially
made for the purpose of device automation. Although extremely powerful, it is completely graphical and very
easy to use, without any previous programming experience.
Since Zipato Rule Creator is offering many options, and it is based on drag and drop, it is highly recommended to
use it on PC rather than on ZipaTile itself. In order to use Zipato Rule Creator go to: my.zipato.com > rule
creator.
Whenever you create or modify your rules within Zipato Rule Creator, click SYNCHRONIZE RULES. This way
all your Rules are transferred to your ZipaTile and they will run locally on it, no matter of the internet
connection with Zipato servers.
Cameras
ZipaTile has built in 2.0Mps camera for the purpose of basic monitoring, photo/video alerting and video
communication. If you want live video of higher quality, you can connect any of supported third party’s IP
cameras to your ZipaTile, and you will have exactly the same functionality as with the built in camera. To
connect new IP camera to ZipaTile, go to my.zipato.com > add new device > ip cameras
Live view
Download and install Zipato application from Google Play store for Android based devices or Apple store for iOS
based devices. Use your Zipato username/password to login and you will be able to see the live video from your
ZipaTile on you Android or iOS device.
You can do the same on your web enabled PC, if you go to my.zipato.com and select Cameras in the left menu.
If you connect more cameras to your ZipaTile, you will be able to see the live video from all of them.
Alerting
Built in camera is already pre-set in Intruder alarm, Safety alarm and Elderly care alarm systems to send the
photo alerts.
If you want to add some additional IP cameras to do the same, you can do it by first connecting cameras to your
ZipaTile, and then adding camera to a particular alarm system.
Additionally, if you want to receive photo or video clips according to some custom conditions, you can use
RULE CREATOR to set these conditions.
Intercom
ZipaTile features both SIP server and SIP client. Zipato Intercom could be used for communication between
Zipato Intercom Clients and supported SIP based door phone units (please advise
[www.zipato.com](http://www.zipato.com) for the list of supported units).
When ZipaTile is connected to Internet, communication between clients could be done worldwide.
Intercom Server setup
Each ZipaTile features the Zipato Intercom Server. However, only one Intercom Server can be enabled
within your Zipato network. In order to enable one Intercom Server, go to device manager > settings >

networks > ip > and click "enable" on the SIP server with the serial number of your ZipaTile (the one which you
would like to be your Intercom server).
After enabling the Zipato Intercom Server, you will be able to find "Intercom" option in the main menu. Over
there you can check basic Intercom settings and manage Intercom Clients, Servers, and create Groups.
Intercom Client setup
Basically, any SIP based device or application can be used as Zipato Intercom Client.
There are 3 types of Intercom Clients:
1. Zipato User Client - any SIP application used by you or your member users within your Zipatosystem
2. Door Phone - any supported SIP based door phone unit properly configured for use with ZipatoIntercom
3. Contact, any …?
User Client setup
User clients are being enabled automatically whenever enabled User connects with it to the Zipato Intercom
Server. User has to use Zipato credentials to connect to Zipato Intercom from within the SIP application. SIP
application has to be set to connect to Zipato Intercom Server. Zipato Intercom Server details can be found at
your controller settings > intercom > general
Door Phone setup
In order to connect supported SIP based door phone to Zipato Intercom, you have to first add door phone as the
client:
go to your controller settings > intercom > add new > doorphone
once after door phone has been added to the clients list, click the "details" button on it in order to check URI
and USERNAME/PASSWORD generated automatically.
Afterwards, use these info to properly setup your door phone.
More detailed instructions about setting up Zipato Intercom you can find online at
www.zipato.com/support.
Weather station
ZipaTile Weather station is using the weather service from [www.weatherunderground.com]
(http://www.weatherunderground.com). You can get the Weather information by touching the current
temperature information on your ZipaTile Home Page.
Weather information are available within Zipato Rule Creator which means that you can create automatic
rules based on weather status or forecast.
Calendar
Calendar application is available if you press the Date information on your ZipaTile Home Page. You can set
calendar appointments and tasks.
Clock
Clock application is available when pressing the Time information on your ZipaTile Home Page. You can set
various time zones and alarms.
In order to set the Right Time Zone, go to Settings > Date&Time and select your timezone manually.

Music player
Music player application is available from within the Application menu. You can use Zipato Music player to listen
music on ZipaTile, or any bluetooth speaker connected to the ZipaTile. To connect your Bluetooth speaker to
ZipaTile, go to Settings > Bluetooth
Troubleshooting
I don’t see all sensor statuses after registration.
Sometimes it takes time for Zipatile to synchronize all information with the cloud during the initialization.
Within 30 minutes at most you should have all statuses active.
I don’t get voice call when alarm has been triggered.
1. Please check do you use Country code in your mobile number. The number should look like this: +1 764
456456
2. Please check whether you have enough Zipato credits in your Zipato wallet. You can check this if you go to
Zipato > Settings > Wallet

AFB DOMOTICS S.L C/ Garcilaso 213 2º 1ª 08027 Barcelona (Spain) a+34 934-081-741
www.afbdomotics.com
BY
Other manuals for ZIPATILE
3
Table of contents
Other Zipato Security System manuals