Idappcom GIPSY User manual

3. Now your laptop or tablet has connected
to the GIPSY’s Wi-Fi hotspot, you can
command the GIPSY to connect to the
internet via a local insecure Wi-Fi hotspot.
Using a web browser, go to the GIPSY
home page at http://www.gipsy.home and
click on the ‘Public Wi-Fi’ menu option
(see figure 3)
.
4. Select the access point you want the
GIPSY to connect to from the list of available
open or secure connections. If a password is required, enter that too. After a few
seconds, the GIPSY should report ‘Connection successful’.
Your GIPSY is now connected to the internet, and is protecting your devices.
Quick Start Guide
Before you start
About your GIPSY
Your GIPSY device is designed to provide an extra layer of security when you are away from your
home or office and you need to connect to the Internet via a public Wi-Fi hotspot or guest access
point.
How it works
Your GIPSY will automatically protect your connected Wi-Fi enabled devices and will block attempts
to compromise your online security. Where you would normally connect your portable device to an
insecure Wi-Fi access point, you will instead connect to the GIPSY’s Wi-Fi access point. The GIPSY will
in turn connect to the insecure access point, and act as a secure gateway between you and the
internet. The GIPSY now provides the industry-standard online Cyber Intrusion Protection, just as
your HIPSY or Office systems do.
Getting started
This guide provides all you need to know to get you set up in just a few minutes. If you experience
any difficulty our technical team are standing by to answer your questions. Further information is
available on our website http://www.go-ipsy.com
GY
P
S
25626 - 06/0716 - IDAPcomm
GLOBAL INTRUSION PREVENTION SYSTEM
Thank you for purchasing a GIPSY from Idappcom!
Here will find everything you need to get your portable devices online and protected.
What’s in the box:
•Your small form, lightweight
GIPSY device.
•A wireless adapter.
•A USB power lead to connect
to your mobile device.
Connecting your GIPSY
Powering on
1. No mains electricity is required. The
GIPSY receives its power from the laptop/
tablet using the USB power cable provided
(see figure 1).
The GIPSY will initialise itself
and begin to broadcast a Wi-Fi signal to
your laptop/tablet or mobile phone.
Once connected to the internet, your GIPSY will establish a secure connection to the Idappcom Security
Operations Centre (SOC) and will automatically begin to update its software and protection policies to
keep you safe from the latest threats. Any security alerts detected by the GIPSY will also be transmitted
securely to the SOC for analysis.
1
2
3
Connecting the GIPSY to a Wi-Fi hotspot
2. Your laptop or tablet should now be able
to connect to the GIPSY’s Wi-Fi access point.
Select the GIPSY’s SSID from the list of
available access point names, and enter the
password
(see figure 2)
.
NB. The GIPSY’s default access point name is
the same as its 'Hostname' (usually in the
form: GIPSY-000-000-00000) and the default
wireless password is the same as its ‘Serial
Number’, which are both printed on the side
of the device.
Connecting to the GIPSY
www.idappcom.com
UK Freephone: +44 (0) 800 680 0791
US Freephone: +1 888 433 8835
email: [email protected]
Help and support
1. Connect to the GIPSY's access point
(see 'Connecting your GIPSY' overleaf).
2. Open up your web browser and go to
http://www.gipsy.home to access the
GIPSY management dashboard.
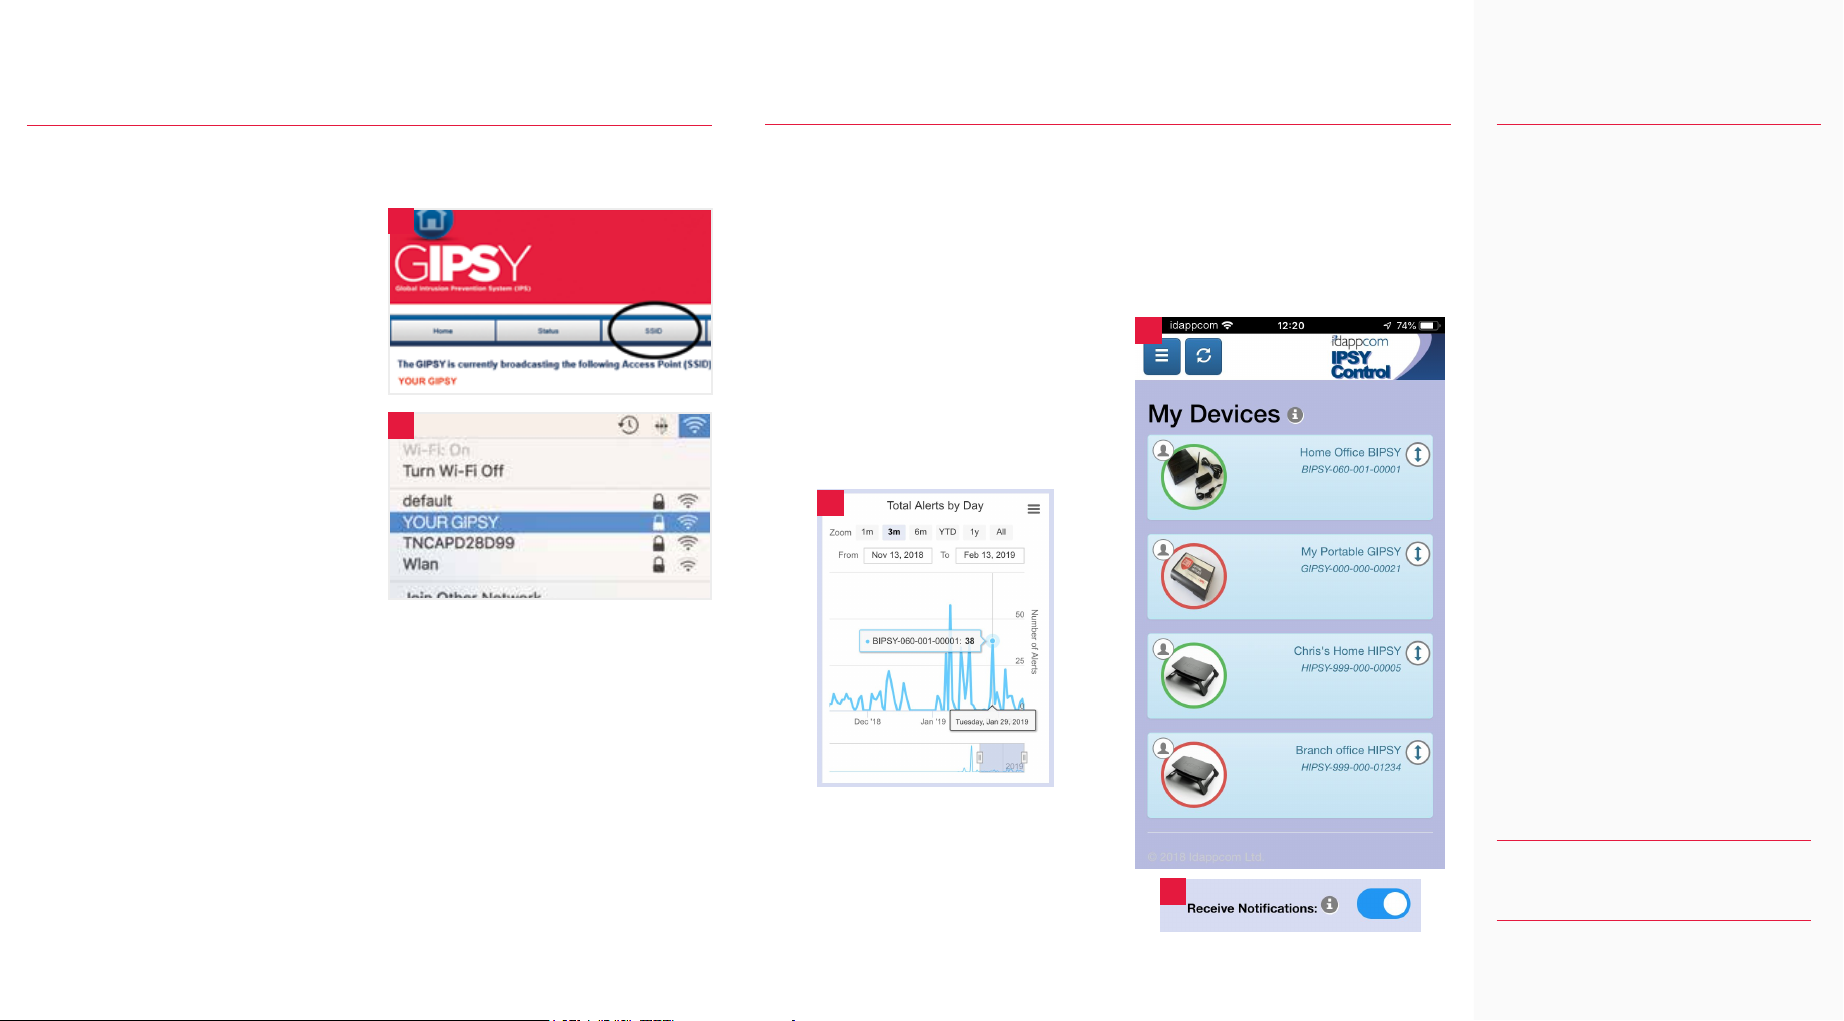
3. Select the SSID option in the menu bar
(see figure 1).
4. Enter the new SSID name (Service Set
Identifier - the broadcast name of the
GIPSY's access point) and Password into
the boxes provided and click ‘Next’.
5. The GIPSY will reconfigure itself with the
new details, and will disconnect the
existing Wi-Fi connection from your laptop
or tablet.
6. Reconnect to the newly renamed GIPSY
access point, using the built in Wi-Fi
controls for your laptop or tablet
(see figure 2).
Personalising your GIPSY
We recommend changing the GIPSY's default access point settings to a personal SSID and
Password that is unique and memorable to you.
You can return at any time to the management dashboard to change these settings by following
the steps above.
Quick tip: Save the management dashboard web address to your favourites bar.
Trouble Shooting Tips:
My GIPSY won’t power-up.
Check that the USB power connections are
clean, dry and fully seated into the USB ports
on your laptop/tablet or power supply.
Consider trying a different suitable USB
power cable. Remember that the GIPSY
takes a few moments to power up and
initialise before it can start up its Wi-Fi
access point.
The GIPSY SSID is not showing in the list
of available connections.
The GIPSY can take a few moments to power
up and initialise. Check that your mobile
device’s Wi-Fi is active and not set to ‘flight
mode’. After 90 seconds try refreshing the
list of available connections.
The GIPSY is failing to make a connection
to the Internet.
Check that the wireless adapter is fully
inserted. Try powering off the GIPSY, and
inserting the Dongle into another USB port
before powering back up.
Still having problems?
Contact our support desk.
If you need help, contact support:
IPSY Control app
Receive immediate notifications with the 'IPSY Control' app
In concert with the on-board management dashboard, you can download and install the IPSY Control
app to your iOS or Android mobile device. You can find the app on the iOS App Store or Google
Play Store by searching for 'IPSY Control'.
Log into the app with the Username and Password details provided to you by our Security
Operations Centre, or your device provider.
The app displays details for all of the IPSY devices
connected to your account (see figure 1). From
here, you can see protection policy selections, get
reports, and enable alert notifications.
Tap an individual device to see more information.
Press the 'Device Reports' button to see historical
activity reports (see figure 2).
Push notifications
Enable push notifications by turning on the 'Receive
Notifications' toggle switch (see figure 3).
Every time your device detects and blocks malware,
or prevents access to undesirable websites, you will
receive a notification on your mobile phone. © 2019 idappcom ltd. All rights reserved.
3
2
1
2
1
Popular Security System manuals by other brands


EDM
EDM Solution 6+6 Wireless-AE installation manual

Highway Safety Group
Highway Safety Group EA401 user manual

Siren
Siren LED GSM operating manual

Detection Systems
Detection Systems 7090i Installation and programming manual

Se-Kure Controls
Se-Kure Controls MicroMini SK-4841 instructions

Siemens
Siemens FDM273 manual