ziva OneTouch User manual

Copyright © 2020 –Kenners bv, Rotterdam, The Netherlands
OneTouch
vacuum sealer

1
Geachte klant
Met de aankoop van dit apparaat heeft u een juiste keuze gemaakt. Met periodiek onderhoud en de
juiste zorg zult u er vele jaren plezier van hebben. Lees de gebruikershandleiding goed door voordat
u het apparaat voor het eerst gebruikt en neem de veiligheidsinstructies in acht die hieronder
beschreven worden.
Personen die de gebruiksaanwijzing van dit apparaat niet kennen moeten het niet gebruiken. Bewaar
de verpakking voor later gebruik, maar gooi alle plastic verpakkingsmateriaal weg. Het kan gevaarlijk
zijn voor kinderen die er mee gaan spelen.
TIP: uw Ziva OneTouch is geschikt voor speciale accessoires met de meegeleverde slang (pag. 7) en
dry-aging! Dry-aging maakt uw vleesproducten verbluffend smakelijk! Lees hier alles over op
pagina 8.
Met de juiste aandacht en zorg heeft u jarenlang plezier van dit apparaat!
Lees daarom deze handleiding alstublieft goed door en volg de instructies op zodat u
schade kunt voorkomen en zolang mogelijk plezier hebt van uw apparaat. Schade die
ontstaat door het niet opvolgen van de instructies valt niet onder garantie of enige
aansprakelijkheid.
INHOUDSOPGAVE
CONTACTINFORMATIE ............................................................................................................................ 2
TECHNISCHE GEGEVENS.......................................................................................................................... 2
GARANTIE & REPARATIE.......................................................................................................................... 2
CONFORMITEITSVERKLARING................................................................................................................. 2
VEILIGHEIDSINSTRUCTIES........................................................................................................................ 3
BEDIENINGSINSTRUCTIES........................................................................................................................ 4
ONDERHOUDSINSTRUCTIES .................................................................................................................... 9
STORINGEN: OORZAKEN & OPLOSSINGEN............................................................................................ 10
AFVAL & RECYCLING.............................................................................................................................. 10
MAINTENANCE INSTRUCTIONS............................................................................................................. 19

2
CONTACTINFORMATIE
Voor meer informatie over Ziva funcooking producten kunt u de veilige QR-code hieronder scannen.
Vragen en opmerkingen? Neem contact met ons op:
+31 (0)85 301 2306
Ziva™is een handelsmerk van Kenners BV.
TECHNISCHE GEGEVENS
Maximale onderdruk: - 0,8 bar
Pompsnelheid: 12 liter/minuut
Vacumeertijd*: 10 - 20 seconden
Sealtijd*: 6 - 10 seconden
Afkoeltijd: tenminste 40 seconden
Vermogen: 110W (220-230V AC @ 50-60Hz)
Afmetingen: 360 x 150 x 78mm
Gewicht: 1,4 kg
* Werkelijke tijd hangt af van afmetingen, vorm, product en verpakking.
GARANTIE & REPARATIE
De garantietermijn voor dit apparaat is twee jaar.
Is uw apparaat defect geraakt? Neem dan contact op met de verkoper of de fabrikant om het
probleem snel en efficiënt op te lossen.
CONFORMITEITSVERKLARING
Fabrikant
Kenners BV, Rotterdam, Nederland
Gecertificeerd conform Europese richtlijnen
➢2014/30/EU (EMC)
➢2014/35/EU (LVD)
➢2011/65/EU (RoHS)

3
VEILIGHEIDSINSTRUCTIES
Dit apparaat mag alleen bediend worden door personen ouder dan 8 jaar.
Kinderen en personen met verminderde zintuiglijke, fysieke of mentale capaciteiten
en/of zonder kennis van de veiligheidsinstructies of ervaring met de bediening moeten
onder toezicht worden gehouden en worden geïnstrueerd over de bediening,
veiligheid en risico’s van dit apparaat.
WEES VOORZICHTIG: RISICO OP BRANDWONDEN!
Dit product bevat onderdelen die zeer heet worden en brandwonden kunnen
veroorzaken bij aanraking. Bijzondere aandacht en supervisie wordt dringend
aanbevolen bij bediening door kinderen of personen met verminderende
zintuiglijke, fysieke en mentale capaciteiten.
➢Wacht tenminste 40 seconden tussen het vacumeren van zakken om oververhitting van en
schade aan de vacuümmachine te voorkomen!
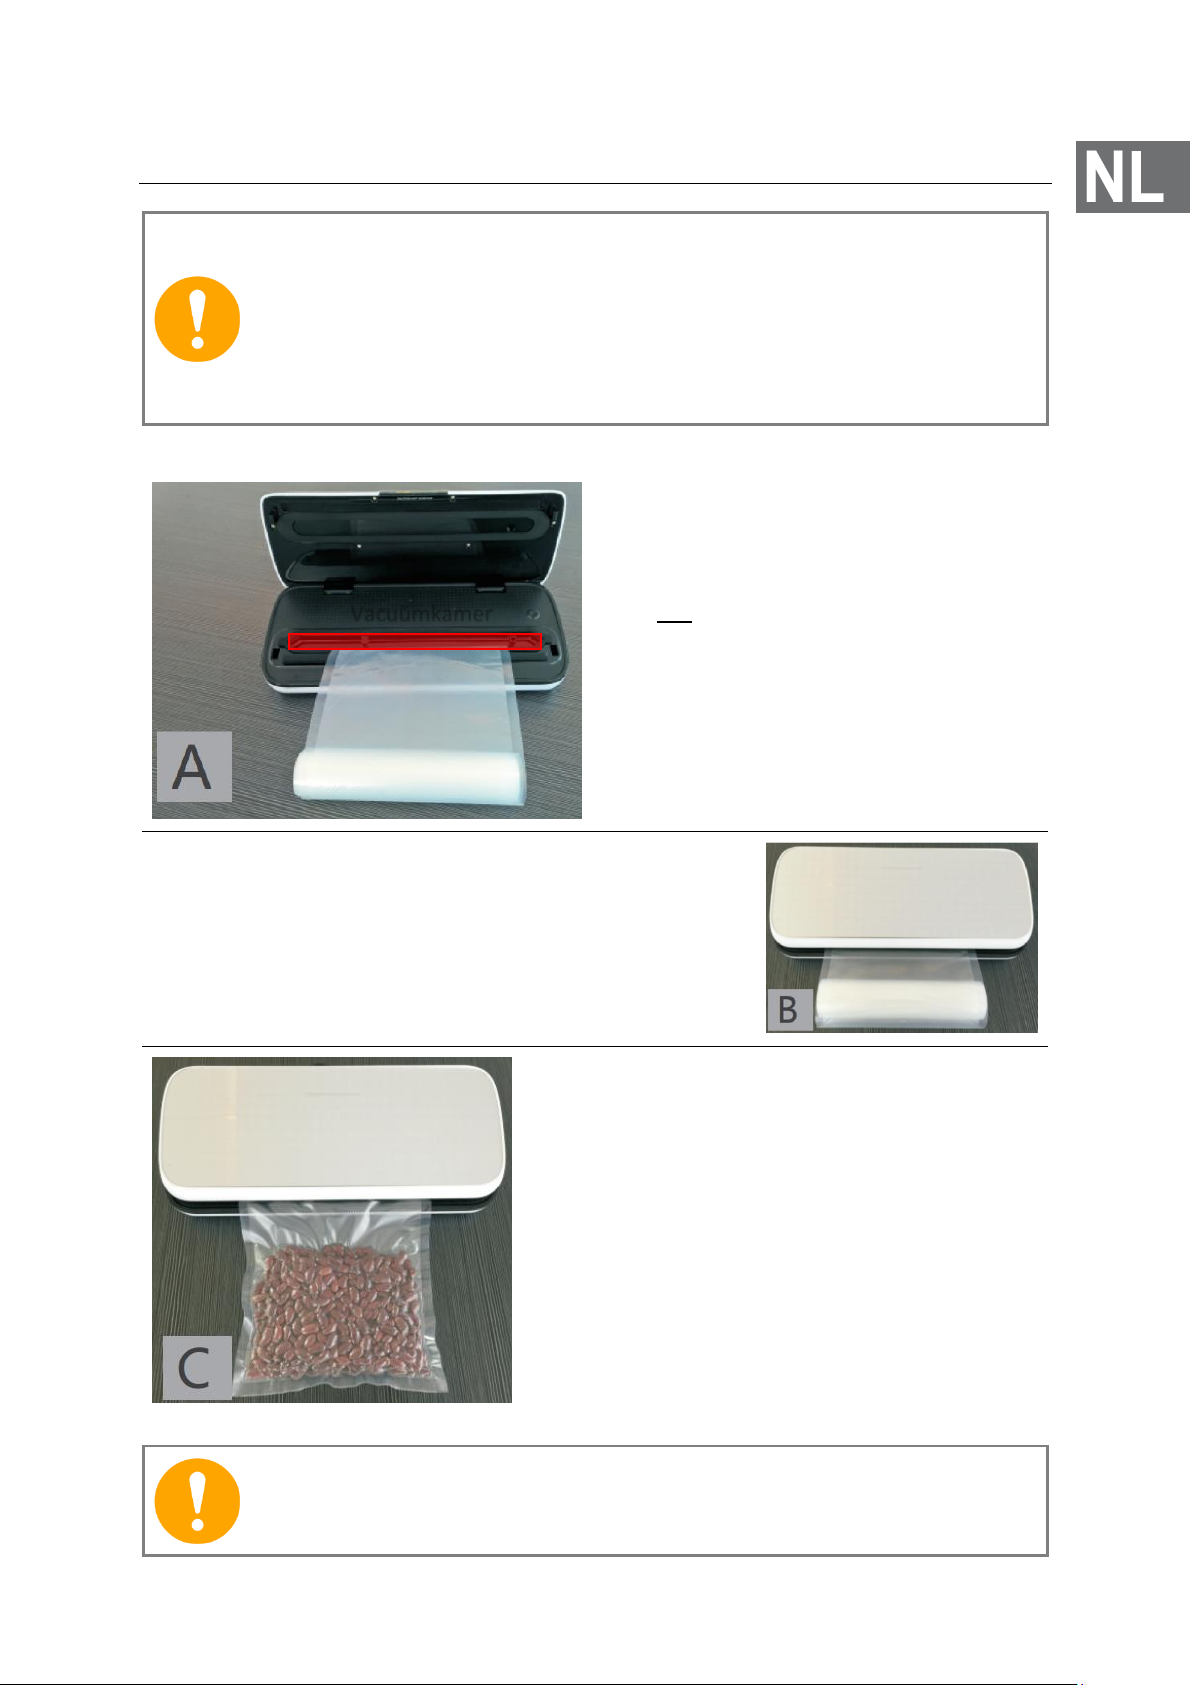
➢Dit product is uitsluitend geschikt voor vacuümzakken met reliëf. Wanneer u “gladde”
vacuümzakken zonder reliëf gebruikt zullen deze op zichzelf afdichten en niet vacumeren.
➢Het apparaat is niet waterdicht. Voorkom dat het nat wordt en sluit het niet aan op stroom
als het apparaat nat is geworden.
➢Voorkom dat vocht uit de vacuümzak in de machine wordt gezogen. Dit leidt tot schade
buiten garantie. Tips om dit te voorkomen vindt u in de bedieningsinstructies.
➢Gebruik geen verlengkabel met dit apparaat.
➢Kinderen niet laten spelen met het apparaat.
➢Schoonmaken en onderhoud door kinderen alleen onder toezicht van een volwassene.
➢De sealstrip van het apparaat wordt heet en kan brandwonden veroorzaken.
➢Houd het apparaat altijd in de gaten tijdens gebruik.
➢Let op kinderen in de buurt van het apparaat.
➢Verkeerd gebruik van dit apparaat kan letsel en schade veroorzaken.
➢De fabrikant is niet aansprakelijk voor letsel of schade door verkeerd gebruik van dit
apparaat. Gebruik het uitsluitend voor het beoogde doel.
➢Uitsluitend bedoeld voor huishoudelijk gebruik.
➢Niet geschikt voor commercieel gebruik of gebruik buitenshuis.
➢Verwijder alle verpakkings- en transportmaterialen van het apparaat vóór gebruik.
➢Controleer het apparaat op zichtbare schade en ontbrekende onderdelen.
➢Gebruik alleen het meegeleverde stroomsnoer.
➢Controleer tijdens gebruik dat het niet mogelijk is om over het stroomsnoer te struikelen of
er onbedoeld aan te trekken.
➢Voorkom dat het apparaat volledig ondergedompeld wordt in water.
➢Schakel het apparaat uit en verwijder de stekker uit het stopcontact voordat u begint met
reinigen of onderhoud en wanneer u het apparaat niet gebruikt.
➢Trek niet aan de stroomkabel tijdens het verwijderen van de stekker uit het stopcontact,
maar pak de stekker vast.
➢Houd dit apparaat en de stroomkabel uit de buurt van hittebronnen, hete objecten en open
vlammen.
➢Zorg dat de stroomkabel volledig is uitgerold tijdens gebruik van het apparaat.
➢De stoomkabel mag niet gedraaid of om het apparaat zijn gewikkeld.
➢Controleer voor ieder gebruik of de stroomkabel en stekker onbeschadigd en droog zijn.

4
➢Wanneer het apparaat, stroomkabel of stekker beschadigd zijn laat dan altijd het apparaat
controleren en eventueel vervangen of repareren door een geautoriseerde reparateur.
➢Uitsluitend geschikt voor gebruik met 220-230V, 50-60Hz. Gebruik met andere voltages leidt
tot verlies van de garantie.
➢Ongeautoriseerde reparatie of modificaties van het apparaat leidt tot verlies van garantie op
het apparaat.
BEDIENINGSINSTRUCTIES
De OneTouch vacuümmachine heeft veel mogelijkheden maar is eenvoudig te bedienen. In dit
hoofdstuk leggen we uit welke knoppen en functies de machine heeft, uit welke onderdelen de
machine bestaat en hoe u de machine gebruikt (werkwijze en bediening).
Uitleg knoppen en functies
In de afbeelding hieronder vindt u een verklaring van de verschillende (touch) knoppen en displays.
Stop: onderbreekt (stopt) onmiddellijk het proces op dat moment. Bijvoorbeeld wanneer u een
probleem opmerkt.
Mode: wisselt tussen “Normal” (normaal) en “Gentle” (voorzichtig). De LED onder de gekozen modus
zal oplichten. In Normal mode wordt de maximale onderdruk opgebouwd voordat de machine zal
sealen. In Gentle mode zal de machine minder onderdruk opbouwen (handig voor kwetsbare
producten)
Food: wisselt tussen “Dry” (droog) en “Moist” (vochtig). De LED onder de gekozen modus zal
oplichten. In Moist modus zal de machine iets langer sealen omdat vocht in de zak de seal nadelig
kan beïnvloeden.
Seal (druk ½ seconde): als u kort deze knop ingedrukt houdt wordt de sealstrip heet en begint de
machine met het sealen (lassen) van de zak. U kunt op deze knop drukken om het vacumeren te
stoppen en de zak direct te sealen. Met deze knop kunt u ook vacuümfolie aan één zijde sealen om
zo een vacuümzak te vormen die u kunt vacumeren. De vertraging van 0,5 seconde voorkomt dat u
deze automatische functie per ongeluk kunt activeren.
Vac Seal (druk ½ seconde): plaats de zak, sluit de deksel en houdt deze knop kort ingedrukt om
volautomatisch te vacumeren en daarna te sealen. De vertraging van 0,5 seconde voorkomt dat u
deze automatische functie per ongeluk kunt activeren.

5
Onderdelen van de machine
A) Sluithaken: deze houden de deksel stevig gesloten. Druk op de deksel om deze te sluiten.
B) Vacuümkamer: hier wordt het vacuüm in gecreëerd (binnen de afdichting rondom). Het
open uiteinde van de zak moet in deze kamer liggen voor een correcte werking van de
machine.
C) Afdichting vacuümkamer: deze seal zorgt dat er een vacuüm opgebouwd kan worden. Als de
seal beschadigt is zal de machine mogelijk niet goed werken. Neem in dat geval contact op
met uw verkoper of de fabrikant.
D) Seal rubber: deze rubber strip zorgt ervoor dat de lasnaad glad en vlak wordt.
E) Seal strip: onder deze teflon strip zit een metalen strip van 2,5mm breed die heet wordt en
de zak dicht last. Let op: deze strip wordt zéér heet tijdens het sealen en kan brandwonden
veroorzaken wanneer u deze aanraakt na het openen van de deksel.
Risico op brandwonden!
De seal strip wordt zeer heet tijdens het sealen van zakken en kan brandwonden
veroorzaken wanneer deze wordt aangeraakt direct na het sealen.
F) Vacuümopening: door deze opening wordt de lucht uit de vacuümkamer gezogen. Voorkom
dat vocht of voedingsresten in deze opening worden gezogen of dat de vacuümzak tijdens
het vacumeren de opening bedekt. U kunt op deze opening de meegeleverde vacuümslang
aansluiten om gebruik te kunnen maken van diverse geschikte vacuümaccessoires (los
verkrijgbaar, zie pagina 7).
G) Dekselsluiting: door aan weerszijden van de machine deze knoppen stevig in te drukken
opent u de deksel.
H) Vacuümknop accessoires: door op deze knop te drukken kunt u vacuümaccessoires
vacumeren via de meegeleverde slang die op de vacuümopening is aangesloten.

6
Werkwijze en bediening
Voorkom dat vocht uit de zak in de machine wordt gezogen!
Wanneer vocht wordt opgezogen kan dit leiden tot schade buiten garantie. Hang de
zak over het werkblad zodat de zwaartekracht helpt of stop de gevulde vacuümzak
voor het vacumeren kort in de vriezer zodat eventueel vocht minder vloeibaar wordt.
Wanneer toch enig vocht in de vacuümkamer terecht komt dient u direct op Stop te
drukken en het vocht in de vacuümkamer te verwijderen.
Plaats de vacuümzak met reliëf met de opening
in de vacuümkamer tussen de randen van de
ovale afdichting. U legt de opening over de
rubber strip en eerste rand van de afdichting,
maar niet over de tweede rand van de ovale
afdichting. Als de opening niet in de
vacuümkamer ligt zal de zak niet vacumeren.
Zorg dat de vacuümzak de vacuümopening aan
de rechterzijde niet bedekt.
Sluit de deksel door deze stevig aan te drukken
tot beide sluithaken van de deksel op hun
plaats zitten (u hoort in dat geval een klik aan
beide zijden).
U kunt nu het vacuüm- of sealproces starten.
Stel het apparaat eventueel in naar wens met
de knoppen “Mode” en “Food” of druk direct ½
seconde lang op de knop “Vac Seal” om het
volautomatische proces (vacumeren + sealen)
te starten met de standaardinstellingen
(Normal Mode en Dry Food).
Wanneer de cyclus of het sealen is voltooid
drukt u de beide knoppen aan weerszijden van
de machine stevig in waardoor de deksel
ontgrendelt wordt. U kunt de gevacumeerde
zak nu uit de machine halen.
Niet te snel achter elkaar vacumeren!
Wacht minimaal 40 seconden tussen het vacumeren van zakken om oververhitting en
schade aan het apparaat te voorkomen.
Vacuümkamer

7
Een vacuümzak maken van vacuümfolie op rol
U kunt vacuümfolie op rol gebruiken om een (veel langere) vacuümzak te maken.
Voorkom lekkage met een dubbele seal
Trek na de vacumeercyclus de zak iets terug uit de machine en druk nogmaals op Seal
(zorg er voor dat de zak nog wel onder de sealstrip ligt) voor een veiligere dubbele seal.
U gaat als volgt te werk:
1. Snijd de folie af op de gewenste lengte.
2. Leg deze met één uiteinde minimaal 10 mm (1 cm) over het seal rubber (onderdeel, pagina 5)
3. Sluit de deksel door deze stevig aan te drukken tot u deze hoort klikken.
4. Druk ½ seconde op de “Seal” knop en wacht tot het proces voltooid is.
5. U kunt nu de deksel openen en de vacuümzak als dusdanig gebruiken.
Een vacuümaccessoire met slang gebruiken
De Ziva OneTouch is geschikt voor het vacumeren van bepaalde accessoires met de meegeleverde
slang, zoals vacuümcontainers en flessenstoppers.
Vacuümcontainers kunt u vacumeren
zonder dat deze vervormen. Ideaal
voor vloeibare en zachte producten,
zoals soepen, sauzen, marinades en
fruit.
Flessenstoppen kunt u
gebruiken om flessen
wijn, en dergelijke, te
vacumeren zodat deze
langer vers blijven.
Bestel direct online
accessoires bij een
betrouwbare partij door
deze veilige QR-code te
scannen.
U gaat als volgt te werk:
1. Sluit de meegeleverde vacuümslang aan op de vacuümopening (onderdeel F, pagina 5). Druk
deze stevig aan zodat de aansluiting niet lekt. Als de accessoires niet goed vacumeert
controleer dan de aansluiting en druk deze eventueel steviger aan.
2. Sluit de vacuümaccessoire aan op de slang, en zorg dat deze niet lekt.
3. Druk op de vacuümaccessoire knop (onderdeel H, pagina 5) om het vacumeren te starten.
4. U kunt op ieder moment op de Stop knop drukken en de vacuümmachine stopt automatisch
wanneer de maximale onderdruk is bereikt.
5. Sluit eventueel de vacuümaccessoires (indien nodig) en ontkoppel eerste de vacuümslang
van de accessoire.
6. Ontkoppel de vacuümslag van de vacuümopening op de vacuümmachine.
7. Let er op dat de vacuümaccessoires geen lucht aanzuigt nadat u de vacuümslang heeft
ontkoppeld (u hoort een sissend geluid) en controleer eventueel of de deksel van een
container goed vast zit.

8
TIP: dry-aging voor verbluffend lekker vlees
De nieuwste rage “dry-aging” is ook mogelijk met uw Ziva OneTouch. U kunt hiervoor speciale dry-
aging vacuümzakken gebruiken die u kunt vacumeren en sealen met deze vacuümmachine. Mis dit
niet, want dry-aging is fenomenaal en eenmaal geproefd wilt u nooit meer anders.
Wat is dry-aging?
Sommige soorten rundvlees moeten eerst rijpen (besterven) of ‘adellijk’ worden om het meest
smakelijk te worden voor consumptie. Tijdens het droog en koud laten
besterven verliest het vleesproduct veel vocht en gewicht en breken enzymen
het bindweefsel af. Het vlees wordt malser én smakelijker, vooral in combinatie
met sous-vide koken.
Met de veilige QR code hiernaast om direct online informatie te vinden en
producten te bestellen voor om aan de slag te kunnen met dry aging.

9
ONDERHOUDSINSTRUCTIES
•Ontkoppel de machine van het stroom door de stekker uit het stopcontact te halen.
•Dompel de machine niet onder water, spoel deze niet af onder (stromend) water.
•Gebruik geen abrasieve schoonmaakmiddelen of schuursponzen.
•Gebruik een vochtige zachte doek of spons met milde zeep om de buitenkant van de
machine schoon te maken.
•Maak de vacuümkamer van de machine schoon door eventuele voedselresten of vloeistoffen
weg te vegen met een droge doek of papier.
•Zorg dat de machine volledig droog is voordat u deze weer aansluit op het stroomnet.
Dit product is niet waterbestendig!
Gebruik tijdens het reinigen niet teveel water, spoel de machine niet af onder
(stromend) water en dompel deze niet onder water. Voorkom dat water in de
machine terecht komt. Dit kan leiden tot schade buiten garantie.

10
STORINGEN: OORZAKEN & OPLOSSINGEN
Probleem
Mogelijk oorzaak & oplossing
Het apparaat wil niet inschakelen
1. Controleer of de stekker in het stopcontact is gestoken.
2. Controleer of de stroomkabel of stekker is beschadigd.
3. Controleer of het stopcontact werkt.
Het apparaat wil niet vacumeren
1. Zorg dat de deksel correct en volledig is gesloten.
2. Controleer dat de zak op de juiste wijze is ingebracht.
3. Laat de machine tenminste 40 seconden afkoelen als u
kort daarvoor nog heeft gevacumeerd.
Het apparaat maakt wel geluid maar
vacumeert niet
1. Controleer of de vacuümopening wordt afgedekt door
de vacuümzak. Trek de zak iets terug.
2. Controleer of de vacuümopening verstopt is geraakt
door voedingsresten.
3. Controleer of er lucht wordt aangezogen door de
vacuümopening door op de vacuüm accessoires knop
te drukken (onderdeel H, pagina 5).
Na vacumeren komt er (na enige
tijd) weer lucht in de vacuümzak
1. Controleer de zak op schade / lekkage
2. Controleer de seal / las van de zak op schade of
onvolkomenheden. De seal hoort transparant en vrij
van onregelmatigheden te zijn. Wanneer de zak aan de
binnenzijde nat was tijdens het lassen kunt u beter de
Food > Moist stand gebruiken of de zak van binnen
droog maken.
3. Sommige producten (bv fruit) ontgassen onder vacuüm
waardoor de zak zich vult met gas.
4. De voeding is bedorven of gaan fermenteren en is
mogelijk niet langer geschikt voor consumptie.
AFVAL & RECYCLING
Deze markering geeft aan dat dit product binnen de gehele EU niet via het huishoudelijke
afval mag worden afgevoerd. Recycle, om mogelijke schade aan het milieu of de
gezondheid van mensen door ongecontroleerde afvoer van afval te voorkomen, het
apparaat op een verantwoorde manier ter bevordering van duurzaam hergebruik van
materialen. Retourneer het gebruikte apparaat via de retour- en verzamelvoorzieningen
of neem contact op met de verkoper bij wie u het product heeft gekocht. Deze kan het
product innemen en milieuvriendelijk recyclen.

11
Dear customer
By purchasing this product, you have made a good decision. With proper maintenance and care you
can enjoy his products for years. Please read this manual carefully before you first use this product
and take notice of the safety instructions as described below.
Persons who have not read this manual should not use this device. Save the packaging for later use,
but throw away all plastic packaging materials since it can be dangerous for children who play with it.
TIP: your Ziva OneTouch is suitable for special vacuum accessories with the included vacuum hose
(page 7) and dry-aging! Dry-aging makes your meat taste incredible! Read more about it on page
17.
With proper care and maintenance, you can enjoy this product for years!
Carefully read this manual and follow the instructions to prevent damaging the device
and enjoy this device for many years. Damage caused by not following instructions in
this manual is not covered by warrant or any liability.
TABLE OF CONTENTS
CONTACT INFORMATION ...................................................................................................................... 12
TECHNICAL SPECIFICATIONS.................................................................................................................. 12
WARRANTY & REPAIRS.......................................................................................................................... 12
DECLARATION OF CONFORMITY ........................................................................................................... 12
SAFETY INSTRUCTIONS.......................................................................................................................... 13
OPERATING INSTRUCTIONS................................................................................................................... 14
MALFUNCTIONS: CAUSES & SOLUTIONS............................................................................................... 20
DISPOSAL & RECYCLING ........................................................................................................................ 20

12
CONTACT INFORMATION
For more information about Ziva funcooking products you can scan the QR-code below.
Questions or remarks? Feel free to contact us:
+31 (0)85 301 2306
Ziva™is a trademark of Kenners BV.
TECHNICAL SPECIFICATIONS
Maximum pressure: - 0,8 bar
Pump speed: 12 liter/minute
Vacuum time*: 10 - 20 seconds
Seal time*: 6 - 10 seconds
Cooldown time: at least 40 seconds
Power rating: 110W (220-230V AC @ 50-60Hz)
Dimensions: 360 x 150 x 78mm
Weight: 1,4 kg
* Actual time depends on size, shape, product and packaging.
WARRANTY & REPAIRS
The warranty period for this product is two years.
Is your device defective? Please contact your seller or the manufacturer to solve the problem.
DECLARATION OF CONFORMITY
Manufacturer
Kenners BV, Rotterdam, The Netherlands
This product is certified according to European directives:
➢2014/30/EU (EMC)
➢2014/35/EU (LVD)
➢2011/65/EU (RoHS)

13
SAFETY INSTRUCTIONS
This device may only be operated by persons older than 8 years.
Children and persons with reduced sensory, physical or mental capacities and/or
without reading these safety instructions or experience with this device should be
supervised during operation and instructed about the controls, safety and hazards.
BE CAREFUL: RISK OF BURNS
Certain parts of this device become very hot and can cause burns when touched.
Special care and supervision is urgently advised when operated by children or
persons with reduced sensory, physical or mental capacities.
➢Wait at least 40 seconds between vacuum packaging of portions to prevent overheating and
damage to the machine.
➢This device only works with embossed vacuum bags. When using vacuum bags with
embossing the bags will seal inside on itself and vacuum cannot be created.
➢This device is not waterproof. Prevent it from becoming wet and do not connect it to a
power source if it has become wet.
➢Prevent moisture from the bags being sucked into the machine. This will cause damage
outside warranty. Tips to prevent this can be found in the operating instructions.
➢Do not use an extension cable with this device.
➢Do not let children play with this appliance.
➢Cleaning and maintenance by children should always be supervised.
➢Never turn the machine on without being placed in (sufficient) water.
➢Some parts of this appliance can become very hot and cause burns when touched.
➢Keep the appliance under constant supervision while in use.
➢Constantly supervise children who are near the appliance.
➢Incorrect usage of this device may cause injury and damages.
➢The manufacturer is not responsible or liable for damages and injury caused by incorrect use
of this appliance. Only use the device for its intended purpose.
➢For domestic use only. Not intended for commercial or outdoor usage.
➢Remove all packaging and transport materials from the inside and outside of the appliance.
➢Check the device for visible damage or missing parts.
➢Only use the power cord that is supplied with this appliance.
➢Make sure that it is impossible to trip over or unintentionally pull the power cord during use.
➢Prevent the appliance from getting submerged in water.
➢Before cleaning, maintenance and storage, always ensure the appliance is turned off and
disconnected from power.
➢Do not pull the power cord when disconnecting the appliance from power. Instead, hold the
plug while pulling it from the power socket.
➢Keep the cord and appliance away from heat sources, hot objects and naked flames.
➢Ensure that the power cord is fully extended before and during usage of the appliance.
➢The power cord must not be twisted or wound around the appliance during use.
➢Check before use that the power cable and plug are undamaged and dry.
➢If the appliance, cord or plug has been damaged, have the appliance inspected and if
necessary repaired or replaced by an authorized repairer or manufacturer.
➢Connect to 220-230V, 50-60 Hz power supply only. The warranty will be void when the
appliance is connected to incorrect voltage.
➢Unauthorized repairs and/or modifications of the appliance will invalidate its warranty.

14
OPERATING INSTRUCTIONS
The Ziva OneTouch has many options but is very simple to operate. In this chapter we will explain
what buttons and functions the device offers, what parts it consists of and how to use the device.
Buttons and functions
The picture below shows the various (touch) buttons and displays.
Stop: immediately stops the machine / process. You can use this when you notice a problem.
Mode: switches between “Normal” and “Gentle” (LED under the chosen mode will illuminate). In
Normal mode maximum vacuum is applied before the machine seals the bag. In Gently mode a lower
vacuum will be applied (handy for soft or sensitive products).
Food: switches between “Dry” and “Moist” (LED under the chosen mode will illuminate). In Moist
mode the machine will seal longer in case there is moisture in the bag between the seal to reduce
the risk of sealing failure.
Seal (press ½ second): this button heats up the sealing strips and starts sealing the bag. You can press
this button to stop the vacuuming process and immediately seal the bag. With this button you can
also seal vacuum foil on roll on one side to create a vacuum bag. The 0,5 second delay is to prevent
accidentally activating this automatic mode.
Vac Seal (press ½ second): first place the bag, close the lid and press this button to start the
automatic process of vacuuming and sealing. The 0,5 second delay is to prevent accidentally
activating this automatic mode.

15
Parts of the machine
A) Closing hooks: this is where vacuum is created (within the gasket that surrounds it). These
keep the lid firmly closed. Press the lid to lock them in place.
B) Vacuum chamber: the open end of the vacuum bags must be placed in this chamber to
ensure correct functioning of the machine.
C) Gasket: this gasket ensures a vacuum can be created and maintained. If the gasket is
damaged them machine will not function correctly. Contact your seller or the manufacturer.
D) Seal rubber: this rubber strip ensures a smooth and flat surface of the weld.
E) Seal strip: below this Teflon strip is a 2,5mm metal strip that will become very hot in order to
weld/seal the bag.
Risk of burns!
This seal strip will become very hot during sealing and can cause burns when touched
after opening the lid. Please be careful when handling the machine with an open lid
directly after sealing.
F) Vacuum opening: air is sucked out of the vacuum chamber through this opening. Prevent
moisture or food from being sucked into this opening and the vacuum bag from covering this
opening during operation. You can attach a suitable vacuum hose for accessories to this port.
G) Release buttons: open the lid by firmly pressing these lid release buttons on both sides of
the machine.
H) Accessories button: press this button to vacuum an accessories through the included
vacuum hose connected via the vacuum opening

16
Vacuum process operation
Prevent moisture from being sucked into the machine!
When moisture is sucked the vacuum opening it can cause serious damage that is not
covered under warranty. Hang the bag over your counter so gravity helps or put the
bag shortly in a freezer to make the fluids less viscous.
When moisture is sucked into the machine you should immediately press Stop and
remove any moisture from the vacuum chamber.
Place the embossed vacuum bag with the
opening in the vacuum chamber. Place the
opening past the rubber strip and first edge of
the gasket ring, but before the second edge of
the gasket ring.
If the opening is not in the chamber, the bag
will not vacuum correctly (or at all).
Make sure the vacuum bag does not cover the
vacuum opening on the right side in the vacuum
chamber.
Close the lid by firmly pressing it down until
both closing hooks lock into place (you will hear
both of them click when this happens).
You can now start the vacuum + sealing or
sealing process.
If required, configure your machine with the
“Mode” and “Food” buttons, or press “Vac
Seal” for 0,5 second to start the automatic
process (vacuum + sealing) with standard
settings (Normal Mode and Dry Food).
When the vacuum cycle or sealing is completed,
firmly press both release buttons on the sides
of the machine to unlock the lid. You can now
open the lid and take your vacuum sealed bag
out.
Don’t vacuum seal to quickly in succession
Wait a minimum of 40 seconds before vacuum sealing another bag to prevent
overheating and damage to the machine.
Vacuum chamber

17
Creating a vacuum bag from foil (roll)
You can use vacuum foil to create a (much) longer vacuum bag.
Prevent leakage with a double seal!
After vacuum sealing pull back the bag slightly and press the Seal button again (make
sure the bag is still under the seal strip) for a more secure double weld.
Workflow:
1. Cut the foil to the desired length.
2. Place it with one end a minimum of 10 mm (1 cm) over the seal rubber (part D, page 14).
3. Close the lid by pressing it down firmly until you hear the clicks as it locks in place.
4. Keep the “Seal” button pressed for ½ second until it starts and wait for it to be completed.
5. You can now open the lid by pressing the release buttons on both sides of the machine
Using a vacuum accessory with hose
The Ziva OneTouch is suitable for vacuuming certain accessories by using a vacuum hose, such as
vacuum canisters and bottle stoppers.
Vacuum canisters can be vacuumed
without deformation. Ideal for fluid or
soft products, such as soups, sauces,
marinades and fruits.
Bottle stoppers can be
used to vacuum bottles of
wine, and such, to
preserve taste and
freshness.
Order your accessories
directly online from a
trusted partner by
scanning this safe QR-
code with your phone.
Workflow:
1. Connect the vacuum hose (included) to the vacuum opening (part F, page 14). Press it down
firmly to prevent the connection from leaking. If the accessory doesn’t vacuum well, check
this connection and press it down more firmly, if required.
2. Connect the vacuum accessory to the vacuum hose, and make sure it doesn’t leak.
3. Press the vacuum accessory button (part H, page 14) to start the vacuum process.
4. You can press the Stop button at any time and the machine will stop automatically when the
maximum under pressure is reached.
5. If required, close the vacuum accessory and first disconnect the vacuum hose from the
accessory.
6. Disconnect the vacuum hose from the vacuum opening on the machine.
7. Check that the vacuum accessory doesn’t leak after disconnecting the hose (you may hear a
hissing noise) and check if the lid of a vacuum canister is closed properly.

18
TIP: dry-aging for incredibly tasty meat
The latest trend “dry-aging’ is also possible with your Ziva OneTouch. You can purchase special dry-
aging vacuum bags that you can vacuum seal with this machine. Don’t miss out, because dry-aged
meat is phenomenal and, once tasted, you won’t go back.
What is dry-aging?
Some beef must first ripen (become “noble”) to become the most palatable for consumption. During
drying and cold nobling, the meat product loses a lot of moisture and weight
and enzymes break down the connective tissue. The meat becomes much more
tender and tasty, especially in combination with sous-vide cooking.
With the safe QR code to the right you can order products directly online from
a trusted partner so you can start dry-aging right away!

19
MAINTENANCE INSTRUCTIONS
•Disconnect the device from any power source by removing the plug from the socket.
•Do not submerge the machine or rinse it under water.
•Do not use abrasive cleaning products or scouring pads.
•Use a damp soft cloth or sponge with mild soap to clean the outside of the machine.
•Clean the vacuum chamber by wiping away any food or fluid with a dry cloth or paper.
•Make sure the machine is completely dry before you reconnect it to electrical power.
This device is not waterproof!
Do not use too much water during cleaning. Do not submerge or rinse the machine
under running water. Prevent water from getting into the inside of the machine as this
can cause damage that is not covered by warranty.
Table of contents
Languages:
Other ziva Food Saver manuals
Popular Food Saver manuals by other brands

3M
3M Matic 800at Instructions and parts list

Silvercrest
Silvercrest SFS 150 B3 operating instructions

SealerSales
SealerSales OnPak Gen 3.0 instruction manual

Silvercrest
Silvercrest SV 125 C6 operating instructions

Centron Technologies
Centron Technologies MS930A Service manual

Mellerware
Mellerware Zipp! manual