Zoom MicTrak M2 User manual

Operation Manual
You must read the Usage and Safety Precautions before use.
©2022 ZOOM CORPORATION
Copying or reprinting this manual in part or in whole without permission is prohibited.
Product names, registered trademarks and company names in this document are the property of their respective companies. All trademarks and
registered trademarks in this document are for identification purposes only and are not intended to infringe on the copyrights of their respective owners.
Proper display is not possible on grayscale devices.

Notes about this Operation Manual
You might need this manual in the future. Always keep it in a place where you can access it easily.
The contents of this document and the specifications of the product could be changed without notice.
• Windows® is a trademark or registered trademark of Microsoft® Corporation.
• Mac, macOS and iPadOS are registered trademarks of Apple Inc. in the USA and other countries
• iOS is a trademark or registered trademark of Cisco Systems, Inc. in the USA and other countries, and it
is used under license.
• Android is a trademark of Google LLC.
• The microSDXC logo is a trademark of SD-3C LLC.
• Recording from copyrighted sources, including CDs, records, tapes, live performances, video works
and broadcasts, without permission of the copyright holder for any purpose other than personal use is
prohibited by law. ZOOM CORPORATION will not assume any responsibility related to infringements of
copyrights.
2

Contents
Notes about this Operation Manual........................................................................................................................ 2
M2 overview................................................................................................................................................................. 5
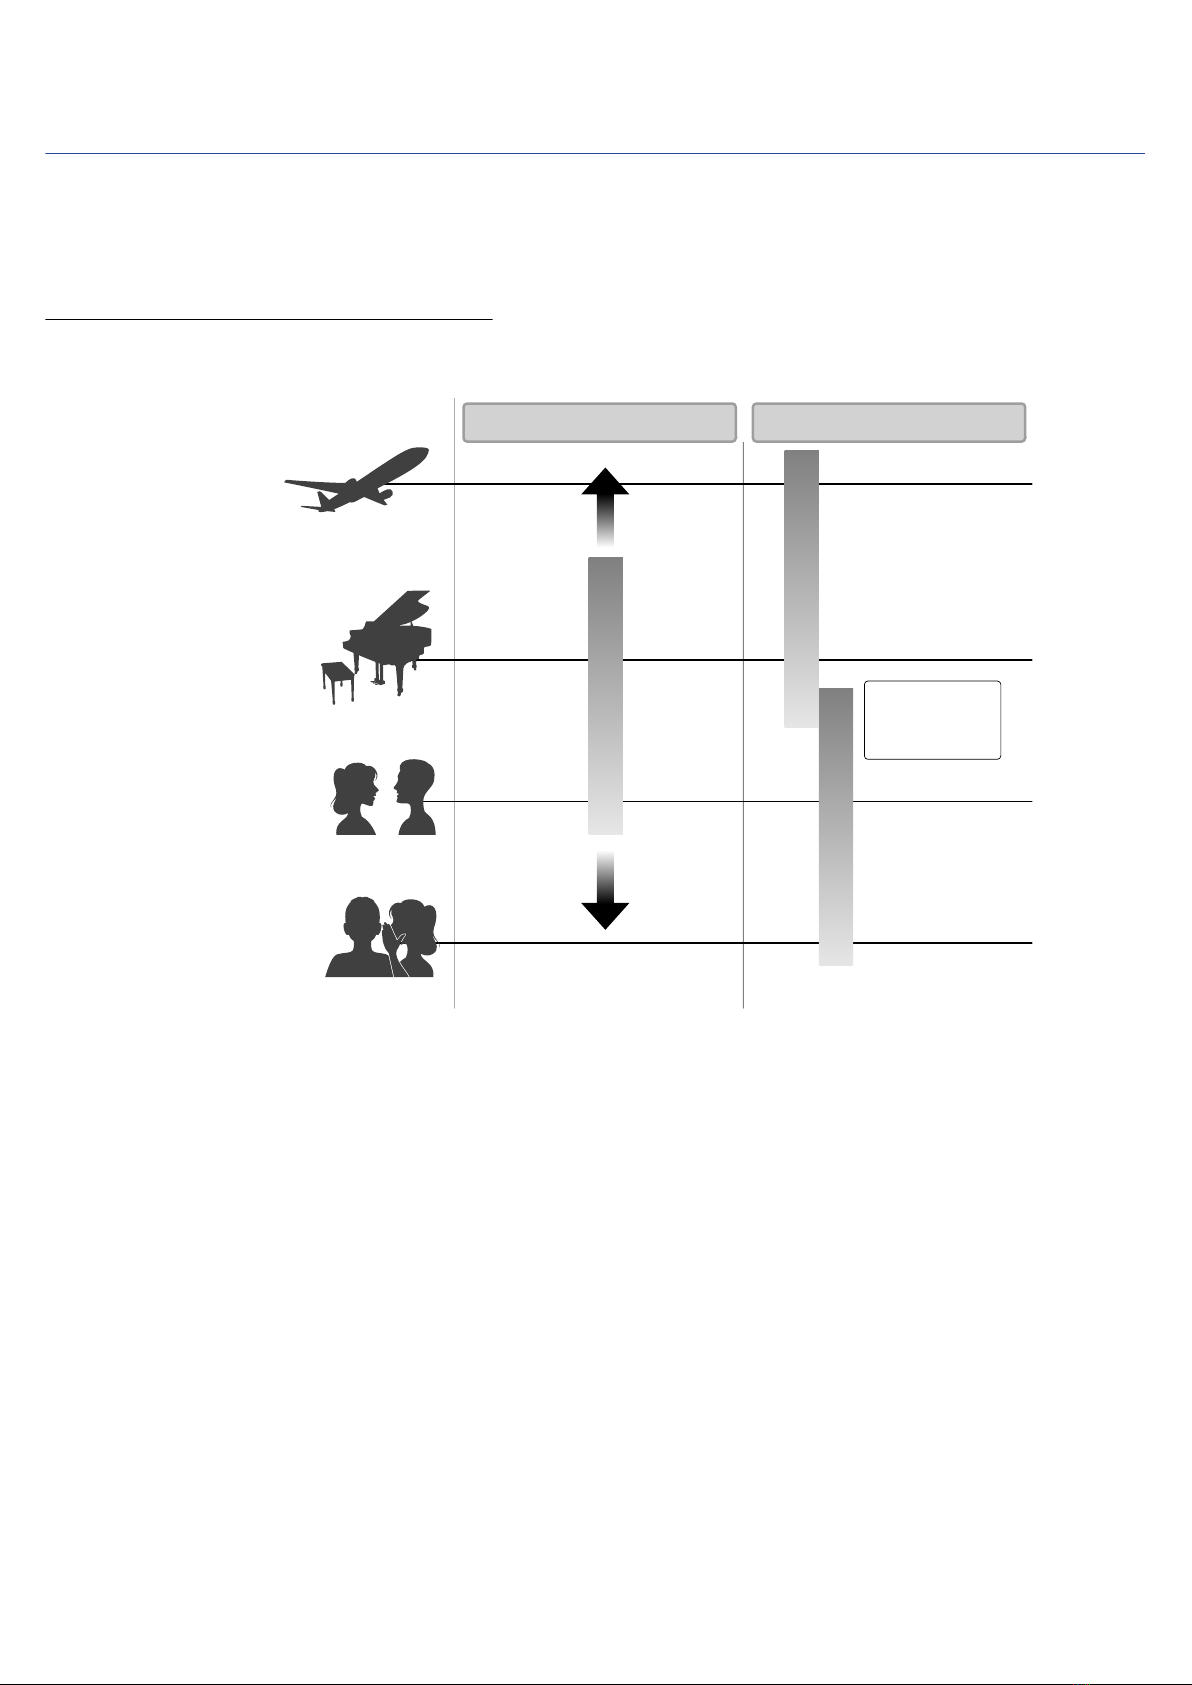
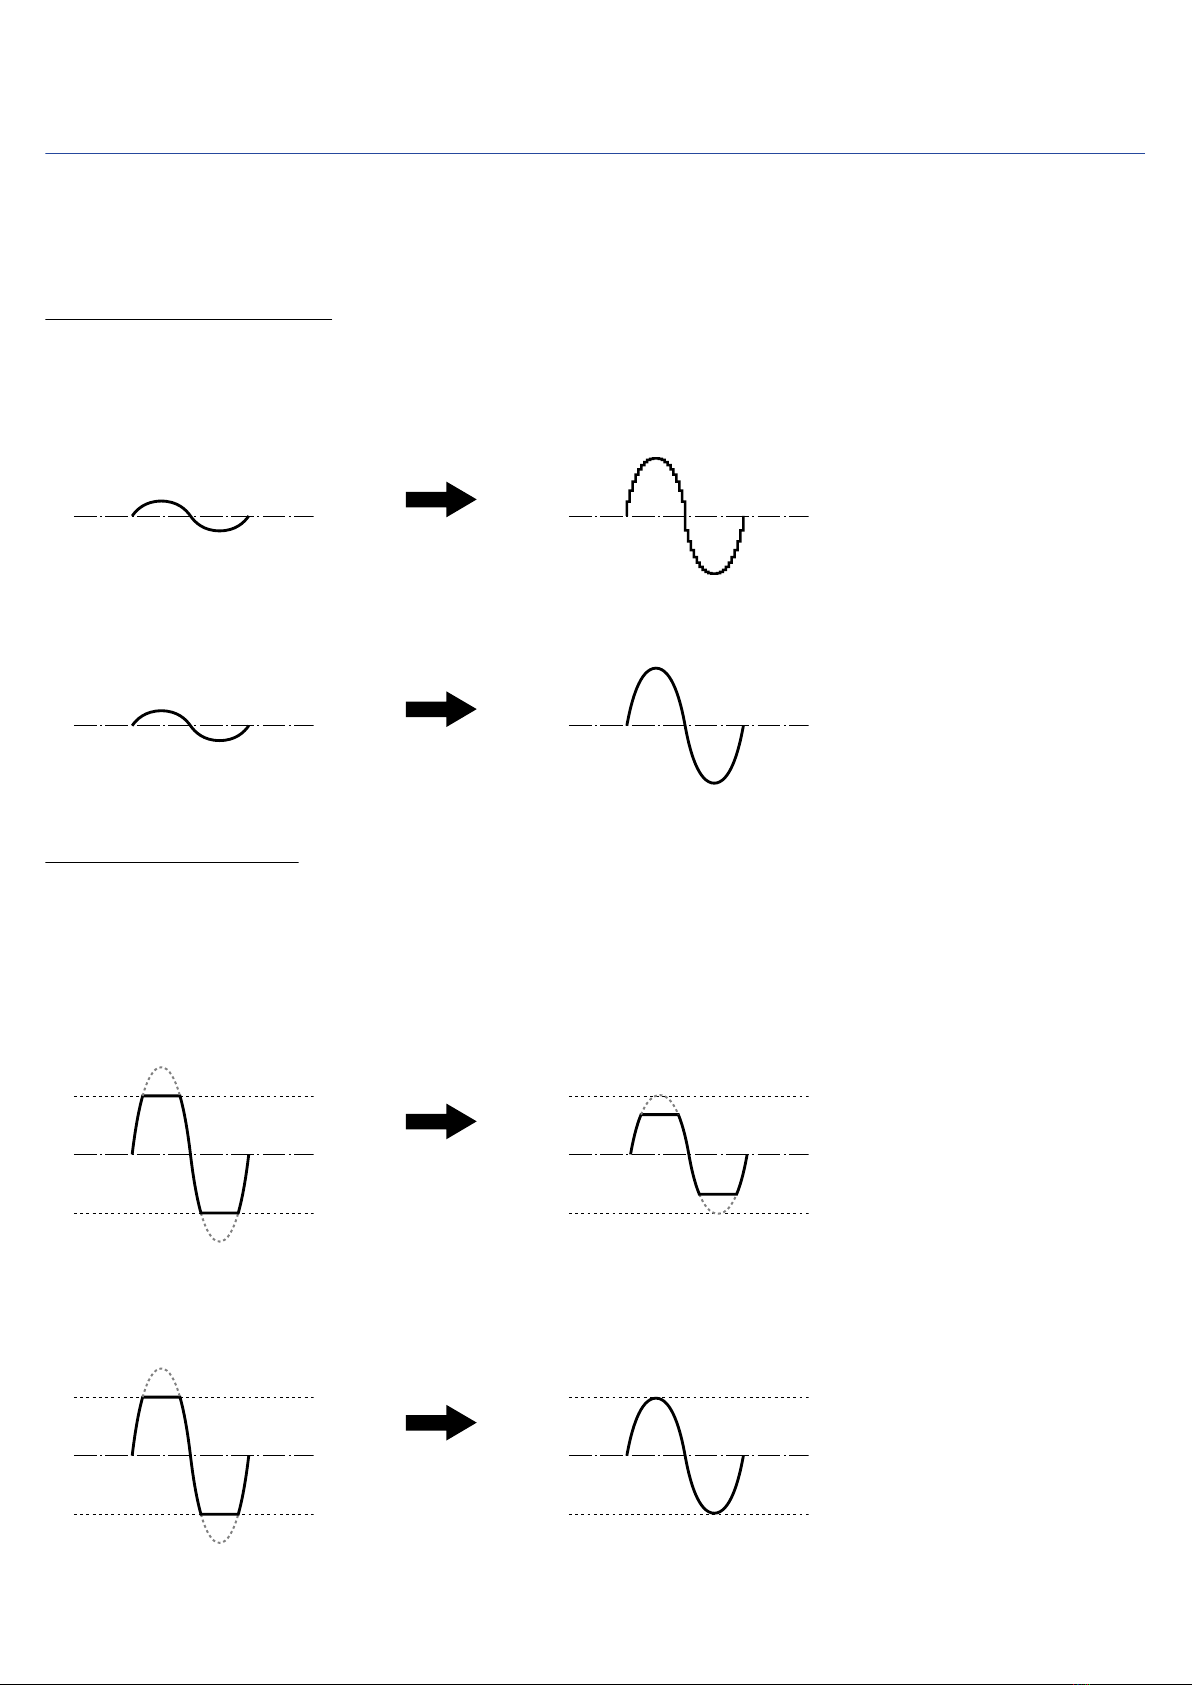
Realizing high audio quality throughout recording and editing.......................................................................... 5
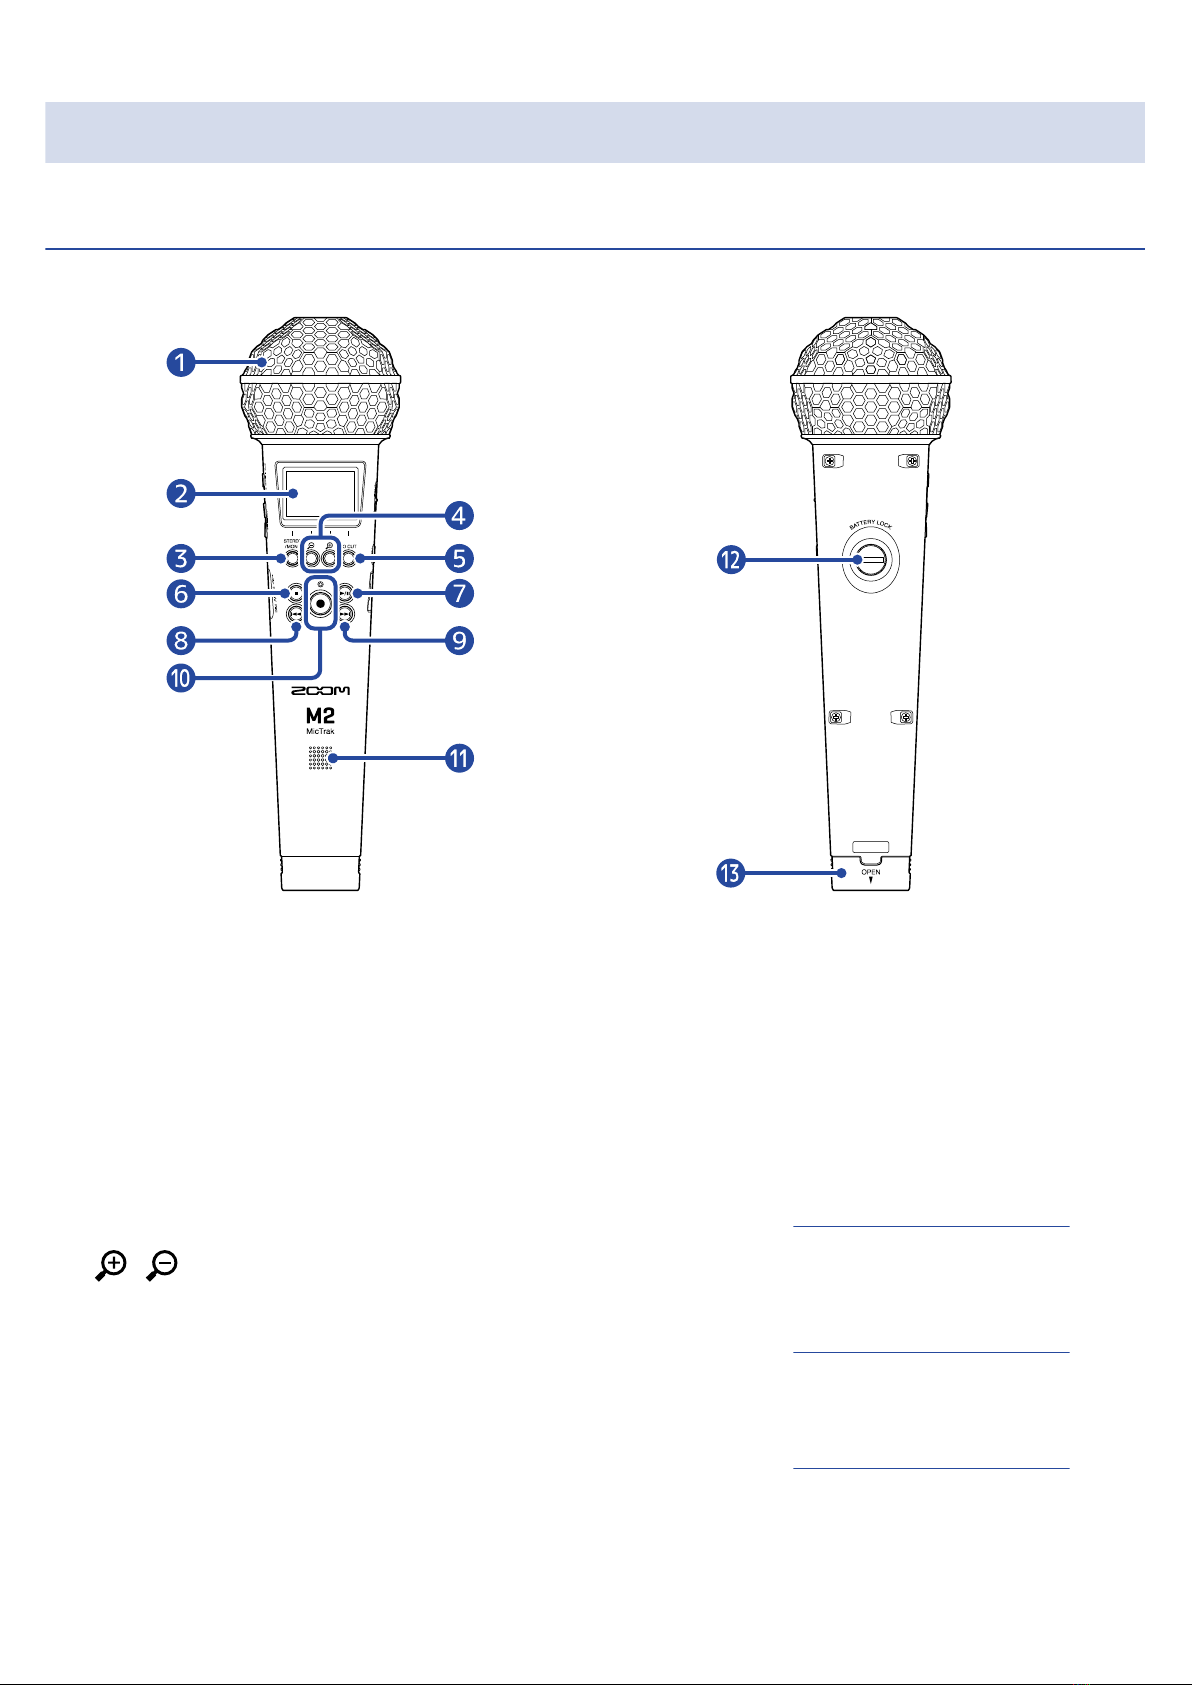
Functions of parts........................................................................................................................................................9
Overview of main screens....................................................................................................................................... 13
Recording process..................................................................................................................................................... 21
Making preparations.................................................................................................................................................22
Inserting microSD cards........................................................................................................................................... 22
Supplying power........................................................................................................................................................ 23
Using the mic holder................................................................................................................................................ 26
Turning the power on/off........................................................................................................................................ 27
Setting the language shown (first time starting up)............................................................................................ 28
Setting the date format (first time starting up)....................................................................................................29
Setting the date and time (first time starting up)................................................................................................30
Setting the type of batteries used (first time starting up).................................................................................. 31
Preventing misoperation (hold function)...............................................................................................................32
Making input settings...............................................................................................................................................33
Changing the stereo/mono setting.........................................................................................................................33
Reducing noise (low-frequency cut)....................................................................................................................... 34
Recording.................................................................................................................................................................... 35
Adjusting the volume display size to make checking easier.............................................................................. 35
Monitoring input and playback sounds.................................................................................................................36
Making recording settings........................................................................................................................................37
Recording.................................................................................................................................................................... 41
Adding marks during recording.............................................................................................................................. 42
Playing recordings..................................................................................................................................................... 43
Adding/deleting marks during playback................................................................................................................46
Using automatic playback volume adjustment.................................................................................................... 47
Managing files............................................................................................................................................................48
M2 folder and file structure.................................................................................................................................... 48
Checking files (FILE LIST Screen).............................................................................................................................51
Deleting files...............................................................................................................................................................53
Optimizing file volume (normalization)..................................................................................................................55
Changing bit depth and exporting files (Export)..................................................................................................56
Checking file information......................................................................................................................................... 58
Using as a USB mic...................................................................................................................................................59
Installing drivers........................................................................................................................................................ 59
Connecting computers, smartphones and tablets.............................................................................................. 60
USB mic muting......................................................................................................................................................... 62
3

Disconnecting from computers, smartphones and tablets................................................................................63
Making USB mic settings..........................................................................................................................................64
Transferring files to computers and other devices............................................................................................. 68
Connecting computers, smartphones and tablets.............................................................................................. 68
Disconnecting from computers, smartphones and tablets................................................................................70
Making various settings........................................................................................................................................... 71
Setting the language shown.................................................................................................................................... 71
Setting the date and time........................................................................................................................................72
Setting the date format............................................................................................................................................74
Setting the display backlight....................................................................................................................................76
Setting the display contrast.....................................................................................................................................78
Setting the type of batteries used..........................................................................................................................79
Setting the time until the power turns off automatically (Auto Power Off)..................................................... 81
Managing microSD cards......................................................................................................................................... 83
Formatting microSD cards....................................................................................................................................... 83
Testing microSD cards..............................................................................................................................................84
Restoring factory default settings.......................................................................................................................... 88
Managing the firmware............................................................................................................................................89
Checking the firmware versions............................................................................................................................. 89
Updating the firmware............................................................................................................................................. 89
Appendix..................................................................................................................................................................... 90
Troubleshooting.........................................................................................................................................................90
Specifications..............................................................................................................................................................92
4

M2 overview
Realizing high audio quality throughout recording and
editing
With dual A/D converter circuits and support for 32-bit float WAV files, the M2 can maintain the highest
audio quality from recording to post-production.
Recording
Dual AD converter circuits enable recording from quiet to loud volumes without any need to make gain
adjustments.
Post-production
Recording with 32-bit float WAV file format allows the recording audio quality to be retained when editing.
5

Dual A/D converter circuit overview
For each input circuit, the M2 has two A/D converters with different input gains. This design enables
high-quality audio recording without the need to adjust gain settings, a step that normally had been
indispensable.
Providing amazing dynamic range
By combining two A/D converters, a wide dynamic range not possible with a single A/D converter has been
realized.
High-gain
AD converter
Low-gain
AD converter
AD converter
switches in
response to
input level
・Airplane
・Nearby thunder
・Train passing on tracks overhead
・Inside train
・Shouting
・Grand piano
・Noisy street
・Chimes
・Ordinary conversation
・Whispering
・Quiet library
・Late night in suburb
Wide dynamic range covered
by two AD converters
Input gain adjusted to
desired recording volume
Dual AD converters
Conventional equipment
6

Switching between two A/D converters
The M2 constantly monitors data from the two A/D converters and automatically selects the one that
provides the best recording results.
Low noise
because high-gain
AD converter selected
Low noise
because high-gain
AD converter selected
No clipping
because low-gain
AD converter selected
7

32-bit float WAV file overview
32-bit float WAV files have the following advantages over conventional 16/24-bit WAV files.
These features enable the quality of the sound during recording to be maintained even during post-
production.
Resolution advantage
32-bit float WAV files have the advantage of being able to maintain high resolution even at low volumes. As
a result, quiet sounds can be made louder when editing after recording without degrading their quality.
■ 16/24-bit WAV
Volume raised
Resolution low
■ 32-bit float WAV
Volume raised
Resolution high
Clipping advantage
If a waveform sounds clipped when output from the M2 or in a DAW, it can be edited after recording to
lower its volume and restore an unclipped waveform because the data in the 32-bit float WAV file itself is
not clipped.
■ 16/24-bit WAV
Clipped recording
Volume lowered
Still clipped
■ 32-bit float WAV
Clipped recording
Volume lowered
Not clipped
8

Functions of parts
Front/back
■ Front ■ Back
❶Built-in XY mic
This stereo mic has two crossing directional mics. This mic can record three-dimensional sound with
natural depth and width.
❷Display
This shows various types of information.
❸STEREO/MONO/operation button
Home Screen: Switch the recording audio format between stereo and mono.
Other screens: Use operation shown by icon at bottom of screen. (→Operation button overview)
❹/ /Operation buttons
Home Screen: Change volume amplification on the display
Other screens: Use operation shown by icon at bottom of screen. (→Operation button overview)
❺LO CUT/operation button
Home Screen: Change LO CUT setting
Other screens: Use operation shown by icon at bottom of screen. (→Operation button overview)
❻STOP button
This stops recording and playback.
9

Press this when playing or paused to close the Playback Screen and open the Home Screen.
❼PLAY/PAUSE button
This starts and pauses playback.
When used as a USB mic, this mutes/unmutes it.
❽REW button
When playing or paused, this will move to the file before the current one, the beginning of the current
file, or the mark before the current position.
Press and hold to search backward.
❾FF button
When playing or paused, this will move to the file or mark after the current one.
Press and hold to search forward.
❿REC button/indicator
This starts recording. The REC indicator lights during recording.
Press when recording or playing to add a mark at that point.
⓫Speaker
Sound is output here during file playback.
If headphones, for example, are connected to the PHONE/LINE OUT jack, audio will not be output from
the speaker.
⓬Battery compartment locking screw
Use this when installing and removing the battery compartment. (→Installing batteries)
⓭Battery compartment
Install batteries here.
To remove the battery compartment, loosen the battery compartment locking screw. (→Installing
batteries)
10

■Operation button overview
When operation icons are shown at the bottom of the Menu Screen and Playback Screen, for example, use
the corresponding operation buttons (which are right below the icons) to select and confirm items on the
screen.
■ Menu Screen example
❶Operation icons
The icons shown depend on the screen.
❷Operation button ( )
Reopen the previous screen.
❸Operation button ( )
Select the item above.
❹Operation button ( )
Select the item below.
❺Operation button ( )
Confirm the selected item.
Other operation icons will also be shown. See the explanations of procedures for each item for details.
■ Abbreviation of procedures in this operation manual
In this operation manual, procedures that involve pressing operation buttons are shown with icons in the
following manner.
Example: Use the buttons that correspond to and to select “Rec Settings”. Then, use the
button that corresponds to to confirm the selected item.
→ Use / to select “Rec Settings” and press to confirm.
11

■ Left and right sides
■ Left side
■ Right side
❶PHONE/LINE OUT jack
This stereo mini jack can be used to output sound to headphones or another device.
❷VOLUME buttons
Use these to adjust the volume of the headphone/built-in speaker.
❸USB port (Type-C)
Connect this to a computer, smartphone or tablet to use this mic as an SD card reader or USB mic. This
supports operation on USB bus power.
❹microSD card slot
Insert a microSD card here.
❺MENU button
This opens the Menu Screen and returns to the Home Screen.
❻POWER/HOLD switch
Use this to turn the power on/off and to disable button operation.
12

Overview of main screens
This section explains the screens that are shown on the M2 display.
Home Screen
This appears on the display when the M2 power is turned on. This shows the state of the M2, including the
recording status and the waveforms of input signals.
❶Status icon
This icon shows the recording status.
• Stopped
• Recording
❷Counter
This shows the available recording time when standing by and the current elapsed recording time
when recording.
❸Remaining battery charge indicator
This is shown when batteries are being used for operation. When the remaining battery charge
becomes low, replace the batteries (→Installing batteries), or connect an AC adapter (→Connecting an
AC adapter) or portable battery (→Using other power sources).
❹Volume/waveform display
This shows the volumes of the signals input to the M2. Waveforms appear during recording.
(→Adjusting the volume display size to make checking easier)
Inputs are shown on the left edge of each volume display.
• L: Built-in XY mic left signal
• R: Built-in XY mic right signal
❺Stereo/mono setting
This shows the current recording format. When STEREO, stereo audio will be recorded. When MONO,
left and right channels will be mixed together and recorded as mono audio. (→Changing the stereo/
mono setting)
13

❻Volume amplification on the display
This shows the amount that the volume is amplified on the display.
Adjust this as necessary so that the volume shown is easy to check. (→Adjusting the volume display
size to make checking easier)
❼LO CUT setting
This shows the LO CUT setting. (→Reducing noise (low-frequency cut))
HINT:
• When a screen other than the Home Screen is open, pressing will open the Home Screen. This
function is useful for returning quickly to the Home Screen from various setting screens. (Returning
directly to the Home Screen is not possible from a few screens.)
• When the Playback Screen or FILE LIST Screen is open, can be pressed to open the Home Screen.
14

Playback Screen
When the Home Screen is open, pressing to start playback will also open this screen.
This screen shows the M2 playback status, including the playback time and recording file waveform.
❶Status icon
Icons shows the playback status.
• Playing back
• Paused
• Searching backward
• Searching forward
❷Playback time
This shows the time elapsed since the start of playback.
❸File length
This shows the length of the file that is currently playing.
❹Remaining battery charge indicator
This is shown when batteries are being used for operation. When the remaining battery charge
becomes low, replace the batteries (→Installing batteries), or connect an AC adapter (→Connecting an
AC adapter) or portable battery (→Using other power sources).
❺Waveform display
This shows the waveforms of the recorded files being played.
The color is inverted for parts of waveforms that have already been played.
Mark positions can also be checked. (→Adding marks during recording, Adding/deleting marks during
playback)
❻Mark bar
Bars show marks added to the file that is playing back.
15

❼Operation icons
By pressing the operation buttons below the corresponding operation icons on the display, the
playback position can be skipped and the screen can be changed. The file can also be deleted or
exported and information about it can be checked. (→ Operation button overview)
HINT:
• Press to stop playback and reopen the Home Screen.
• Press to open the FILE LIST Screen.
16

FILE LIST Screen
Press when the Playback Screen is open to open this screen.
The files on the microSD card will be shown in a list on the display, so the content of the card can be
checked and files can be played and deleted, for example.
❶Status icon
Icons shows the playback status.
• Playing back
• Paused
• Searching backward
• Searching forward
❷Remaining battery charge indicator
This is shown when batteries are being used for operation. When the remaining battery charge
becomes low, replace the batteries (→Installing batteries), or connect an AC adapter (→Connecting an
AC adapter) or portable battery (→Using other power sources).
❸File list
This list shows the files on the microSD card.
The names and lengths of files are shown. A progress bar is shown for the selected file.
When the list has more files than will fit on the display, a scrollbar will appear on the right edge.
❹Operation icons
Files can be selected and deleted by pressing the operation buttons below the corresponding
operation icons on the display. The screen can also be switched. (→Operation button overview)
❺Progress bar
This shows the current playback position.
❻Playback time/file length
When playing or paused, this shows the elapsed time from the start of playback. When stopped, this
shows the file length.
17

Menu Screen
Use the Menu Screen to make various settings, including recording and hardware settings.
❶Menu title
❷Menu items
These include setting items and setting values.
❸Operation icons
By pressing the operation buttons below the corresponding operation icons on the display, menu
items can be selected and selected items can be confirmed. (→ Operation button overview)
❹Remaining battery charge indicator
This is shown when batteries are being used for operation. When the remaining battery charge
becomes low, replace the batteries (→Installing batteries), or connect an AC adapter (→Connecting an
AC adapter) or portable battery (→Using other power sources).
❺Scrollbar
This will appear when the list has more items than will fit on the display.
■Opening the Menu Screen
1. Press .
19

HINT:
When a screen other than the Home Screen is open, pressing will open the Home Screen. This function
is useful for returning quickly to the Home Screen from various setting screens. (Returning directly to the
Home Screen is not possible from a few screens.)
20
Other manuals for MicTrak M2
1
Table of contents
Other Zoom Microphone manuals