Zorlu VAD 955 TXS User manual

COOKER HOOD
USER MANUAL

2
r product.

33

5
0
0
598,898
250
262
Min675 Max1055
83
20400
600
2080
1)
2)
3)
5)
Internal Chimney
External Chimney
Control Panel
Cooker Lighting
Aluminum Cassette Filter
4)
2580
400
500
262
250
20
32
Max 895 Min 512
495
598,898
898
500
80
250
262
80
400
600
20
25
Min 667 Max 1047
500
598,798,898
250
Min 635 Max 915
2080
500
400
20
40
262
4
1
2
3
4
5
1
2
43
5
1
2
3
45
1
2
3
INTRODUCTION OF DEVICE
MODELS
ADB-9010
ADX-9005
VAD 955 TXS
ADX-6005
VAD 655 TXS
ADX-9007
ADX-7007
ADX-6007
ADX-9006
ADX-6006
ADW-9010

*Before you take pot, fry-pan etc. from the hob,
put their lids on.
*Do not leave hot oil on the hob. Pots that have
hot oil in them may cause selfignition.
*Pay attention to curtains and covers during
cooking of meals like frying because oil may
flare up.
*Make sure that filters are changed in
convenience. Filters that are not changed at
appropriate time has risk of causing fire due to
oil that will be gathered on them.
*Do not use filter materials that are not flame
resistant instead of filter.
*Do not operate your product without aluminum
filter; do not remove filters when the product is
on.
*In case of flame, cut power of the product and
the cooking appliances. (Cut power of the
product by plugging it off the socket).
*Your product may cause fire risk if cleaning is
not applied periodically.
*Cut power of the product before maintenance
process. (Cut power of the device by unplugging
it)
*When chimney hood and the appliances
working with energy other than electricity are
operated at the same time, negative pressure in
the room should not be more than 4 Pa (4 x 10
bar)
*If there is an appliance working with fuel or
gaseous fuel at the same place with your hood,
this appliance's exhaust should be isolated from
its volume totally and the appliance should be
hermetic type.
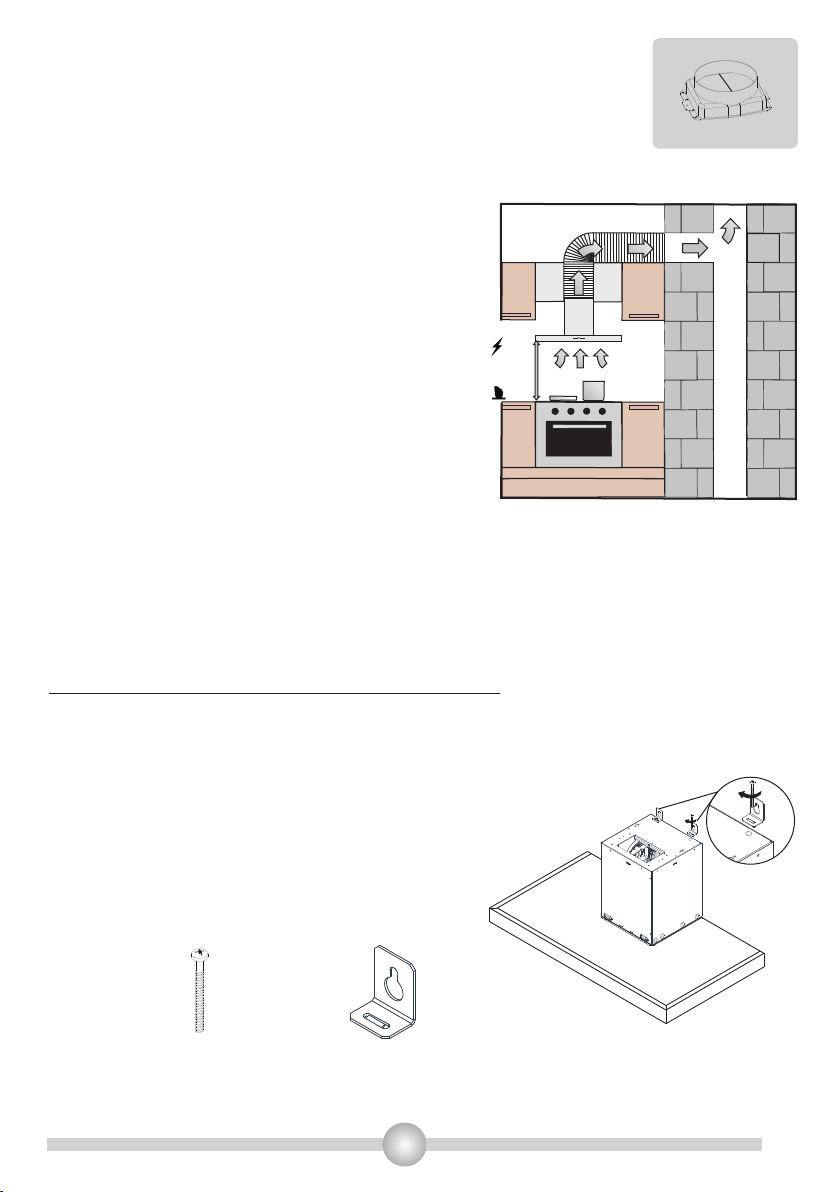
*When chimney connection is applied to your
product, use ducts of 150mm or 120mm
diameter. Duct connection should be as short as
possible and should include few bends.
*This product is designed for usage at home.
*Your products usage voltage is 220-240
Volts~50Hz
*Grounded plug is used at your product's
electric network cable. This cable should
definitely be plugged in a grounded socket.
*All electrical networks should be set by a
qualified electrician.
*Installation applied by unauthorized people
may cause the product to operate at low
performance, damage of the product and
accidents.
*Power supply cable should not be exposed
to press or smash during montage. Network
cordon should not be placed near the
cookers; it may cause fire if it melts.
*Do not plug into the socket before
installation of the product is completed.
*Keep the plug at a reachable place so that
you can unplug it in case of any danger.
*Do not touch the lamps when they are on for
long time. Lamps may hurt your hand as they
will be hot.
*Kitchen cooker hoods are designed for
usage during normal and home-style
cooking. If it is used for other purposes,
failure risk occurs and it will be out of
warranty.
*Follow applicable rules and directions for
passing out outlet air. (This warning is not
valid for usage without chimney.)
*Flaming foods should not be cooked under
the product.
*Start your product after you put pot, fry-pan
etc. on the hob. Otherwise high temperature
may cause some parts of your product to get
deformed.
-5
5
WARNINGS AND SAFETY PRECAUTIONS

*Keep package materials away from
children as they may be dangerous for
them.
*Be sure that your child does not play with
the product. Do not allow kids to use your
product.
*If power supply cable is damaged, this
cable should be changed by its producer or
its service agency or a personnel who is a
specialist at the same level in order to
prevent a dangerous situation.
Warning about Transportation and Carriage
*All the materials used at package of your product are suitable for recycling.
*Please comply with the signs on the product's box during transportation.
*Hold the holders placed at sides of the box in order to carry your product.
If you need transportation;
*Keep the original box.
*Carry your product in its original box; comply with the carrying signs on the product's box.
If there is no original package;
*Do not put heavy material on the chimney hood.
*Keep the external surface from bash.
*Pack your product to avoid damages.
Installation, taking off your product from its package:
*Check if there is any deformation on your product.
*Transportation damages and failures should immediately be reported to the transportation
responsible.
*If you notice any damage please report to the seller.
*Do not allow children to play with packing material!!!
*In case of flame, cut power of the cooker
hood and the cooking appliances, cover the
flame. Never use water in order to
extinguish it.
Use “MAX 6 A” fuse at cooker hood
installment for your security.
“CAUTION: Accessible parts may become hot when used with cooking appliances”
''The appliance is not to be used by children or persons with reduced physical,
sensory or mental capabilities, or lack of experience and knowledge, unless they have
been given supervision or instruction''
6

Standard Accessories
Plastic Outlet (Figure 1)
Plastic outlet mounted to air outlet of the cooker hood
Min.65 cm
Min.75 cm
Place of the Product:
After installation of your product, distance between
range hood and electrical hob should be at least 65
cm and gas hobs at least 75cm. Figure 2
Installation, taking off your product from its package:
*Check if there is any deformation on your product.
*Transportation damages and failures should immediately be reported to the transportation
responsible.
*If you notice any damage please report to the seller.
*Do not allow children to play with packing material!!!
Installing Hanging Bar
There are 2 L shaped hanging bars in to install your product,
provided with screws. Fix bars on product body via M5 x 35
screws into M5 turn screws (Figure 3).
M5 x 35 Ysb
Screws
Hanging bar
Figure 1
Figure 2
Figure 3
7

Installing Plastic Outlet
Install plastic outlet to top of motor cabin via 3,5x9,5 screws
(Figure 4).
3,5 x 9,5 RYSB
Screws
Ø 8 mm
Ø 6 mm
Drilling Mounting Holes
Attach mounting schemeon the wall and drill holes on points
marked as A,B,C via Ø8 mm driller. To install chimney part, use
Ø6 mm driller by taking reference of min./max. height
dimensions .
WARNING : During drilling the hanging holes , please pay attention to the diameter of the
holes to be used for hanging the hood.
If the diameters of hanging holes are not as pointed , the hood can not be assembled properly.
Hood Hanging
Holes
Ø 8 mm
Outlet Connection
Holes
Ø 6 mm
A
B
C
D
E
Nailing Dowels
Nail Ø10 mm dowels into A,B,C holes drilled as Ø8 mm.
Place Ø6 mm dowels on two holes, drilled as Ø6 mm
(Figure 5)
for 60-70-90cm models, drill holes on points marked as
G,H and nail Ø10 mm dowels into it.
10 mm Plastic
dowel
6 mm Plastic
dowel
Figure 4
Figure 5
8

A
B
C
D
E
Chimney Fixing Bar Screws;
Drill holes on the wall via Ø6 mm driller. Fix the chimney fixing
bar via 3,9 x 22 Ysb screws on Ø6 mm plastic dowels.
Drill holes on the wall via Ø10 mm driller. Fix 2 pcs of 5,5 x 60
Ysb screws onA,B points on Ø10 mm plastic dowels.
The distance between the wall and screw top should be 5mm.
Figure 6
5,5 x 60 Ysb
Screw
3,9 x 22 Ysb
Screw
Placing Range Hood on The Wall
Hang L shaped hanging bars on Aand B points (Figure 7)
A
B
DE
DE
A
B
Note: You may fine tune parallelism by easing M5 screws on
the top.
Tighten the Hanging Screws:
Tighten screws after hanging to fix your product via
screwdriver. You may use the M5x40Ysb screws to have fine
tune parallelism of hood. Figure 8
Figure 6
Figure 7
Figure 8
9

C
C
Tighten the Hanging Screws:
Fix product onto wall from point C with 5,5x60 Ysb screw in
order to ensure your product is safely installed. Figure 9
Installing Aluminum Flexible Pipe:
Connect aluminum flexible pipe to outlets on the product
and kitchen wall.
Please make sure that this connection is strong enough not
to break when the hood is on in the highest level. Figure 11
Figure 9
Figure 11
Fix product onto wall from point G,H with 5,5x60 screws
in order to ensure your product is safely installed. Figure
10
G - H
Figure 10
10
3112-3125-3130-3178 models / 60-70-90cm models;

D
E
External
chimney
Internal
chimney
3,5 x 9,5 RYSB
Nickel Screw
Installing the External Chimney:
Place internal chimney into external chimney. Place
chimneys to motor box and push it downward. Make
sure that the connection between the body and motor
box is so tight.Figure 12
Installing internal chimney
Pull internal chimney upwards through the external
chimney. Fix the chimney with 3,5 x 9,5 nickel
covered screws.Figure 13
After complete the installing the hood, please check all the connections before operate it.
Please take off the protective folio from you product.
Figure 12
Figure 13
11

Replacing the Lamps
Cut off the connection of the cooker hood with electricity. Take off the aluminum cassette filter.
Take off the failed lamp and replace it with a new one that is of the same rating. (Please wait for the
lamps to cool as they might hurt your hand.)
Replacing 50W Halogen Lamp
In order to change halogen lamps, take the lamp downwards
pushing back of lamp holder downwards and then turning it a
little bit anti-clockwise take it off downwards. Figure 14
Replacing 20 W Lamps
In order to replace halogen lamps, hold one lamp, as shown
in and turn it to left tor right. Bring the lamp pin in the same
line with socket and pull towards yourself.Remove glass
cover as shown in Picture with an object, which would not
scratch product's surface . To remove pull the faulty lamp
down, and replace with a new one. Figure 15
Functions of the Product
Your hood is compatible for use with our without chimney.
Usage with chimney
The product should be connected to a chimney that will direct the air out during usage with
chimney. In order to achieve best performance, pay attention that the duct system follows the
shortest way for connection to the chimney. Your product is produced as it will be appropriate for
usage with chimney.
Attention!!!
Outlet of the product should not be connected to air canals that have other smoke as well.
Active Carbon Filter
To provide air recirculation where product's chimney air outlet cannot be connected to exterior,
it is necessary to use active carbon filter with your product. You may purchase this accessory
from authorized sellers and after sales services
Figure 15
Figure 14
12

5
13
speed switch
Lamp switch
CONTROL PANEL USE
After installation, remove the protective plastic film from the metal panels.
Product has 5-speed motor. Low-mid-high levels can be selected according to the cooking
fume intensity. Push pull knob controlling the motor is located on the front panel. As the
knob is rotatedclockwise, the desired fan speed can be selected. The levels can be seen
ondisplay screen. There is a button to control the lighting function, as the button is pushed
the cooktop lightening switches on.
As the light switch is pushed once, the cooktop lightening will be active. As the light switch
is pushed and hold more than 1 sec the mood lighting, which is located on front panel, will
be active. After the cooking process is completed leave the product on for a while, then
thecooking fume and smell residue disappears
Speed adjustment
Lighting panel use:

Illumination
The product has 2 lamps and one lamp button to operate illumination. Press lamp button in
order to start illumination.
Usage of 5 Speed Digital Control
Usage
Remove protective folio on the inox product after installation.
Speed Selection The product has 5 speeds of ventilation level. One of 1,2,3,4,5 speeds is
selected in accordance with steam of cooking or fry. Motor is started pressing control button
on the front panel. Speed is increased pressing button, and decreased by pressing button.
Automatic timer (TIMER) is available at the models with electronic remote control. When you press
button more than 2 seconds, timer function will be on for 15 minutes. When the timer is on,
Display will signal and the motor will be off automatically 15 minutes later. Please use the cooker
and the product at the same time to enable circulation. Doing so, air suction power will be affected
positively. We recommend you to operate your product for few minutes more after the cooking is
completed to enable absorption rest of smell and steam.
Cleaning Periods of the Aluminum Filters:
Filters should be cleaned when C signal appears on Display or (according to usage) each 2-3
weeks. In order to remove C signal, after the filters are cleaned and replaced to their place, press
button more than 3 seconds (when the product is at off position). Letter “E” will appear on
Display and the product will operate as normal. If you would like to continue using the product
without deleting C signal, when you press the button active speed will appear for
1 second, then C signal will appear once more and the motor will continue operating.
NOTE: C signal will appear after usage of the product for 60 hours.
5
Auto
14

Figure 16
15
Carbon Filter Usage
Your product is compatible with two types of carbon filters.
You may see following information on how to use carbon filters.
Before installing or replacing carbon filter, first you should cut your product's power off.Carbon
filters should be replaced with a new one each 3-5 months because it is used at kitchens that does
not have chimney outlet.
Carbon filter should never be washed.
Grease filters should be installed on the product even when carbon filter is not in use. Do not use
your product without grease filter.
Replacing Carbon Filter
It is necessary to install 2 carbon filters to your product.
To place the carbon filter, place your filter on connection channels on motor and turn it
clockwise.In order to remove filter, turn it anti-clockwise. Figure 17

Feeding Voltage 220-240 V 50Hz
Motor Isolation Class
Isolation Class
F
CLASS I
16
Illumination
Your product has one lamp and a buton to control illumination. Press on lamp button in order
to start illumination.
Button Positions
TECHNICAL SPECIFICATIONS
Usage of the Control Panel
Speed Selection:
Your product has 3 ventilation speed level. Depending on the cooking and frying steam , you may
use your device with low- medium or high speed.
To operate product, press on motor control buttons on the front panel. Press on button on the
control panel to switch the device off. It is advised to run the device and the hob simultaniously so
that an air flow could be formed. With this method , the absorbtion power will be affected
positively. Keep your hood on for a some longer to ensure odour and steam is absorbed.

Peel protective papers out from the inox devices after assembly.
Speed Choice
The device has 3 degrees of ventilation. According to the cooking and frying steam, you can
choose low-middle-high ventilation levels. Buttons on the front panel are used for turning the
device on. The models with eletronic controllers have automatic timers. 15 minutes automatic
timer is turned on, when pressed any of the buttons, which starts the motor up, more than 2
seconds. When timer starts, display will signal and after 15 minutes motor will automaticly stop.
Please turn on hob and hood at the same time to activate circulation. This will provide positive
effect on vacuum power. Let the device run for a while after cooking process is finalised, thus the
remaining smell and steam will be absorbed.
Cleaning Periods of Aluminum Filter
Filter should be cleaned when “C” signal appears on the Display or each 2-3 weeks (in accordance
with the usage frequency). After cleaning and replacing filters to their places, button should be
pressed for more than 3 seconds (when the product is off) in order to remove the “C” signal. “E”
signal will appear on Display and product will start working at normal position. If you want to
continue using your product without removing “C” signal, active speed will appear for 1 second
when you press
button, then “C” signal will appear once more and the motor will continue operating.
Illumination
The product has 2 lamps and one lamp button to operate illumination. Press lamp button in
order to start illumination.
3
17
Usage of 3 Speed Digital Control

Efficient Ventilation
In order to ensure correct ventilation, keep your kitchen windows closed.
IMPORTANT NOTE
Please pay attention when the product is operated at the same time with a product which operates
using air and fuel (for instance; heater, water heater etc. which operates using gas, diesel fuel,
coal or wood), since cooker hood may affect burning negatively as it directs the air out.
This warning is not valid for usage without chimney.
Washable Aluminum
Cassette Filter
18
MAINTENANCE
*Disconnect electricity connection before maintenance and
cleaning process.
*Aluminum cassette filter holds the dust and the oil in the air.
*Metal filter should be washed once in a month with hot and
soaped water or, if possible, at dishwasher (60C).
*Take off aluminum cassette filter pressing on springy
latches on end point. After cleaning, do not replace before it
dries.
*Outer surface of the cooker hood should be wiped with a
wet cloth that is wetted with water or alcohol.
*Please avoid contact of electronic parts with water or
similar materials.
*Using Inox cleaning and maintenance products available in
the market will help your product to perform longer.
Warning: Aluminum filters may be washed in the
dishwasher. Color of aluminum filters may change after
several washings. This is normal and it is not necessary to
change the filters.

If the product does not work:
Before you contact the technical service:
Make sure that the product is plugged in and the electric fuse of the electric wiring is running. Do
not take any action that will damage the product. Before you contact with technical service, check
your cooker hood according to Table 1. If the problem goes on, contact the seller or the most
authorized service.
Check electric connection(Voltage of the
electric network should be between 220-240V,
cooker hood should be connected to grounded
Check motor switch (Motor switch should be at
on position)
Check motor switch (Motor switch should be at
on position)
Check aluminum filter(Aluminum Cassette
Filter should be washed once a month at
normal
conditions.)
Check lamps(Lamps should be firm.)
Check outlet (Outlet should be open)
Check Carbon Filter (Carbon filter should be
replaced with a new one each 2-3 months at the
models wit h Carbo n Filter at n ormal
conditions)
Cooker-hood does not work
Illumination Lamp does not work
Cooker-hoods air suction is weak
Cooker-hood does not direct air out
(at places without chimney)
In order to use the cooker hood efficiently;
*Use ducts of 150/120mm diameter and as few bends as possible when you make the chimney
connection.
*Pay attention to aluminum filters' cleaning periods and changing periods of carbon filters.
*Use the product at middle speed if high suction power is not necessary.
* In order to ensure that ventilation occurs correctly, windows of the kitchen should be kept
19

20
This manual suits for next models
8
Table of contents
Other Zorlu Ventilation Hood manuals
Popular Ventilation Hood manuals by other brands

VentAHood
VentAHood Ventilation Hood Models Equipped with K250... installation instructions

German pool
German pool RHS 6328 user manual

Concept2
Concept2 POK 4190 instruction manual

Concept2
Concept2 OPK5490bc manual

VentAHood
VentAHood AH12 installation instructions

Universal Blue
Universal Blue UCEXTCC-18 instruction manual

Concept2
Concept2 OPK 3260n manual

Turboair
Turboair Diva Instruction on mounting and use

VentAHood
VentAHood WALL MOUNT HOOD installation instructions

ROROS HETTA
ROROS HETTA SENSE User instructions

Range Master
Range Master 61000 Series instructions

System air
System air Villavent F251-17 installation, user and maintenance instructions