Zumimall G4K User manual

®
ZUMIMALL
Get Smarter About Your Security
4G LTE Security Camera
QUICK START GUIDE

Brand Story
Founded in 2008, Zumimall focuses on the design and
research of intelligent security technology. Zumimall insists on
taking consumer needs as its core and strives to create smart
home products that lead a global home fashion trend for
consumers. Zumimall believes that craftsmanship creates top
quality and technology changes life. With high-quality products
and first-class service, Zumimall won the love and trust of
millions of customers as soon as it went public. Over the years,
Zumimall has served 45 continents of America, covering 80%
of the population. Zumimall is the provider of a smart lifestyle
and a guardian of the wonderful moments of your life.
Scan "zumimall" QR code to
purchase products
Follow @zumimalloffice on
Facebook
回 @zumimall
囹 @zumimalloffice
回 @zumimallcam
回 @zumimallcamera

What's in the Box?
Camera
Solar Panel
Bracket
SIM Card
Camera
Bracket
Screw Bag
SIM Card
Tweezers
Charging
Cable
Solar Panel
Product
Manual
2

Camera Introduction
Antenna
Built-in PIR Sensor
Spotlight
Lens
Microphone
Reset Key
Power Key
SD Card Clot
Nano SIM Clot
Charging Port
Speaker
Working LED
Charging LED
Power Key
Press and hold the power button for 5 seconds to turn on the
camera
Reset Key
Press and hold RESET for 5 seconds to reset the device (if you
have modified the settings, they will revert to the factory default
settings)
SD Card Slot
Support local SD card storage (up to 128G)
El ___________________________

SIM Card Slot
Support Nona SIM Card
Lens
Support FHD resolution
Power Light
Red means charging is in progress Blue means charging is
complete
Microphone
Capture sound for your videos
PIR Sensor
Can detect moving objects up to 10 meters away
Working
Status Light
Red light continuously on: camera network abnormal
Red light flashing : waiting for network connection
Red and blue lights flash alternately: SIM card recognition failed
Blue light flashing slowly: SIM card recognition is successful
Speaker
Two-way voice call sound output
Charge Port
Use 5V/2A power supply to charge the camera
Thumb Screw
For fixing the camera and the bottom bracket
Antenna
4G dedicated signal antenna
Download and Register APP
l.Download "ZUMIMALL" APP
Search "zun "in App Store or Google Play, or scan the QR code
below to download and install it on your smartphone.

2.APP Permission Settings
When using the application for the first time, please turn on the
following 2 permissions.
Allow ■ ZUMIMALL" to access mobile cellular data and WLAN, otherwise you
will not be able to add devices.
Allow" ZUMIMALL" to receive messages, otherwise the phone will not receive
alert push notifications when motion detection or audible alerts are triggered.
* The following is a screenshot of IOS cell phone operation, Android cell phone
permissions open method is basically the same as this method.
3.Register Account
New users must register by email, the concrete steps are as follows:
• Click on "Register";
• Follow the steps to complete your account registration;
• Login.
5 ______________________________________________________

Tip: O Please use the correct e-maiL
Q Please select the correct country code.
❸ When registering for a new account, please select the region where
you are actually located.
(Cameras cannot be shared between different registration regions.)
Choice SIM card
l.A SIM card is included in the camera box, and
this card supports the major carrier networks in
your country.
Note:
It has the advantages of easy installation and use, fast and convenient
data recharge, strong network compatibility, strong 4G signal, strong
compatibility with the camera, no need to sign an agreement with the
operator, etc. It is recommended for you to use it.
________This SIM card is only compatible with this camera, please do not insert
it into a smartphone or other electronic products.
2.lf you need to configure a SIM card of a local
operator, please refer to the following list to
choose:
Contraries
Recommended Carriers
3/4G Frequency Bands Supported
by the Camera
United States
Verizon/AT&T/T-Mobile
LTE-FDD: B2/B4/B5/B!2/B13/B14/B66/B71
WCDMA: B2/B4/B5
Unites Kingdom
O2/Vodafone/EE/Three
LTE-FDD:Bl/B3/B5/B7/B8/B20/B28
LTE-TDD: B38/B40
WCDMA:B1/B5/B8
Germany
Telekom/Vodafone/Telef6nica
France
Orange/ Bouygue/ SFR/Free
Other Countries
of Europe
Choose from local mainstream
operators
6

Note:
• The camera does not guarantee the compatibility of the SIM cards of carriers
other than those listed in the above list, please choose carefully. The camera
only uses data traffic and will not use services such as calls/texts.
• Some cards have a PIN code that you can disable first with your smartphone.
Do not insert an IOT or M2M SIM card into your smartphone.
• Cameras purchased in this country cannot be used in other countries because
of different 4G frequency bands. Cameras purchased in Europe are supported
by the countries marked on the SIM card manual.
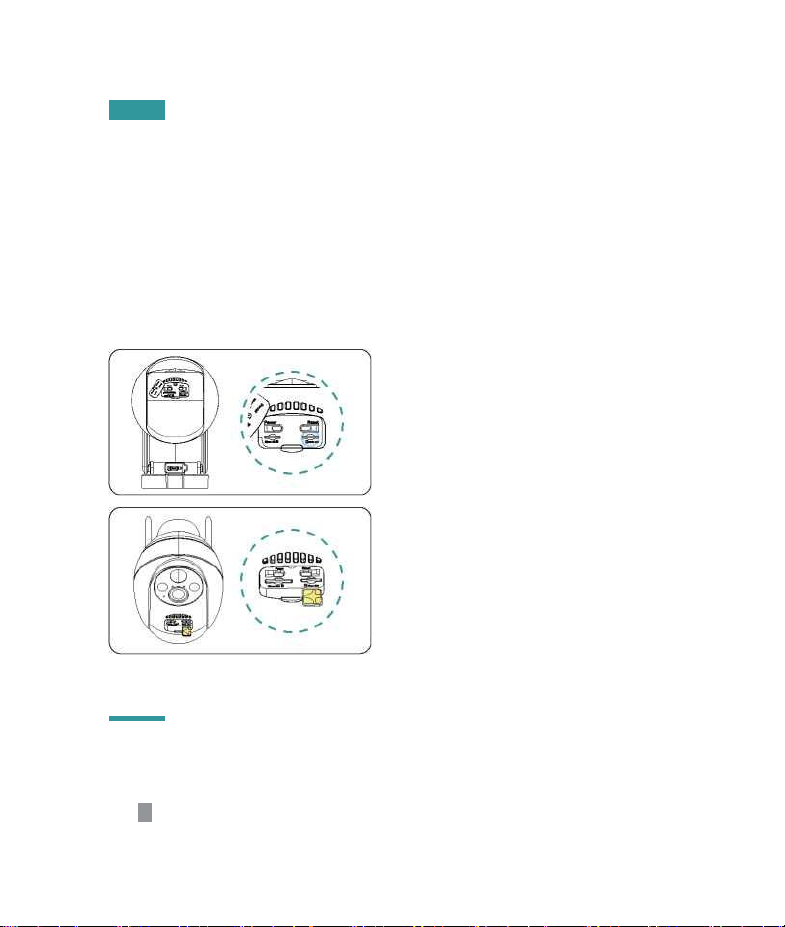
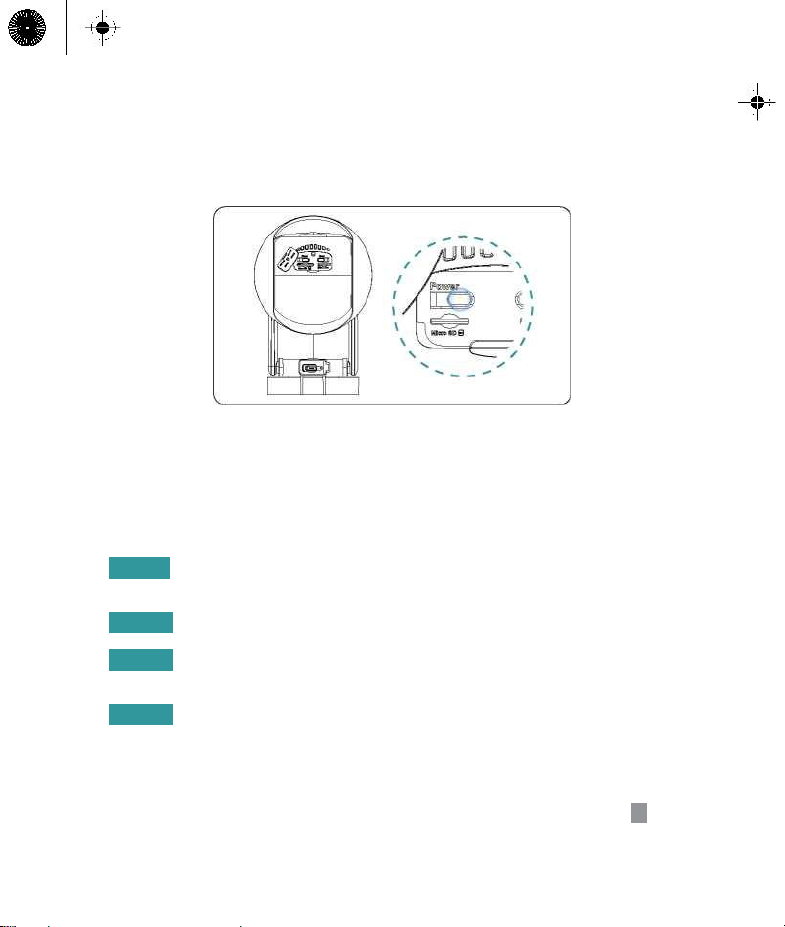
Insert the SIM Card
The SIM card slot is located in the
rubber cover under the camera lens,
please remove the rubber cover first.
When choosing a Nona SIM card to insert
it into the SIM card slot, please
remember: the side with the gold contacts
is facing up, and you need to push the
trimmed notch into the SIM card slot and
press it all the way in.
If it is difficult to operate, please use the SIM card tweezers in the camera box.
Note:
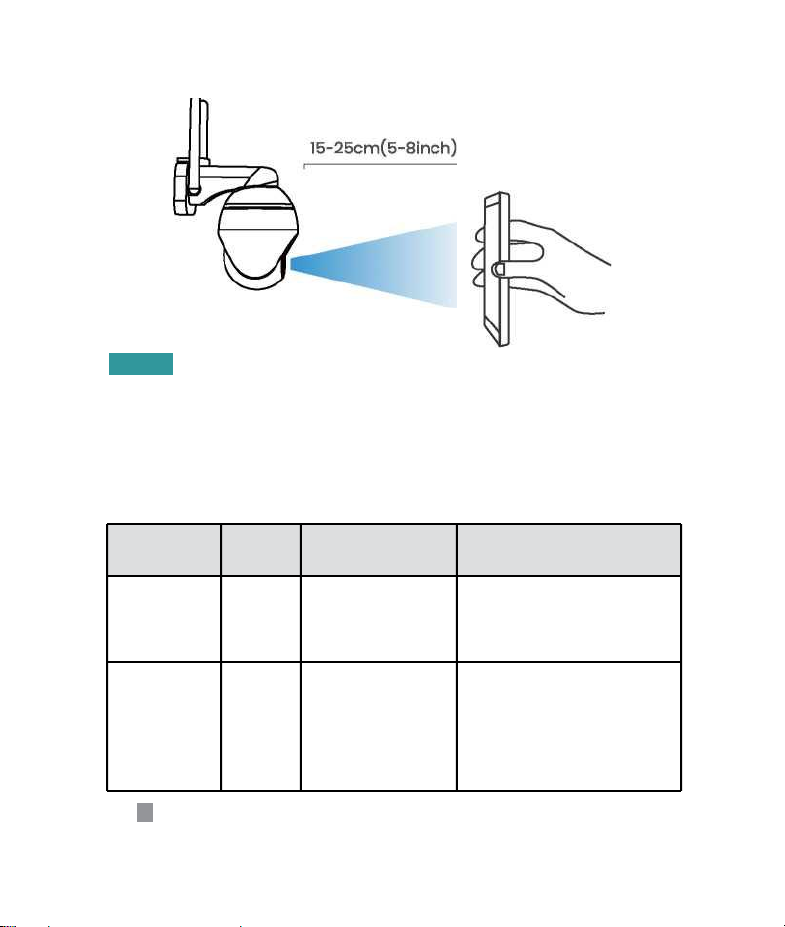
________Do not insert the SIM card into the card slot backwards.
It will cause the SIM card not to be recognized, and the SIM card will
be stuck inside and cannot be pulled out.
7 ____________________________________________________________

Power On the Camera
After inserting the SIM card, press and hold the power button of
the camera for 3 seconds until the working indicator on the side of
the lens lights up in red, then let go.
Wait for about 30 seconds until the working indicator turns blue light
flashing, you will hear the voice prompt "Waiting to connect", which
means the camera has successfully connected to the 4G network,
and the next step is to add the camera in the APP.
Add the Camera On the Phone
Stepl: Move the camera and smartphone to a location with a good mobile
network signal, and make sure there are no signal interferes around.
Step2: Run the" ZUMIMALL" application, click Q and select "4G Camera".
Step3: Follow the prompts to ensure that that the camera has been inserted
into the SIM card and turned on (the indicator light turns blue and flashes).
Step4: Aim the QR code of the mobile phone directly at the camera lens.
Keep ◦ distance of 15-25 cm(5-8 inch) and do not move. After hearing the "Bugu"
sound from the camera until the QR code is successfully recognized,
click the "Hear the sound" button .
8

Step5: After you click "Hear the sound", the camera will start connecting to
smartphone. Once the connection is complete, the app will jump to the "Device
Found!" page where you can edit the camera name, and then click "Done".
Please read the installation instructions of the camera carefully.
When installing the camera later, it can help you avoid some wrong operations.
Add failed?
Please refer to the following to resolve the
issues:
Camera voice
prompt
Working
light
status
Camera status
Solutions
Wait for connection
timeout
Indicator light
off
If the network is not
configured for a long time,
the device will
automatically sleep
Press the power button to restart
SIM card not found
The red and
blue lights
flash
alternately
and then turn
off
The camera does not
recognize this SIM card
1. Check whether the SIM card is
inserted in the correct direction
2. Check whether the SIM card is not
fully inserted, and reinsert it
9 ______________________________________________________

SIM card cannot be
used
Red and blue
lights flash
alternately
Camera cannot register
to carrier network
1. Please check whether the SIM card
has a PIN code, insert the SIM card
into the mobile phone and disable the
PIN (do not insert the camera's own
SIM card into the mobile phone).
2. Check whether your SIM card has
been activated, if not, please contact
the operator to activate the SIM card
(the camera comes with a SIM card,
please contact the brand's customer
service staff).
3. Check if your SIM card data is
sufficient
4. The signal may be weak at the
current location, please move the
camera to a position with better signal.
No LTE signal
Red light
keeps
flashing
SIM card has no data
plan or 4G signal
difference
1. Please check if your SIM card's data
plan is available
2. The current 4G signal is weak,
please move the camera to a better
signal location, or replace the SIM card
APN not matched
Red and blue
lights flash
alternately
The camera is not
compatible with the APN of
the SIM card
Please import the APN of the SIM card
into the camera in the APP (for details,
please refer to the following content)
Note: If you try to add a camera several times and still fail, please contact the
brand's customer service staff for help.
APN Settings
• Only using the local SIM card, there is a probability that the APN cannot be
recognized. You need to manually import APN information to the camera.
• When the camera plays the voice of "Unrecognized APN", add a page of "4G
camera" in the APP, click "Blinking red and blue lights" -> select "Enter current
SIM card APN information" to enter the APN setting page.
10

• Just enter the
corresponding information in
the first three columns "MCC;
"MNC" and "APN". If you do
not know the APN
information of the SIM card,
please consult the card
operator for assistance. Or
insert the SIM card into the
smart phone and obtain APN
information in the phone
system After successfully
importing the APN, please
re-add the 4G camera.
Charge the Camera
It is recommended to fully charge the camera battery
before installing the camera outdoors.
Charge the camera with a
standard and high-quality 5V
power adapter (not included).
Use the solar panel to charge
the camera.
Charging indicator (at the top left of the lens):
• Red LED: Charging
• Blue LED: Charging completed
11 _________________________________________________________________________________________________________

Note:
Safety Reminder:
_______For better weather resistance, insert the charging port of the solar
panel into the rubber plug, and the rubber plug fully covers the charging port.
Oln order to avoid frequent alarms and rapid
battery consumption, do not point the
camera directly at the road or in crowded
places.
OMake sure there are no reflections
within 5 feet (1.5 meters) of the PIR
sensor, otherwise it will interfere with the
normal function of the sensor.
Oln order to better connect the 4G networl^it is
recommended to install the antenna upward or horizontally.
O Install the camera 2-3 meters(7-1 Oft) above the ground.
This height maximizes the detection range of the PIR motion sensor.
ODo not place the camera exactly in the direction of the intruder's movement
The angle formed by the connection between the PIR sensor and the intruder
and the intruder's walking route must be greater than 20 degrees.
Do not use a non-5V power adapter to charge the
camera, and do not charge near fire and heaters. If the battery emits odor, heat,
deformation and other abnormal conditions during the charging process,
please stop charging or use it immediately.
Install the Camera
Notes before installation:
O In order to ensure that the camera can obtain
a good network signal, please install the
camera
in a location with good signal and no signal
interference
©For outdoor use, the camera must be installed
forward for better waterproof performance and
better PIR motion sensor efficiency
0ln order to ensure better waterproof performance,
after installation, please ensure that all rubber plugs
on the surface of the camera are covered

Note: As shown in the picture, the red dotted line is the usual intrusion path
of the intruder, then point A is the best installation location for the camera, if it is
installed at point B, it may cause a missed alarm.
• Installation Step:
Use Power Drill and two
screws to fix the camera
bracket on t he wall. It is
recommended that the bracket be 7-
10 ft above the ground (2-3 meters)
Step2: Clip the camera base into
the bracket from top to bottom, and
the installation is completed.
Note: To remove the camera from the wall, press the snap position under the
bracket with your finger, and then pull out the camera.
• Install the Solar Panel:
Please use the plastic brackets and screws included in the box to install
the solar panel.
Stepl: Use Power Drill and two
screws to fix the camera bracket on t
he wall. It is recommended that the
bracket be 7-10 ft above the ground
(2-3 meters)
13 ____________________________________________________________________

Note: In order to obtain the best charging efficiency, the solar panel must be
installed in a location with sufficient sunlight (it is recommended that there be
no light shielding around), and the daily light time can be guaranteed to be
more than 4 hours.
Step2: Align the screw cap of the
bracket with the screw hole on the
back of the solar panel and rotate it
clockwise to fix it.
Step3: Adjust the angle of the solar
panel according to the actual
environment, and ensure that the front
of the panel is facing up (45° angle is
the best inclination angle).
Step4: Unplug the rubber plug on
the surface of the camera charging
port, insert the solar panel charging
head through the hole on the rubber
plug, and then insert it into the camera
charging port correctly.
Step5: For better waterproof
performance, please cover the
charging port completely with the
rubber plug.
14
Table of contents
Other Zumimall Digital Camera manuals
Popular Digital Camera manuals by other brands

Samsung
Samsung EVNX200ZBSBUS user manual

Concord Camera
Concord Camera Eye Q Duo 1.3 Mega Pixels Camera quick start guide

Olympus
Olympus CAMEDIA C-5000 Zoom Reference manual

SCS Sentinel
SCS Sentinel WifiCam 720 Installation and user manual

Basler
Basler A600f User's manual supplement

Samsung
Samsung SCB-4000(P) user manual