Zumimall GX3K User manual

WIRELESS I WIFI I OUTDOOR I SECURITY
GX3K
BATTERY POWERED CAMERA
FCC ID:2AZL7-ZS-GX1S
Get Smarter About Your Security
QUICK START GUIDE

Thanks for your shopping and trust.
We have been optimizing our products and improve our lifetime
customer service to offer you a better shopping experience. If you have
any problems, please feel free to send us an E-mail. We will solve your
problems within 24 hours. In addition, your advice or suggestions will be
much appreciated and welcomed.
Register via link below to get 3 Years Warranty Extension.
https://bit.ly/3Oqu840
Product Service
Email: [email protected]
Distributor: [email protected]
More About Us
Web: www.zumimall.com
Facebook: www.facebook.com/zumimalloffice
Amazon Store: www.amazon.com/zumimall
Warranty Service

Brand Story
Founded in 2008, Zumimall focuses on the design and research of
intelligent security technology. Zumimall insists on taking consumer
needs as its core and strives to create smart home products that lead
a global home fashion trend for consumers. Zumimall believes that
craftsmanship creates top quality and technology changes life. With
high-quality products and first-class service, Zumimall won the love
and trust of millions of customers as soon as it went public. Over the
years, Zumimall has served 45 continents of America, covering 80% of
the population. Zumimall is the provider of a smart lifestyle and a
guardian of the wonderful moments of your life.

1. What’s in the Box -----------------------------------------P1
2. Product Diagram ----------------------------------------P2
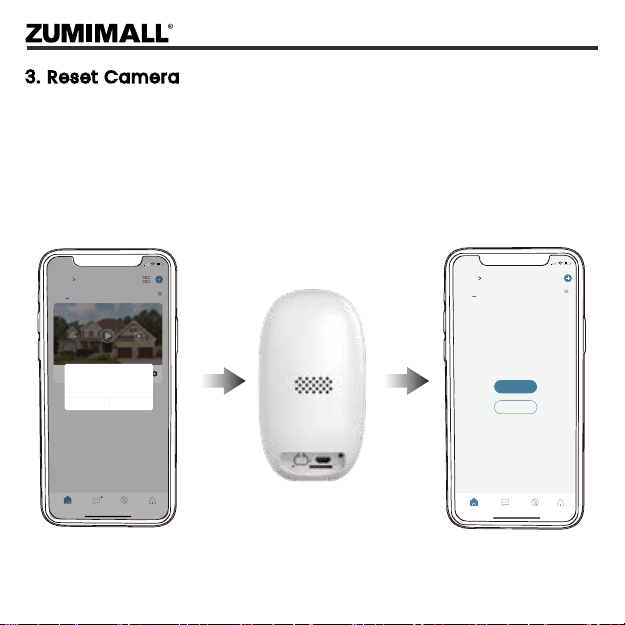
3. Reset Camera ------------------------------------------P3
4. Download and Install App ---------------------------------P4
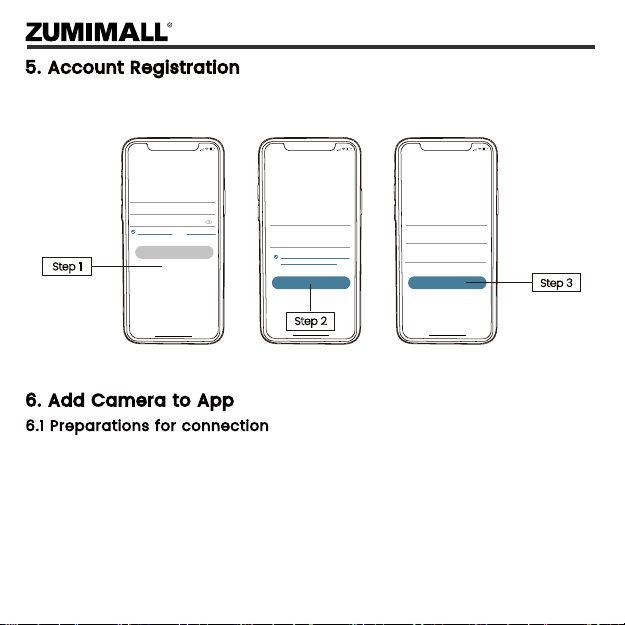
5. Account Registration -------------------------------------P5
6. Add Camera to App ------------------------------------- P5
6.1 Preparations for Connection -----------------------------P5
6.2 Connect Camera to App -------------------------------P6
7. Camera Installation --------------------------------------P8
8. Important Notes ----------------------------------------P8
9. Monitoring Area -----------------------------------------P9
10. Device Menu -------------------------------------------P10
11. Two-Way Audio -----------------------------------------P1 1
12. PIR Body Detection -------------------------------------- P1 1
12.1 Body Detection Alarm Setting --------------------------- P1 1
12.2 Alarm Notifications -----------------------------------P12
12.3 Record/Playback/Delete ------------------------------P12
INDEX PAGE

13. Power Saving Settings -----------------------------------P13
13.1 Alarm Interval & Shooting Interval -----------------------P13
13.2 Maximum Shooting Time & Recording Time ---------------P13
13.3 Alarm Plan -----------------------------------------P14
14. Battery Management -----------------------------------P15
15. Solar Panel --------------------------------------------P16
16. Multi Device Management -------------------------------P18
16.1 Multi Camera Management ---------------------------P18
16.2 Multi User Sharing -----------------------------------P18
17. ZUMIMALL FAQ -----------------------------------------P20
INDEX PAGE

ZUMIMALL Battery Camera * 1 Solar Panel with Cable *1
Outdoor Metal Mount *1 Solar Panel Metal Mount *1
Quick User Guide *1 USB Cable *1
Screws Set *2(1-Camera/1-Solar Panel)
1. What’s in the Box
1
NOTE: Micro SD card and power adapter are not included.

Camera Lens
White Light
PIR Sensor
LED Indicator
3 IR Lamps
Microphone
Speaker
USB Port
Micro SD Card Slot
Power Button
Reset Hole
Charging Status
1
2
3
4
5
6
10
12
11
7
8
9
2. Product Diagram
Power Button
Reset Button
Blink Slowly in Red
Blink Fast in Red
Solid in Red
Solid in Blue
Blink Slowly in Blue
Keep pressing for 5-10 seconds to power on/power off
Keep pressing for 5-10 seconds to reset
Awaiting Wi-Fi connection, ready for adding devices
Wi-Fi connecting
Network problem
Wi-Fi connected, camera running normally
Firmware update
2
1
2
3
4
7
8
9
10
11
12
5
6

3. Reset Camera
3
①Keep pressing to remove device
②Press the reset button for 5-10s until hear the 'Boogu' sound
③Reconnect as before…
Home
Homepage Messages Search
5:48
All Devices
Me
Living room Bedroom
Add Device
Quick Guide
5:51
Home
Homepage Messages Search
All Devices
Me
Living room Bedroom
02-16-2022 01:56:08 PM
064958492 Tips
Cancel OK
Are you sure you would like to
delete this device?

Download ZUMIMALL App from Google Play™ or App Store™.
Or scan the QR codes as below, with your smart phone.
NOTE: Google Play™ is a trademark of Google Inc.
App Store™ is a service mark of Apple Inc.
NOTE: Please turn on both of the following permissions.
①Allow ZUMIMALL App to access mobile cellular data and wireless LAN, otherwise it
will fail to connect the camera.
②Allow ZUMIMALL App to receive pushed messages, otherwise, the phone will not
receive alarms when motion is detected.
4. Download and Install App
ZUMIMALL AndroidiOS
>
>
<
Notifications
ZUMIMALL
ALERTS
Allow Notifications
9:41
Lock Screen
Banner Style
Sounds
Badges
OPTIONS
When Unlocked(Default)
Show Previews
Temporary
>
>
Automatic
Notification Grouping
>
NotificationCenter Banners
5:51
<
ZUMIMALL
Wireless Data
ALLOW”WIRELESS DATA”TO USE DATA
Off
WLAN
WLAN & Cellular Data
5:51
4

New user needs to sign up ZUMIMALL App with email address. Click 'Sign up' to create
a New Account and follow the steps to complete registration.
5. Account Registration
6. Add Camera to App
6.1 Preparations for connection
①Insert a Micro SD Card into the camera to save video clips or you can start the
7-day free cloud service. Without Micro SD Card or cloud service, no video will
be saved.
②The camera only works with 2.4GHz Wi-Fi, not support 5GHz.
③When connecting to the network, please take the camera close to the router
(Recommended within 10-15ft).
5:51
<
Sign up
United States +1 >
Email
Registrtion means agreement with the user
agreement and privacy agreement.
Next
5:51
<
Sign up
Account
Nickname
Password
Done
5:51
Log in
Forgot password?Remember password
>
Glad to meet you!
United States
Account
Passward
Sign Up
Step 1
Step 3
Step 2
5

6.2 Connect Camera to App
6
Tap 'Add Device'
Reset the Camera Input Wi-Fi Password Prepare the Scanning
Select 'Battery Camera' Turn on the Camera
Home
Homepage Messages Search
5:48
All Devices
Me
Living room Bedroom
Add Device
Quick Guide
5:48
Battery
Camera
Smart
Doorbell
Battery Camera
Power Plug
Camera
Baby
Camera
Floodlight
Camera
Doorbell
Kits
Select Device
5:49
Add Battery Camera
Press the [battery camera] button to
wake the device if it is asleep.
Hold the device power button to start
the device.
<
Please stay near to your router for the
best signal.
Next
Hold the RESET button on your device for
4-5 seconds(please refer to the user
manual for more on this).
Wait for a flashing RED indicator light.
Tap Next
5:49
Add Battery Camera
Please reset the device.
<
Next
5:50
Wi-Fi Setup
SELECT A 2.4GHZ WIFI NETWORK AND
ENTER Your Password
The Device Does Not Work with 5G Wifi NetWorks
Common Router Setup Methods
Junan
cam2019@
<
Next
Please remove all film from the lens.Tap
Next to show a QR code, and let your
device scan the code. Keep your phone
5-8 inches from the lens.
5:50
Operation Instructions
<
15-25cm
5-8 in
Next

7
5:50
Scan QR Code
<
Scan the QR code below with the device
at a distance of 5-8 inches. A tone will be
heard when successfully scanned.
Next
Help
Scan QR Code when Indicator
Flashing Slowly in Red Finished Installation
When Reaches 100%
5:50
Connect Network
<
Make sure the device in an
energized state
02:06
Make sure the device is connected to
the router
Make sure the device and the phone are
on the same network
Search device Register to the cloud Device
initialization
Perform Network Diagnosis View Installation Tips
5:50
Network Diagnostic Skip
<
WIFI signal strength
High
Current Place is good, you can install
the camera.
02-15-2022 11:08:17 AM
6KB/s
Next
5:50
How to install camera
Install tips:
<
1.Please use outdoor mounting bracket if you
want to install camera outside.
2.It is recommended to install the camera at a
height of 2-3 meters.
3.Avoid direct sunlight to the camera lens.
4.Avoid placing the camera lens against the
wall and glass at close range.
Done

①Fix the bracket to where you want to install the
camera with the supplied screw.
② Fasten the camera on the metal mount, and fix
them.
③Adjust the viewing angle of the camera.
7. Camera Installation
360°
To reduce false alarms, please note that:
①Do not install the camera in a position facing strong lights/mirror/window/
swimming pool.
② Do not place the camera too close to any angel with busy traffic.
③ Keep camera away from the outlets, including air conditioner vents, humidifier
outlets, the heat transfer vents of the projectors, etc.
④Keep the camera at least 1 meter away from any wireless devices to avoid
interference, such as microwave stove, Wi-Fi routers and etc.
8. Important Notes
8

9. Monitoring Area
①It is not suggested to install the camera vertically towards the moving objects,
otherwise, it may not detect the motion events or cause delay.
②It is suggested to make the angle between PIR Sensor and detected objects
more than 10 degrees.
③The camera motion sensor is much more sensitive to side-to-side movement
across its field of view than to movement directly toward or away from the camera.
9

10. Device Menu
1
2
3
4
5
6
7
8
9
10
11
12
13
14
15
16
17
18
19
20
21
22
23
24
25
26
27
Add Camera
Device List
Real Time
Live View Button
Camera Name
Settings
Device Homepage
Messages
Explore
Personal Homepage
Quit Live Viewing
Setting Manual
View Live
SD Card History
Cloud Storage
Screenshot to Phone
Two-Way Talk
Record to Phone
Motion Detection On/Off
Light
Siren
Audio warning and strobe light
Album
Time Bar
Zoom
Date of History Record
Alarm time point
10
5:51
+
Home
Homepage Messages Search
All Devices
Me
Living room Bedroom
02-16-2022 01:56:08 PM
064958492
3
5
8
7
1
2
4
6
9
10
5:51
060238708(X1pro)
Bit Rate:5KB/s
Live
Screenshot
Motion Detection
Intercom Record
History Cloud
WiFi:82%
<
02-16-2022 01:53:01 PM
FHD
Light Siren
11
13
12
14
15
18
20
21
16
17
19
5:51
060238708
Live
00:00 00:05 00:10
Calendar
Recoed Album
Alert Screenshot
History Cloud
<
02-16-2022 01:55:10 PM
24
26
27
25
5:51
060238708(X1pro)
Bit Rate:5KB/s
Live
Audio warning
and strobe light
History Cloud
WiFi:82%
<
02-16-2022 01:53:01 PM
22
23
Album

Motion detection sensitivity can be adjusted from 1 to 10 .
Please refer to the image below.
12.1 Motion Detection Alarm Setting
12. PIR Motion Detection
Sensitivity
LOW: 1-3
MID: 4-7
HIGH: 8-10
NOTE: The higher the sensitivity is, the longer distance the PIR can detect. Accordingly, the battery will
drain faster.
Detecting Distance (For moving and living objects)
13-16ft(4-5meters)
16-23ft(5-8meters)
23-42ft(8-13meters)
Tap on
'
Settings
'
Set it upSelect
'
Alarm Management
'
11. Two - Way Audio
①Open the microphone permission of ZUMIMALL APP.
②Long press the intercom button to start speaking, and
the sound will be emitted from the camera at this time.
③Release the intercom button to listen to the speech,
and the sound will be emitted from the mobile phone.
11
5:51
060238708
<
Network Indicator
Time Setting
Image Setting
Sound Setting
Alarm Management
Cloud Storage Service
Contact us
Checking for a New Version
Restart Device
Battery Management
Recording Management
Delete the Device
5:51
060238708(X1pro)
Bit Rate:5KB/s
Live
Screenshot
Motion Detection
Intercom Record
History Cloud
WiFi:82%
<
02-16-202201:53:01 PM
FHD
Light Siren
Hold to Talk
5:51
060238708(X1pro)
Bit Rate:5KB/s
Live
Screenshot
Motion Detection
Intercom Record
History Cloud
WiFi:82%
<
02-16-2022 01:53:01 PM
FHD
Light Siren
5:51
Alarm Management
<
After turning it on, you can monitor the human
behavior who stands in front of the device and send
alarms. It is possible to choose different detection
sensitivities.
Detection sensitivity is supported to select from 1
to 10. Higher the value, easier to tigger the motion
detection and alaem.
Select The Working Mode of The Current Camera
Deteciton Sensitivity
12345678910
Set the time period of the alarm, the device only
triggers an alarm event during this time period.
Audio warning and strobe light is only valid at night
Custom Mode
Alarm Working Mode
Alert Plan
Alarm Area
Audio warning and strobe light

This camera does not support 7*24 hours all day recording, it is an event recording
camera. It is only triggered when body motion is detected.
Here are system's reactions:
① Alarm notifications with sounds from App.
②Pictures/videos automatically stored in Micro SD Card or Cloud.
12.2 Alarm Notification
①On 'MESSAGES' page, click 'Alarm Messages', you can view all the records listed.
②Click the following buttons to playback or delete.
③All screenshots or manually recorded videos on live/history/ cloud page will be
saved in Pictures & Videos. Files here can be saved in your phone Album or shared
with others directly.
12.3 Record/Playback/Delete
Message ->
Alarm Message
5:51
Messages
Alarm Messages
060238708
Homepage Messages Search Me
?
Motion Detection
2022-02-15 11:08:21
02-14-2022 08:08:10 AM
08:08:10
Motion Detection
5:51
Messages
2022-02
8 9 10 11 12 13 14 15 16
all alarm event
02-14-2022 03:30:16 PM
15:30:16
Motion Detection
02-14-2022 10:32:12 AM
10:32:12
Motion Detection
02-14-2022 10:32:09 AM
10:32:09
Motion Detection
02-14-2022 08:53:53 AM
08:53:53
Motion Detection
02-14-2022 08:10:30 AM
08:10:30
Motion Detection
Click to Playback
Alarm Video
Click to Delete
History
Click to Preview
the Snapshot
12

13.1 Alarm Interval
13.2 Recording Time
13. Power Saving Settings
This is a function that avoids repeated alarms for the same event.
You can choose an alarm interval of different lengths, if the interval is 5 minutes, then
the camera is triggered at 08:00, you will receive an alarm message, and you will not
receive a new alarm push in the next 5 minutes, even if motion detection continues
to occur.
NOTE: This function is off by default, you can set it as needed.
You can choose a different recording length if you set the recording length to 20
seconds, then after the camera is triggered, you can view the 20 seconds of alarm
video in the history of cloud playback.
5:51
060238708
<
Device Information
Receive Alert Notifications
Installation Guide
Device Share
Location Management
Image Setting
Alarm Management
Network Indicator
Time Setting
Sound Settings
Cloud Storage Service
Battery Management
Recording Management
5:51
Custom Mode
<
Day Detection
The Alert will be triggered only when human
motion is detected.
Recording Time
Night Detection
10 seconds
20 seconds
30 seconds
Alarm Interval
* This mode has a long video replaording time, Which
will cause excessive power consumption
Off
2 minutes
5 minutes
10 minutes
5:51
Alarm Management
<
After turning it on, you can monitor the human
behavior who stands in front of the device and send
alarms. It is possible to choose different detection
sensitivities.
Detection sensitivity is supported to select from 1
to 10. Higher the value, easier to tigger the motion
detection and alaem.
Select The Working Mode of The Current Camera
Deteciton Sensitivity
12345678910
Set the time period of the alarm, the device only
triggers an alarm event during this time period.
Audio warning and strobe light is only valid at night
Custom Mode
Alarm Working Mode
Alert Plan
Alarm Area
Audio warning and strobe light
13

You can set the weekly/daily alarm schedule as you need. If you set the camera's
working hours from 0:00 to 1:00 .The camera will only be triggered and record alarm
video during this time period.
NOTE:Alarm schedule can be set for up to 4 time periods.
13.3 Alarm Plan
14
5:51
Set the Time Period
<
Set the time period of the alarm, the device only triggers an
alarm event during this time period.
Select Day
Deteciton Sensitivity
Start Time 00:00
End Time
Mon
Tue
Wed
Thu
Fri
Sat
Sun
00:00
5:51
Time Period Setting
00:00 ~ 01:00
<
Select the alarm period to be turned on
Mon
Add Time Period
5:51
Alarm Management
<
After turning it on, you can monitor the human
behavior who stands in front of the device and send
alarms. It is possible to choose different detection
sensitivities.
Detection sensitivity is supported to select from 1
to 10. Higher the value, easier to tigger the motion
detection and alaem.
Select The Working Mode of The Current Camera
Deteciton Sensitivity
12345678910
Set the time period of the alarm, the device only
triggers an alarm event during this time period.
Audio warning and strobe light is only valid at night
Custom Mode
Alarm Working Mode
Alert Plan
Alarm Area
Audio warning and strobe light

14. Battery Management
①The camera has a built-in high-capacity battery, which can be used for 2-3
months, assuming the camera wakes up 15 times per day and play video for 10
minutes each day.
NOTE: The battery durability depends on how frequently the camera is woken up.
The more it wakes up, the faster the battery drains. It is recommended to lower down
the 'Motion Detection' sensitivity or turn it off occasionally.
②When power is less than 20%, the App will send you reminding messages for
charging in time.
③Charge the camera with DC 5V 2A charger, until it is fully charged after 6-8 hours.
15
Table of contents
Other Zumimall Digital Camera manuals