Zyris ISOVAC User manual

1
EN
INSTRUCTIONS FOR USE
EN
DA
DE
EL
ES
FI
FR
IT
JA
NL
NO
PL
PT
SV
TR

2
TABLE OF CONTENTS
INDHOLDSFORTEGNELSE
INHALTSVERZEICHNIS
ΠΙΝΑΚΑΣ ΠΕΡΙΕΧΟΜΕΝΝ
CONTENIDO
SISÄLLYSLUETTELO
TABLE DES MATIÈRES
INDICE
目次
INHOUDSOPGAVE
INNHOLDSFORTEGNELSE
ÍNDICE
INNEHÅLLSFÖRTECKNING

Isovac® Dental Isolation Adapter: Instructions for Use
Isovac®-tandisolationsadapter: Brugsanvisning
Isovac® Zahnmedizinischer Isolierungsadapter: Gebrauchsanweisung
Προσαρογέα οδοντική αποόνωση Isovac®: Οδηγίε χρήση
Adaptador de aislamiento dental Isovac®: Instrucciones de uso
Hammaslääketieteellinen Isovac®-eristysadapteri: Käyttöohjeet
Adaptateur pour isolation dentaire Isovac® : Mode d’emploi
Adattatore per isolamento dentale Isovac®: Istruzioni per l’uso
Isovac®歯科用アイソレーションアダプター:取扱説明書
Isovac®-adapter voor tandisolatie: Gebruiksaanwijzing
Isovac® dental isolasjonsadapter: Bruksanvisning
Adapter do izolacji stomatologicznej Isovac®: Instrukcja użytkowania
Adaptador de isolamento dentário Isovac®: Instruções de utilização
Isovac® tandisoleringsadapter: Bruksanvisning
Isovac® Dental İzolasyon Adaptörü: Kullanım Talmatları
EN
DA
DE
EL
ES
FI
FR
IT
JA
NL
NO
PL
PT
SV
TR

4
Device Description
Isovac®Dental Isolation Adapter
h EIV0101 h EIV0102
This system is intended for use with Mouthpieces developed by
Zyris, Inc. These Mouthpieces are available in a wide range of sizes for
effective isolation.
Each Isovac Dental Isolation Adapter is comprised of one main
component: Control Head
Control Head
h PIV0101
The Control Head includes two
Vacuum Levers, a Right
(P/N: 20-0405) and a Left
(P/N: 20-0406), to adjust suction
in the upper and lower areas of
the Mouthpiece.
Suction Line Plug
h PIL0206
O-ring Maintenance Kit
h AIL0226
Double End Tube Brush
h AIL0225
Lever Set
h PIV0102
Sold separately
Mouthpiece Lubricant
h AIL0202
Sold separately
Hose Connectors
h AIL0227 h AIL0234
h AIL0231 h AIL0235
h AIL0232 h AIL0236
h AIL0233
Sold separately
Some chairs may require a hose
connector to install the Isovac onto
the High Volume Evacuation (HVE)
valve or Saliva Ejector hose.
Barrier Sleeves
h AIL0203 (non-sterile)
Sold Separately
Non-sterile Control Head Barrier
Sleeves are available for additional
protection from cross-
contamination. Use of Barrier
Sleeves does not eliminate the need
to follow disinfecting and
sterilization recommendations for
the Control Head.

5
EN
Mouthpieces
h CILXX0X (non-sterile)
Sold separately
Mouthpieces are single use only and
available in various sizes. The Mouthpieces
are constructed of a soft, flexible polymer
and are not made with natural rubber latex.
They do not contain phthalates or BPAs. For
more information on sizes, go to Zyris.com.
Intended Use
Isovac is a dental isolation adapter for
clinical use by dental professionals. The
adapter is designed to isolate two
quadrants at once, simultaneously
providing tongue and cheek retraction
and continuous suction. The retraction and
continuous suction are the important
functions that control the oral
environment, reducing contamination and
improving bond strength while protecting
the airway and soft tissue.
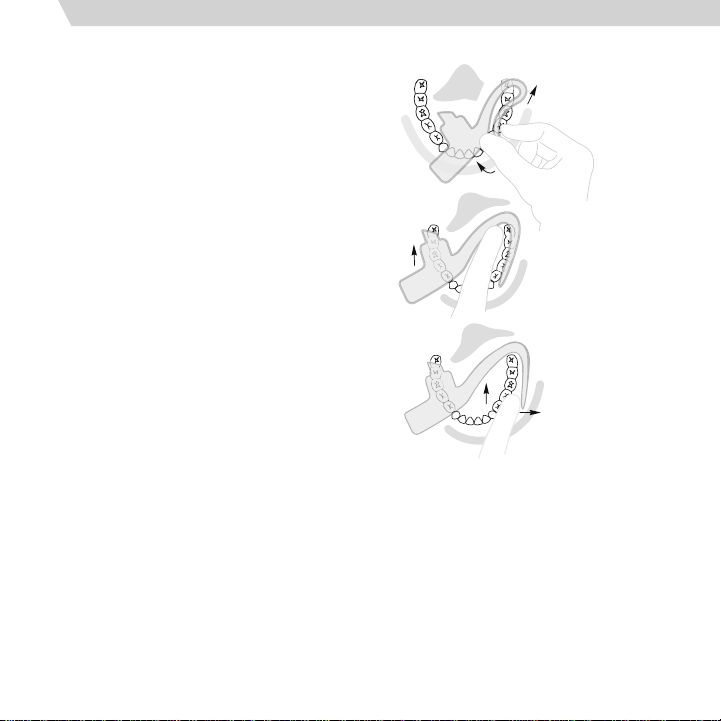
Contraindications
No known contraindications. Do not use
without reviewing how to select the
correct Mouthpiece size for each patient.
Do not use if unable to position the
Mouthpiece correctly.
Side Eects
Use of the Mouthpiece may trigger a
pharyngeal reflex (laryngeal spasm) in
hypersensitive patients, or if it is not
placed correctly within the oral cavity.
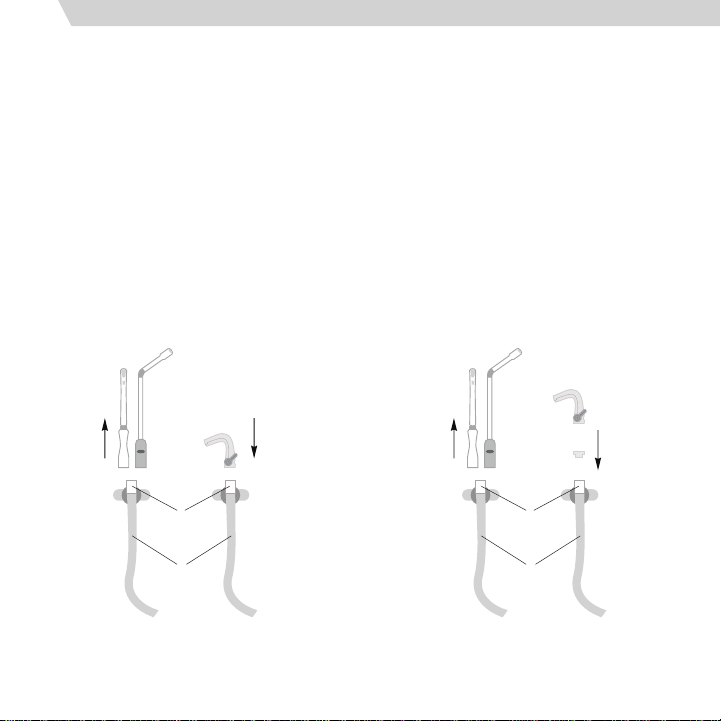
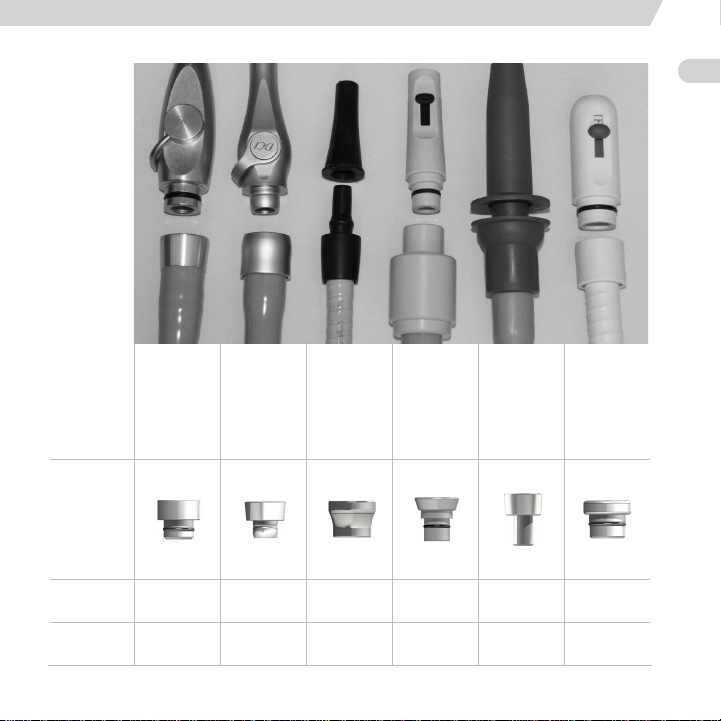
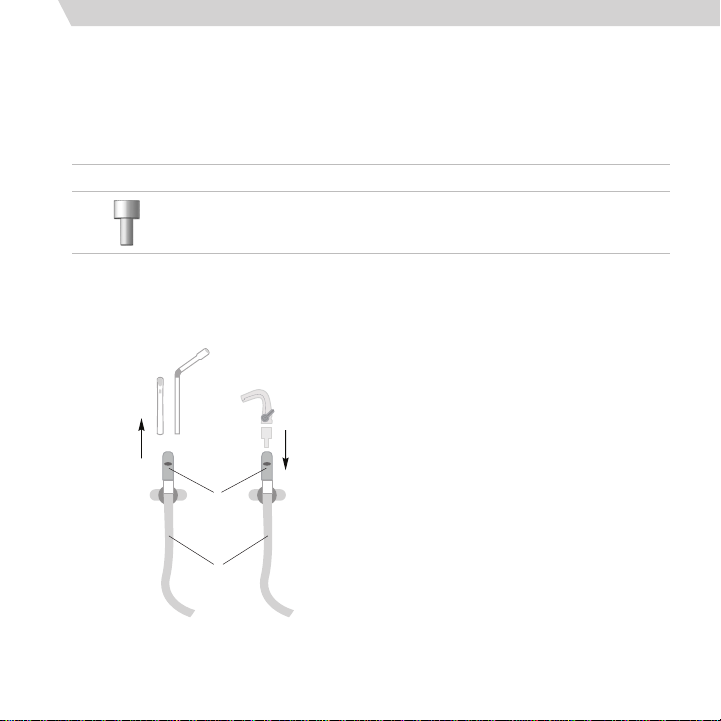
How Supplied
Isovac
The Isovac Dental Isolation Adapter
contains: 3 Control Heads, Suction Line
Plug, Double End Tube Brush, O-ring
Maintenance Kit and Instructions for Use.
Mouthpieces
Mouthpieces (sold separately) are supplied
in convenient operatory boxes. Each
Mouthpiece is individually packaged.

6
Installation
Attaching without a Connector
Isovac is designed to install easily onto an
existing High Volume Evacuation (HVE)
Valve or Saliva Ejector in most dental
operatories. To install, detach the HVE Valve
or Saliva Ejector from the tailpiece of the
evacuation hose. Next, attach the Isovac
directly onto the tailpiece. Press firmly in
place (Figure 1).
Attaching with a Connector
For some dental units, a connector (sold
separately) may be required to attach the
Isovac to the tailpiece of the evacuation
hose. To install, detach the HVE Valve or
Saliva Ejector from the tailpiece of the
evacuation hose. Next, attach the
connector onto the tailpiece. Then, attach
the Isovac onto the connector. Press firmly
in place (Figure 2).
To find the correct connector, identify the
connection type for your dental unit
(Table 1). Contact your Customer Service
Representative if your connection type is
not shown.
Figure 1. Installation without a Connector
Tailpiece
Evacuation Hose
Step 1
Detatch HVE Valve
or Saliva Ejector
Step 2
Attach Isovac directly
onto tailpiece
Tailpiece
Evacuation Hose
Step 1
Detatch HVE Valve
or Saliva Ejector
Step 3
Attach Isovac
onto connector
Step 2
Attach connector
onto tailpiece
Figure 2. Installation with a Connector

7
EN
Connection
Type:
A-dec Pelton &
Crane Style
Sirona Heka XO Care Anthos,
Castellini,
Finndent,
Kavo, OMS,
Planmeca,
Stern Weber
Connector:
Part
Number:
hAIL0227 hAIL0231 hAIL0233 hAIL0234 hAIL0235 hAIL0236
Attaches
to:
HVE HVE Saliva Ejector Saliva Ejector Saliva Ejector Saliva Ejector
Table 1. Connection Types and Connectors

8
How to Operate
Using the Dual Vacuum Levers
Dual Vacuum Levers adjust suction
intensity in both the upper and lower
quadrants. To adjust, rotate the left and
right Vacuum Levers to the desired suction
intensity for each quadrant. To shut off
suction, rotate the levers to the most
downward position.
Attaching Directly onto HVE Valve / Saliva Ejector Control Heads
To attach the Isovac directly onto HVE Valve / Saliva Ejector Control Heads, use the 11 mm
Connector (sold separately) (Table 2). To install, detach the vacuum tip from the Control Head.
Next, attach the 11 mm Connector onto the Control Head. Then, attach the Isovac onto the
11 mm Connector. Press firmly in place (Figure 3).
Connector: Connection Type: Part Number: Attaches to:
11 mm Connector hAIL0232 HVE Valve / Saliva Ejector
Control Head
Table 2. 11 mm Connector.
HVE Valve /
Saliva Ejector
Control Head
Evacuation Hose
Step 1
Detatch vacuum
tip from Control
Head
Step 3
Attach Isovac
onto connector
Step 2
At ta ch 11mm
connector onto
Control Head
Figure 3. Installation Directly onto
HVE Valve / Saliva Ejector Control Heads

9
EN
Selecting the Mouthpiece
To select the correct Mouthpiece size, measure
the patient’s interincisal opening. If between
sizes, you may select the smaller size.
Approx. Interincisal
Mouthpiece Size Opening
Pediatric (PED) < 30 mm
Extra Small (XSM) < 30 mm
Small (SML) 30 mm
Medium (MED) 30-45 mm
Medium Deep Vestibule (MDV) 30-45 mm
Large (LRG) > 45 mm
Table 3. Mouthpiece Sizes
The Finger Method
The finger method may also be used to
select the appropriate Mouthpiece size
(Figure 5).
Attaching the Mouthpiece
Slide the Mouthpiece onto the Control
Head until the two locking barbs engage.
Water or mouthpiece lubricant may be
used to lubricate the inside surface of the
Mouthpiece sleeve to ease attachment.
Cheek Shield
Flexible Isthmus
Integrated
Bite Block
Tongue Retractor
Locking Barb
Openings
Mouthpiece Sleeve
Figure 4. Mouthpiece
Vacuum
Channels
Figure 5. The Finger Method
Pediatric / Extra Small
One Finger (< 30 mm)
Small
Two Fingers (30 mm)
Medium / Medium DV
Three Fingers (30-45 mm)
Large
Four Fingers (> 45 mm)

10
Placing the Mouthpiece
Prior to placing the Mouthpiece within the
patient’s oral cavity, moisten the Mouthpiece
and the patient’s lips.
Step 1
Hold the sides of the Control Head with
your index finger and thumb. With your
other hand, fold the Cheek Shield onto the
Tongue Retractor. Gently slide the folded
mouthpiece into the buccal vestibule on
the side to receive treatment. Angle the
mouthpiece to allow the lower edge of
the Tongue Retractor to move along the
buccal edge of the teeth.
Step 2
Move the bite block onto the occlusal
surface of the teeth, just distal to the
mandibular cuspid. Instruct the patient to
“rest gently”on the bite block to secure.
Step 3
Place the Cheek Shield into the buccal
vestibule. Move the Isthmus onto the
retromolar pad behind the maxillary tuberosity.
Adjust the Tongue Retractor in the lingual
vestibule as needed. Move the bite block
distally to provide more vertical working room.
Figure 6, 7, & 8. Mouthpiece Placement
Step 1
Step 2
Step 3

11
EN
Disassembly of the Control Head
Step 1
Holding the head of the vacuum hose, pull
to remove the Control Head. Do not bend.
When Isovac is removed, the Suction Line
Plug (PN: PIL0206) can be used to plug the
suction hose.
Step 2
Remove the Vacuum Levers by rotating
the levers to“off” position and keep
pushing gently until each lever pops out,
or gently pry them out. (Figure 9.)
Step 3
Separate the upper and lower halves of
the Control Head by pulling the two halves
apart from the hinges.
Figure 9. Isovac Dental Isolation
Adapter Components
Control
Head
Upper
Control
Head
Lower
O-rings
Vacuum
Control
Levers
O-rings
Cleaning and Sterilization
of the Control Head
All components of the Isovac can be
sterilized in an autoclave. Zyris
recommends sterilization between
each patient.
Remove biomatter and other debris from
the suction channels using the provided
Double End Tube Brush with a neutral pH
(6.5-7.5) enzymatic cleaning solution.
After cleaning, rinse with tap water, dry,
and place components in an autoclave
pouch to be sterilized in a steam
autoclave. Use validated sterilization
cycles (Table 4).
Validated Sterilization Cycles
Min. Exposure Min. Drying
Cycle Temperature Time Time
Standard 132 °C / 270 °F 15 min 15 min
Prevacuum 132 °C / 270 °F 4 min 20 min
Prevacuum 134 °C / 273 °F 3 min 20 min
Table 4. Validated Sterilization Cycles

12
Maintenance
Control Head
After sterilization, lubricate the Vacuum
Lever O-rings with the provided Dow 111
O-ring lubricant. Check the inside of the
Lever for L (Left) and R (Right) for correct
placement (Figure 10).
Figure 11. Retainer Ring to Lubricate
Apply O-ring
Lubricant
(P/N: AIL0221)
Figure 10. Vacuum Lever to Lubricate
Apply O-ring
Lubricant
(P/N: AIL0221)
RRight Lever
LLeft Lever
Warnings
YDdiL
D WARNING: Mouthpieces are single use
only. Reuse can result in the transmission
of infectious pathogens. Mouthpieces
must be discarded after use. Mouthpieces
cannot be safely resterilized after use.
LWARNING: Do not use if the individual
Mouthpiece package has been previously
damaged or opened. Non-sterile
Mouthpieces are individually packaged in
polyethylene bags.
YWARNING: Be sure to use established
protocols and patient monitoring when
using the Mouthpiece in conjunction with
sedation dentistry. Patient management
by a certified anesthesiologist is strongly
recommended.
Precautions
YCAUTION: When performing dental
procedures requiring high levels of blood
evacuation, it is recommended that the
Mouthpiece be intermittently flushed with
water to prevent coagulation in the
Mouthpiece to avoid loss of suction.
YCAUTION: Do not autoclave the
Control Head at temperatures above
135 °C; higher temperatures could
damage components and void your
product warranty.

13
EN
YCAUTION: Failure to maintain properly
lubricated O-rings can result in damage
to the Isovac that is not covered by
product warranty.
YCAUTION: With regular use, cleaning,
and maintenance, the device is designed
to last for years. Check the device for wear
prior to use to make sure that it is
adequate for use.
Guide to Symbols
Catalog
number
Non-sterile Caution
Date of
manufacture
Do not
re-use
Do not use
if package
is damaged
Consult
Instructions
for Use
Manufacturer
Limited 1-Year Warranty
Zyris warrants this product to be free from
defects in material and workmanship
for a period of one year from the date
of original purchase. If the product
exhibits such a defect, Zyris will, at its
option, repair or replace it without costs
for parts and labor. The product must
be returned by the customer to Zyris in
accordance with current Return Material
Authorization procedures. Proof of date
of original purchase may be required.
This warranty does not cover finishes or
normal wear, nor does it cover damage
resulting from accident, misuse, dirt,
tampering, unreasonable use, failure
to provide reasonable and necessary
maintenance, service performed or
attempted by unauthorized individuals
or service agencies, or devices that have
been otherwise modified. All implied
warranties, including any implied warranty
or merchantability or fitness for any
particular purpose, are limited in duration
to one year from the date of receipt of
the product. In no event will Zyris be
responsible for consequential damages
resulting from the use of this product.
Instructions for Use may also be found at:
Zyris.com
Storage
Conditions
r
15:
30:

14
Enhedsbeskrivelse
Isovac®-tandisolationsadapter
h EIV0101 h EIV0102
Dette system er beregnet til brug sammen med mundstykker, der
fremstilles af Zyris, Inc. Disse mundstykker fås i mange forskellige
størrelser og giver effektiv isolation.
Hver Isovac-tandisolationsadapter består af en hovedkomponent:
Kontrolhoved
Kontrolhoved
h PIV0101
Kontrolhovedet indeholder to
vakuumhåndtag, et højre
(delnr.: 20-0405) og et venstre
(delnr.: 20-0406) til justering af
suget i de øvre og nedre
områder af mundstykket.
Stik til sugeledning
h PIL0206
O-ring-vedligeholdelsessæt
h AIL0226
Rørbørste med dobbeltende
h AIL0225
Håndtagssæt
h PIV0102
Sælges separat
Smøremiddel til mundstykke
h AIL0202
Sælges separat
Slangekonnektorer
h AIL0227 h AIL0234
h AIL0231 h AIL0235
h AIL0232 h AIL0236
h AIL0233
Sælges separat
Nogle stole kan kræve en
slangekonnektor til installering
af Isovac på HVE- (High Volume
Evacuation) ventilen eller
spytsugeslangen.
Barrieremuer
h AIL0203 (usterile)
Sælges separat
Usterile barrieremuffer til
kontrolhovedet er tilgængelige
til yderligere beskyttelse mod
krydskontaminering. Anvendelse
af barrieremuffer eliminerer ikke
behovet for at følge anbefalingerne
for desinfektion og sterilisering
af kontrolhovedet.

15
DA
Mundstykker
h CILXX0X (usterile)
Sælges separat
Mundstykker er kun til engangsbrug og fås
i forskellige størrelser. Mundstykkerne er
fremstillet af en blød, fleksibel polymer og
er ikke fremstillet af naturligt gummilatex.
De indeholder ikke ftalater eller BPA'er.
Få flere oplysninger om størrelser
på Zyris.com.
Anvendelsesformål
Isovac er en tandisolationsadapter til
klinisk anvendelse af tandlæger.
Adapteren er designet til at isolere to
kvadranter på én gang og samtidig sørge
for tunge- og kindtilbagetrækning samt
kontinuerlig sugning. Tilbagetrækningen
og den kontinuerlige sugning er vigtige
funktioner, som giver kontrol over det
orale miljø, reducerer kontamineringen
og forbedrer bindingsstyrken, idet
luftvejene og det bløde væv beskyttes.
Kontraindikationer
Ingen kendte kontraindikationer. Må ikke
bruges uden at gennemgå, hvordan den
rigtige mundstykkestørrelse udvælges til
hver patient. Må ikke anvendes, hvis
mundstykket ikke kan placeres korrekt.
Bivirkninger
Brug af mundstykket kan udløse en
svælgrefleks (laryngospasme) hos meget
følsomme patienter, eller hvis det ikke
placeres korrekt i mundhulen.
Leveringsmåde
Isovac
Isovac-tandisolationsadapteren
indeholder: 3 kontrolhoveder, stik
til sugeledning, rørbørste med
dobbeltende, O-ring-vedligeholdelsessæt
samt brugsanvisning.
Mundstykker
Mundstykker (sælges separat) leveres i
praktiske kasser til klinikbrug. Hvert
mundstykke er pakket enkeltvist.

16
Installation
Installeret uden en konnektor
Isovac er designet til let installation på en
eksisterende HVE- (High Volume
Evacuation) ventil eller spytsug på de fleste
tandlægeklinikker. Installationen foretages
ved at afmontere HVE-ventilen eller
spytsuget fra endestykket af sugeslangen.
Sæt derefter Isovac direkte på endestykket.
Tryk det fast på plads (Figur 1).
Tilslutning med en konnektor
I nogle tandlægeklinikker kan en
konnektor (sælges separat) være
nødvendig til fastgøring af Isovac
til endestykket af sugeslangen.
Installationen foretages ved at afmontere
HVE-ventilen eller spytsuget fra
endestykket af sugeslangen. Sæt derefter
konnektoren i endestykket. Forbind
derefter Isovac til konnektoren. Tryk det
fast på plads (Figur 2).
Find den korrekte konnektor ved at
identificere forbindelsestypen i din
tandlægeklinik (Tabel 1). Kontakt din
kundeservicerepræsentant, hvis din
forbindelsestype ikke er vist.
Figur 1. Tilslutning uden en konnektor
Endestykke
Sugeslange
Trin 1
Frakobl HVE-ventil
eller spytsug
Trin 2
Tilslut Isovac direkte
til endestykket
Endestykke
Sugeslange
Trin 1
Frakobl HVE-ventil
eller spytsug
Trin 3
Tilslut Isovac til
konnektoren
Trin 2
Tilslut
konnektoren til
endestykket
Figur 2. Tilslutning med en konnektor

17
DA
Forbindelses-
type:
A-dec Pelton &
Crane Style
Sirona Heka XO Care Anthos,
Castellini,
Finndent,
Kavo, OMS,
Planmeca,
Stern Weber
Konnektor:
Del-
nummer:
hAIL0227 hAIL0231 hAIL0233 hAIL0234 hAIL0235 hAIL0236
Sluttes til: HVE HVE Spytsug Spytsug Spytsug Spytsug
Tabel 1. Forbindelsestyper og konnektorer

18
Betjening
Sådan bruger du to vakuumhåndtag
To vakuumhåndtag justerer sugekraften
i både den øvre og nedre kvadrant.
Justering foretages ved at dreje det
venstre og højre vakuumhåndtag til
den ønskede sugekraft for hver kvadrant.
Du lukker for sugningen ved at dreje
håndtagene hen til den nederste position.
Tilslutning direkte til HVE-ventilens / spytssugets kontrolhoveder
For at tilslutte Isovac direkte til HVE-ventilens / spytsugets kontrolhoveder anvendes en
11-mm konnektor (sælges separat) (Tabel 2). Installer ved at afmontere vakuumspidsen fra
kontrolhovedet. Slut derefter 11-mm konnektoren til kontrolhovedet. Slut dernæst Isovac til
11-mm konnektoren. Tryk det fast på plads (Figur 3).
Konnektor: Forbindelsestype: Delnummer: Sluttes til:
11-mm konnektor hAIL0232 HVE-ventilens / spytsugets
kontrolhoved
Tabel 2. 11-mm konnektor
HVE-ventilens/
spytsugets
kontrolhoved
Sugeslange
Trin 1
Frakobl
vakuumspidsen
fra kontrolhovedet
Trin 3
Tilslut Isovac til
konnektoren
Trin 2
Tilslut 11-mm
konnektoren til
kontrolhovedet
Figur 3. Tilslutning direkte til HVE-ventilens /
spytsugets kontrolhoveder

19
DA
Valg af mundstykke
For at vælge et mundstykke i den korrekte
størrelse måles patientens interincisale
åbning. Hvis resultatet ligger mellem to
størrelser, kan du vælge den mindste størrelse.
Omtrentlig
Mundstykkestørrelse interincisal åbning
Pædiatrisk (PED) < 30 mm
Ekstra lille (XSM) < 30 mm
Lille (SML) 30 mm
Medium (MED) 30-45 mm
Mellemdybt hulrum (MDV) 30-45 mm
Stor (LRG) > 45 mm
Tabel 3. Størrelse på mundstykker
Fingermetoden
Fingermetoden kan også bruges til at
vælge den rette størrelse på mundstykket
(Figur 5).
Fastgørelse af mundstykket
Skub mundstykket ind mod
kontrolhovedet, indtil de to modhager
går i indgreb. Der kan bruges vand eller
mundstykkesmøring til at smøre den
indvendige del af mundstykkets muffe for
at lette fastgørelsen.
Kindskjold
Fleksibel
isthmus
Integreret
bidplade
Tungeholder
Åbninger
for låsende
modhager Mundstykkets
Figur 4. Mundstykke
Vakuum-
kanaler
Figur 5. Fingermetoden
Pædiatrisk / Ekstra lille
Lille
Medium / Medium DV
Stor
INTERINCISAL ÅBNING I MM

20
Placering af mundstykket
Inden mundstykket placeres i patientens
mundhule, fugtes mundstykket og
patientens læber.
Trin 1
Hold om siderne af kontrolhovedet med
din pege- og tommelfinger. Brug den
anden hånd til at folde kindskjoldet
omkring tungeholderen. Sæt forsigtigt
det foldede mundstykke ind imellem
tænder og kind ved siden af for at
modtage behandling. Mundstykket
skal vinkles, så den nederste kant af
tungeholderen kan flyttes langs den kant
af tænderne, der vender ind mod kinden.
Trin 2
Anbring bidpladen på tændernes
tyggeflader, lige distalt for
hjørnetænderne i underkæben. Bed
patienten om at lade tænderne "hvile"
på bidpladen, så den holdes fast.
Trin 3
Anbring kindskjoldet imellem tænder og
kind. Flyt isthmus til den retromolære pude
bag ved tuberositas maxillaris. Juster
tungeholderen i hulrummet ved tungen
efter behov. Flyt bidpladen distalt, så der
dannes mere lodret arbejdsrum.
Figur 6, 7 og 8. Placering af mundstykke
Trin 1
Trin 2
Trin 3
Table of contents
Languages:
Other Zyris Dental Equipment manuals
Popular Dental Equipment manuals by other brands

Rapid Shape
Rapid Shape RS cure Original operating instructions

Shofu
Shofu Solidilite LED user manual

Belmont
Belmont CLESTA eIII installation instructions

Durr Dental
Durr Dental PTS 195 Installation and operating instructions

KaVo Dental
KaVo Dental 1.003.7710 Instructions for use

parkell
parkell TurboVue Instructions for use