Zzipp ZZONE-IR User manual

ZZONE-IR
ZZONE-IRCD
MANUALE D’USO USER MANUAL
INTERNET RADIO INTERNET RADIO CON CD
INTERNET RADIO WITH CDINTERNET RADIO TUNER

2
Grazie per avere acquistato un pro-
dotto ZZIPP.
Leggere attentamente quanto ripor-
tato in questo manuale
per comprendere il funzionamento
dell’apparecchio e utilizzarlo nel
migliore dei modi.
Conservare in luogo sicuro queste
istruzioni in modo da poterle riutiliz-
zare all’occorrenza.
Prima di collegare il prodotto a una
fonte di alimentazione, assicurar-
si che il cavo di alimentazione non
sia danneggiato. Assicurarsi che la
tensione della presa elettrica rientri
nell’intervallo indicato sul prodotto
(sull’alloggiamento o su un adesivo).
Mai scollegare il prodotto dal cavo di
alimentazione tirando o strattonando
il cavo stesso. Assicurarsi sempre
che il prodotto sia utilizzato in una
sede con adeguata ventilazione con
almeno 50 cm di spazio dalle super-
fici vicine. Assicurarsi che nessuna
delle aperture di ventilazione sia
ostruita. Non utilizzare il prodotto a
temperature ambiente superiori a
104°F / 40°C.
Before connecting the product to a
power source, make sure the power
cord is not pinched or damaged.
Make sure that the voltage of the
electrical outlet is within the range
indicated on the product (on the hou-
sing or on a sticker).
Never disconnect the product from
the power cord by pulling or tugging
on the cord.
Always make sure that the product
is used in a location with adequate
ventilation with at least 50 cm
of space from adjacent surfaces.
Make sure none of the ventilation
openings are blocked.
Do not use the product in ambient
temperatures above 104 ° F / 40 ° C.
Thanks for purchasing this ZZIPP
product, please read this instruction
carefully to understand how to ope-
rate the product correctly. Please
store this instruction in a safe place
after reading as a reference in the
future.
Per ridurre il rischio di shock elettri-
ci non rimuovere coperchio e laterali.
Per le riparazioni rivolgersi sempre a
personale qualificato.
Per ridurre il rischio di incendio e
shock elettrici non esporre l’appa-
recchio a umidità e a contatto diretto
con liquidi.
To reduce the risk of electric shock,
do not remove the cover or the side.
Always contact qualified personnel
for repairs.
To reduce the risk of fire and electric
shock, do not expose the appliance
to moisture and direct contact with
liquids.
ISTRUZIONI SULLA SICUREZZA SAFETY INSTRUCTIONS

3
Location of Controls
Remote control
Security code for your wireless network
01. To start up
02. Network Setup
03. Overview of features and functions
04. Internet Radio
05. Media Centre
06. DAB+/DAB Radio
07. FM Radio
08. Bluetooth playback
09. Alarm Setting
10. Sleep Timer Setting
11. Configuration
12. Remote control via PC / Smart phone
13. Tuning internet radio & favourite
14. Trouble Shooting
Helpful Tips
Technical Specification
Posizione dei controlli
Controllo remoto
Codice di sicurezza per la vostra rete
01. Operazioni preliminari
02. Impostazione della rete
03. Panoramica delle caratteristiche
04. Internet Radio
05. Media Center
06. Radio DAB+/DAB
07. Radio FM
08. Riproduzione Bluetooth
09. Impostazione della sveglia
10. Impostazioni di sleep
11. Configurazione
12. Controllo remoto PC / Smart phone
13. Sintonizzazione radio e preferiti
14. Risoluzione dei problemi
15. Suggerimenti utili
Specifiche tecniche
04
06
07
07
08
10
11
13
14
15
16
17
18
18
25
26
28
30
31
04
06
07
07
08
10
11
13
14
15
16
17
18
18
25
26
28
30
31
CONTENUTI CONTENTS

4
ON
WLAN
ANTENNA
DAB/FM
ANTENNA
OFF
DC IN
Back Forward
Tune / Select
Menu
Pulsante di accensione
Premere per entrare o uscire dallo stand-by
Connettore cuffie
Da 6.3mm il volume è controllabile dal display
Led di accensione
Acceso fisso quando il dispositivo è alimentato
Sensore IR
Riceve i segnali del telecomando
Display LCD
Display di controllo da 2.4”
Menù (home)
Premere per visualizzare il menù principale
Back
Premere per tornare al menù precedente
Forward
Premere per passare al menù successivo
Tune/Select
Ruotare per navigare nei menù, premere per confermare
Connettore antenna WiFi
Collegare l’antenna prima di impostare la rete
Connettore rete RJ45
Rete 10Mbps
Uscita digitale (ottica)
Connessione TosLink
Uscita digitale (coassiale)
Connessione S/PDIF
Uscita LINE
Connettore per antenna DAB/FM
Connettore di alimentazione
Interruttore di accensione
Power button
Press to enter/exit from Standby mode
Headphone jack
6.3mm Headphone out with volume controlled by dial
Power LED
On when DC-in has valid power
IR Sensor
Receives Infra red signal from remote control
LCD display
2.4”TFT color display
Menù (home)
Press to display main menù
Back
Press to exit to previous menu
Forward
Press to cycle through the display option
Tune/Select
Rotate to navigate menù, Press to select an item
WiFi antenna connector
Connect the antenna before setting up the WiFi network
Lan Jack
10Mbps RJ45
Digital Out (optical)
TosLink connection
Digital Out (coaxial)
S/PDIF connection
Line out
Antenna jack for DAB/FM
DC-IN Jack
Power On/Off switch
1
1
1
1
1
8
1
8
1
2
1
2
1
9
1
9
1
3
1
3
1
10
1
10
1
4
1
4
1
11
1
11
1
5
1
5
1
12
1
12
1
16
1
16
1
17
1
17
1
15
1
15
1
13
1
13
1
14
1
14
1
6
1
6
1
7
1
7
POSIZIONE DEI CONTROLLI LOCATION OF CONTROLS

5
Connettore cuffie
Da 6.3mm il volume è controllabile dal display
Slot scheda micro SD
Micro SD/TF card
Sensore IR
Riceve i segnali del telecomando
Display LCD
Display di controllo da 2.4”
Slot Compact Disk
Ingresso per il CD con meccanismo Slot-In
Tune/Selezione
Ruotare per navigare nei menù, premere per confermare
Led di accensione
Acceso fisso quando il dispositivo è alimentato
Pulsante di accensione
Premere per entrare o uscire dallo stand-by
Controlli riproduzione CD
Controlli di riproduzione del CD
e pulsanti di navigazione menù principale
Antenna WiFi
Connettore per antenna DAB/FM
Uscita digitale (ottica)
Connessione TosLink
Uscita digitale (coassiale)
Connessione S/PDIF
Uscita LINE
RCA stereo L-R
Connettore di alimentazione
Interruttore di accensione
Headphone jack
6.3mm Headphone out with volume controlled by dial
Slot micro SD card
Micro SD/TF card
IR Sensor
Receives Infra red signal from remote control
LCD display
2.4”TFT color display
Slot Compact Disk
CD with Slot-In input
Tune/Select
Rotate to navigate menù, Press to select an item
Power LED
On when DC-in has valid power
Power button
Press to enter/exit from Standby mode
CD controls
CD playback controls
and main menu navigation buttons
WiFi antenna
Antenna jack for DAB/FM
Digital Out (optical)
TosLink connection
Digital Out (coaxial)
S/PDIF connection
Line out
RCA stereo L-R
DC-IN Jack
Power On/Off switch
1
1
1
1
1
8
1
8
1
2
1
2
1
9
1
9
1
3
1
3
1
4
1
4
1
5
1
5
1
6
1
6
1
7
1
7
9 0V 1.0 A
Powe r Input : 9.0V 1 .0A
Powe r Consumption : 9W
1
10
1
10
1
11
1
11
1
12
1
12
1
16
1
16
1
15
1
15
1
13
1
13
1
14
1
14

6
LOCATION OF CONTROL
CONTROLLI CD
Torna al menù
principale
Va alla sezione
mode, usare
tune/select per
selezionare
un’altra sezione
Menu precedente
permette di
spostarsi indietro
nella lista
Menu successivo
permette di
spostarsi avanti
nella lista
Premere e mantenere
premuto per salvare una
stazione nei favoriti. Premere
per richiamare una stazione
memorizzata
premere per
rimuovere il CD
Arresta la
riproduzione del CD
Riproduce la prossima
traccia del CD
Riproduce la precedente
traccia del CD
Avvia o mette in pausa la
riproduzione del CD

7
Attiva/disattiva l’audio
Pulsante di accensione/stand-by
Tastierino numerico
Impostala stazione attuale
tra i preferiti
Richiama la lista dei preferiti
Pulsanti di spostamento cursore
Pulsante di conferma
Impostazione allarme
Impostazione spegnimento
automatico
Controlli di volume
Menù principale
Selettore di sorgente:
Internet radio/DAB/FM/Bluetooth
Attiva l’equalizzatore per le uscite
LINE e CUFFIA
Stazione radio precedente/successiva
Traccia precedente/successiva
Pulsante di play/pausa
Permette di accedere alla lista delle stazioni
locali
Permette di accedere alle informazioni di
sistema e alle informazioni di rete
Permette di accedere al menù che regola le
impostazioni di luminosità del display
Mute Button
Toggle between standby/on
Input index number
Current station to favourite
Recall the favourite list
Cursors to navigate menù
Confirm button
Alarm button
Sleep Timer
Volume control
Main menù
Switch between:
Internet radio/DAB/FM/Bluetooth
Equalizer
For headphone and line out only
Next/previous station
Next/previous track
Play/pause
Access the local station list
Quick access to network and system info
Dummer to adjust the display brightness
TELECOMANDO REMOTE CONTROL
0-9 0- 9
Mode
Mode
OK OK
EQ
EQ
LOCAL
LOCAL
INFO
INFO
DIMMER
DIMMER

8
Usando il telecomando
Sulla tastiera alfa-numerica, premere
ripetutamente ogni pulsante per scorrere le
lettere, numeri e simboli come elencati di
seguito. Per inserire un carattere, scorrere
fino a quello corretto e quando è evidenziato,
premere il pulsante
per inserire il carattere successivo.
Quando si arriva all’ultimo carattere della
password ed è evidenziato, premere [OK] per
confermare.
Usando il pulsante di controllo
Usare la manopola [Tune/Select] per scorrere i
caratteri, quando quello corretto è evidenziato,
premere il pulsante [Forward/ ] per inserire
il carattere successivo.
Quando si arriva all’ultimo carattere della
password ed è evidenziato, premere
[Tune/Select] per confermare.
Nota: Il codice di sicurezza è sensibile alle
maiuscole e alle minuscole.
Assicuratevi di avere un router wireless a
banda larga collegato e funzionante.
La radio supporta connessioni wireless di tipo:
B, G ed N (il router con wireless tipo N puo’
essere usato anche con impostazioni B o G).
Assicuratevi di conoscere codici e password
per WEP (wired equivalent privacy) o WPA
(Wi-Fi protected access), in caso contrario
rivolgersi a chi ha configurato la rete per voi.
La radio può funzionare sia con connessione di
rete wireless o con connessione cablata RJ45.
Please ensure the following is ready:
A wireless broadband router is connected to
the internet successfully. The radio
supports Wireless B, G and N connection
(Wireless N router can also be used with
the setting on B or G).
You know the Wired Equivalent Privacy (WEP)
or Wi-Fi Protected Access (WPA)
data encryption code/password. If you
do not know the code/password, please
contact the person /technician who set up
the router/network for you. The radio can
work via Wireless network connection (Wi-Fi
connection) and Wired connection (RJ45).
Button 1: 1 ! @ # $ % ^ & * ( ) _ + [ ] { } ; : ’ ” \ | , . / < > ?
Button 2: 2 A B C a b c
Button 3: 3 D E F d e f
Button 4: 4 G H I g h i
Button 5: 5 J K L j k l
Button 6: 6 M N O m n o
Button 7: 7 P Q R S p q r s
Button 8: 8 T U V t u v
Button 9: 9 W X Y Z w x y z
Button 0: 0
Using remote control
On the alpha-numerical keypad, press each
button repeatedly to cycle through the
letters, numbers and symbols as listed below.
To input a character, scroll to the correct one
and when it is highlighted, press the
button to input the next character.
When it comes to the last character of the
password and it is highlighted, press [OK] to
confirm.
Using control button on the Tuner
Use the [Tune/Select] knob to scroll through
the characters, when the correct one
is highlighted, press [Forward/ ] button to
input the next character.
When it comes to the last character of the
password and it is highlighted, press
[Tune/Select] to confirm.
Note: The security code is case sensitive.
CODICE DI SICUREZZA
PRIMA DI PARTIRE
SECURITY CODE
BEFORE YOU START

9
La connessione a Internet può essere
impostata tramite LAN cablata o (WiFi).
La tua radio richiede una connessione Internet
a banda larga.
Il modo più semplice è usare un cavo CAT 5 o
CAT 6 per connettersi a un router fornito dal
tuo ISP.
Connessione cablata LAN
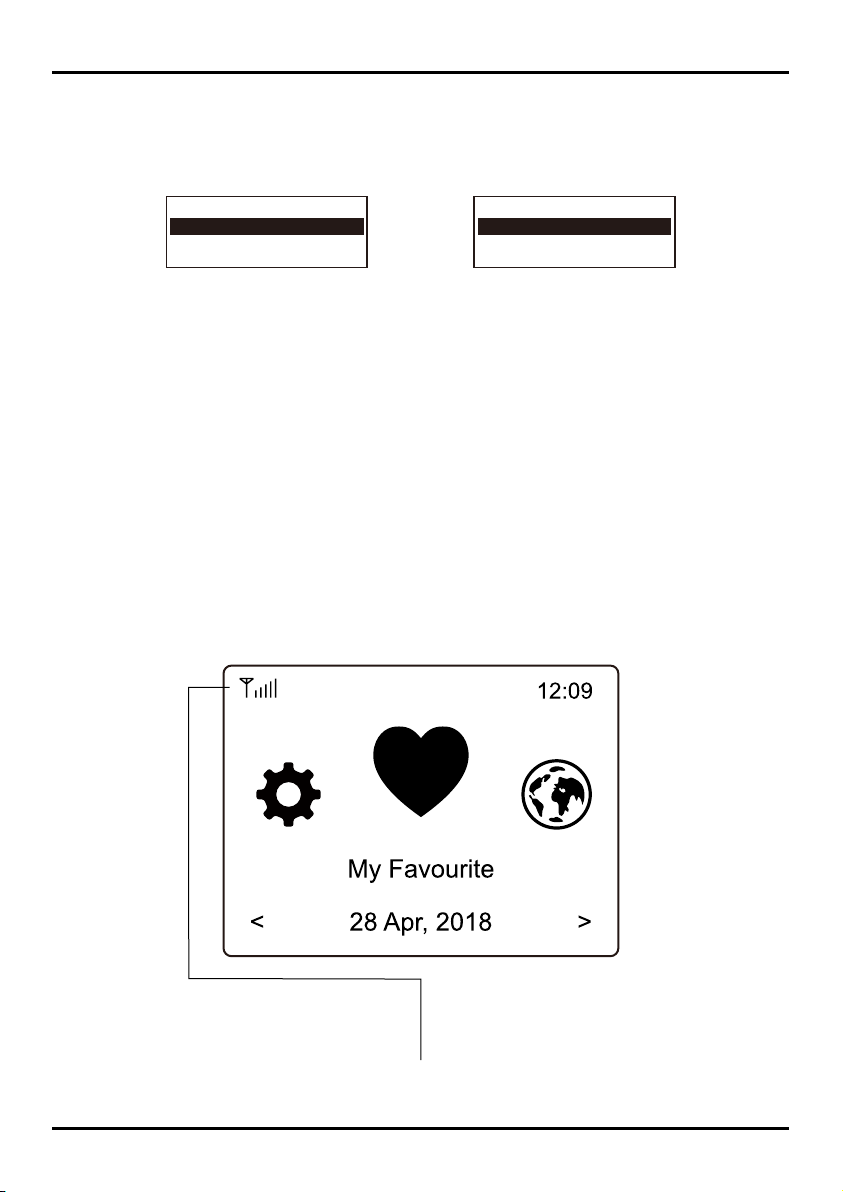
Per la connessione LAN cablata ad un
router con DHCP abilitato, la configurazione
della rete viene fatta automaticamente e la
radio può essere utilizzata per la ricezioni
internet radio e la condivisione UPnP senza
l’interazione dell’utente. Quando la
rete è collegata, l’icona Ethernet
apparirà nell’angolo in alto a sinistra.
Connessione tramite rete wireless (wi-fi)
Collegare l’antenna Wi-Fi al connettore sul
lato posteriore della radio.
Alla prima accensione, verrà visualizzata la
procedura guidata di configurazione rete.
Scegliere Sì per iniziare
configurare la rete.
Premere il pulsante [Back/ ] per evidenziare
Yes e premere
[Tune/Select] per confermare.
Internet connection can be setup via Wired
LAN or Wireless LAN (WiFi).
Your Tuner requires a broadband Internet
connection through wired Ethernet or
WiFi. The easiest way is use a CAT 5 or CAT 6
cable to connect through wired
Ethernet to a Wifi router, which connects to an
Adsl modem or a cable modem
provided by your ISP.
Wired LAN (Ethernet)
For Wired Ethernet connection to a router with
DHCP enabled, the network
configuration for Internet connection is
automatically done and the Tuner can be
used for Internet radio and UPnP sharing
without user interaction. When the
network is connected, the Ethernet icon
will appear on the top left corner.
Wireless LAN (Wi-Fi)
Connect the Wi-Fi antenna to the connector on
the rear side of the tuner. If this is
first time use, the Configure Network wizard
will be displayed. Choose Yes to start
configuring network. Press the [Back/ ]
button to highlight Yes and press
[Tune/Select] to confirm.
Remove internet radio tuner
(called Tuner hereafter) from the package box.
• Plug in the DC adapter and switch the Power
on/off switch (on the rear cabinet) to ON.
Press [ ] button on the front (Power LED will
be briefly lit).
• Caution: Use only the adaptor supplied with
the radio. Connecting a power supply with a
different rating will cause permanent damage
to the radio and may be hazardous.
• The Tuner is intended to connect with
external powered speaker. It does not have
amplifier and speaker driver built-in.
Please connect your stereo through the
Analogue output or Digital output located on
the rear panel of the Tuner for listening.
Rimuovere il sintonizzatore radio Internet
(chiamato in seguito radio) dalla scatola
dell’imballaggio.
• Inserire l’adattatore DC e commutare
l’interruttore Power on/off (sul cabinet
posteriore) su ON. Premere il pulsante [ ]
sulla parte anteriore (il LED Power si accende
brevemente).
• Attenzione: Usare solo l’adattatore fornito
con la radio. Collegare un alimentatore
con una potenza diversa causerà danni
permanenti alla radio e può essere pericoloso.
• La radio è destinata al collegamento con
un’amplificazione esterna.
Non ha amplificatore e altoparlante
incorporati. Si prega di collegare il vostro
sistema di amplificazione utilizzando l’uscita
analogica o digitale situata sul pannello
posteriore.
01. OPERAZIONI PRELIMINARI
02. IMPOSTAZIONI DI RETE
01. TO START UP
02. NETWORK SETUP

10
Select Add/Remove AP from the list, use the
[Tune/Select] knob to scroll and
press it to confirm, then choose Add AP (Scan):
It will start scanning the available Wi-Fi
routers around. Scroll to your network and
press [OK] to confirm. If your wifi network has
a security code protected, it will ask
you to enter the passphrase/password. Please
refer to the above section ‘How to
input security code for your wireless network’
on pag 6.
When the Wi-Fi connection is successful, the
Association Complete will be shown
briefly. The wifi signal bar will appear on the
top left corner of the display:
Inizierà la scansione dei router Wi-Fi disponibili.
Scorrere fino alla rete prescelta e premere
[OK] per confermare. Se la rete wifi ha un
codice di sicurezza, verrà richiesto di inserire
la password. Si prega di fare riferimento alla
sezione precedente “codice di sicurezza” a
pag 6.
Quando viene stabilita la connessione Wi-Fi
apparirà brevemente la scritta
Association complete.
La barra del segnale Wi-Fi sarà visualizzata
nell’angolo in alto a sinistra sul display.
Selezionare Add/Remove AP dalla lista, usare
la manopola [Tune/Select] per scorrere e
premerla per confermare, quindi scegliere Add
AP (Scan):
BARRA DEL SEGNALE WI-FI WI-FI SIGNAL BAR
Add AP
Remove AP
Add/Remov e AP
AP: [ ]

11
Press [Menu/ ] to enter the main menu or
the on the remote control. Scroll by
rotating the [Tune/Select] knob or the [ / ]
button on remote:
My Favorite - To show the list of favorite
stations which have been assigned to the
presets. There are up to 99 presets available.
Internet Radio - Start exploring the worldwide
radio stations and music here.
Media Center - You can browse and stream
music from your network via UPnP or
DLNA Compatible devices.
DAB+/DAB Radio - Pick up DAB+ and DAB
radio signal if available in your local
area (no internet connection required).
FM Radio - Receive ordinary FM radio stations
in your local area
(no internet connection required).
Bluetooth - Bluetooth playback, to play audio
stream (receive) from another
Bluetooth enabled device after pairing/
connected each other.
Alarm - Alarm clock.
Two alarm settings available.
Sleep Timer - Enable the timer to turn the
radio in standby after the selected time
elapsed.
Configuration - More options/settings
available to personalize as you desire.
Premere [Menu/ ] per entrare nel menu
principale o il tasto sul telecomando.
Scorrere ruotando la manopola [Tune/Select] o
i tasti [ / ] del telecomando:
My Favorite - Per mostrare la lista delle
stazioni preferite che sono state assegnate ai
preset. Sono disponibili fino a 99 preset.
Internet Radio - Per iniziare ad esplorare le
stazioni radio e la musica di tutto il mondo.
Media Center - È possibile sfogliare e
trasmettere musica in streaming dalla rete
tramite UPnP o dispositivi compatibili DLNA.
DAB+/DAB Radio - Raccogli il segnale radio
DAB+ e DAB se disponibile nella tua zona
(nessuna connessione internet richiesta).
Radio FM - Ricevi le normali stazioni radio FM
nella tua area locale
(nessuna connessione internet richiesta).
Bluetooth - Riproduzione Bluetooth, per
riprodurre il flusso audio (ricevere) da un altro
dispositivo abilitato Bluetooth dopo
l’accoppiamento/collegamento reciproco.
Allarme - Sveglia.
Due impostazioni di allarme disponibili.
Sleep Timer - Abilita il timer per mettere la
radio in standby dopo il tempo impostato.
Configurazione - Più opzioni/impostazioni
disponibili per personalizzare come si
desidera.
03. PANORAMICA CARATTERISTICHE 03. OVERVIEW OF FEATURES

12
04.INTERNET RADIO 04.INTERNET RADIO
On the main menu, choose Internet Radio and
you will find the options below:
Select Skytune to start enjoying thousands of
radio stations over the world.
You can filter your search by Region, Music
genre and talks.
The Local Radio let you access quickly the
stations available in your local area
through internet connection.
Search
Instead of browsing the radio station list, you
can input a few characters of the
desired station to filter out / short list the
stations.
History
The radio memorizes the stations you have
listened up to 99 stations.
If you have listened more than 99 stations, it
will supersede the first station that you
have listened.
History
La radio memorizza le stazioni ascoltate fino
ad un numero massimo di 99.
Oltre alla 99 esima stazione, l’ultima sostituirà
la prima stazione ascoltata.
Search
Invece di sfogliare l’elenco delle stazioni radio,
è possibile inserire alcuni caratteri della
stazione desiderata per filtrare / accorciare la
lista delle stazioni.
Note - You can change the Local Radio area
under Configuration> Local radio setup.
Please refer to section 11 for the details.
When you scroll along the list of Globe All
and want to quickly reach to a certain point of
the long list, input the index number on the
remote control to quickly jump to that point.
For example, on the remote control, input 28
and press OK, it will highlight the station no.
28.
Nota - È possibile cambiare l’area della radio
locale in Configuration> Local radio setup.
Si prega di fare riferimento alla sezione 11 per
i dettagli.
Quando scorrete la lista Globe All e volete
raggiungere rapidamente un certo punto
della lista, inserite il numero di indice sul
telecomando per saltare rapidamente a quel
punto. Per esempio, sul telecomando, inserite
28 e premete OK, verrà evidenziata la stazione
n. 28.
Selezionate Skytune per iniziare a godere di
migliaia di stazioni radio in tutto il mondo.
È possibile filtrare la tua ricerca per regione,
genere musicale e argomenti.
La Radio Locale ti permette di accedere
rapidamente alle stazioni disponibili nella tua
area locale attraverso la connessione internet.
Nel menu principale, scegliete Internet Radio e
troverete le opzioni qui sotto:

13
Start playing internet radio
When a radio station starts playing, more radio
information can be displayed.
Press the button in the state of the playing
screen below:
Every time you press the button, it will show
various information at a time such as
the streaming bit rate, name of the song, artist
name (if available), the big time clock
and the radio’s station logo (if available):
The new added station will always show in the
last item on the Favorite list.
You can store up to 99 presets.
Recall a station
Press the button on the remote control
to recall the list of presets, or navigate to My
Favourite on the main menu and select it to
confirm.
Edit your favorite list
On the Favorite list, choose the radio station
you want to edit then press the [ ]
button on the remote control (or press
[Forward/ ] on the unit). It will enter the
Edit menu with the following options:
Move down - To move down the ranking of a station
Move up - To move up the ranking of a station
Delete - To delete a particular station
La nuova stazione aggiunta apparirà sempre
nell’ultima voce della lista dei preferiti.
È possibile memorizzare fino a 99 preset.
Richiamare una stazione
Premere il pulsante sul telecomando per
richiamare l’elenco dei preset, oppure navigare
fino a My Favourite nel menu principale e
selezionarlo per confermare.
Modificare l’elenco dei preferiti
Nell’elenco dei preferiti, scegliere la stazione
radio che si desidera modificare, quindi
premere il pulsante [ ] sul telecomando
(o premere [Forward/ ] sull’unità).
Si accederà al menu di modifica con le
seguenti opzioni:
Move down - Per spostare in basso una stazione
Move up - Per spostare in alto una stazione
Cancella - Per cancellare una particolare
stazione
Ogni volta che si preme il pulsante verranno
visualizzate varie informazioni come
il bit rate dello streaming, il nome della
canzone, il nome dell’artista (se disponibile),
l’ora corrente e il logo della stazione radio
(se disponibile):
Iniziare la riproduzione dell’internet radio
Quando una stazione radio inizia la
riproduzione, possono essere visualizzate altre
informazioni sulla radio.
Premere il pulsante nello stato della
schermata di riproduzione qui sotto:

14
05. MEDIA CENTER 05. MEDIA CENTER
The device supports UPnP and is DLNA-
compatible.
This provides the opportunity to stream music
from your network. However, this requires you
to have a compatible device in your network
that can function as a server. This can be e.g.,
a network hard drive or a conventional PC
with e.g., Windows 10 via which access to the
shared folder or media sharing is permitted.
The folders can then be browsed and played on
the Tuner.
Note - Please make sure your computer laptop
is on the same Wi-Fi network as the
Radio before you start using this function.
Music streaming
• Once the UPnP/DLNA compatible server is
configure to share media files with your
radio, you can start music streaming.
• On the main menu, select Media Centre and
choose UPnP.
• It may take a few seconds for the radio to
complete the scan for available UPnP
servers. If no UPnP servers are found, it will
show Empty List.
• After a successful scan is done, select your
UPnP server.
• The radio will show the media categories
available from the UPnP server, e.g.
‘Music’, ‘Playlists’ etc.
• Choose the media files that you wish to play.
You can set the mode of playback under
Configuration > Playback setup.
My Playlist
You can make your own playlist for the UPnP
music files. Choose and highlight the
song you want to add to playlist, press and
hold the [Tune/Select] knob or press
and hold the [OK] button on remote, until the
sign appears.
The song will be added to My playlist.
Clear My Playlist
Remove all songs in “My Playlist” to allow a
new playlist to be prepared.
Note - If you have DLNA compatible servers
available, follow the steps described
above to browse the audio files from DLNA
compatible device on the Tuner to play.
Il dispositivo supporta UPnP ed è compatibile
con DLNA.
Questo offre l’opportunità di trasmettere
musica in streaming dalla vostra rete.
Tuttavia, questo richiede un dispositivo
compatibile nella rete che possa funzionare
come server. Questo può essere, ad esempio,
un disco rigido di rete o un PC convenzionale
con, ad esempio, Windows 10 attraverso il
quale è consentito l’accesso alla cartella
condivisa o alla condivisione dei media.
Le cartelle possono quindi essere sfogliate e
riprodotte sulla radio.
Nota - Assicurarsi che il computer sia sulla
stessa rete Wi-Fi della Radio prima di iniziare
a usare questa funzione.
Musica in streaming
• Una volta che il server compatibile UPnP/
DLNA è configurato per condividere file
multimediali con la radio, è possibile avviare lo
streaming musicale.
• Nel menu principale, selezionare Media
Center e scegliere UPnP.
• La radio potrebbe impiegare alcuni secondi
per completare la scansione dei server UPnP.
Se non viene trovato alcun server UPnP,
mostrerà Empty List.
• Dopo che la scansione è stata effettuata con
successo, selezionare il server UPnP.
• La radio mostrerà le categorie multimediali
disponibili dal server UPnP, ad esempio
‘Musica’, ‘Playlists’ ecc.
• Scegliete i file multimediali che si desidera
riprodurre. È possibile impostare la modalità
di riproduzione in Configuration > Playback setup.
My Playlist
È possibile creare la propria playlist per i file
musicali UPnP. Scegliere ed evidenziare il
brano che si desidera aggiungere alla playlist,
tenere premuta la manopola [Tune/Select] o
premere e tenere premuto il pulsante [OK] sul
telecomando, finché non appare il simbolo
Il brano verrà aggiunto a My playlist.
Clear My Playlist
Rimuove tutti i brani in “My Playlist” per consentire
la preparazione di una nuova playlist.
Nota - Se si dispone di server DLNA compatibili,
seguire i passaggi descritti sopra per sfogliare i
file audio dal dispositivo DLNA compatibile sul
sintonizzatore da riprodurre.

15
06. DAB+/DAB RADIO 06. DAB+/DAB RADIO
If there is Digital Audio Broadcasting (DAB) in
your area, the Tuner can pick up the
DAB stations as well (no internet connection is
required). The Tuner supports both
DAB and DAB+.
Connect the wire antenna (supplied in the box)
to the antenna jack on the rear
cabinet. Place the Tuner close to the window
and extend the antenna as far as it can
go to get the best reception.
On the main menu, scroll to DAB Radio or use
the [Mode] button on remote to
switch to DAB Radio. Press [OK] to start.
It will ask whether you want to Scan DAB
Station. Press OK to start scanning and it
will show the progress on the number of
channels received. When it is done, a
preset page will be displayed for your action.
You can select the channel and start listening
to it. Whenever you want to add to My
Favourite, press the button and it will add
to the favourite list.
Always press the [ ] button (or [Back/ ] on
the unit) to return to the Preset list.
Note - When a DAB radio is playing,
press the [ ] button to view more radio
information, each time you press the [ ]
button, it will display various information
at a time such as radio frequency, rolling texts
(if available) and big time clock.
New digital radio stations should be picked up
automatically by the Tuner if they are
part of a multiplex you already received.
Otherwise you need to do the Preset Scan
again.
Selezionare un canale per ad ascoltarlo.
Per aggiungere ai preferiti un canale premere
il pulsante e verrà aggiunto alla lista.
Premere il pulsante [ ] (o [Back/ ]
sull’unità) per tornare all’elenco dei preferiti.
Nota - Quando una radio DAB è in riproduzione,
premere il pulsante [ ] per visualizzare
altre informazioni ogni volta che si preme
il pulsante [ ], verranno visualizzate varie
informazioni come la frequenza radio, i testi
scorrevoli (se disponibili) e l’ orario.
Le nuove stazioni radio digitali dovrebbero
essere captate automaticamente dal
sintonizzatore se sono parte di un multiplex
già ricevuto. Altrimenti è necessario rifare la
scansione.
La radio può captare anche le stazioni DAB
(Digital Audio Broadcasting) (non è necessaria
una connessione Internet). Il sintonizzatore
supporta sia DAB che DAB+.
Collegare l’antenna a filo (fornita nella
confezione) al jack sul retro dell’unità.
Posizionare il sintonizzatore vicino alla finestra
ed estendere l’antenna al massimo per
ottenere la migliore ricezione.
Nel menu principale, scorrere su DAB Radio o
usare il pulsante [Mode] sul telecomando per
passare a DAB Radio. Premere [OK] per
iniziare.
Verrà chiesto se si desidera eseguire la
scansione delle stazioni DAB. Premere OK
per iniziare la scansione e verrà visualizzato
il progresso del numero di canali ricevuti.
Una volta terminata la procedura una pagina
preimpostata sarà visualizzata.

16
07. RADIO FM 07. RADIO FM
To receive the ordinary FM stations (no
internet connection is required), connect
the wire antenna (supplied in the box) to the
antenna jack on the rear cabinet first.
Place the Tuner close to the window and
extend the antenna as far as it can go to
get the best reception.
On the main menu, scroll to FM Radio or use
the [Mode] button on remote to switch
to FM Radio. Press [OK] to start.
It will ask whether you want to Scan FM
Station. Press OK to start scanning and it
will show the progress on the number of
channels are found. When it is done, it will
automatically save the found channels on
presets and display the list for your action.
You can select the channel and start listening
to it. Whenever you want to add to My
Favourite, press the button and it will add to
the favourite list.
Always press the [ ] button (or [Back/ ]
button on the unit) to return to the Preset list.
Note - When it is playing FM radio, press the
[ ] button to view more radio information,
each time you press the [ ] button, it will
display various information at a time such as
radio frequency and big clock display.
Manual Tune
To manual tune to the frequency, long press
the [OK] on remote or long press
[Tune/Select] on the unit, until you see the
“Tuning” appeared on the display, at
the bottom right corner.
Use the < / > button on remote to tune the
frequency. When done, long press
the [OK] button to exit manual tune.
Selezionare un canale per iniziare la
riproduzione. Per aggiungere un canale ai
preferiti, premere il pulsante
Premere il pulsante [ ] (o [Back/ ] sull’unità)
per tornare alla lista dei preferiti.
Nota - Quando è in riproduzione la radio FM
premere il pulsante [ ], verranno visualizzate
varie informazioni, come la frequenza,
l’orologio, ecc...
Sintonia manuale
per sintonizzare manualmente la frequenza,
premere a lungo [OK] sul telecomando o
premere a lungo [Tune/Select] sull’unità,
finché non appare la scritta “Tuning” sul
display, nell’angolo in basso a destra.
Usa i tasti < / > sul telecomando per
sintonizzare la frequenza. Al termine,
premere a lungo il tasto [OK] per uscire dalla
sintonizzazione manuale.
Per ricevere le stazioni FM ordinarie
(non è necessaria una connessione a Internet),
collegate l’antenna a filo (fornita nella scatola)
alla presa sul retro della radio.
Posizionare il sintonizzatore vicino alla finestra
ed estendere l’antenna fino a dove può andare
per ottenere la migliore ricezione.
Nel menu principale, scorrere fino a Radio FM
o usare il pulsante [Mode] del telecomando
per passare su Radio FM epremere [OK].
Il sistema chiederà conferma per eseguire
la scansione delle stazioni FM. Premere OK
per iniziare, il progresso del numero di canali
trovati verrà visualizzato sul display. Una
volta terminata la scansione i canali verranno
salvati come preset.

17
08. RIPRODUZIONE BLUETOOTH 08. BLUETOOTH PLAYBACK
Before transmission between your Bluetooth
device and the radio is possible, both
devices must be coupled. This process is
called “pairing”. The Tuner is served as a
receiver, to receive music stream to play on
the Tuner.
If you have already coupled to a Bluetooth
device before, this connection will be
restored automatically when both devices are
in range and Bluetooth operation has
been selected on the radio. “Pairing” does not
have to be repeated. This function
may need to be activated in your Bluetooth
device, however.
• Push the Menu button to display the
selection menu for the different operating
modes.
• Use the up / down button to select the
operating mode Bluetooth and push the dial
switch.
• Switch your Bluetooth device to which you
want to connect the radio on and
activate the pairing mode here. The device
scans for Bluetooth devices in the
reception range.
• When the radio is found, your bluetooth
device shows its name ZZONE-IR-XXXX or
ZZONE-IRCD-XXXX depends on the model. (the
XXXX is an identification code for your radio
unit).
• Select the radio at your bluetooth device.
• Start playback on your bluetooth device.
• Playback now takes place using the radio.
Prima che la trasmissione Bluetooth
sia possibile, i dispositivi devono essere
accoppiati. Questo processo si chiama
“Pairing”.
Se si è già accoppiato a un dispositivo
Bluetooth in precedenza, questa connessione
verrà ripristinata automaticamente.
Il “Pairing” non deve essere ripetuto.
• Premere il pulsante Menu per visualizzare
il menu di selezione delle diversi modalità di
funzionamento.
• Usare il pulsante su / giù per selezionare il
modo operativo Bluetooth e confermare.
• Accendere il dispositivo Bluetooth a cui si
desidera collegare la radio e attivare qui la
modalità di accoppiamento. L’apparecchio
scansiona i dispositivi Bluetooth nel
campo di ricezione.
• Quando la radio viene trovata, il dispositivo
bluetooth mostra il suo nome ZZONE-IR-XXXX
o ZZONE-IRCD-XXXX a seconda del modello.
(il XXXX è un codice di identificazione della
vostra radio).
• Selezionate la radio sul dispositivo bluetooth.
• Avviare la riproduzione sul dispositivo
bluetooth.
• La riproduzione avviene ora tramite la radio.

18
09. IMPOSTAZIONI SVEGLIA 09. ALARM SETTING
• Choose Alarm from the main menu or press
the [Alarm] button on the remote control.
• Select either Alarm 1 or Alarm 2, choose
Turn on to activate the Alarm.
• Follow the alarm wizard instructions to set
the alarm.
• The wizard will guide you through the
settings below:
Time - Set the time for the alarm
Sound - You can choose Wake to Tone, My
Favourite, Wake to FM Radio or
Wake to DAB Radio as the alarm source.
Note - Wake to FM or Wake to DAB Radio -
only the preset stations can
be used for the radio alarm (if the preset scan
has been completed).
Wake to My Favourite - Please preset your
favorite station before setting this as the alarm
source.
Repeat - You can schedule the alarm as you
desire -Everyday, Once or multiple days.
Alarm Volume - Adjust the volume of the
alarm as you like by rotating the [Tune/Select]
knob or [ / ] button on remote.
Alarm duration - Set the duration of the alarm
from the preset options ranging from 30 to 180
minutes. The radio will be turned to standby
when the selected duration of time is due.
• After the above settings are completed,
press the [ ] button to exit and make sure
the Alarm is turned on. You will see the Alarm
icon appeared on the display if it is
activated.
• Scegliere Alarm dal menu principale o
premere il tasto [Alarm] sul telecomando.
• Seleziona Allarme 1 o Allarme 2, scegli
Attiva per attivare la sveglia.
• Seguire le istruzioni della procedura guidata
per impostare l’allarme.
• La procedura guidata assisterà l’utente
attraverso le impostazioni seguenti:
Time - Imposta l’ora della sveglia
Sound - Permette di scegliere Wake to Tone,
My Favourite, Wake to FM Radio o
Wake to DAB Radio come fonte della sveglia.
Nota - Wake to FM o Wake to DAB Radio -
solo le stazioni preimpostate possono
essere usate per la sveglia radio (se
la scansione delle preselezioni è stata
completata).
Wake to My Favourite - Preimpostare la
stazione preferita prima di impostarla per la
sveglia.
Repeat - permette di impostare la cadenza:
Tutti i giorni, una volta o più giorni.
Alarm Volume - Regola il volume della sveglia
ruotando la manopola [Tune/Select] o
i tasti [ / ] del telecomando.
Alarm duration - Imposta la durata con
opzioni preimpostate che vanno da 30 a 180
minuti. La radio verrà messa in standby
quando la durata di tempo selezionata è
scaduta.
• Dopo aver completato le impostazioni di cui
sopra, premere il pulsante [ ] per uscire.
L’icona Alarm apparirà sul display quando la
funzione è attivata.

19
10. IMPOSTAZIONI SLEEP
11. CONFIGURAZIONE
10. SLEEP TIMER SETTING
11. CONFIGURATION
You can set the timer to let the radio goes
standby after the selected time elapsed in
the range of 15 minutes to 180 minutes.
Press [ ] button on the remote control to set
the timer.
You will see the icon appeared on the display if
the timer is set.
Here you will find the complete settings /
options available to configure your own
tuner. On the main menu, navigate to
Configuration setting. Press OK and you will
see a list of options available.
Network
• Network Options
Always on: The WLAN function remains
switched on (faster access when
switching from DAB or FM mode to Internet
radio).
Auto off in 30s: The WLAN function shuts down
after 30 seconds when not in use
(to save energy).
• Wi-Fi Channels
Not all of the Wi-Fi channels are available in
every country. There may be variation
between different countries. Therefore it is
necessary to choose the Wi-Fi
channels to ensure the Wi-Fi performs
satisfactory. We have already set the channels
according to the requirement in different
countries. Choose the country you are staying
from the list to get the correct channel.
The Europe/United Kingdom is set by default,
press [OK] on the Remote control
or push the [Tune/Select] knob to edit the
country selection.
Qui si trovano le impostazioni della radio.
Dal menù principale, navigare fino a
Configuration setting. Premere OK per
visualizzare l’ elenco di opzioni disponibili.
Network
• Network Options
Sempre attivo: La funzione WLAN rimane
accesa (accesso più veloce quando si passa
dalla modalità DAB o FM alla radio Internet).
Auto off in 30s: La funzione WLAN si spegne
dopo 30 secondi quando non viene utilizzata
(per risparmiare energia).
• Wi-Fi Channels
Non tutti i canali Wi-Fi sono disponibili in ogni
paese. Ci può essere una variazione
in base alla zona. Pertanto è necessario
scegliere i canali Wi-Fi per garantire che
il Wi-Fi funzioni in modo soddisfacente.
Scegliere il paese in cui ci si trova dalla lista
per ottenere il canale corretto.
L’Europa/Regno Unito è impostato di default,
premere [OK] sul telecomando
o premere la manopola [Tune/Select] per
modificare la selezione del paese.
È possibile impostare il timer in modo che la
radio vada in standby dopo un certo tempo
variabile da 15 minuti a 180 minuti.
Premere il tasto [ ] sul telecomando per
impostare il timer.
L’icona apparirà sul display se il timer è
impostato.

20
Wi-Fi Network
• Add / Remove AP
Add AP - It will scan out a list of routers
around.
Add AP (WPS button) - Choose this option to
connect your Wi-Fi router via WPS if the router
has a WPS button.
Add AP (SmartConfig) - Choose this option
to configure the W-Fi network with a smart
phone through an app.
It is available on iOS App
Store and android play store. Search and
install the app “Esptouch”.
Have your smart phone connected to the Wi-Fi
network which the radio will be connected to.
It is recommended to place the radio within 2
meters from the router for better successful rate.
Follow the steps below:
1. On the radio, navigate to Configuration >
Network > Add/Remove AP > Add AP
(SmartConfig), press OK to confirm
2. Launch the App on your smart phone
3. The name of the SSID (your Wi-Fi network)
will show up as follow:
4. Enter the password of your network.
5. Tap “Multicast” followed by “Confirm” to
complete.
The radio will start associating with the
network and followed with the
message “Association complete” if network is
successfully connected.
Remove AP - If you have already added a
router and want to remove it, choose
this option.
Note - Always bring the Tuner within 2 meters
of the Wi-Fi router for setup.
4. Inserire la password della rete.
5. selezionare “Multicast” seguito da
“Conferma” per completare.
La radio inizierà l’associazione con la
rete, comparirà il messaggio “Association
complete” se la rete è stata collegata con
successo.
Remove AP - Se si è già aggiunto un router e si
vuole rimuoverlo.
Nota - collocare sempre il Tuner entro 2 metri
dal router Wi-Fi per la configurazione.
Wi-Fi Network
• Add / Remove AP
Add AP - Eseguirà la scansione di una lista di
router nei dintorni.
Add AP (WPS button) - Scegliere questa
opzione per connettere il router Wi-Fi via WPS
se il router ha un pulsante WPS.
Add AP (SmartConfig) - Scegli questa
opzione per configurare la rete W-Fi con uno
smartphone attraverso un’app.
È disponibile su iOS App Store e Android Play
Store. Cerca e installa l’app “Esptouch”.
Collegare lo smartphone alla rete Wi-Fi a cui
la radio è collegata.
Si raccomanda di posizionare la radio entro
2 metri dal router per un migliore tasso di
successo.
Seguite i passi seguenti:
1. Sulla radio, andare su Configuration >
Network > Add/Remove AP > Add AP
(SmartConfig), premere OK per confermare
2. Lancia l’App sullo smart phone
3. Il nome dell’SSID (la rete Wi-Fi) apparirà
come segue:
This manual suits for next models
3
Table of contents