manuals.online logo
Brands
  1. Home
  2. •
  3. Brands
  4. •
  5. 2connect
  6. •
  7. Automobile Accessories
  8. •
  9. 2connect CAM-FT6 User manual

2connect CAM-FT6 User manual

Connects2Vision
- Resolution 720 x 480 (Wide Angle View)
- Picture Mode NTSC
- CMOS Chipset: 1/3”
- Lens FOV: 210 Degrees (H) x 140 Degrees (V)
- Viewing Angles: Birds-Eye, Wide Angle, Reversing Left/Right Blind Spot, Driving
- Waterproof Rating: IP67
- Parking Guidelines Yes (Removable/Dynamic)
User Manual
Prior to Installation
Read the manual prior to installation. Technical knowledge is necessary for installation. Please ensure you use
the correct tools to avoid damage to the vehicle or product.
Connects2 can not be held responsible for the installation of this product.
Technical Support
Connects2 want to provide a fast and suitable resolution should you encounter any technical issues. With this in
mind, when contacting Connects2, try to provide as much Information as possible. This will speed up the process
and help us to help you.
Please use our dedicated online technical support centre: support.connects2.com
2-in-1 Reversing Camera/Brake Light Solution
with Wireless Controller
Fiat Ducato (X250) 2006 - 2014, (X290) 2014-UP
PRODUCT FEATURES:
CAM-FT6
V1-10-19
www.connects2.com
2
Connects2Vision
CAM-FT6
Extension Cable
Power Adapter
Cable
Make Connections to Vehicle/Unit
Camera replaces OEM brake light
Control Unit
Wireless Controller (Mount on dashboard)
Control Unit
Extension Cable
Power Adapter
Cable
Vehicle Connection Overview
Wiring Diagram
INSTALLATION
1 Red Acc 12V Connect to vehicle 12V Accessory feed
2 Black Ground Connect to ground
3 Green Reverse Trigger Connect to vehicle reverse trigger output
4 Blue CAN + Connect to rear of OBD connector (see diagram on Page 3)
White CAN - Connect to rear of OBD connector (see diagram on Page 3)
www.connects2.com 3
Connects2Vision
Extension Cable
USING THE WIRELESS CONTROLLER
The wireless controller included in the kit can be used to change the viewing mode of the camera, as
well as adjust key parameters for each viewing mode.
To bring up the HUD menu, put
the vehicle into reverse gear and
press A.
Note: The HUD menu will time-out
after 3 seconds to allow an unin-
hibited view of the camera image.
Press the A button to bring the HUD
menu back onto the screen
The currently selected viewing mode is displayed by the icon in the centre of the HUD menu. This will
default to Driving/Rear-View mode, or to Reversing mode when in reverse gear.
To change the camera mode, whilst the vehicle is in reverse gear, press B or C to cycle through the
Reversing, Wide Angle and Birds-Eye viewing modes.
Start-Up
HUD Menu
Switch to
Wide Angle
Switch to
Birds-eye
Go to Settings
Currently selected view
Viewing Modes
Reversing (Select from HUD Menu) Driving/Rear-View (Default view when not in reverse)
A
BC
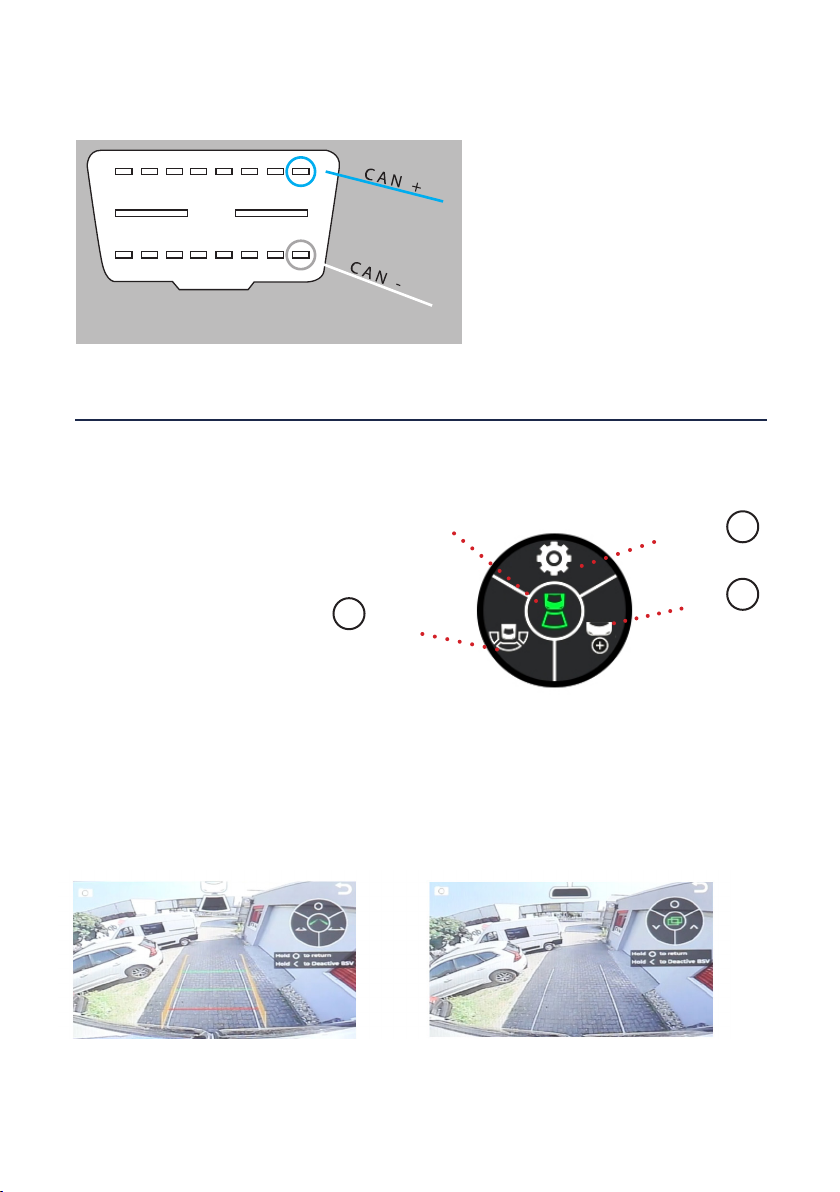
Connecting CAN-Bus Wiring
FRONT OF OBD CONNECTOR
Locate the vehicle’s OBD port and unscrew/
remove the female connector.
On the reverse of the connector (the side
where wiring enters it), connect the CAN
+ (blue) and CAN - (white) wires from the
harness to the locations specied in the
diagram (Pins 1 and 9).
12345678
10111213141516 9
www.connects2.com
4
Connects2Vision
Adjusting Settings
To adjust settings for all viewing modes, press A from the HUD menu to enter the settings menu.
Once in the settings menu, short press A to cycle through the various settings screens available. Screens
include camera angle and position for each mode, and guideline width for parking lines.
Once in a settings screen, the selected setting is indicated by the icon in the centre of the display. The
parameters can be adjusted with B and C.
To return to the previous screen, Press and hold A.
Activating/Deactivating Blind Spot View (BSV) Mode
When in any of the settings screens, a long press of B will activate or deactivate BSV (Blind Spot View).
When active, this will trigger the blind spot camera image when an indicator is activated and the vehicle
is moving at a speed of over 40km/h.
When inactive, using the indicators will not trigger the blind spot view and the camera will remain in
Driving/Rear-View mode.
Note: this function will only work if the CAN-Bus wiring is connected.
Move to next setting
(Short Press)
Return to previous
(Long Press)
Adjust parameter
Adjust paramater
(Short Press)
Activate/Deactivate BSV
(Long Press)
Currently selected
setting
A
C
B
Birds-Eye (Select from HUD Menu) Left Blind Spot (Triggered by Indicator - See Page 4)
Wide Angle (Select from HUD Menu) Right Blind Spot (Triggered by Indicator - See Page 4)

Other 2connect Automobile Accessories manuals

2connect CT23AU13/L User manual

2connect

2connect CT23AU13/L User manual

2connect CAM-VW7 User manual

2connect

2connect CAM-VW7 User manual

Popular Automobile Accessories manuals by other brands

AVS RM43B owner's manual

AVS

AVS RM43B owner's manual

Brodit Mobile Phones brochure

Brodit

Brodit Mobile Phones brochure

Goobay 43561 user manual

Goobay

Goobay 43561 user manual

Scosche MAGICMOUNT MAGDM manual

Scosche

Scosche MAGICMOUNT MAGDM manual

Quadratec 07-Current Wrangler installation manual

Quadratec

Quadratec 07-Current Wrangler installation manual

WeatherTech No-Drill MudFlap installation instructions

WeatherTech

WeatherTech No-Drill MudFlap installation instructions

Mountain Top Roll Bar manual

Mountain Top

Mountain Top Roll Bar manual

Fabbri BICI OK 2 quick start guide

Fabbri

Fabbri BICI OK 2 quick start guide

Advantech TREK-743 user manual

Advantech

Advantech TREK-743 user manual

BAK bakFlip Installation sheet

BAK

BAK bakFlip Installation sheet

Denali UP72STBK manual

Denali

Denali UP72STBK manual

bosal 036573 Fitting instructions

bosal

bosal 036573 Fitting instructions

Car Shades SKO-FABI-E-C installation manual

Car Shades

Car Shades SKO-FABI-E-C installation manual

Metra Electronics 99-8214TB installation instructions

Metra Electronics

Metra Electronics 99-8214TB installation instructions

Yakima EXO SnowBank quick start guide

Yakima

Yakima EXO SnowBank quick start guide

Horizon Fitness 36650 installation instructions

Horizon Fitness

Horizon Fitness 36650 installation instructions

Federal Signal Corporation ML-PT instruction sheet

Federal Signal Corporation

Federal Signal Corporation ML-PT instruction sheet

SPEEDY-LIFT SP-CHR17R installation manual

SPEEDY-LIFT

SPEEDY-LIFT SP-CHR17R installation manual

manuals.online logo
manuals.online logoBrands
  • About & Mission
  • Contact us
  • Privacy Policy
  • Terms and Conditions

Copyright 2025 Manuals.Online. All Rights Reserved.