3B SCIENTIFIC U192001 User manual

3B SCIENTIFIC®PHYSICS
1
X-ray apparatus U192001
Instruction sheet
05/11 ALF / Hh

2
1. Protection from radiation
From the first use of the X-ray apparatus to the last,
you must ensure that any planned use is in con-
formance with local legislation, stipulations and
regulations and has been approved by the respon-
sible authorities or otherwise certified.
High voltage may only be applied when the cover is
closed and the safety circuitry is correctly con-
nected and activated. Only when this has been
done can the X-ray apparatus be operated. The
housing is secured against unauthorised opening
by means of a self-tapping screw. This prevents X-
ray radiation from escaping and allows experi-
ments to be performed in safety.
The maximum operating parameters U= 30 kV and
I= 100 μA must not be exceeded.
Every time the X-ray apparatus is used, the radia-
tion protection equipment must be checked as
specified in Section 8.1.
Never open the housing of the X-ray apparatus. Any
attempt to manipulate, repair or otherwise tamper
with the equipment other than setting it up for use
in a laboratory invalidates the certification for this
type of equipment and it may no longer be used
for any purpose. Repairs may only be made by the
manufacturer UK 3B Scientific Ltd.
•The apparatus must be secured in such a way
as to prevent unauthorised access.
2. Safety instructions
The X-ray apparatus conforms to safety regulations
for electrical measuring, control and laboratory
equipment as specified in DIN EN 61010 Part 1 and
is designed to meet protection classification I. It is
to be operated in dry rooms as appropriate for the
use of electrical equipment.
Safe operation of this equipment is guaranteed as
long as it is used as stipulated. However, there is no
guarantee of safety if the equipment is used incor-
rectly or carelessly. If there is any suspicion that the
equipment can no longer be operated without risk
(e.g. if visible damage is detected), the equipment
must immediately be withdrawn from use and
secured in such a way as to prevent its inadvertent
operation.
•As soon as you have unpacked the X-ray appara-
tus, check it for any signs of damage that may
have occurred during transport. If any damage is
found, do not attempt to operate the equipment
but inform the manufacturer UK 3B Scientific Ltd.
•Please do not dispose of the packaging, since it
might be handy should you need to return the item.
•Before using the equipment for the first time,
ensure that the mains voltage selector switch is
set to the right voltage.
Due to the high dosage potential inside the X-ray
apparatus, users are obliged to treat the equip-
ment with special care.
•Before any use of the X-ray apparatus, the
housing, the cover plus the control and display
elements should all be checked and in particu-
lar the radiation protection equipment must
be checked as specified in Section 8.1.
•If any damage is found, the equipment must
immediately be withdrawn from use and se-
cured in such a way as to prevent its inadver-
tent operation.
•If any malfunction occurs, the equipment must
immediately be withdrawn from use and se-
cured in such a way as to prevent its inadver-
tent operation.
•If the high voltage indicator lamp is lit even
though the cover has not been fully closed and
locked in its central position, the equipment
must immediately be withdrawn from use.
If the cathode heater filament of the tube is not oper-
ating, then no “afterflash” (spark discharge of the tube
heater filament on disconnection of high voltage) can
take effect when the high voltage supply is turned off.
In this event, a high voltage can remain in effect in
the tube for up to 6 hours after disconnection.
•For this reason you should not touch any of the
high voltage terminals for at least 6 hours after
failure of the cathode.
•When replacing bulbs or fuses, always discon-
nect from the mains.

3
3. Components and control elements
1 Fine adjustment trimmer for goniometer
2 Trimming potentiometer for setting emitter current
3 High voltage ON/OFF button
4 Housing
5 Base
6 Timer
7 Key switch for mains supply
8 Jack socket for emitter current measurement, giving
an output voltage proportional to current
9 Cover
10 Screening plate with radiation warning label

4
11 Dumbbell shaped slot for locking the cover
12 Protractor scale for measuring arm
13 Measuring arm with magazine for photographic
slides
14 Pressure plate
15 Protractor scale for sample holder
16 Sample holder
17 Radiation exit window with brass collimator
18 Securing screws for leaded glass dome
19 X-ray tube
20 Access holes
21 Leaded glass dome
22 Locking pin for cover
23 Length scale for focal point
24 4-mm sockets for addition of driver motor
25 High voltage selector switch
26 Mains voltage indicator lamp (white)
27 High voltage indicator lamp (red)

5
28 Circuit breaker for mains supply
29 Circuit breaker for high voltage supply
30 Mains voltage selector switch
31 Ventilation grille
32 Mains socket
4. Description
The X-ray apparatus allows you to undertake a wide
variety of experiments on the following topics:
•Properties of X-rays:
Penetration by X-rays
Straight-line propagation
Ionisation
X-ray photography
•Fluorescence
•Shielding from X-rays
•Absorption experiments
•Distance law
•Dosimetry and radiation protection
•Refraction of X-ray beams:
Laue imaging
Debye-Scherrer imaging
•Bragg reflections
Duane-Hunt displacement law (determination of
Planck's constant h)
•Moseley's law
A horizontal counter tube goniometer is built into
the X-ray apparatus that consists of a pivoting meas-
urement arm with a sample holder on its axis of
rotation. The arm takes the form of a magazine for
photographic slides and can also accommodate a
Geiger-Müller counter (U19201), an ionisation cham-
ber (U19208) and various experimental equipment,
either in the shape of slides or mounted on a 50 mm
x 50 mm baseplate (e.g. U19205, U19206, U19207).
The pivoting arm can be turned by hand around the
sample holder or can be coupled to a fixed angle at a
2:1 ratio for experiments on Bragg reflection, for
example. The space where the experiment takes
place is inside a closed housing with a transparent,
radiation-proof cover. The cover has a safety lock
that prevents it from being opened until the high-
voltage ON/OFF button has been switched to OFF and
a delay of 2 seconds has elapsed for the decay of the
high voltage. A timer for a period of up to one hour
allows you to set up long exposures and means that
the equipment does not continue operating for long
periods without supervision. The highly evacuated X-
ray tube with its directly heated tungsten cathode
and copper anode is made of borosilicate glass with
a concave, thin-walled exit window. A leaded glass
cover with a brass collimator allows the X-ray beam
to exit parallel to the top of the apparatus and pre-
vents any scattered radiation from escaping. The
emitted X-ray beam strikes a lead-aluminium screen-
ing plate bearing a radiation symbol of the same
diameter as the uncollimated X-ray beam

6
5. Scope of delivery
1 Basic apparatus
1 X-ray tube
1 Jack plug
2 Fuses
1 Radiation warning plates in German, English,
French and Spanish
1 Instruction sheet
6. Technical data
X-ray tube:
Anode voltage: 20/30 kV selectable,
electronic stabilisation
Emitter current: 0 to 80 μA continuously
adjustable with electronic
stabilisation
Radiation dosage: < 0.1 mrem/h-1 at 0.1 m
from accessible surfaces
Heated cathode: 4 V, 1 A
Focal point: 5 mm x 1 mm
Anode material: Cu
Leaded glass collimator: 5 mm dia.
Beam divergence: Better than 10°
Wavelength of
charact. radiation: Cu -Kα: 154 pm
Cu -Kβ: 138 pm
Dimensions: 100 mm x 32 mm dia.
Counter tube goniometer:
Pivot range: 0°
+10° to +130° and
-10° to -130° relative to
axis of beam
Angle coupling: Independent of sample
holder alignment or in the
ratio 2:1
Accuracy of
Bragg angle 2 θ: 5 minutes of arc
Timer: 0 to 60 min, continuously
adjustable
Mains: 115 V/230 V, 50/60 Hz via
mains lead
Power consumption: 100 VA
Dimensions: 250 mm x 370 mm dia.
Weight: 9 kg
7. Spares and accessories
1. Spare X-ray tube U19204
2. Basic equipment set U19205
The basic equipment set allows for qualitative
and quantitative experiments, e.g. on straight-
line propagation, ionisation, penetration by X-
rays and X-ray photograph, demonstration of the
wave nature of X-ray radiation, investigation of X-
ray fluorescence and determination of mass-
absorption coefficients.
Scope of delivery:
1 Fluorescent screen
1 Debye-Scherrer camera
2 Film cartridges
1 Lead stencil
2 Plate electrodes on 4-mm plug
1 Slotted collimator aperture, 1 mm
1 Pinhole collimator aperture, 1 mm Ø
1 Spare magazine with circular apertures
2 Slotted apertures, 1 mm/3 mm
1 Circular aperture, 9.5 mm dia.
2 Monocrystals, LiF, NaCl
2 Miniature crystals, LiF
1 Powder sample, LiF
10 Copper wires
4 Absorption films, Ni, Cu, Co, Zn
1 Revolver for scattering films, coated with the
following elements V, Cr, Mn, Fe, Co, Ni, Cu,
Zn
1 Remote controller for scattering film revolver
1 Set of assembly aids (acetate adhesive, clips)
1 Storage box, with moulded inlays for equip-
ment
3. Crystallography accessories U19206
These crystallography accessories allow for ad-
vanced crystallographic studies, derivation of
Moseley's law, the Debye-Scherrer procedure,
Bragg reflections and material analysis.
Scope of delivery:
4 Films, Fe, V, Mn, Cr
2 Monocrystals, KCl, RbCl
5 Powder samples. NaF, SiC, NH4Cl, MgO, Al
2 Sets of wire samples, Al, Nb (3 each) for De-
bye-Scherrer experiments
10 Polyethylene fibres
1 Disc for calculating Bragg reflection angle
4. Radiography accessories U19207
These radiography accessories allow for exper-
ments on the following topics: scattering, absorp-
tion; dependence of penetration on accelerating
voltage or emitter current, resolution, screening,

7
half-value thickness (HVT); exposure times, non-
destructive material analysis.
Scope of delivery:
1 Maltese cross
1 Phantom
1 Circular aperture
1 Aluminium layer, stepped
5 Aluminium absorbers, 0.1/0.25/0.5/1.0/2.0 mm
1 Lead absorber, 0.5 mm
1 Plastic absorber
2 Magnets
4 Material testing models (porosity, cracks,
weld, painting)
5. Filmpack 2 U19209
Filmpack 2 contains highly sensitive films for ra-
diography using α, βand X-ray radiation. The
films are individually wrapped in opaque plastic
covers and can be developed and fixed in day-
light.
Scope of delivery:
20 Films 38 mm x 35 mm in opaque plastic wrap-
pers
1 Bottle of X-ray developer
1 Bottle of X-ray fixer
1 Syringe with cannula for injecting chemicals
into the film wrappers.
1 Metal clips
6. Filmpack 4 U19210
As per Filmpack 2 except:
12 Films 150 mm x 12 mm in opaque plastic
wrappers for Debye-Scherrer camera.
7. Motor drive U19202-115 or U19202-230
A motor drive is used in conjunction with a De-
bye-Scherrer camera for analysing structures us-
ing the rotating crystal method.
Mains: 115/230 V, 50/60 Hz
Power consumption: 3 VA
8. Ionisation chamber U19208
The ionisation chamber is for investigating the
ionisation of air and other gases by X-rays at dif-
fering pressures (saturation characteristic, Geiger-
Müller tube model, dosimetry).
Operating voltage: max. 2 kV
Ionisation current: 10-11 to 10-10 A
Rod electrode: 75 mm long
Chamber: 85 mm x 25 mm dia.
Tubing: 5 mm dia.
9. Geiger-Müller tube U19201
The Geiger-Müller counter tube is a self-
quenching halogen-trigger counter tube for regis-
tering α, β, γand X radiation.
Dose rate range: 10-3 to 10² mGy/h
Mass of active surface (mica):
2.0 to 3.0 mg/cm²
Operating voltage: 500 V
Connection: BNC
Cable length: 1 m
Dimensions: 57 mm x 22 mm dia.
10. Ratemeter U19203
The ratemeter counts pulses from a counter tube
and measures emitter current in an X-ray tube. In
conjunction with a digital display with an adjust-
able threshold (U18620), the output signals,
counter tube voltage, pulse rates and current can
all be displayed directly.
Current measuring input:Jack socket
0 to 200 μA
Ratemeter meas. range: 0-2,000 pulses/s
0-20,000 pulses/s
Trigger times: 3 s, 15 s, 30 s, 60 s
11. Digital display with adjustable threshold U18620
This digital display with adjustable threshold is
intended for immediate use with the ratemeter
(U19203). It has four input channels and the up-
per and lower limits for these can be signalled
audibly.
Display: 3½ digits, 12.5 mm high
Dimensions : 105 mm x 76 mm
8. Operation
8.1 Checking radiation protection equipment
Every time the X-ray apparatus is used, you should
check in advance that the equipment relating to
radiation protection is functioning correctly. This
check should be conducted in the sequence that
follows. In the event of any of these steps revealing a
problem, the equipment must immediately be un-
plugged from the mains. If the problem cannot be
eliminated by following the suggestions listed in
Section 10, the X-ray apparatus will need to be re-
paired by the manufacturer. Only if this safety check
is completed successfully may the X-ray equipment
be used.
•Check the cover for damage.
•Check that the screening plate with the radiation
sign is firmly secured.

8
•Check the locking pin of the cover for any dam-
age.
•Check that the leaded glass dome and brass
collimator are free of damage and firmly se-
cured.
•Check that the mains indicator lamp is function-
ing correctly by closing the cover, connecting the
equipment to the mains, setting the timer and
turning on the key switch. The indicator lamp
should then light. The high voltage indicator
should not be lit.
•Check that the timer is working properly by turn-
ing on the key switch and setting a time.
•Check the timer relay by setting the timer to 0.
The mains indicator should not be lit even if the
equipment is plugged in.
•Check the high voltage indicator lamp. Set a time
on the timer with the cover closed and locked
(locking pin in centre position) and turn on the
key switch. The high-voltage indicator lamp
should not light up at this stage. Switch on the
high voltage using the ON/OFF button. The indi-
cator lamp and the light-ring of the button
should then light up.
•Check the switching function of the safety device
in the cover hinge as follows: with the high volt-
age switched on, slide the cover sideways with-
out opening it, so that the locking knob remains
within one end of the dumbbell-shaped slot. The
high voltage should switch off automatically, so
that the high-voltage indicator lamp and the
light-ring also go off.
8.2 Putting the X-ray apparatus into operation
8.2.1 Opening, closing and locking the cover
•To open the cover towards the side where the
measuring arm is located, push it sideways and
lift it open.
•To close the cover, insert the locking pin into the
dumbbell slot on the side where the measuring
arm is located.
•Push the cover sideways so that the locking pin
audibly snaps into the centre position.
The cover is now secured against any unintentional
opening. The high voltage supply may now be
switched on.
8.2.2 Turning on the X-ray apparatus
•Select a time on the timer.
•Turn on the X-ray apparatus using the key
switch.
The mains indicator lamp should now light up. Once
the time is up, the machine should switch itself off.
8.2.3 Closing the cover and switching on the high
voltage
•Once the mains is connected, select the high
voltage supply U = 20 kV/30 kV via the slide
switch.
•Close the cover and lock it with the locking pin
in the centre position.
•Press the high voltage button.
The high-voltage indicator lamp and the light-ring of
the ON/OFF button light up, and X-radiation is gen-
erated.
•Check for the presence of an X-ray beam using
the fluorescent screen, ionisation chamber or
Geiger-Müller tube.
8.2.4 Setting and measuring emitter current
•Connect a voltmeter with a measurement range
of 10 V DC to the jack socket using an adapter
cable.
•Use a screwdriver to set the desired emitter cur-
rent on the trim potentiometer.
The following relationship applies:
IA[A] = UA[V] / 105[Ohm]
Thus, for example, a DC voltage of 8 V indicated on
the voltmeter corresponds to a tube current of 80
µA.1
8.2.5 Switching off the high voltage and opening the
cover
•Press the high-voltage ON/OFF button, allow the
delay time needed for the unlocking of the cover
safety catch, and slide the cover sideways.
8.2.6 Sample holder
Monocrystals (NaCl, LiF, etc.) can be attached to the
sample holder (see Fig. 5). The clamp and base can
be removed by undoing the relevant screw.
•Fix the monocrystal into the sample holder with
the clamp thus defining the angular alignment
of the crystal. The rough side of the crystal
should point towards the X-ray tube.
•Read off the angle θbetween the sample holder
and the beam axis.
8.2.7 Measuring arm
The measuring arm has 18 slots for experiment ac-
cessories and detectors. An angle between measuring
arm and X-ray beam of 2 θcan be read on the arm's
protractor scale. For accurate measurement of angle
there is also a vernier scale. It is used as follows:
•Set the arm to the next whole marking for 2 θ.
•Set the fine adjustment trimmer against the
thread tension to 0 while holding the measuring
arm.
The arm can be set by an extra ± 4° using the fine
adjustment trimmer.

9
•Read of the relative angle from the vernier (accu-
rate to about 5 minutes of arc).
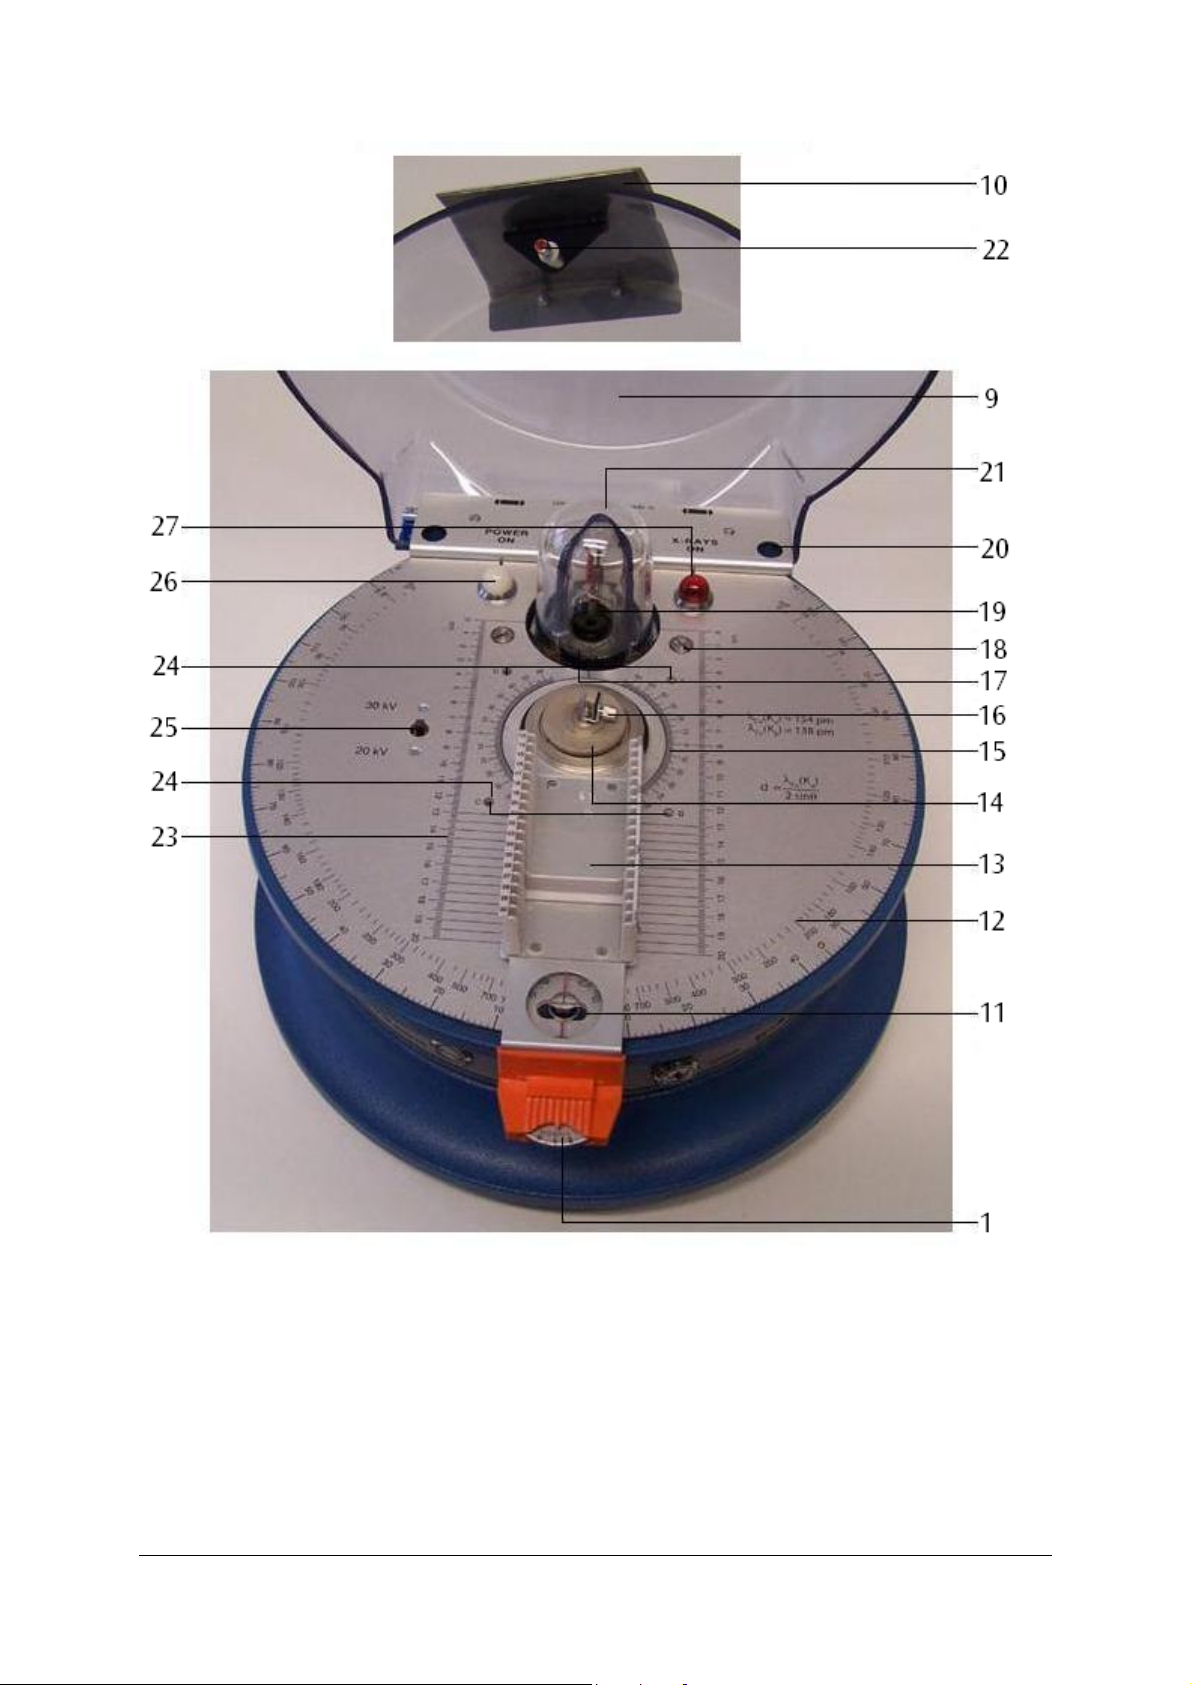
8.2.8 Angle coupling 2:1
To photograph a Bragg spectrum the measuring arm
needs to be set to twice the crystal angle 2 θwhile
the sample holder is rotated by a given angle θ.
•Set both the measuring arm and the sample
holder to precisely θ= 0°.
•Carefully screw in the pressure plate.
Now when the measuring arm is moved, the sample
holder rotates by precisely half the angle (see Fig. 4).
•To decouple the two elements, unscrew the
pressure plate by one or two turns.
8.3 Changing fuses
•Disconnect the mains plug.
8.3.1 Mains fuse
•Unscrew the fuse holder for the mains fuse from
the bottom of the housing.
•Insert a new fuse of the correct value (T1A, 250 V).
•Screw the fuse holder back in.
8.3.2 High voltage fuse
•Unscrew the fuse holder for the high voltage fuse
from the bottom of the housing.
•Insert a new fuse of the correct value (T1A, 250 V).
•Screw the fuse holder back in.
8.4 Changing bulbs
•Disconnect the mains plug.
•Remove the plastic cover for the mains or high
voltage indicator as appropriate
•Unscrew the lamp with the help of a short sec-
tion of plastic tubing and replace the bulb:
Mains voltage indicator lamp: 6 V / 0.05 A
High voltage indicator lamp: 6 V / 0.1 A
•Screw the cover back on.
8.5 Adjustment of X-ray rube
The X-ray apparatus is supplied having been pre-
adjusted at the factory. There will usually be no need
to adjust it any more. However, it is possible for the
adjustment to have been lost during transport so
that re-adjustment becomes necessary.
8.5.1 Height adjustment of X-ray tube
•Insert the counter tube into slots 17 and 20 of
the measuring arm and rotate it to 0°.
•Take a 1-mm horizontal slot aperture (from
U19205) and insert it into slot 13.
•Position an aperture of 1 mm dia. (from U19205)
on the brass collimator of the leaded glass dome.
•Turn on the X-ray apparatus and select a high
voltage of 20 kV.
•Set the emitter current so that the counter tube
registers around 200 to 400 pulses per second
(see 8.2.4).
•Remove the rubber stopper from the bottom of
the apparatus at the rear to access the screw for
adjusting the height of the tube and set it up so
that the maximum rate of count is obtained.
•Replace the rubber stopper.
8.5.2 Sideways adjustment of X-ray tube
•Turn off the X-ray tube and open the cover.
•Insert a 1-mm slotted aperture (from U19205)
into slot 30 so that it is aligned vertically.
•Fix a 1-mm slotted aperture (from U19205) to the
brass collimator of the leaded glass dome so that
it is aligned vertically.
•Remove the clamp from the sample holder and
place the mounting clip for glass rods (from
U19205) in the sample holder (see Fig. 5).
•Turn on the mains.
•Aim the tube through the crossover between the
two slot apertures. The glass rod should be pre-
cisely in the middle of the cathode reflex on the
anode.
•If it is not in this position, release the securing
screws and rotate the leaded glass dome by a
small angle.
•Remove the glass rod and clip.
•For this fine adjustment, place a lithium fluoride
(LiF) miniature crystal in the sample holder.
•Turn the measuring arm and sample holder to
0°.
•Set up the 2:1 angle coupling (see 8.2.8).
•Move the measuring arm to an angle 2 θ= 45°.
You should select the side of the goniometer so
that impinging and reflected beams are on the
angled side of the sample holder (see Fig. 5).
•Set the high voltage to 30 kV, close the cover and
turn on the high voltage.
•Look for the Cu-Kαreflex maximum (quoted
value for LiF = 44°56’). The measured value
should be within 30’ of the quoted value.
•If the measured value is outside this tolerance,
check through the previous steps and repeat
them if necessary.
•If the measured value is still outside the toler-
ance, set the measuring arm to the average of
the measured and quoted values.
•Remove the rubber stopper at the top on the
rear of the housing to access the screw for chang-
ing the inclination of the tube and adjust it until
the counter rate reaches a maximum.

10
•Move the measuring arm to find a maximum for
the reflex. If necessary, keep adjusting until the
measured and quoted values do lie within the
30' tolerance.
9. Operating instructions for accessories
9.1 Inserting the collimators (from U19205)
The collimators serve to reduce the divergence of the
beam.
•Simply plug one of the collimators directly onto
the brass collimator of the leaded glass dome.
9.2 Inserting apertures and other experimental
items in photographic slide format onto the
measuring arm.
•Simply slot the slide into the required slot and
clamp it using the spring clip.
9.3 Ionisation chamber (U19208)
•Assemble the ionisation chamber as in Fig. 6.
To demonstrate the ionising effect of X-rays at nor-
mal pressures, use the chamber cover with the wide
opening. For low pressure (principle of the Geiger-
Müller tube), use the lid with the vacuum pump
connection.
•Thread the voltage leads and, if necessary, the
pump hose through the openings from the ex-
periment chamber. Experiment leads should be
equipped with the supplied plugs.
•Slot the ionisation chamber onto the measuring
arm (see Fig. 2).
9.4 Geiger-Müller tube (U19201)
•Slot the tube holder onto the slide holder of the
measuring arm and secure it with the spring
clips. (see Fig. 3)
9.5 Revolver for scattering films (from U19205)
The scattering film revolver is a revolving holder for
8 different metal films that can be rotated into the
beam one after the other using a remote trigger. The
symbols for the elements are shown in a window on
the reverse of the revolver.
•Remove the clamp for the sample holder (see
Fig. 9).
•Position the revolver on the sample holder with
the hemispherical recess facing downwards.
•Screw the remote triggering device onto the
scattering film revolver and check that it is work-
ing properly.
•Thread the remote trigger through to the outside
under the cover.
9.6 Debye-Scherrer camera (from U19205) with
motor drive (U19202)
The Debye-Scherrer camera is made up of three
parts: housing, cover and a clamp with bevel gear
(see Fig. 7). The motor drive can be used, for exam-
ple, to take rotating crystal images.
•Remove the clamp from the sample holder and
set the measuring arm to an angle 2 θ= 90° and
the sample holder to θ= 90°. Make sure that the
smooth side of the sample holder is pointing to-
wards the tube.
•Fix a 1-mm collimator to the brass collimator on
the leaded glass dome.
•Try out the positioning of the Debye-Scherrer
camera housing between the leaded glass dome
and the sample holder (see Fig. 7). If there is no
room for play in the camera, it can be adjusted
using the screw in the bottom of the camera.
•Load the camera with a film from Filmpack 4
(U19210) inside a dark room. Make sure the film
is firmly placed inside the inner cylinder.
•For rotating crystal images, a film from Filmpack
2 (U19209) should also be placed on the bottom
of the camera.
•Position the sample in the padding around the
hole of the clamp, close the lid of the camera
and slot the clamp with the clamped sample into
the camera itself.
•Place the camera on the sample holder.
•If required, also set up the motor drive (U19202)
as in Fig. 8. Plug its connectors into the 4-mm
socket. Make sure the bevel gear is able to turn
freely. Using the supplied Allen key, the inclina-
tion of the motor's bevel gear can be adjusted.
9.7 X-ray films (U19209/U19210)
9.7.1 Development
•Before sucking developer fluid into the syringe,
raise the plunger by 1 ml so that there will be
some air above the fluid. This ensures that all the
fluid from the syringe and the cannula enters the
film wrapper when injected.
•Insert the cannula into one of the openings next
to the printing on the film wrapper and inject
the developer into the wrapper.
Make sure that both sides of the film are coated with
developer and that the developer is well distributed
within the wrapper throughout the development
process.
•You can achieve this by applying slight pressure
to the wrapper with your thumb and forefinger.
•Once the development time has elapsed, you can
inject fixer into the wrapper without removing
the developer first.

11
Development Developer Fixer
Time 1½ min. 4 min.
Filmpack 2 2½ ml 3½ ml
Filmpack 4 3½ ml 5 ml
9.7.2 Removing the film
•After the film has been developed, snip off one
corner of the wrapper with scissors and apply
slight pressure to force all the liquid out of the
wrapper.
•Then snip off one edge of the wrapper and use a
metal clip to pull the film out.
•Wash the film for a few minutes in running wa-
ter before viewing.
If the film is to be archived, it will require another 10
minutes of fixing and 30 minutes more washing in
running water. Normal fixer with or without harden-
ers can be used for this.
9.7.3 Storage of chemicals
Whereas fixer is relatively stable, the developer can
decompose as a result of air in the bottle.
•If developer needs to be kept for a long time
though the bottle is already partially empty, it is
better if it is transferred to a smaller con
tainer. This means it remains usable for longer.
•Before closing the developer bottle, squeeze the
bottle so that the fluid comes to brim before
closing it. This ensures that as little air as possi-
ble remains above the fluid in the bottle.
•Observe local regulations when disposing of
chemicals.
9.7.4 General information
When exposing X-ray film, the distance of the film
from the object should be kept as small as possible
and the distance of the film from the radiation
source as large as possible for the required exposure
time and size of radiation source.
The film can also undergo exposure from beta and
gamma radiation emitted from low energy sources
that may be present in a school.
If the film is irradiated with a relatively large quan-
tity of "soft" X-ray radiation, the pattern of the wrap-
per may appear on the developed image.
When the film is sealed into its PVC wrapper, pres-
sure points sometimes appear at the edges. After
development these pressure points may appear as
dark black patches.
10 Troubleshooting
Fault Possible causes Solutions
Mains indicator light is not work-
ing even though the mains con-
nection has been checked.
Timer is set to 0
Mains fuse has blown
High voltage fuse has blown
Indicator bulb has blown
Other causes
Set a short timer period.
Replace the fuse (see Section 8.3).
Replace the bulb (see Section 8.4).
The equipment needs to be
checked by the manufacturer.
Cathode heater fails to glow,
although the high voltage is
switched on, the preselected tube
current is greater than zero, and
the mains voltage indicator lamp
shows “ON”
Cathode is faulty
Heater control circuit is faulty
The equipment needs to be
checked by the manufacturer.

12
High voltage indicator light is not
working even though the mains
indicator is on
Safety circuit
Indicator bulb has blown
Other causes
Check the safety circuit as specified
in Section 8.1, especially the fas-
tening of the leaded glass dome
and the hinges and locking of the
cover.
Replace the bulb (see Section 8.4).
The equipment needs to be
checked by the manufacturer.
High voltage "crackles" shortly
after switching on
Moisture under the leaded glass
dome
Unlock and remove the lead glass
dome, wipe it with a dry cloth, and
replace it and lock it.
The cathode lights up brightly for
a short time after the high volt-
age has been switched off („After-
flash“)
This is not a fault, its purpose is to
allow discharging of the high-
voltage components.
No X-ray beam although the high
voltage is turned on
The cathode is not lit
The emitter current is too small
No emitter current
Collimators or such like in the way
of the beam
X-ray tube has lost its adjustment
The equipment needs to be
checked by the manufacturer.
Caution: high voltage remains in
effect for several hours after the
tube has been switched off!
Adjust the emitter current (see
Section 8.2.4)
The equipment needs to be
checked by the manufacturer.
Check the set-up for the experi-
ment
Adjust the X-ray tube (see Section
8.5)

13
Fig. 1 Inserting the fluorescent screen onto the measuring arm
Fig. 2 Inserting the ionisation chamber onto the measuring arm
Fig. 3 Inserting the Geiger-Müller tube onto the measuring arm
AaAb
Ac
Fig. 4 Geometry of Bragg reflections (a. X-ray tube, b. Monocrystal, c. Counter tube)

14
Aa
Ab
Ac
Ad
Fig. 5 Insertion of crystal into sample holder (a Screw, b Clamp, c Base, d Fixed section of sample holder)
A
B
Fig. 6 Assembly of ionisation chamber (A for low pressure, B for normal atmospheric pressure)
Fig. 7 Insertion and removal of Debye-Scherrer camera

A TELTRON Product from UK3B Scientific Ltd. • 8 Beaconsfield Road • Weston-super-Mare • Somerset BS23 1YE
Subject to technical amendments
© Copyright 2008 3B Scientific GmbH
Fig. 8 Debye-Scherrer camera with motor drive
0 300
Fig. 9 Insertion of scattering film revolver magazine

Table of contents
Popular Laboratory Equipment manuals by other brands

Forma Scientific
Forma Scientific 8172 installation manual

Kendro
Kendro HERAsafe KS operating instructions

Keit
Keit IRmadillo ASM0627-09-Z-Cx-O-G-D2x user manual

ThermoFisher Scientific
ThermoFisher Scientific QuantStudio 12K Flex OpenArray AccuFill... user guide

IKA
IKA HB ECO operating instructions

Owen Mumford
Owen Mumford Autoject 2 Instructions for use