mrclab DVO Series User manual

Vacuum Oven
DVOSeries
Operation Manual
●Please read and understand the product specification before operate instrument.
For adverse consequences caused by wrong operation, our company is not responsible for.
●The contents of the operation manual may make changes and improvement in the future, there
will be not the notice, please understanding.
●If found abnormal phenomenon in the process of use, please do not hesitate to contact our
company.
●Please keep the operation manual, at the same time, please be sure to fill in and send the warranty
card to our after-sales service center.
MRC.7.21

Contents
1.Safety instruction
2.Application
3.Structure
4.Working condition
5.Technical parameters
6.Instrument operation
7.Display instructions
8.Wiring
9. Points for attention
10. Maintenance
11. Problem solution

1. Safety instruction
Dangerous!
1. Must be connect with the ground.
2. When the instrument is smoking vacuum or heating, do not allow to touch the door and window,
must stand at more than one-meter distance from door.
3. Shall not dry inflammable, explosive, volatile and corrosive substances.
4. When need not to smoke air continuously, should shut off the vacuum valve firstly, then close the
vacuum motor power switch, in order to prevent the vacuum pump oil flow backward to tank.
5. If the oven is broken, must be repaired by professional maintenance person.
6. If need to repair electrical parts, must be repaired by electrical engineer.
Warning! (May cause a serious property damage or loss of life)
1. Must fully read and understand operation manual, before operate the instrument.
2. When replace the fuse and electric parts, must pull the plug.
3. When the instrument is not used for long time, must pull the plug.
2. Application
It is suitable for drying and heating articles in vacuum conditions in the laboratories of industrial
and mining enterprises, colleges and universities and R&D institutions etc. Make vacuum
heating for articles in vacuum dry box. The vacuum dry box has following advantages:
(1)Could reduce the drying temperature, shorten the drying time.
(2)Avoid some articles heated oxide, dust particle damage and the heating air kills the biological
cells.
3. Structure
The shape of vacuum oven is horizontal type. The box body is make of high-quality steel plate with
pressing and welding processing. The surface of box adopts plastic spraying treatment. Thermal
protective coating filled by alumina silica wool. The box door is made of double toughened glass,
which could regulate the open and close, degree of tightness of box door. The formed high-
temperature resistance silicon rubber sealing washer used between work room and glass door for

ensuring sealing between the box door and work room, which improved the vacuum degree
greatly. DVO type has square workroom.
1. Vacuum gauge
2. LED light switch
3. PID temperature controller
4. Power switch
5. Vacuum valve
6. Inert gas inlet valve
7. Observation window 8. Door handle 9. Leakage protection switch
10. Inert gas inlet hole
11. KF25 vacuum pump hole
12. Power socket
LED lights, use lower than 100 oC.

4. Working condition
(1). Environment temperature: +5~40oC
(2). Relative humidity: ≤85%RH
(3). Atmospheric pressure: 86~106Kpa
(4). Around without intense shaking, clearance is more than 50 cm.
(5). There are not direct sunlight and heat radiation.
(6). There is not a strong airflow blowing straight body.
(7). There is not high concentration of dust and corrosive materials.
5. Technical parameters
Model DVO-25 DVO-53 DVO-91 DVO-215
Power Voltage 220V 380V
Power 500W 1400W 1500W 2100W
Material
Case
Steel with epoxy powder coating
Chamber
Stainless Steel
Temperature
Heating
method 4-sided 4-sided or Shelf
Controller low proportional gain, LCD PID control
Temp range
RT to 250
℃
(lower than 100
℃
when LED lights on)
Temp
accuracy 0.1℃
Temp
fluctuation ±1℃
Timer range
1-9999minutes
Vacuum
Max vacuum ≤133Pa(1mmHg)
Vacuum
gauge 0 to -0.1Mpa(760mmHg to 10mmHg)
Door gasket
Silicone
Safety Circuit breaker, overheat protector
Size Capacity 25L 53L 91L 215L

Chamber
size 300x300x275 415x370x345 450x450x450 560x640x600
Product size
580x450x450
720x525x535
615x590x635
1050x760x910
Shelf
Max no.
4
5
5
3
Standard no. 1 2 3 3
Adjustable YES YES YES(shelf
heating NO)
YES(shelf
heating NO)
6. Instrument operation
(1). Installation
Put the vacuum oven at the place in the room with good air conditions and without succession.
There should no inflammable, explosive and corrosive air in the surroundings of instrument.
(2). Debugging
Close the vacuum oven door and screw the handle. Close the return-air valve and open vacuum
valve, connect the airway at side of box body with vacuum pump by vacuum rubber pipe, switch on
the power of vacuum pump, begin to exhaust air. When the indicating value of vacuum meter
reaches to required value, close the vacuum valve and switch of vacuum pump. At this time, it has
vacuum condition in the box. It there is no heating function, the debugging of vacuum oven is end..
(3). Usage
1. Put the articles need to be dried in the oven, close the oven door and screw the handle, close the
return-air valve and open the vacuum valve, connect the airway at side of oven body with vacuum
pump through vacuum rubber, switch on the power of vacuum pump, it begins to exhaust air. When
the indicating value of vacuum meter reaches to the required vacuum degree, close the vacuum
valve, and then close the vacuum pump, at this time, it is in vacuum condition in the oven.
2. Switch on the power, turn it on, the indicating light is on, which means it works in normal. The
meter will display the temperature of workroom, then regulate the control meter to the setting
temperature, open the heating switch, the workroom begins to heat, the green light on the control
meter is on, which means it is power on and temperature is rising. After 60 minutes, constant
temperature of instrument, the display temperature should be in conformity with the setting
temperature.
3. If you required lower temperature, for example 60℃,you could adopt second setting style, set
50℃at the first time, when the overshoot temperature fall after rise, set 60℃at the second

time, in this way, you could reduce or stop the overshoot temperature.
4. Different articles with different humidity required different drying time. If longer drying time
required and the vacuum degree reduced, exhaust air and make vacuum circumstances again and
vacuum pump and then open the vacuum valve.
5. After finish drying, close the power firstly, open the return-air valve, make the air in the oven not
in vacuum condition, open the oven door and take the articles out. (In vacuum conditions, the rubber
ring and glass door absorbed tightly, not easy to open the oven door, after some time, open it easily).
6. In vacuum condition, the control temperature could not lower than 50℃. If it is lower than
50℃,the value measured by standard thermometer is different with the display value of meter, that
is normal. It could not affect the temperature control and precision when the temperature is higher
than 50℃.
7.Display instructions
1.Product code
(1) Panel size(mm)
D:72*72 G:48*48 E:48*96 A:96*96 W:80*160
(2) 7 Degree of intelligence
(3) Output mode selection
4: Relay output
5: Solid state relay output
6: Phase shift trigger pulse output
7: Zero-crossing trigger SCR output
8: Zero-crossing trigger pulse signal output
9: 0-10mA 4-20mA continuous current output
10: Phase shift continuous output
11: 0-5V 0-12V On-off output
(4) Alarm selection
0: no alarm
1: relay alarm
2: buzzer alarm
(5) Model input type selection
1: K.E.S.B and other thermocouple input
2: CU50.PT100
3: 0-10mA 0-5Vlinear voltage output

2.Main technical parameters
1) Power: 220V±10%..AC;
2) Environmental temperature: 0~50℃;
3) Relative Humidity: < 85%RH;
4) Range of temperature: RT~250.0℃;
5) Range of time: 1 ~9999 minutes;
6) Temp fluctuation: ±1℃
3. Panel Instructions
1. Function key(SET)
2. Shift key—Press and hold for 5 seconds to self-tuning
3. Minus key-Sound attenuation
4. Plus key —see heat preservation time
5. heating symbol
6. alarm symbol
7. set: self-adjusting symbol
8. running symbol
9. Set value display window
10. Measured value display window
4.Operation and using
(1)Power up and switch on, the upper row of meter indicates Inp-LLL, while lower row indicates

(Pt)
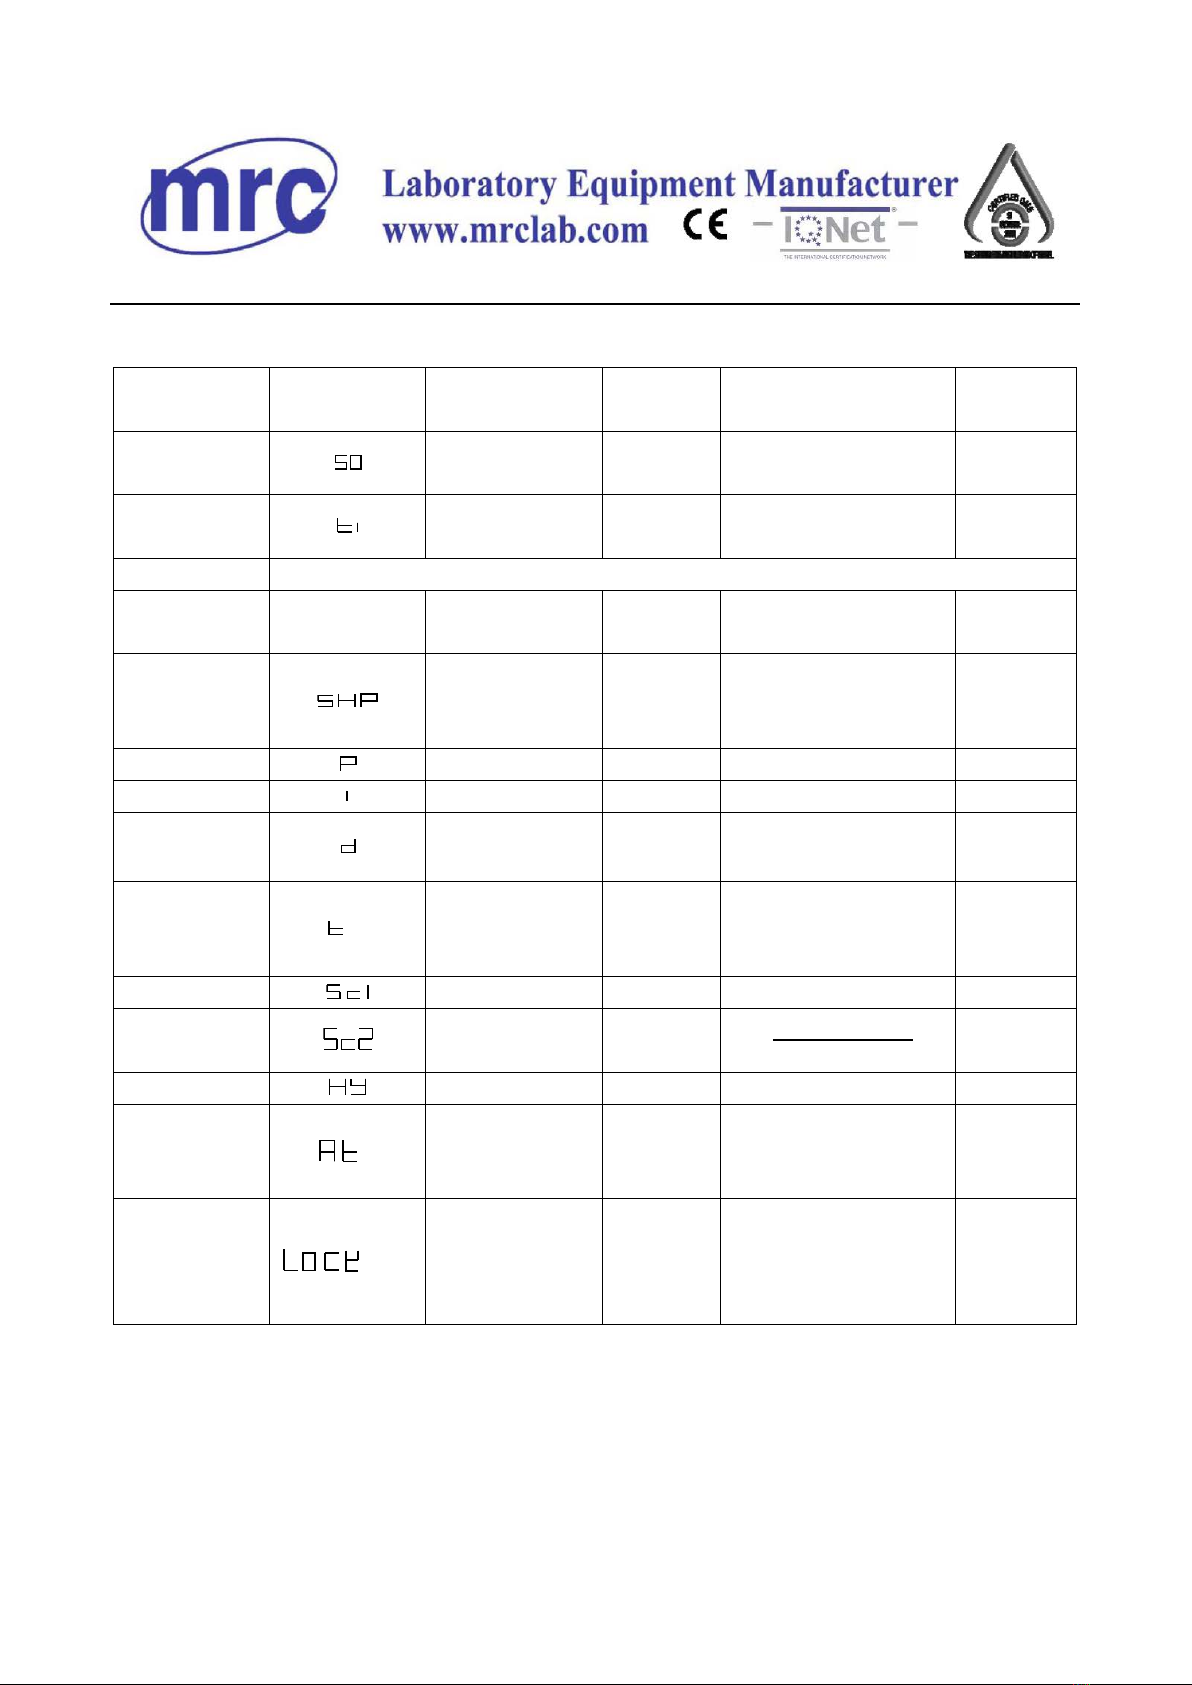
(2) Press the SET function key for 1 second to enter the first menu, the upper row displays ,
which is the required set temperature, and then press the SET function key, the upper row displays
,which is the required time setting, and then press the SET function key to save.
(3) Press the SET function key for 5 seconds to enter the setting parameters required by the second
menu (according to Table 1), and then press the SET function key for 5 seconds to save the setting
value.
4.1 Self-tuning function of the meter
Press for 5 seconds, appear set symbol ,and self-adjusting begins; when self-
adjusting ends, off, then get a group of PID parameters overcoming excessive temperature.
During self-adjusting, press for 5 seconds and off, then self-adjusting ends. The meter
will be controlled following the original PID parameters.
If the temperature rise is slow, use a parameter that is several tens of degrees higher than the
self-tuning parameter to control the required time speed.
4.2 Time function:
Press key and then the total power up time shows in minutes. In case of power failure, the
previous timer is invalid. When the caller calls, start the timer from zero again.
4.3.Time setting up function:
According to the first menu in Table 1, the upper row of the meter displays , and the lower row
sets the time.
When the time needed by the meter is up, lower row shows off and output function ends. If you
want to resume control time setting up, you should select power off first, then restart. Long-term
heat preservation is required, and the time is set to "0"
4.4 If it displays LLL, it means that the sensor is short-circuited or the temperature is less than -20℃;
if it displays HHH, it means that the sensor is open or the temperature is greater than the
measurement range.
Note: When using the vacuum oven, if the sensor is placed inside the oven, and it is self- adjustment
at 140℃. The reference number is for example: I=392+200=592.P=848.D=637. The period is set
to 40 seconds..
If the sensor is placed outside the box, it will be self-tuning at 160°C. The reference number is for
example: I=350+300=650.P=1060.D=1007. The period is set to 60 seconds.
When using the vacuum oven, after self- adjustment, the PID parameters remain unchanged, and
the period is set to 5-10 seconds.

4.5. Internal parameters settings
Parameter table 1
First menu Prompt Name Setting
range Description Factory
default
Press “SET” Master Control
setting Full range Random
Press “SET” Timing setting 0-9999 Timing when temperature
reach the set value 0
Second menu Press “SET” key for 5 seconds to enter. After value setting press “SET” key for 5 seconds to log out and save.
Serial number Prompt Name Setting
range Description Factory
default
1 Upper limit alarm 100
When measured value is
greater than set value, alarm
and output.
10
2 Proportional belt 0-999 Heating rate 500
3 Integral 0-999 Integral time 150
4 Differential 0-999 Differential time 250
5 Period 0-120
Output time (by second),
and the period is the
differential 1/13
20
6 Sensor correction Sensor translation correction 0
7 Slope correction 0
8 hystersis 1-20 1
9 Self-tuning selection
0
1
2
0.Step control
1.PID working
2.Self tuning working
1
10 Electric lock
0
1
2
0 :no lock ;
1: first menu locked;
2:first and second menu
locked
0
While the upper row display LLLL, it means sensor cutting out or the temperature is below measured lower limit
value.
while the upper row display HHHH, it means sensor cutting out or the temperature is above measured upper limit
value.
SC2
Modified degree *400
Set value
Modified
value

8. Wiring
72*72 DFD
SCR output Relay output ,Voltage output ,
Zero crossing trigger

Relay output ,Voltage output
48*48 DFG

96*96 DFA

9. Points for attention
1. The vacuum dry box must be grounding effectively for ensuring safety.
2. when the vacuum dry box don’t need to connect with air exhausting, close the vacuum valve firstly, then
close the power lf vacuum pump, at the same time, open air press valve of vacuum pump, otherwise the
pump oil will flow backward to the box.
3. When withdraw the treated articles, if it is inflammable, must put it in the sir when the temperature
cooling the lower then ignition point for acoiding the combustion from reaction.
4. There is no emplosion protection equipment in the cacuum dry box. Don’t put the. inflammable articles
into it.
If the filter could be installed in the space between the vacuum box and vacuum pump, avoid the damp air
enter into the vacuum pump.
10. Maintenance
(1). The oven should be kept clean, use soft cloth to wipe the door, avoid using chemical solvent,
lest produce chemical reaction.
(2). If do not use the instrument for long time, coat corrosion resistant oil on electroplate parts
80*160 DFW

and cover the plastic protective cover, put it in a dry room for avoiding the damage of parts
and affecting the use result.
11. Problem solution
Phenomenon Reassons Treatment
No power supply
The socket has no power
supply
Check the line and change
the socket
The socket isn’t plug well or
the wire is broken
Change the plug and
connect the wire well
Fuse is open cirvuit Change the fuse
The power is not switch on Switch on the power
The temperature in the box
isn’t rising
The setting temperature is
low
Adjust the setting temperature
The electric heater is wrong Change heater
The temperature controller is
wrong
Change the temperature
controller
The temperature sensor
loosened
Screw the connecting nut
The error between the setting
temper ature and temperature
in the box is big
Damage of sensor
Change the temperature
controller
Temperature is out of
control
Change the temperature
controller
Fix the sensor well
The temperature controller is
wrong
Change the temperature
controller
Table of contents
Other mrclab Laboratory Equipment manuals
Popular Laboratory Equipment manuals by other brands

Solmetex
Solmetex Hg5 Installation and operation manual

Waters
Waters Xevo G2 QTof Operator's, overview and maintenance guide

Okolab
Okolab H301-NIKON-TI-S-ER user manual

Agilent Technologies
Agilent Technologies ESG series User and Programming Guide

GE
GE AKTA avant user manual

Agilent Technologies
Agilent Technologies 83620A Service manual

Thermo Scientific
Thermo Scientific 89852 user guide

Thermoline Scientific Equipment
Thermoline Scientific Equipment TO-152G operating instructions

ACKERMANN
ACKERMANN 16-2040N user manual

Okolab
Okolab H301-LUDL 96A602 user manual

Bürkle
Bürkle AccuOne Directions for use

Endress+Hauser
Endress+Hauser analytikjena multi N/C 2100 operating manual