3Ware 9650SE-2LPML User manual

3ware®
Serial ATA RAID Controller
Supports the 9650SE, 9590SE, and 9550SX Models
PN 720-0159-00
March 2007
User Guide

www.3ware.com ii
Copyright
©2004-2007 Applied Micro Circuits Corporation (AMCC). All rights
reserved. This publication may be copied or reproduced for reference
purposes only. All other purposes require the express written consent of
AMCC, 215 Moffett Park Drive, Sunnyvale, CA 94089. AMCC shall not be
responsible or liable for, and shall be held harmless against, any and all
damages, claims, and/or disputes that arise from the copying or reproduction
of this publication.
Trademarks
3ware®, Escalade®, 3DM®, and TwinStor® are all registered trademarks of
AMCC. The 3ware logo, 3BM, Multi-Lane, StorSave, StorSwitch,
StreamFusion, and R5 Fusion are all trademarks of AMCC. PowerPC and the
PowerPC logo are trademarks of International Business Machines
Corporation. Linux® is a registered trademark of Linus Torvalds in the
United States, other countries, or both. Windows® is a registered trademark
of Microsoft Corporation in the United States and other countries. Firefox® is
a registered trademark of the Mozilla Foundation. PCI Express® is a
registered trademark of PCI-SIG®. All other trademarks herein are property
of their respective owners.
Disclaimer
While every attempt is made to make this document as accurate as possible,
AMCC assumes no responsibility for errors or omissions in this document,
nor does AMCC make any commitment to update the information contained
herein.

www.3ware.com iii
Table of Contents
About this User Guide. . . . . . . . . . . . . . . . . . . . . . . . . . . . . . . . . . . . . . . . vii
How this User Guide is Organized . . . . . . . . . . . . . . . . . . . . . . . . . . . . . . . . . . . . . . .vii
Conventions . . . . . . . . . . . . . . . . . . . . . . . . . . . . . . . . . . . . . . . . . . . . . . . . . . . . . . . . ix
Screenshots . . . . . . . . . . . . . . . . . . . . . . . . . . . . . . . . . . . . . . . . . . . . . . . . . . . . . . . . ix
Using the 3ware HTML Bookshelf . . . . . . . . . . . . . . . . . . . . . . . . . . . . . . . . . . . . . . . ix
Chapter 1. Introducing the 3ware® SATA RAID Controller . . . . . . . . . . . . . . . . . . . . .1
What’s New with 9650SE Models . . . . . . . . . . . . . . . . . . . . . . . . . . . . . . . . . . . . . . . . 1
System Requirements . . . . . . . . . . . . . . . . . . . . . . . . . . . . . . . . . . . . . . . . . . . . . . . . . 2
Understanding RAID Concepts and Levels . . . . . . . . . . . . . . . . . . . . . . . . . . . . . . . . 4
RAID Concepts . . . . . . . . . . . . . . . . . . . . . . . . . . . . . . . . . . . . . . . . . . . . . . . . . . . . 4
Available RAID Configurations . . . . . . . . . . . . . . . . . . . . . . . . . . . . . . . . . . . . . . . . 5
Determining What RAID Level to Use . . . . . . . . . . . . . . . . . . . . . . . . . . . . . . . . . . 11
3ware Tools for Configuration and Management . . . . . . . . . . . . . . . . . . . . . . . . . . . 13
Monitoring, Maintenance, and Troubleshooting Features . . . . . . . . . . . . . . . . . . . . . 14
Chapter 2. Getting Started with Your 3ware RAID Controller . . . . . . . . . . . . . . . . . .16
Chapter 3. First-Time RAID Configuration Using 3BM. . . . . . . . . . . . . . . . . . . . . . . .20
Basic Steps for Creating a Unit . . . . . . . . . . . . . . . . . . . . . . . . . . . . . . . . . . . . . . . . . 20
Specifying a Hot Spare . . . . . . . . . . . . . . . . . . . . . . . . . . . . . . . . . . . . . . . . . . . . . . . 28
Leaving Individual Drives as JBODs . . . . . . . . . . . . . . . . . . . . . . . . . . . . . . . . . . . . . 28
Checking the Motherboard Boot Sequence . . . . . . . . . . . . . . . . . . . . . . . . . . . . . . . 29
What Next? . . . . . . . . . . . . . . . . . . . . . . . . . . . . . . . . . . . . . . . . . . . . . . . . . . . . . . . . 29
Chapter 4. Driver Installation . . . . . . . . . . . . . . . . . . . . . . . . . . . . . . . . . . . . . . . . . . . .30
Driver Installation Under Windows . . . . . . . . . . . . . . . . . . . . . . . . . . . . . . . . . . . . . . 31
Materials Required . . . . . . . . . . . . . . . . . . . . . . . . . . . . . . . . . . . . . . . . . . . . . . . . 31
Creating a 3ware Driver Diskette . . . . . . . . . . . . . . . . . . . . . . . . . . . . . . . . . . . . . 32
Installing the 3ware Driver and Windows on a New Unit . . . . . . . . . . . . . . . . . . . . 32
Installing the Driver on a System that Boots from a Different Device . . . . . . . . . . 33
Making Units Managed by a 3ware Controller Available to Windows . . . . . . . . . . 38
Driver Installation Under Linux . . . . . . . . . . . . . . . . . . . . . . . . . . . . . . . . . . . . . . . . . 39
Obtaining 3ware Linux Drivers . . . . . . . . . . . . . . . . . . . . . . . . . . . . . . . . . . . . . . . 40
Driver Installation Under Red Hat Linux or Fedora Core 5 . . . . . . . . . . . . . . . . . . 41
Driver Installation Under SuSE Linux . . . . . . . . . . . . . . . . . . . . . . . . . . . . . . . . . . 47
Compiling a 3ware Driver for Linux . . . . . . . . . . . . . . . . . . . . . . . . . . . . . . . . . . . . 50
Driver Installation Under FreeBSD . . . . . . . . . . . . . . . . . . . . . . . . . . . . . . . . . . . . . . 50
Obtaining 3ware FreeBSD Drivers . . . . . . . . . . . . . . . . . . . . . . . . . . . . . . . . . . . . 51
Installing the Driver under FreeBSD . . . . . . . . . . . . . . . . . . . . . . . . . . . . . . . . . . . 51
Chapter 5. 3ware BIOS Manager 2 (3BM 2) Introduction . . . . . . . . . . . . . . . . . . . . . .57
Starting 3BM 2 . . . . . . . . . . . . . . . . . . . . . . . . . . . . . . . . . . . . . . . . . . . . . . . . . . . . . 57
Exiting the 3BM Configuration Utility . . . . . . . . . . . . . . . . . . . . . . . . . . . . . . . . . . . . 59
Working in the 3BM Screens . . . . . . . . . . . . . . . . . . . . . . . . . . . . . . . . . . . . . . . . . . 60
Adjusting BIOS Loading Settings . . . . . . . . . . . . . . . . . . . . . . . . . . . . . . . . . . . . . . . 63
Displaying Controller Information . . . . . . . . . . . . . . . . . . . . . . . . . . . . . . . . . . . . . . . 65
Getting Help While Using 3BM . . . . . . . . . . . . . . . . . . . . . . . . . . . . . . . . . . . . . . . . . 65
Chapter 6. 3DM 2 (3ware Disk Manager) Introduction . . . . . . . . . . . . . . . . . . . . . . . .66
Browser Requirements for 3DM . . . . . . . . . . . . . . . . . . . . . . . . . . . . . . . . . . . . . . . . 67
Installing 3DM . . . . . . . . . . . . . . . . . . . . . . . . . . . . . . . . . . . . . . . . . . . . . . . . . . . . . . 68

iv 3ware Serial ATA RAID Controller User Guide
Starting 3DM and Logging In . . . . . . . . . . . . . . . . . . . . . . . . . . . . . . . . . . . . . . . . . . 68
Logging In to the 3DM Web Application . . . . . . . . . . . . . . . . . . . . . . . . . . . . . . . . 68
Starting the 3DM Daemon under Linux and FreeBSD . . . . . . . . . . . . . . . . . . . . . 70
Starting the 3DM Process under Microsoft Windows . . . . . . . . . . . . . . . . . . . . . . 70
Viewing 3DM Remotely Using a Web Browser . . . . . . . . . . . . . . . . . . . . . . . . . . . 71
Working with the 3DM Screens . . . . . . . . . . . . . . . . . . . . . . . . . . . . . . . . . . . . . . . . . 71
3DM Menus . . . . . . . . . . . . . . . . . . . . . . . . . . . . . . . . . . . . . . . . . . . . . . . . . . . . . . 72
Viewing Information About Different Controllers . . . . . . . . . . . . . . . . . . . . . . . . . . 74
Refreshing the Screen . . . . . . . . . . . . . . . . . . . . . . . . . . . . . . . . . . . . . . . . . . . . . 74
3DM Screens and What They're Used For . . . . . . . . . . . . . . . . . . . . . . . . . . . . . . 74
Setting Up 3DM Preferences . . . . . . . . . . . . . . . . . . . . . . . . . . . . . . . . . . . . . . . . . . 76
Setting and Changing 3DM Passwords . . . . . . . . . . . . . . . . . . . . . . . . . . . . . . . . 77
Managing E-mail Event Notification . . . . . . . . . . . . . . . . . . . . . . . . . . . . . . . . . . . 77
Enabling and Disabling Remote Access . . . . . . . . . . . . . . . . . . . . . . . . . . . . . . . . 78
Setting the Incoming Port # . . . . . . . . . . . . . . . . . . . . . . . . . . . . . . . . . . . . . . . . . . 79
Setting the Frequency of Page Refreshes . . . . . . . . . . . . . . . . . . . . . . . . . . . . . . 79
Chapter 7. Configuring Your Controller. . . . . . . . . . . . . . . . . . . . . . . . . . . . . . . . . . . .80
Viewing Information About a Controller . . . . . . . . . . . . . . . . . . . . . . . . . . . . . . . . . . 80
About Controller Policies . . . . . . . . . . . . . . . . . . . . . . . . . . . . . . . . . . . . . . . . . . . . . 82
Viewing Controller Policies . . . . . . . . . . . . . . . . . . . . . . . . . . . . . . . . . . . . . . . . . . . . 83
Setting the Auto Rebuild Policy . . . . . . . . . . . . . . . . . . . . . . . . . . . . . . . . . . . . . . . . 85
Using Auto-Carving for Multi LUN Support . . . . . . . . . . . . . . . . . . . . . . . . . . . . . . . . 86
Setting the Size of Volumes Created with Auto-Carving . . . . . . . . . . . . . . . . . . . . . . 88
Enabling and Setting Up Staggered Spin-up . . . . . . . . . . . . . . . . . . . . . . . . . . . . . . 89
Exporting JBOD Disks . . . . . . . . . . . . . . . . . . . . . . . . . . . . . . . . . . . . . . . . . . . . . . . 90
Chapter 8. Configuring Units . . . . . . . . . . . . . . . . . . . . . . . . . . . . . . . . . . . . . . . . . . . .91
Configuring a New Unit . . . . . . . . . . . . . . . . . . . . . . . . . . . . . . . . . . . . . . . . . . . . . . . 91
Configuration Options When Creating a Unit . . . . . . . . . . . . . . . . . . . . . . . . . . . . 92
Creating a Unit through 3DM . . . . . . . . . . . . . . . . . . . . . . . . . . . . . . . . . . . . . . . . 94
Creating a Unit through 3BM . . . . . . . . . . . . . . . . . . . . . . . . . . . . . . . . . . . . . . . . . 97
Ordering Units in 3BM . . . . . . . . . . . . . . . . . . . . . . . . . . . . . . . . . . . . . . . . . . . . . 100
Partitioning, Formatting, and Mounting Units . . . . . . . . . . . . . . . . . . . . . . . . . . . 101
Creating a Hot Spare . . . . . . . . . . . . . . . . . . . . . . . . . . . . . . . . . . . . . . . . . . . . . . . 103
Specifying a Hot Spare through 3DM . . . . . . . . . . . . . . . . . . . . . . . . . . . . . . . . . 104
Specifying a Hot Spare through 3BM . . . . . . . . . . . . . . . . . . . . . . . . . . . . . . . . . 104
Naming a Unit . . . . . . . . . . . . . . . . . . . . . . . . . . . . . . . . . . . . . . . . . . . . . . . . . . . . . 105
Setting Unit Policies . . . . . . . . . . . . . . . . . . . . . . . . . . . . . . . . . . . . . . . . . . . . . . . . 106
Enabling and Disabling the Unit Write Cache . . . . . . . . . . . . . . . . . . . . . . . . . . . 108
Setting Auto Verify for a Unit . . . . . . . . . . . . . . . . . . . . . . . . . . . . . . . . . . . . . . . . 109
Setting Continue on Source Error During Rebuild . . . . . . . . . . . . . . . . . . . . . . . 110
Enabling and Disabling Queuing for a Unit . . . . . . . . . . . . . . . . . . . . . . . . . . . . . .111
Setting the StorSave Profile for a Unit . . . . . . . . . . . . . . . . . . . . . . . . . . . . . . . . . 112
Changing An Existing Configuration by Migrating . . . . . . . . . . . . . . . . . . . . . . . . . 115
RAID Level Migration (RLM) Overview . . . . . . . . . . . . . . . . . . . . . . . . . . . . . . . . 116
Changing RAID Level . . . . . . . . . . . . . . . . . . . . . . . . . . . . . . . . . . . . . . . . . . . . . 117
Expanding Unit Capacity . . . . . . . . . . . . . . . . . . . . . . . . . . . . . . . . . . . . . . . . . . . 118
Informing the Operating System of Changed Configuration . . . . . . . . . . . . . . . . 119
Deleting a Unit . . . . . . . . . . . . . . . . . . . . . . . . . . . . . . . . . . . . . . . . . . . . . . . . . . . . 120
Deleting a Unit through 3DM . . . . . . . . . . . . . . . . . . . . . . . . . . . . . . . . . . . . . . . . 121
Deleting a Unit through 3BM . . . . . . . . . . . . . . . . . . . . . . . . . . . . . . . . . . . . . . . . 122
Removing a Unit . . . . . . . . . . . . . . . . . . . . . . . . . . . . . . . . . . . . . . . . . . . . . . . . . . . 123
Removing a Unit Through 3DM . . . . . . . . . . . . . . . . . . . . . . . . . . . . . . . . . . . . . . 124
Removing a Unit Through 3BM . . . . . . . . . . . . . . . . . . . . . . . . . . . . . . . . . . . . . . 125
Moving a Unit from One Controller to Another . . . . . . . . . . . . . . . . . . . . . . . . . . . . 126

www.3ware.com v
Moving Units from an 8000 Controller to a 9000 Controller . . . . . . . . . . . . . . . . 126
Moving Legacy JBOD Units to a 9000 Controller . . . . . . . . . . . . . . . . . . . . . . . . 127
Moving Units from a 9500S to a 9550SX, 9590SE, or 9650SE Controller . . . . . 128
Adding a Drive . . . . . . . . . . . . . . . . . . . . . . . . . . . . . . . . . . . . . . . . . . . . . . . . . . . . 129
Removing a Drive . . . . . . . . . . . . . . . . . . . . . . . . . . . . . . . . . . . . . . . . . . . . . . . . . . 130
Rescanning the Controller . . . . . . . . . . . . . . . . . . . . . . . . . . . . . . . . . . . . . . . . . . . 131
Chapter 9. Maintaining Units . . . . . . . . . . . . . . . . . . . . . . . . . . . . . . . . . . . . . . . . . . .133
Checking Unit and Drive Status through 3DM . . . . . . . . . . . . . . . . . . . . . . . . . . . . 133
Enclosure LED Status Indicators . . . . . . . . . . . . . . . . . . . . . . . . . . . . . . . . . . . . . 135
Unit Statuses . . . . . . . . . . . . . . . . . . . . . . . . . . . . . . . . . . . . . . . . . . . . . . . . . . . . 135
Drive Statuses . . . . . . . . . . . . . . . . . . . . . . . . . . . . . . . . . . . . . . . . . . . . . . . . . . . 137
About Degraded Units . . . . . . . . . . . . . . . . . . . . . . . . . . . . . . . . . . . . . . . . . . . . . . . 137
About Inoperable Units . . . . . . . . . . . . . . . . . . . . . . . . . . . . . . . . . . . . . . . . . . . . . . 138
Alarms, Errors, and Other Events . . . . . . . . . . . . . . . . . . . . . . . . . . . . . . . . . . . . . . 138
Viewing Alarms, Errors, and Other Events . . . . . . . . . . . . . . . . . . . . . . . . . . . . . 138
Using the Alert Utility Under Windows . . . . . . . . . . . . . . . . . . . . . . . . . . . . . . . . 139
Downloading an Error Log . . . . . . . . . . . . . . . . . . . . . . . . . . . . . . . . . . . . . . . . . 141
Viewing SMART Data About a Drive . . . . . . . . . . . . . . . . . . . . . . . . . . . . . . . . . . 141
Background Tasks . . . . . . . . . . . . . . . . . . . . . . . . . . . . . . . . . . . . . . . . . . . . . . . . . 142
About Initialization . . . . . . . . . . . . . . . . . . . . . . . . . . . . . . . . . . . . . . . . . . . . . . . . 143
About Verification . . . . . . . . . . . . . . . . . . . . . . . . . . . . . . . . . . . . . . . . . . . . . . . . 146
Starting a Verify Manually . . . . . . . . . . . . . . . . . . . . . . . . . . . . . . . . . . . . . . . . . . 148
Rebuilding Units . . . . . . . . . . . . . . . . . . . . . . . . . . . . . . . . . . . . . . . . . . . . . . . . . 150
Cancelling a Rebuild and Restarting It with a Different Drive . . . . . . . . . . . . . . . 154
Setting Background Task Rate . . . . . . . . . . . . . . . . . . . . . . . . . . . . . . . . . . . . . . 155
Background Task Prioritization . . . . . . . . . . . . . . . . . . . . . . . . . . . . . . . . . . . . . . 156
Scheduling Background Tasks . . . . . . . . . . . . . . . . . . . . . . . . . . . . . . . . . . . . . . . . 156
Viewing Current Task Schedules . . . . . . . . . . . . . . . . . . . . . . . . . . . . . . . . . . . . . 157
Turning On or Off Use of a Task Schedule . . . . . . . . . . . . . . . . . . . . . . . . . . . . . 158
Removing a Task Schedule . . . . . . . . . . . . . . . . . . . . . . . . . . . . . . . . . . . . . . . . . 159
Adding a New Task Schedule Slot . . . . . . . . . . . . . . . . . . . . . . . . . . . . . . . . . . . 159
Selecting Self-tests to be Performed . . . . . . . . . . . . . . . . . . . . . . . . . . . . . . . . . . 160
Locating a Drive by Blinking Its LED . . . . . . . . . . . . . . . . . . . . . . . . . . . . . . . . . . . . 161
Chapter 10. Maintaining Your Controller. . . . . . . . . . . . . . . . . . . . . . . . . . . . . . . . . . .163
Determining the Current Version of Your 3ware Driver . . . . . . . . . . . . . . . . . . . . . . 163
Updating the Firmware and Driver . . . . . . . . . . . . . . . . . . . . . . . . . . . . . . . . . . . . . 164
Downloading the Driver and Firmware . . . . . . . . . . . . . . . . . . . . . . . . . . . . . . . . 165
Updating the Firmware Through 3DM 2 . . . . . . . . . . . . . . . . . . . . . . . . . . . . . . . 166
Updating the 3ware Driver and Firmware Under Windows . . . . . . . . . . . . . . . . . 167
Using the Update Utility With Multiple Controllers . . . . . . . . . . . . . . . . . . . . . . . . 171
Updating the 3ware Driver Under Windows XP . . . . . . . . . . . . . . . . . . . . . . . . . 172
Updating the 3ware Driver Under Red Hat or Fedora Core . . . . . . . . . . . . . . . . 178
Updating the 3ware Driver Under SuSE . . . . . . . . . . . . . . . . . . . . . . . . . . . . . . . 179
Updating the 3ware Driver Under FreeBSD . . . . . . . . . . . . . . . . . . . . . . . . . . . . 181
Updating the Firmware Under Linux and FreeBSD . . . . . . . . . . . . . . . . . . . . . . . 182
Viewing Battery Information . . . . . . . . . . . . . . . . . . . . . . . . . . . . . . . . . . . . . . . . . . 183
Testing Battery Capacity . . . . . . . . . . . . . . . . . . . . . . . . . . . . . . . . . . . . . . . . . . . . . 183
Chapter 11. 3DM 2 Reference . . . . . . . . . . . . . . . . . . . . . . . . . . . . . . . . . . . . . . . . . . . .186
Controller Summary page . . . . . . . . . . . . . . . . . . . . . . . . . . . . . . . . . . . . . . . . . . . . 187
Controller Details page . . . . . . . . . . . . . . . . . . . . . . . . . . . . . . . . . . . . . . . . . . . . . . 188
Unit Information page . . . . . . . . . . . . . . . . . . . . . . . . . . . . . . . . . . . . . . . . . . . . . . . 189
Unit Details page . . . . . . . . . . . . . . . . . . . . . . . . . . . . . . . . . . . . . . . . . . . . . . . . . . . 190
Drive Information page . . . . . . . . . . . . . . . . . . . . . . . . . . . . . . . . . . . . . . . . . . . . . . 192

vi 3ware Serial ATA RAID Controller User Guide
Drive Details window . . . . . . . . . . . . . . . . . . . . . . . . . . . . . . . . . . . . . . . . . . . . . . . . 193
Controller Settings page . . . . . . . . . . . . . . . . . . . . . . . . . . . . . . . . . . . . . . . . . . . . . 195
Scheduling page . . . . . . . . . . . . . . . . . . . . . . . . . . . . . . . . . . . . . . . . . . . . . . . . . . . 199
Maintenance page . . . . . . . . . . . . . . . . . . . . . . . . . . . . . . . . . . . . . . . . . . . . . . . . . 202
Alarms page . . . . . . . . . . . . . . . . . . . . . . . . . . . . . . . . . . . . . . . . . . . . . . . . . . . . . . 210
Battery Backup page . . . . . . . . . . . . . . . . . . . . . . . . . . . . . . . . . . . . . . . . . . . . . . . . 211
Enclosure Summary page . . . . . . . . . . . . . . . . . . . . . . . . . . . . . . . . . . . . . . . . . . . . 213
Enclosure Details page . . . . . . . . . . . . . . . . . . . . . . . . . . . . . . . . . . . . . . . . . . . . . . 214
3DM 2 Settings page . . . . . . . . . . . . . . . . . . . . . . . . . . . . . . . . . . . . . . . . . . . . . . . 215
Chapter 12. Troubleshooting . . . . . . . . . . . . . . . . . . . . . . . . . . . . . . . . . . . . . . . . . . . .218
Web Resources . . . . . . . . . . . . . . . . . . . . . . . . . . . . . . . . . . . . . . . . . . . . . . . . . . . 218
Before Contacting Customer Support . . . . . . . . . . . . . . . . . . . . . . . . . . . . . . . . . . . 219
Basic Troubleshooting: Check This First . . . . . . . . . . . . . . . . . . . . . . . . . . . . . . . . 219
Command Logging . . . . . . . . . . . . . . . . . . . . . . . . . . . . . . . . . . . . . . . . . . . . . . . . . 220
Problems and Solutions . . . . . . . . . . . . . . . . . . . . . . . . . . . . . . . . . . . . . . . . . . . . . 220
Enclosure-Related Problems . . . . . . . . . . . . . . . . . . . . . . . . . . . . . . . . . . . . . . . 221
Hardware Installation Problems . . . . . . . . . . . . . . . . . . . . . . . . . . . . . . . . . . . . . 221
Software Installation Problems . . . . . . . . . . . . . . . . . . . . . . . . . . . . . . . . . . . . . . 222
Problems in 3DM and 3BM . . . . . . . . . . . . . . . . . . . . . . . . . . . . . . . . . . . . . . . . . 223
Error and Notification Messages . . . . . . . . . . . . . . . . . . . . . . . . . . . . . . . . . . . . . . . 224
Error and Notification Message Details . . . . . . . . . . . . . . . . . . . . . . . . . . . . . . . . 227
Appendices . . . . . . . . . . . . . . . . . . . . . . . . . . . . . . . . . . . . . . . . . . . . . . . .264
Installing Software from a Graphical User Interface (GUI) . . . . . . . . . . . . . . . . . . . 271
Installing Software on Linux and FreeBSD from the Command Line . . . . . . . . . . . 278
Uninstalling Software . . . . . . . . . . . . . . . . . . . . . . . . . . . . . . . . . . . . . . . . . . . . . . . 279
Uninstalling 3DM under Microsoft Windows . . . . . . . . . . . . . . . . . . . . . . . . . . . . 279
Uninstalling 3DM under Linux or FreeBSD . . . . . . . . . . . . . . . . . . . . . . . . . . . . . 279
FCC Radio Frequency Interference Statement . . . . . . . . . . . . . . . . . . . . . . . . . . . . 280
Microsoft Windows Hardware Quality Lab . . . . . . . . . . . . . . . . . . . . . . . . . . . . . . . 281
European Community Conformity Statement . . . . . . . . . . . . . . . . . . . . . . . . . . . . . 281
Limited Warranty . . . . . . . . . . . . . . . . . . . . . . . . . . . . . . . . . . . . . . . . . . . . . . . . . . . 282
Warranty Service and RMA Process . . . . . . . . . . . . . . . . . . . . . . . . . . . . . . . . . . . 283
AMCC Technical Support and Services . . . . . . . . . . . . . . . . . . . . . . . . . . . . . . . . . 284
Sales and ordering information . . . . . . . . . . . . . . . . . . . . . . . . . . . . . . . . . . . . . . . . 284
Feedback on this manual . . . . . . . . . . . . . . . . . . . . . . . . . . . . . . . . . . . . . . . . . . . . 284
Index . . . . . . . . . . . . . . . . . . . . . . . . . . . . . . . . . . . . . . . . . . . . . . . . . . . . .285

vii 3ware Serial ATA RAID Controller User Guide
About this User Guide
This document, 3ware Serial ATA RAID Controller User Guide, provides
instructions for configuring and maintaining RAID units on 3ware 9650SE,
9590SE, and 9550SX series RAID controllers.
This guide assumes that you have already installed your controller and drives
in your system, and set up your 3ware Sidecar, if you have one. If you have
not yet done so, see the installation guide that came with your controller. If
you do not have the printed copy, an PDF of the installation guide is available
on your 3ware CD, or you can download it from: http://www.3ware.com/
support/userdocs.asp. (Note that there are different installation guides for
different 3ware RAID controller models.)
There are often multiple ways to accomplish the same configuration and
maintenance tasks for your 3ware RAID controller. This manual includes
instructions for performing tasks using two tools: one at the BIOS level
(3ware BIOS Manager 2, referred to as 3BM 2) and one that runs in a browser
(3ware Disk Manager 2, referred to as 3DM 2).
You can also perform many tasks at the command line, using 3ware’s
Command Line Interface (CLI). The CLI is described in a separate manual:
3ware Serial ATA RAID Controller CLI Guide. Information from both this
Users Guide and the CLI Guide are also available in the 3ware HTML
Bookshelf, available in the 3ware Documentation folder and on your 3ware
CD. (For more information, see “Using the 3ware HTML Bookshelf” on
page ix.)
How this User Guide is Organized
Table 1: Chapters and Appendices in this Guide
Chapter/Appendix Description
1. Introduction Provides an overview of product features for
the 3ware 9650SE, 9590SE, and 9550SX
controller models. Includes system
requirements and an introduction to RAID
concepts and levels.

viii 3ware Serial ATA RAID Controller User Guide
2. Getting Started Provides a summary of the process you should
follow to get started using your 3ware RAID
controller.
3. First-Time RAID Configuration
Using 3BM Provides step-by-step instructions for
configuring RAID units if you have just installed
the controller.
4. Driver Installation Describes how to install drivers for the 3ware
controller if you have just installed and
configured it. Includes information for Windows,
Linux, and FreeBSD.
5. 3ware BIOS Manager (3BM) Describes the basics of using 3BM.
6. 3ware Disk Manager 2
(3DM 2) Describes the basics of using 3DM. Also
includes information about installing and
uninstalling 3DM, and how to start the 3DM
process manually, if required.
7. Configuring Your Controller Describes how to view details about the
controller, check its status, and change
configuration settings that affect the controller
and all associated drives.
8. Configuring Units Describes how to configure new units and hot
spares, change existing configurations, and set
unit policies.
9. Maintaining Units Describes how to check unit and drive status,
review alarms and errors, schedule background
maintenance tasks, and manually start them,
when necessary or desirable. Includes
explanations of initialization, verify, rebuild, and
self-tests.
10. Maintaining Your Controller Describes how to update the driver, move a unit
from one controller to another, and replace an
existing 3ware controller with a new one. Also
includes information about checking battery
status on a BBU (Battery Backup Unit).
11. 3DM 2 Reference Describes the features and functions on each
of the pages in 3DM.
12. Troubleshooting Provides common problems and solutions, and
explains error messages.
A. Glossary Includes definitions for terms used throughout
this guide.
B. Software Installation Provides instructions for installing software
management tools (3DM 2, CLI, tw_update)
and documentation.
C. Compliance and Conformity
Statements Provides compliance and conformity statement.
Table 1: Chapters and Appendices in this Guide
Chapter/Appendix Description

Conventions
www.3ware.com ix
Conventions
The following conventions are used through this guide:
•3BM and 3BM 2 both refer to the 3ware BIOS Manager, version 2.
•3DM and 3DM 2 both refer to the 3ware Disk Manager, version 2.
•In the sections that describe using 3DM, current controller is used to refer
to the controller which is currently selected in this drop-down list.
•Unit refers to one or more disks configured through 3ware to be treated by
the operating system as a single drive. Also known as an array. Array and
unit are used interchangeably throughout this manual.
• Boldface is used for buttons, fields, and settings that appear on the screen.
•Monospace font is used for code and to indicate things you type.
Screenshots
The screenshots in this documentation are examples only, and may not exactly
reflect the operating system and browser you are using. 3ware software works
on a number of different operating systems, including Mac OS X, Microsoft
Windows®, Linux®, and FreeBSD®, and runs in a number of different
browsers. In addition, the version shown in screenshots may not match your
version. For the current released and tested version number, see the latest
release notes.
Using the 3ware HTML Bookshelf
The 3ware HTML Bookshelf is an HTML version of this user guide and the
CLI Guide, combined as one resource. It is available on your 3ware CD, in the
/doc folder.
To make use of the 3ware HTML Bookshelf
1 Copy the compressed version of the guide (3wareHTMLBookshelf.zip or
3wareHTMLBookshelf.tgz, depending on your operating system) to a
local drive on your computer and extract it.
D. Warranty, Technical Support,
and Service Provides warranty information and tells you
how to contact technical support.
Table 1: Chapters and Appendices in this Guide
Chapter/Appendix Description

x3ware Serial ATA RAID Controller User Guide
2 To launch the bookshelf at the opening page, open the
3wareHTMLBookshelf folder and double click the file index.html.
Opening the file from “index.html” automatically displays a navigation
panel at the left that includes a Table of Contents, Index, and Search.
You can also open the bookshelf by double-clicking any other html file in
the 3wareHTMLBookshelf folder. When you open an individual file, the
navigation pane does not automatically open. In this case, you can display
the navigation pane by clicking the Show Navigation button at the left.
Figure 1. Navigation Button in the 3ware HTML Bookshelf Window
Click the Show Navigation
button to display the Table of
Contents
Note: The 3ware HTML Bookshelf is created as a set of HTML documents
that are often displayed from a website. When installed on your personal
computer, some browsers flag them as “active content,” and require your
approval before displaying the content.
If you see messages similar to the following, you must confirm the display of
active content in order to see the pages.

13ware Serial ATA RAID Controller User Guide
1
Introducing the 3ware®SATA
RAID Controller
AMCC 3ware RAID controllers deliver full-featured, true hardware RAID to
servers and workstations. AMCC's RAID controllers offer Serial ATA (SATA)
and SATA II interfaces in both low profile and full-height footprints.
Combined with an advanced RAID management feature set that includes
web-based, command-based, and API (application programming interface)
software components, AMCC controllers, available in 2-, 4-, 8-, 12-, 16-, and
24-port configurations, provide compelling RAID solutions.
This section introduces the features and concepts of AMCC 3ware RAID
controllers. It is organized into the following topics:
•What’s New with 9650SE Models
•System Requirements
•Understanding RAID Concepts and Levels
•3ware Tools for Configuration and Management
•Monitoring, Maintenance, and Troubleshooting Features
What’s New with 9650SE Models
The 9650SE models in 3ware’s 9000 series of RAID controllers have the
following features and benefits:
•Simultaneous RAID 6 parity generation to maximize RAID 6
performance
•8th-generation StorSwitch™ non-blocking switch fabric for maximum
controller output
•StreamFusion™ optimizes RAID 5 and RAID 6 disk accesses to
maximize application performance under heavy loads
•StorSave™ BBU with write journaling optimizes data protection and
performance
•RAID levels 0, 1, 5, 6, 10, 50, Single Disk, and JBOD
Chapter 1. Introducing the 3ware® SATA RAID Controller
23ware Serial ATA RAID Controller User Guide
(RAID 6 and RAID 50 are available only with 3ware RAID controller
models that have 8 or more ports)
•Choice of 2, 4, 8, 12, 16, or 24 SATA ports
•PCI Express® x1, x4 and x8 connectivity
•If you have a 3ware Sidecar, the drive Locate feature allows you to easily
identify a drive in the enclosure by blinking the LED associated with it
System Requirements
3ware 9650SE, 9590SE, and 9550SX model RAID controllers have the
following requirements:
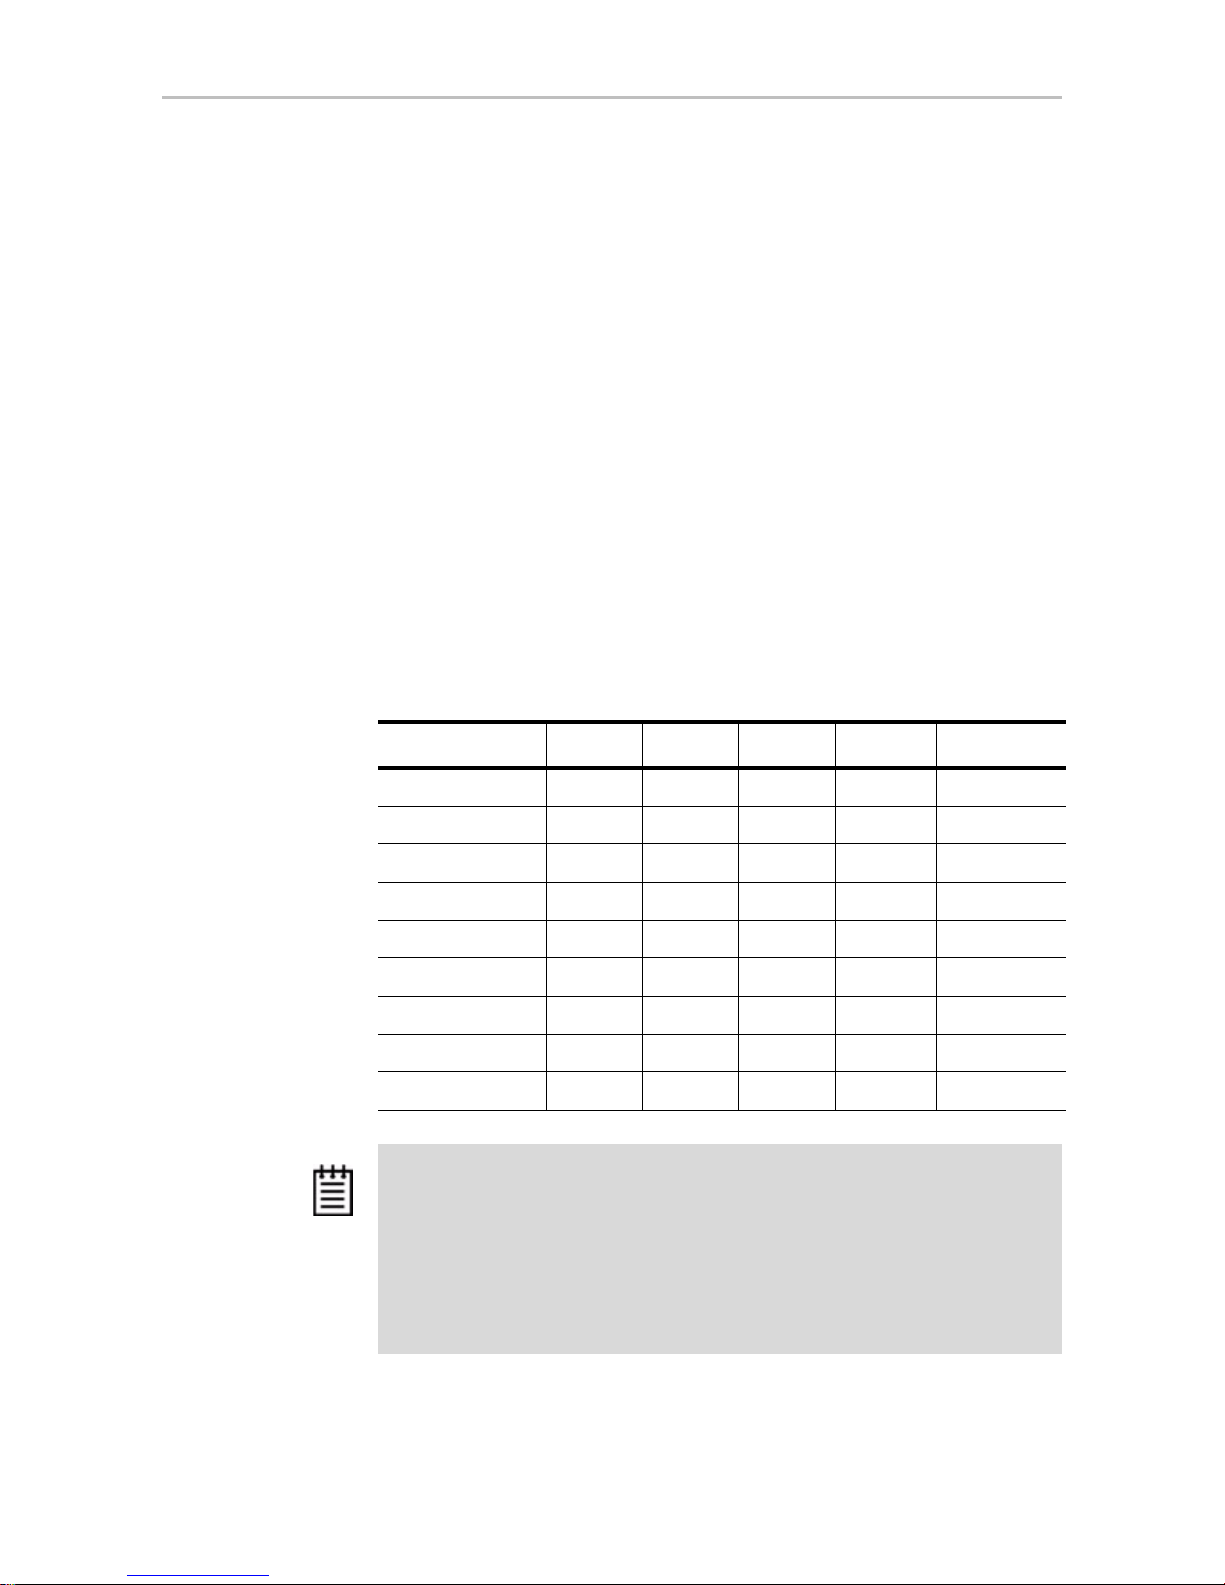
Motherboard and Slot Requirements
A workstation-class or server-class motherboard, with slots that support the
specific 3ware RAID controller model, as shown in Table 2.
Table 2: Required Slots for 3ware RAID Controller Models
Controller Model PCI-E X1 PCI-E X4 PCI-E X8 PCI-E x16 PCI-X (64-bit)
9650SE-2LPML YES YES YES Yes No
9650SE-4LPML NOYES YES Yes No
9650SE-4LPME NOYES YES Yes No
9650SE-8LPML NOYES YES Yes No
9650SE-12ML NONOYES Yes No
9650SE-16ML NONOYES Yes No
9650SE-24M8 NONOYES Yes No
9590SE NOYES YES Yes No
9550SX NONONONo Yes
Notes:
3ware 9650SE and 9590SE RAID controllers must be installed in a PCI Express
slot that complies with PCI 1.1 or later standards.
The 3ware 9550SX Controller performs best when installed in a PCI-X 133MHz 64-
bit slot. However, it can also operate at 66MHz or 100MHz.
PCI Slots used for the 9550SX controllers must comply with PCI 2.2 or later
standards and must meet the Plug and Play and PC99 specifications.

System Requirements
www.3ware.com 3
Drive Requirements
Depending on the particular model, the 3ware RAID controller may be
connected to two, four, eight, twelve, sixteen, or twenty-four SATA drives
using the supplied interface cables.
Drives must meet SATA-1 (1.5 GB/s) or SATA-2 (3.0 Gb/s) standards.
A list of drives that have been tested is available at
http://www.3ware.com/products/compatibility_sata2.asp
Drives may be of any capacity or physical form factor.
The length of shielded and unshielded interface cables may not exceed 1M
(39”) for Serial ATA controllers.
Operating System
•3ware RAID controllers may be used with:
•Windows 2000, Windows XP, Windows Server 2003, both 32-bit and 64-
bit x86
•Red Hat Linux, 32-bit and 64-bit x86
•SuSE Linux, 32-bit and 64-bit x86
•Fedora Core, 32-bit and 64-bit x86
•Other versions of Linux, 32-bit and 64-bit x86, using the open source
Linux 2.4 or 2.6 kernel driver
•FreeBSD, 32-bit and 64-bit x86
For the latest driver versions for all operating systems, see the current Release
Notes at http://www.3ware.com/support/.
Other Requirements
•Adequate air flow and cooling
•Adequate power supply for drives
•3DM 2 (3ware Disk Manager) displays information in a browser. It
requires one of the following browsers:
•Internet Explorer 5.5 and later
•Mozilla Firefox 1.2 and later
•Netscape 7 and later
In addition:
•JavaScript must be enabled
•Cookies must be enabled

Chapter 1. Introducing the 3ware® SATA RAID Controller
43ware Serial ATA RAID Controller User Guide
•For best viewing, screen resolution should be 1024 x 768 or greater,
with 16-bit color or greater.
For a complete listing of features and system requirements, refer to the 3ware
SATA RAID Controller datasheets, available from the website at http://
www.3ware.com/products.
Understanding RAID Concepts and Levels
3ware RAID controllers use RAID (Redundant Array of Inexpensive Disks)
to increase your storage system’s performance and provide fault tolerance
(protection against data loss).
This section organizes information about RAID concepts and configuration
levels into the following topics:
•“RAID Concepts” on page 4
•“Available RAID Configurations” on page 5
•“Determining What RAID Level to Use” on page 11
RAID Concepts
The following concepts are important to understand when working with a
RAID controller:
•Arrays and Units. In the storage industry, the term “array” is used to
describe two or more disk drives that appear to the operating system as a
single unit. When working with a 3ware RAID controller, “unit” is the
term used to refer to an array of disks that is configured and managed
through the 3ware software. Single-disk units can also be configured in
the 3ware software.
•Mirroring. Mirrored arrays (RAID 1) write data to paired drives
simultaneously. If one drive fails, the data is preserved on the paired
drive. Mirroring provides data protection through redundancy. In
addition, mirroring using a 3ware RAID controller provides improved
performance because 3ware’s TwinStor technology reads from both
drives simultaneously.
•Striping. Striping across disks allows data to be written and accessed on
more than one drive, at the same time. Striping combines each drive’s
capacity into one large volume. Striped disk arrays (RAID 0) achieve
highest transfer rates and performance at the expense of fault tolerance.
•Distributed Parity. Parity works in combination with striping on RAID 5,
RAID 6, and RAID 50. Parity information is written to each of the striped

Understanding RAID Concepts and Levels
www.3ware.com 5
drives, in rotation. Should a failure occur, the data on the failed drive can
be reconstructed from the data on the other drives.
•Hot Swap. The process of exchanging a drive without having to shut
down the system. This is useful when you need to exchange a defective
drive in a redundant unit.
•Array Roaming. The process of removing a unit from a controller and
putting it back later, either on the same controller, or a different one, and
having it recognized as a unit. The disks may be attached to different ports
than they were originally attached to, without harm to the data.
For definitions of other terms used throughout the documentation, see the
“Glossary”.
Available RAID Configurations
RAID is a method of combining several hard drives into one unit. It offers
fault tolerance and higher throughput levels than a single hard drive or group
of independent hard drives. RAID levels 0, 1, 10 and 5 are the most popular.
AMCC's 3ware controllers support RAID 0, 1, 5, 6, 10, 50, JBOD and Single
Disk. The information below provides a more in-depth explanation of the
different RAID levels.
For how to configure RAID units, see “Configuring a New Unit” on page 91.
RAID 0
RAID 0 provides improved performance, but no fault tolerance. Since the
data is striped across more than one disk, RAID 0 disk arrays achieve high
transfer rates because they can read and write data on more than one drive
simultaneously. The stripe size is configurable during unit creation. RAID 0
requires a minimum of two drives.
When drives are configured in a striped disk array (see Figure 2), large files
are distributed across the multiple disks using RAID 0 techniques.
Striped disk arrays give exceptional performance, particularly for data
intensive applications such as video editing, computer-aided design and
geographical information systems.
RAID 0 arrays are not fault tolerant. The loss of any drive results in the loss of
all the data in that array, and can even cause a system hang, depending on
your operating system. RAID 0 arrays are not recommended for high
availability systems unless additional precautions are taken to prevent system
hangs and data loss.

Chapter 1. Introducing the 3ware® SATA RAID Controller
63ware Serial ATA RAID Controller User Guide
Figure 2. RAID 0 Configuration Example
RAID 1
RAID 1 provides fault tolerance and a speed advantage over non-RAID disks.
RAID 1 is also known as a mirrored array. Mirroring is done on pairs of
drives. Mirrored disk arrays write the same data to two different drives using
RAID 1 algorithms (see Figure 3). This gives your system fault tolerance by
preserving the data on one drive if the other drive fails. Fault tolerance is a
basic requirement for critical systems like web and database servers.
3ware uses a patented technology, TwinStor®, on RAID 1 arrays for
improved performance during sequential read operations. With TwinStor
technology, read performance is twice the speed of a single drive during
sequential read operation.
The adaptive algorithms in TwinStor technology boost performance by
distinguishing between random and sequential read requests. For the
sequential requests generated when accessing large files, both drives are used,
with the heads simultaneously reading alternating sections of the file. For the
smaller random transactions, the data is read from a single optimal drive head.
Figure 3. RAID 1 Configuration Example
RAID 5
RAID 5 provides performance, fault tolerance, high capacity, and storage
efficiency. It requires a minimum of three drives and combines striping data
with parity (exclusive OR) to restore data in case of a drive failure.
Performance and efficiency increase as the number of drives in a unit
increases.
Parity information is distributed across all of the drives in a unit rather than
being concentrated on a single disk (see Figure 4). This avoids throughput
loss due to contention for the parity drive.

Understanding RAID Concepts and Levels
www.3ware.com 7
RAID 5 is able to tolerate 1 drive failure in the unit.
Figure 4. RAID 5 Configuration Example
RAID 6
RAID 6 requires a 3ware 9650SE RAID controller.
RAID 6 provides greater redundancy and fault tolerance than RAID 5. It is
similar to RAID 5, but has two blocks of parity information (P+Q) distributed
across all the drives of a unit, instead of the single block of RAID 5.
Due to the two parities, a RAID 6 unit can tolerate two hard drives failing
simultaneously. This also means that a RAID 6 unit may be in two different
states at the same time. For example, one sub-unit can be degraded, while
another may be rebuilding, or one sub-unit may be initializing, while another
is verifying.
RAID 6 requires a minimum of five drives. Performance and storage
efficiency also increase as the number of drives increase.

Chapter 1. Introducing the 3ware® SATA RAID Controller
83ware Serial ATA RAID Controller User Guide
Figure 5. RAID 6 Configuration Example
RAID 10
RAID 10 is a combination of striped and mirrored arrays for fault tolerance
and high performance.
When drives are configured as a striped mirrored array, the disks are
configured using both RAID 0 and RAID 1 techniques, thus the name RAID
10 (see Figure 6). A minimum of four drives are required to use this
technique. The first two drives are mirrored as a fault tolerant array using
RAID 1. The third and fourth drives are mirrored as a second fault tolerant
array using RAID 1. The two mirrored arrays are then grouped as a striped
RAID 0 array using a two tier structure. Higher data transfer rates are
achieved by leveraging TwinStor and striping the arrays.
In addition, RAID 10 arrays offer a higher degree of fault tolerance than
RAID 1 and RAID 5, since the array can sustain multiple drive failures
without data loss. For example, in a twelve-drive RAID 10 array, up to six
drives can fail (half of each mirrored pair) and the array will continue to
function. Please note that if both halves of a mirrored pair in the RAID 10
array fail, then all of the data will be lost.

Understanding RAID Concepts and Levels
www.3ware.com 9
Figure 6. RAID 10 Configuration Example
RAID 50
RAID 50 is a combination of RAID 5 with RAID 0. This array type provides
fault tolerance and high performance. RAID 50 requires a minimum of six
drives.
Several combinations are available with RAID 50. For example, on a 12-port
controller, you can have a grouping of 3, 4, or 6 drives. A grouping of 3 means
that the RAID 5 arrays used have 3 disks each; four of these 3-drive RAID 5
arrays are striped together to form the 12-drive RAID 50 array. On a 16-port
controller, you can have a grouping of 4 or 8 drives.
In addition, RAID 50 arrays offer a higher degree of fault tolerance than
RAID 1 and RAID 5, since the array can sustain multiple drive failures
without data loss. For example, in a twelve-drive RAID 50 array, up to one
drive in each RAID 5 set can fail and the array will continue to function.
Please note that if two or more drives in a RAID 5 set fail, then all of the data
will be lost.

Chapter 1. Introducing the 3ware® SATA RAID Controller
10 3ware Serial ATA RAID Controller User Guide
Figure 7. RAID 50 Configuration Example
Single Disk
A single drive can be configured as a unit through 3ware software. (3BM,
3DM 2, or CLI). Like disks in other RAID configurations, single disks
contain 3ware Disk Control Block (DCB) information and are seen by the OS
as available units.
Single drives are not fault tolerant and therefore not recommended for high
availability systems unless additional precautions are taken to prevent system
hangs and data loss.
JBOD
A JBOD (acronym for “Just a Bunch of Disks”) is an unconfigured disk
attached to your 3ware RAID controller. JBOD configuration is no longer
supported in the 3ware 9000 series. AMCC recommends that you use Single
Disk as a replacement for JBOD, to take advantage of advanced features such
as caching, OCE, and RLM.
JBOD units are not fault tolerant and therefore not recommended for high
availability systems unless additional precautions are taken to prevent system
hangs and data loss.
Hot Spare
A hot spare is a single drive, available online, so that a redundant unit can be
automatically rebuilt in case of drive failure.
This manual suits for next models
9
Table of contents
Other 3Ware Computer Hardware manuals


