3
XSStick
®
W12
1
2
4
©4G Systems GmbH & Co. KG, Jarrestraße 2-6, 22303 Hamburg, Germany, www.4g-systems.com
SIM CARD
OPEN
SIM
1
2
3
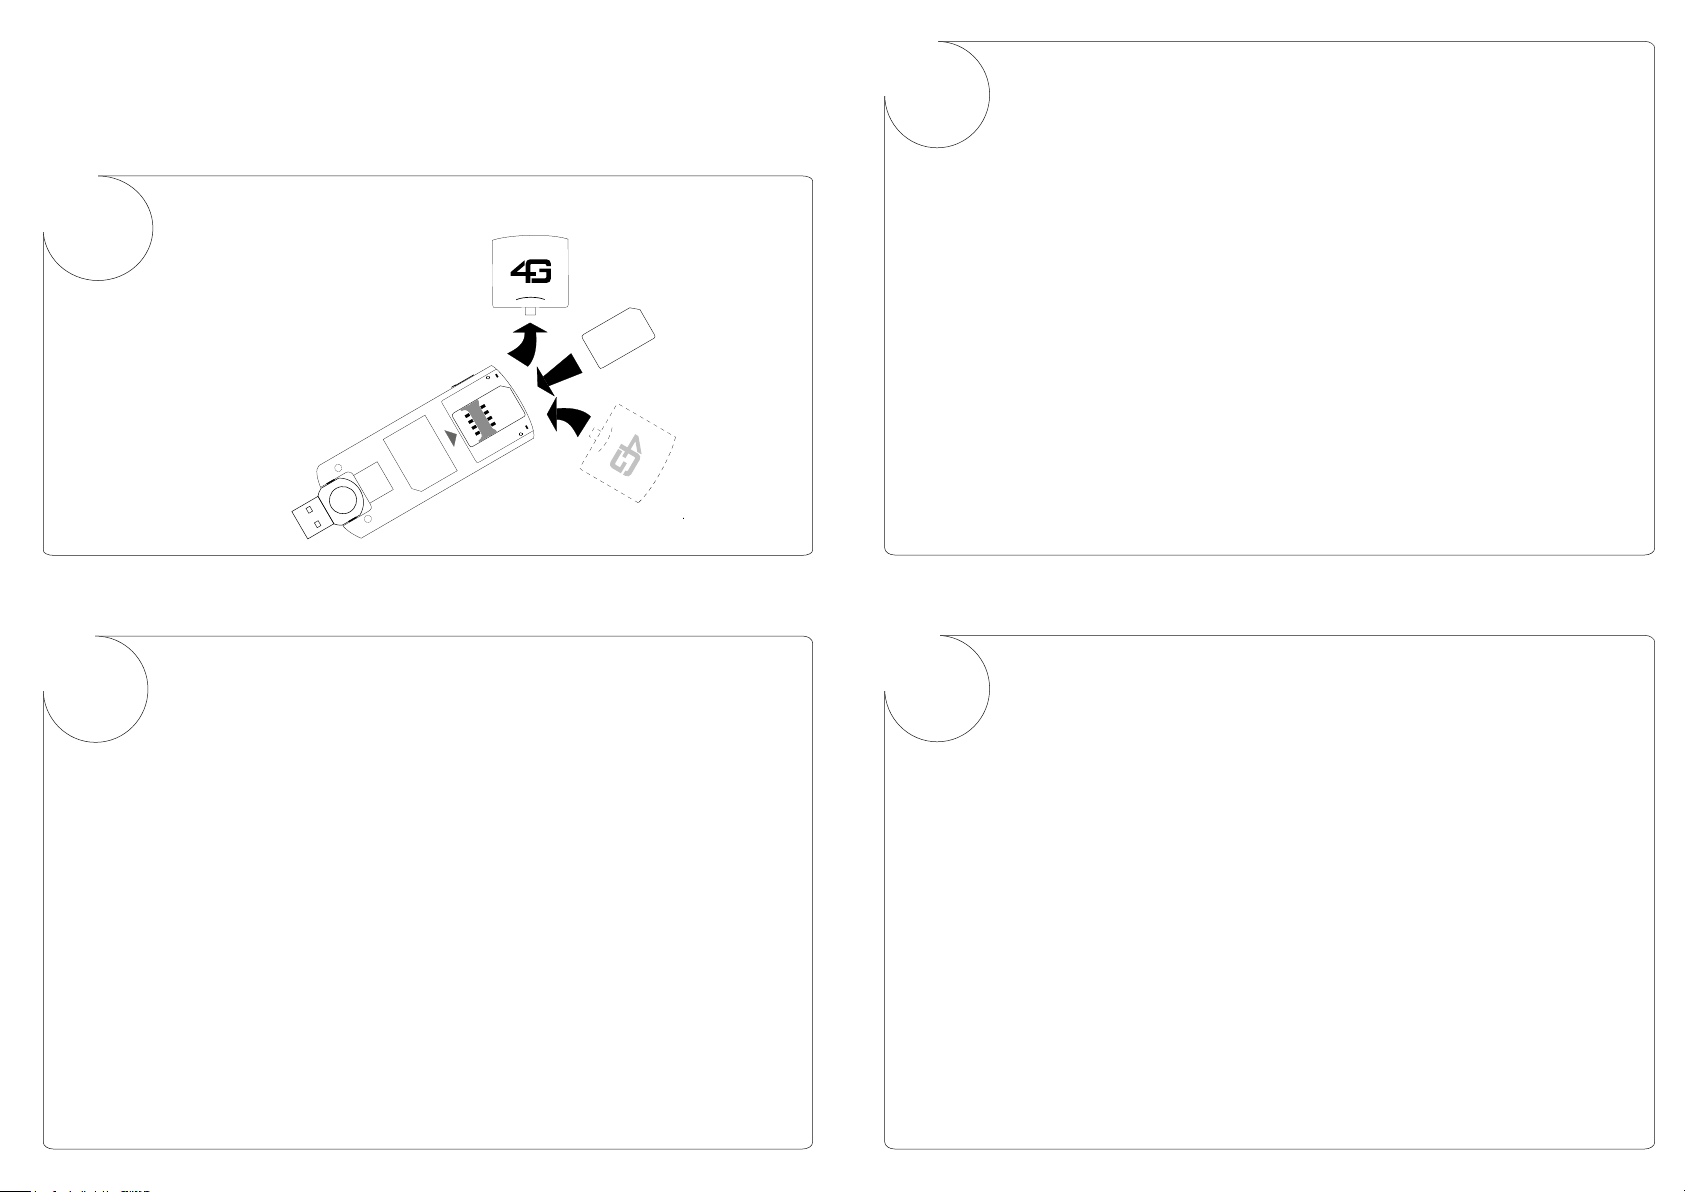
Einsetzen der SIM-Karte
Kurzanleitung
3
XSStick
®
W12
1
2
4
©4G Systems GmbH & Co. KG, Jarrestraße 2-6, 22303 Hamburg, Germany, www.4g-systems.com
SIM CARD
OPEN
SIM
1
2
3
Insert your SIM Card
Quick Start Guide
Wenige Sekunden nachdem der XSStick®W12 mit dem Computer
verbunden wurde, erscheint das XSManager CD Symbol auf dem Desktop.
Öffnen Sie dieses Symbol und ein Fenster mit dem Disk-Image
XSManager.dmg, erscheint. Durch doppelklicken dieser Datei wird ein
virtuelles Laufwerk geöffnet in dem Sie die XSManager-Installation
starten können.
Folgen Sie dann den Anweisungen des Installationsprogramms.
Sollte dies nicht geschehen, können Sie die Software manuell installieren:
Der XSStick®W12 wird als Laufwerk im Arbeitsplatz eingebunden.
Öffnen Sie dieses Laufwerk beispielsweise mit dem Windows Explorer und
führen Sie die Applikation autorun.exe aus.
Folgen Sie dann den Anweisungen des Installationsprogramms.
Windows XPTM & VistaTM
Sobald Sie den XSStick®W12 mit dem Computer verbunden haben,
startet automatisch die Installation der mitgelieferten Software.
Nach erfolgreicher Installation startet die Software XSManager
mit der Sie alle Funktionen des XSStick®W12 steuern können.
PIN Eingabe
Bei Aufforderung geben Sie bitte die PIN Ihrer SIM-Karte ein, und bestätigen
Sie die Eingabe mit OK.
Funktionen im XSManager
Verbinden: Sie stellen eine Verbindung ins Internet her.
SMS/MMS: Sie können Kurznachrichten senden oder lesen.
Statistik: Sie erhalten Details über die aktuelle Verbindung.
Einstellungen: Sie öffnen einen Dialog zur Konfiguration Ihres
XSStick®W12.
Durch Drücken eines der vier verfügbaren Buttons starten Sie folgende
Funktionen:
P/N: 4602.000019.01
Frei Verfügbarer Speicher des XSStick®W12
MAC OSTM Tiger & Leopard
Der XSStick®W12 stellt Ihnen ca. 40 MB freien
Speicherplatz zur Sicherung Ihrer Favoriten oder für die Verwaltung
Ihrer Kontakte zur Verfügung.
Für die Inbetriebnahme des Speichers vewenden Sie bitte einmalig die
Funktion Ihres Betriebssystems zum formatieren eines Laufwerks.
Anschließend kann der Speicher Ihres XSStick®W12 wie ein herkömmlicher
USB-Datenstick verwendet werden.
A window with the disk image XSManager.dmg will open automatically
after connecting the XSStick®W12 to the computer. A virtual drive is opened
by double-clicking this file. Double-click the XSManager symbol to start the
installation.
Then follow the instructions of the installation wizard.
You can start the installation manually: You will find alternativly the
XSStick®W12 as a drive under „My Computer“.
Open this drive using e.g. Windows Explorer and start the application
“autorun.exe”.
Then follow the instructions of the installation wizard.
Windows XPTM & VistaTM
On connecting the XSStick®W12 to the computer, the installation
of the software provided with the device starts automatically.
The XSManager starts automatically after the installation has been
completed successfully.
You can use it to control all functions of the XSStick®W12.
Enter your PIN
When requested, enter the PIN of your SIM card and confirm with OK.
Function of the XSManager
Connect: Connect to the Internet.
SMS/MMS: Send or read short messages.
Statistics: View details of the current connection.
Settings: Opens a dialog to configure your XSStick®W12.
These features can be started by pressing one of the following buttons:
P/N: 4602.000019.01
Free Memory of your XSStick®W12
MAC OSTM Tiger & Leopard
The XSStick®W12 provides approx. 40 MB of free storage space for
managing your favourites or contacts.
Please use the standard function of your operating system to format a storage
device for initial setup. This has to be done only once.
Afterwards the memory of your XSStick®W12 can be accessed like an usual USB
flash drive.