INSTRUKCJA MONTAŻU
INSTRUKCJA MONTAŻU I OBSŁUGI
Przeczytaj uważnie i zachowaj instrukcję do wykorzystania w przyszłości.
OSTRZEŻENIA
Nie ponosimy odpowiedzialności za jakiekolwiek szkody spowodowane nieprzestrzeganiem tych instrukcji.
Urządzenie może być źródłem możliwego porażenia, NIGDY nie należy próbować serwisować grzejnika bez odłączania go od źródła zasilania.
Źródło możliwego zapłonu.
PRZECZYTAJ UWAŻNIE – grzejnik halogenowy został zaprojektowany do bezpiecznej pracy. Niemniej jednak instalacja, konserwacja i ob-
sługa grzejnika mogą być niebezpieczne. Przestrzeganie poniższych procedur zmniejszy ryzyko pożaru, porażenia prądem, obrażeń ciała i
skróci czas instalacji do minimum. Zachowaj tą instrukcję do wykorzystania w przyszłości.
1. Przeczytaj całą instrukcję przed użyciem grzejnika.
2. Przed użyciem wyjmij grzejnik z opakowania i sprawdź, czy jest w dobrym stanie.
3. Nie pozwól dzieciom bawić się częściami opakowania (takimi jak opakowanie plastikowe).
4. Sprawdź napięcie w domu, aby upewnić się, że odpowiada specyfikacji znamionowej grzejnika. Panel grzewczy ma stopień ochrony IP 65. Oznacza to, że
jest bezpieczny dla wnikania wody ze wszystkich stron. Panel grzewczy można bezpiecznie umyć przy użyciu węża ogrodowego.
5. Przed użyciem dokładnie sprawdź przewód zasilający i wtyczkę, aby upewnić się, że nie są uszkodzone.
6. Przed odłączeniem przewodu zasilającego pamiętaj o wyłączeniu urządzenia, a podczas włączania zasilania urządzenia upewnij się, że masz suche ręce,
aby uniknąć porażenia prądem.
7. Nie używaj łatwopalnych przedmiotów w pobliżu grzejnika. Przedmioty takie jak meble, poduszki, pościel, papier, ubrania i zasłony trzymaj w odległo-
ści co najmniej 1 metra od frontu grzejnika. Najbezpieczniej trzymać je z boku lub tyłu urządzenia.
8. Nie zawieszaj lampy grzewczej w pobliżu lub w bezpośrednim sąsiedztwie wanny, basenu lub jakiegokolwiek źródła wody.
9. Aby zabezpieczyć się przed porażeniem prądem, nie zanurzaj przewodu ani wtyczki w wodzie ani innych cieczach.
10. Nie wkładaj ani nie dopuść, aby jakieś obiekty dostały się do otworów wentylacyjnych lub wylotowych. Może to spowodować porażenie prądem, pożar
lub uszkodzenie grzejnika.
11. Zawsze odłączaj grzejnik od sieci, gdy nie jest używany.
12. Nie pozwól, aby przewód zwisał z blatu w miejscu, w którym dzieci mogą go łatwo pociągnąć.
13. Nie wkładaj palców ani innych przedmiotów do grilla podczas pracy.
14. Nie pozostawiaj urządzenia bez nadzoru podczas jego użytkowania.
15. Grzejnik ten nie jest przeznaczony do stosowania w łazienkach, pralniach i podobnych pomieszczeniach. Nigdy nie zawieszaj grzejnika w miejscu w któ-
rym mógłby spaść do wanny lub innego pojemnika z wodą.
16. Nie ponosimy żadnej odpowiedzialności za jakiekolwiek szkody spowodowane nieprzestrzeganiem instrukcji lub innym niewłaściwym użytkowaniem.
17. To urządzenie nie jest przeznaczone do użytku przez osoby (w tym dzieci) o ograniczonych zdolnościach fizycznych, sensorycznych lub umysłowych, bez
doświadczenia i wiedzy, chyba że są one nadzorowane lub poinstruowane w zakresie użytkowania urządzenia przez osobę odpowiedzialną za ich bez-
pieczeństwo . Dzieci należy nadzorować, aby upewnić się, że nie bawią się urządzeniem.
18. Jeśli przewód zasilający zostanie w jakikolwiek sposób uszkodzony, musi zostać wymieniony przez producenta lub jego przedstawiciela serwisowego
lub osobę o podobnych kwalifikacjach, aby uniknąć zagrożenia.
19. Aby zapobiec przegrzaniu się urządzenia, wloty i wyloty powietrza należy utrzymywać w czystości i wolne od wszystkiego, co może spowodować zablo-
kowanie. Od czasu do czasu sprawdzaj wszystkie wloty i wyloty, aby upewnić się, że są wolne od wszelkich zanieczyszczeń i kurzu. NIE ZAKRYWAJ.
20. Części grzejnika mogą przekraczać temperaturę 200OC . Kontakt z rurką grzewczą lub częściami metalowymi w jej pobliżu może spowodować poważne
OPARZENIA. Aby uniknąć poparzeń, nie dotykaj nagą skórą gorącej powierzchni.
21. NIGDY nie wkładaj rąk pod elementy grzewcze. ZAWSZE pozwól elementowi grzewczemu przestygnąć co najmniej 30 minut przed dotknięciem rury
grzewczej lub sąsiednich części.
22. Ten produkt zawiera materiały nadające się do recyklingu. Nie wyrzucaj tego produktu razem z niesortowanymi odpadami komunalnymi. Skontaktuj się
z lokalną gminą w celu uzyskania informacji na temat najbliższego punktu zbiórki.
OSTRZEŻENIE: NIGDY nie wkładaj rąk pod elementy grzewcze.
PL
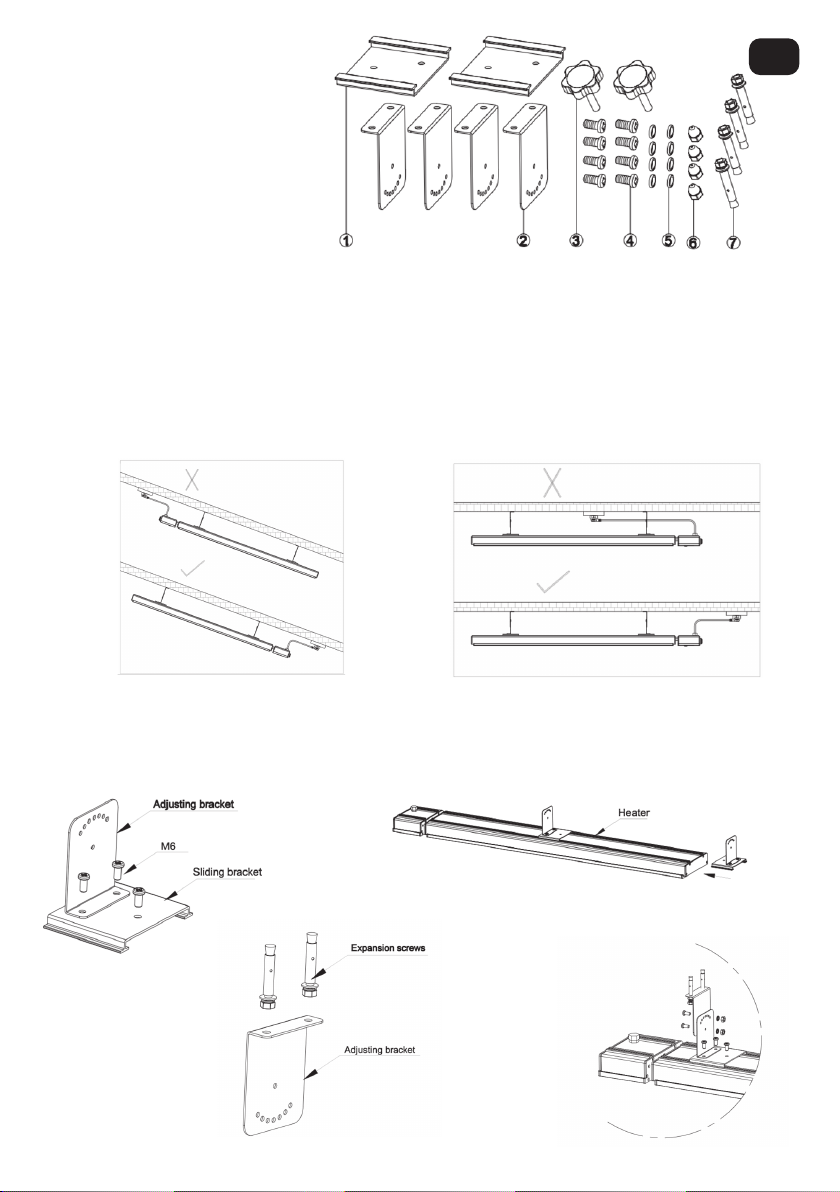
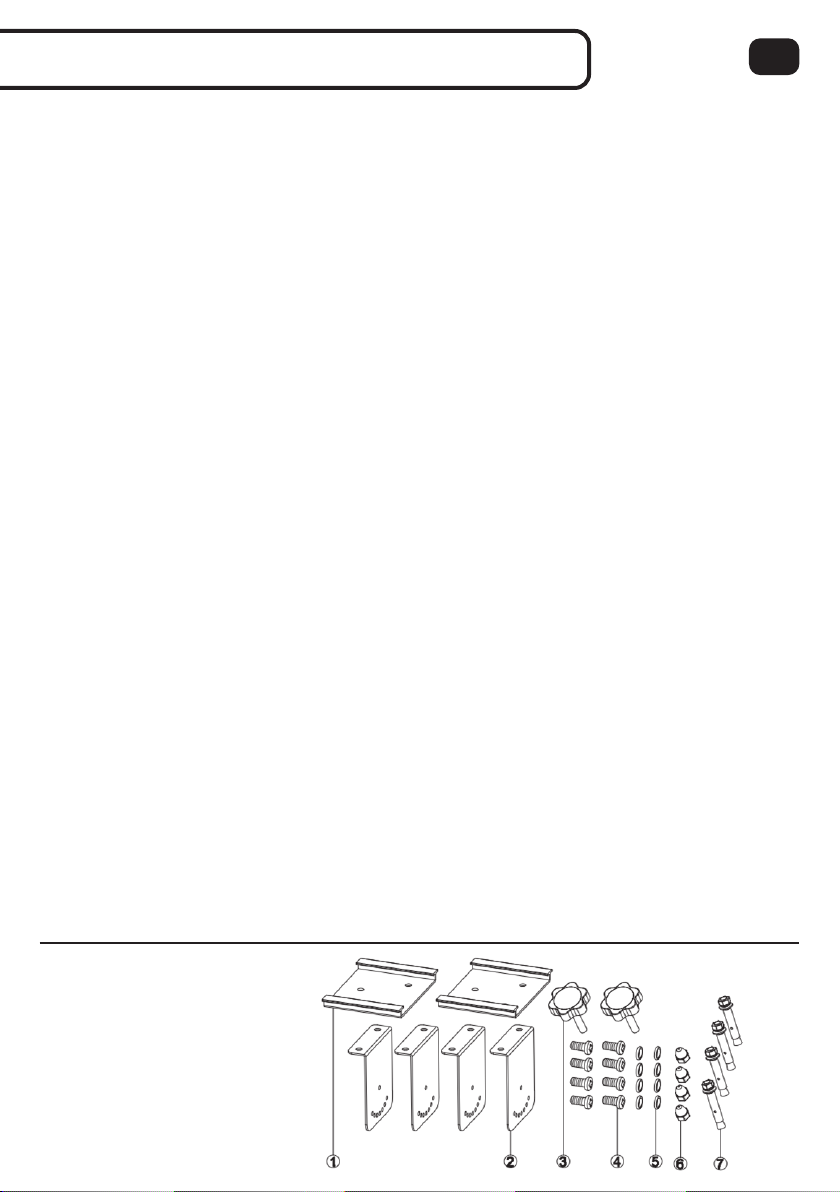
ZESTAW MONTAŻOWY:
1. prowadnica aluminiowa 2 szt.
2. wspornik (profil L) 4 szt.
3. śruba z pokrętłem (M6) 2 szt.
4. śruba (M6 x 12mm) 8 szt.
5. podkładka (Ø 6mm) 8 szt.
6. nakrętka (M6) 4 szt.
7. śruba rozporowa (M6 x 60mm) 4 szt.