4max SpinRay Instruction Manual

Building Instructions for 4-Max SpinRay
This design and all information contained in these building instructions are the © Copyright of 4-Max.
4-Max can not responsible for any damage or injury caused by this flying model.
www.4-Max.co.uk
Building Instructions
www.4-Max.co.uk
Designed and developed by George Worley and Colin Low

Building Instructions for 4-Max SpinRay
This design and all information contained in these building instructions are the © Copyright of 4-Max.
4-Max can not responsible for any damage or injury caused by this flying model.
www.4-Max.co.uk
Kit Contents
Foam Parts Carbon Spar and Hardware 1 tube of UHU Por
Parts Required to Complete
2 x Bell Motors 1400kv 70W we recommend Purple Power PPB-2826-1400
2 x 10A-12A Electronic Speed Controllers
2 x Prop Adapters
1 x 6x4 APCE Prop (standard rotation)
1 x 6x4 APCE Prop (opposite rotation)
1 x 3S 740mAh or 800mAh LiPo battery we recommend Purple Power PPL-20C3S-0740
2 x 9g servos
1 x 5 channel receiver – We recommend Spektrum 2.4GHz
1 x Computer transmitter – We recommend Spektrum 2.4GHz
Tools Needed to Complete
Weights to hold items down/in position
Pins to hold items in place
Fine tooth saw
Allen key
Heavy duty side cutters
Standard Cyano (Superglue)
Cyano accelerator (Kicker)
2mm drill

Building Instructions for 4-Max SpinRay
This design and all information contained in these building instructions are the © Copyright of 4-Max.
4-Max can not responsible for any damage or injury caused by this flying model.
www.4-Max.co.uk
Start With Elevons
Lay a piece of cling film on a flat surface.
Apply a bead of UHU Por along the trailing
edge of wing and the elevons
Run the end of a small paint brush along
the groove to get a “U” shape fillet of glue
Lay the rear part of the main wing down on the cling film and push the elevons up to the
trailing edge of the wing ensuring the equal spacing of the elevons along the wing.
Weight and pin the elevon to the wing and
allow to dry for 20 minutes
Leave a 2-3mm gap at the wing tip
Do not make the elevons flush to the end of the wings as this will interfere with the
movement of the elevons against the side fins. Pin and weight them to hold them in place.
Allow to dry for 20 minutes. Remove from board, remove cling film and spread out any
excess glue (on the side that was next to the cling film) and allow to dry for a further 20
minutes.
One Half of Motor Mounts
While the elevon to wing joint is drying apply a generous covering of glue to the bottom of
the motor mount, gently move parts in a circular motion to ensure glue covers all parts.
Then immediately separate and allow glue to cure for 12 minutes before carefully aligning
and squeezing together (contact glue style). Repeat the same for the second motor mount
making sure everything is square, as per photo below.

Building Instructions for 4-Max SpinRay
This design and all information contained in these building instructions are the © Copyright of 4-Max.
4-Max can not responsible for any damage or injury caused by this flying model.
www.4-Max.co.uk
Lower Fuselage
Apply a generous amount of UHU Por to
one side of the lower fuselage side cheek
and join to the long main fuselage and
gently move parts in a circular motion to
ensure glue covers all parts. Then
immediately separate and allow glue to
cure for 12 minutes before carefully
aligning and squeezing together (contact
glue style).
Repeat the same for the second side
cheek making sure everything is square.

Building Instructions for 4-Max SpinRay
This design and all information contained in these building instructions are the © Copyright of 4-Max.
4-Max can not responsible for any damage or injury caused by this flying model.
www.4-Max.co.uk
Wing
Trial fit the carbon spar and cut to length using a fine tooth saw ensuring you do not breathe
in any of the carbon dust as it is carcinogenic.
Spread a thick layer of UHU
Por on the curved leading
edge of the rear part of the
main wing
Apply a thin layer on one
side of the carbon spar,
Allow to cure for 10-15
minutes before joining.
(contact glue style)
Spread a thick layer of UHU
Por to the curved trailing
edge of the front part of the
wing and a thin layer to the
carbon spar which is now
glued to the rear half of the
wing.
Allow the glue on the front of
the wing and the carbon spar
to cure for 12 minutes before
joining the front half of the
wing to the rear half of the
wing.
Both halves joined
Fuselage
Glue bottom half of fuselage
to wing (contact glue style)
Glue the two remaining
halves of the motor mount to
the top side of the wing
(contact glue style)
Glue top half of fuselage to
wing (contact glue style)

Building Instructions for 4-Max SpinRay
This design and all information contained in these building instructions are the © Copyright of 4-Max.
4-Max can not responsible for any damage or injury caused by this flying model.
www.4-Max.co.uk
Motor Mounts and Side Fins
Glue the light ply motor
mount to the wing as per
photo (contact glue style).
The light ply mount is slightly
oversized, this is intended.
Measure the centre of the
side fins and glue to wing
(contact glue style) ensuring
they are square from the
front and side
The finished model
We find it’s easier to install the motors, ESC’s, Servo’s and Receiver before adding the side
fins.
The Following Only Applies If You Are Installing The 4-Max
Power Package
The 4-Max Power Package
Mark and pilot drill the holes
for the motor mount. Add a
small drop of thin cyano to the
holes to strengthen the light
ply. Install the motor mount as
in the picture.
Motors and ESC’s installed.
Mark and cut out the hole for
the servos
Use UHU Por to tack the servos
in place
Use UHU Por to tack the ESC’s
and wires in place

Building Instructions for 4-Max SpinRay
This design and all information contained in these building instructions are the © Copyright of 4-Max.
4-Max can not responsible for any damage or injury caused by this flying model.
www.4-Max.co.uk
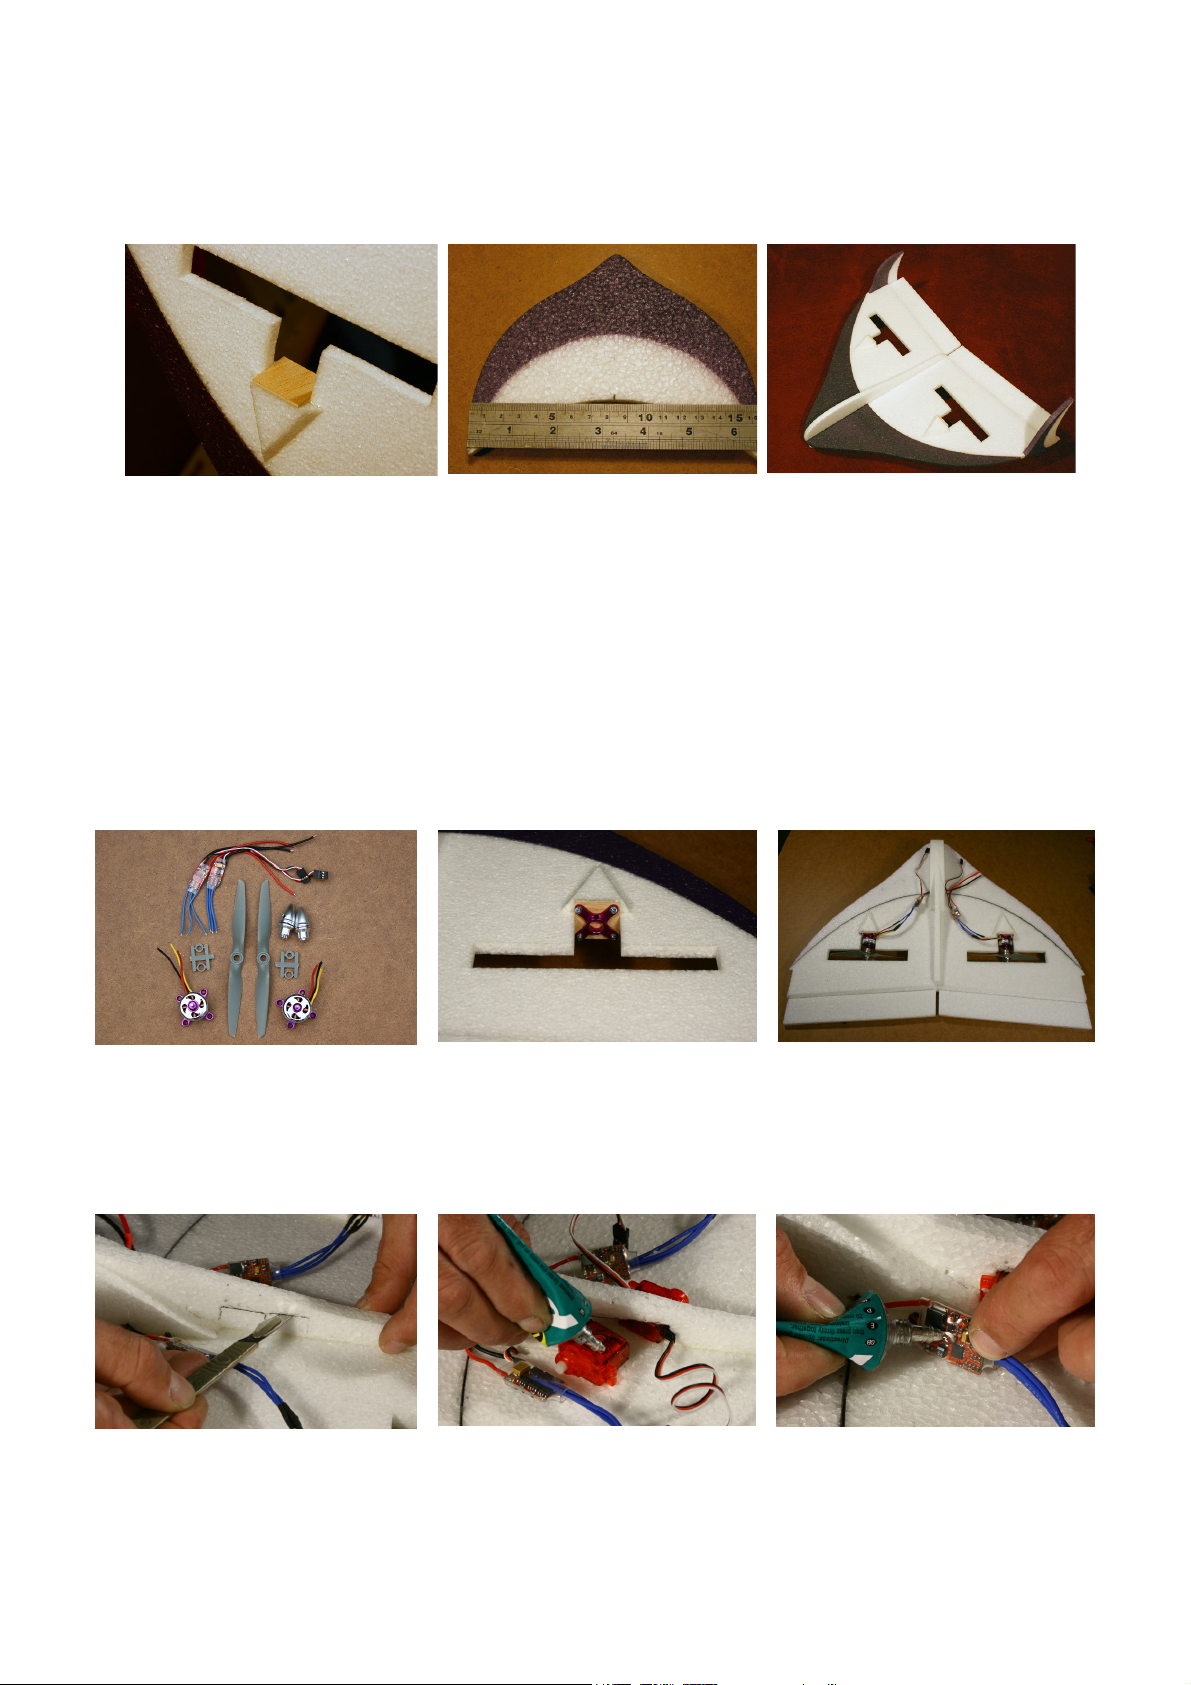
You need to disable the BEC on
one of the ESC’s this is done
by removing the red wire and
taping it back out of the way.
Assemble the wire retainer as
shown above. You will need to
use a 2mm drill to on the horn
for the wire retainer
Put a small drop of medium or
thick cyano on the nut and
then spray with kicker. Ensure
that the wire retainer can
rotate easily.
Mark the position for the horn
ensuring the holes are over the
hinge line as in the above
photo. Use a 2mm drill to drill
the elevon.
Spray the horn with kicker and
allow to dry. Apply thick cyano
to the elevon and insert the
horn in the elevon very quickly
and spray with kicker.
Ensure the servos are centred.
Make sure the servo arm is at
90º to the wing. Trim excess
piano wire with side cutters.
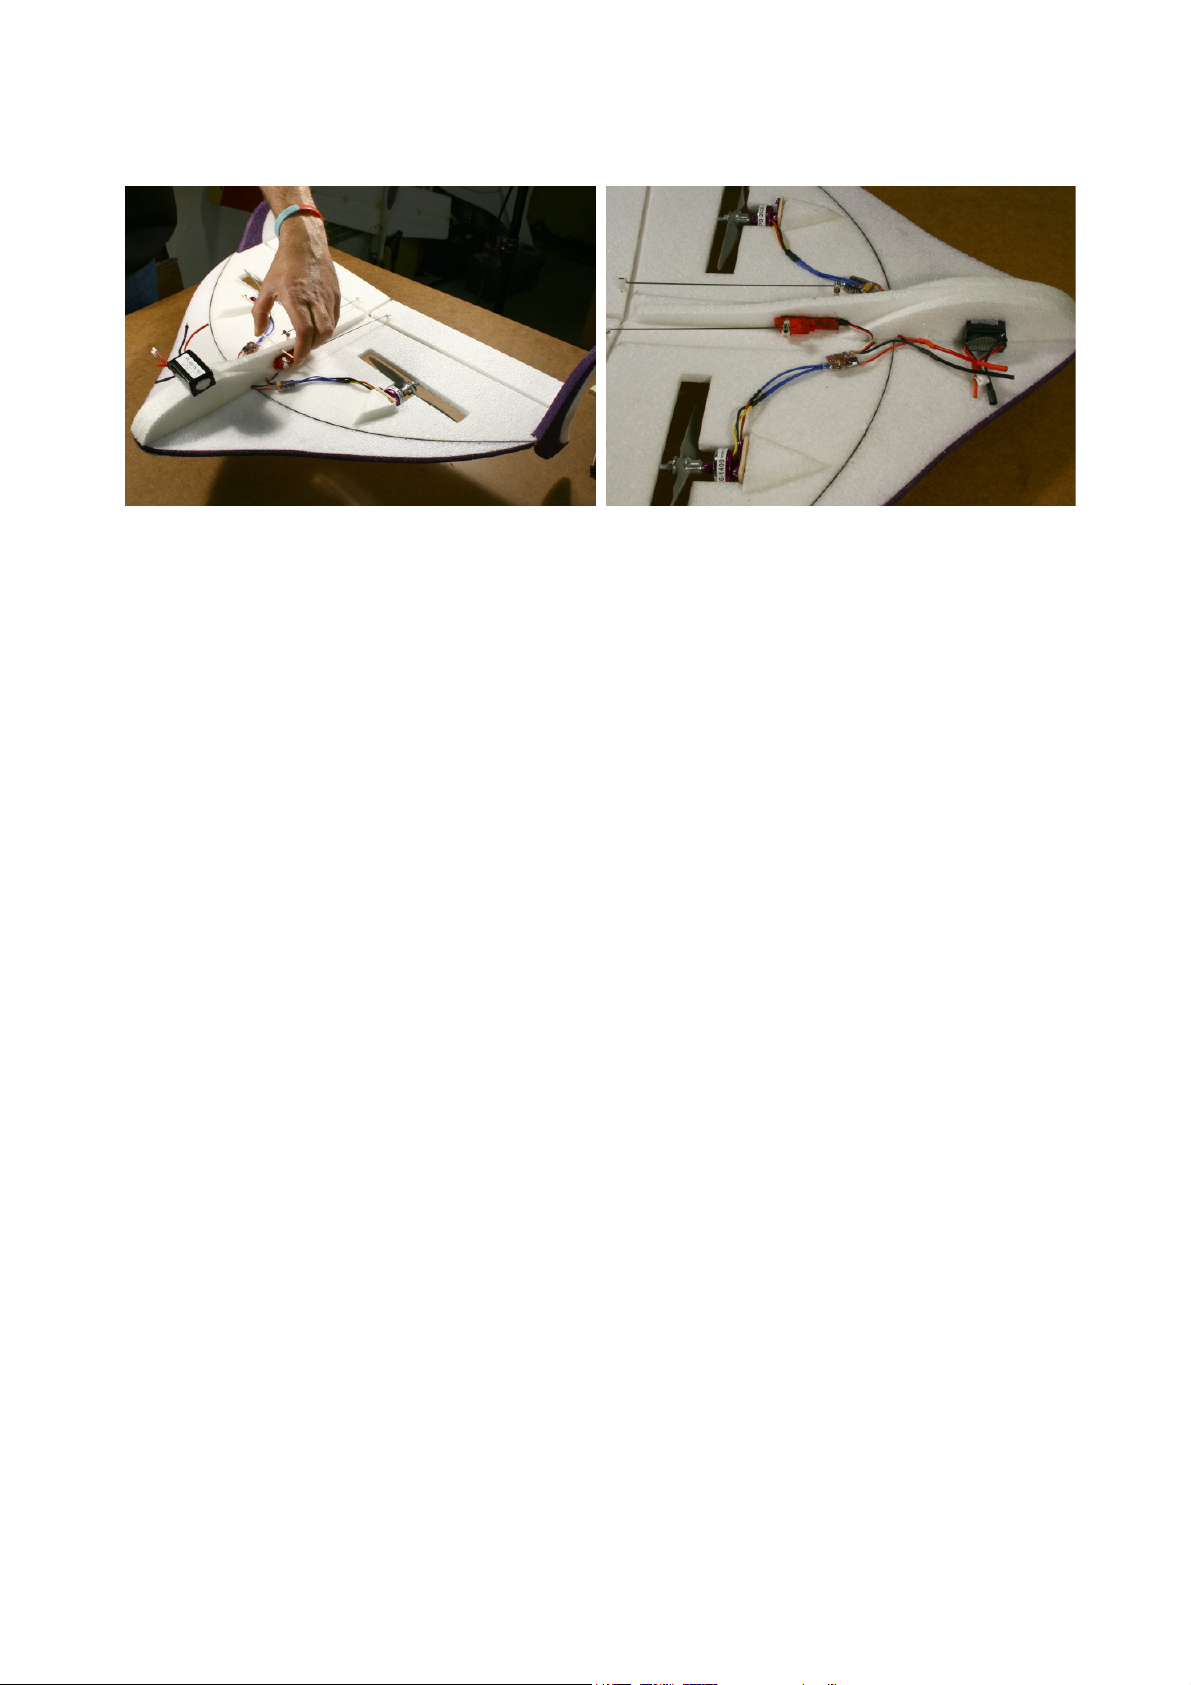
Place a small mark on the side
fin to mark where glue is to be
applied.
Apply UHU Por to side fin and
end of wing (contact glue
style).
Measure 165mm forward from
the hinge line and insert a
cocktail stick or small piece of
wire through the foam.

Building Instructions for 4-Max SpinRay
This design and all information contained in these building instructions are the © Copyright of 4-Max.
4-Max can not responsible for any damage or injury caused by this flying model.
www.4-Max.co.uk
Hold the model by the cocktail stick and
balance the model by moving the battery
fore and aft. Mark and cut the hole for the
battery. Slightly undercut the hole to ensure
a snug fit for the battery.
The finished model all wired up and ready to
fly (after a bit of programming of your
transmitter).
Please see www.4-Max.co.uk for information on transmitter programming.
Specification
Length 455mm 17.91”
Wingspan 595mm 23.42”
Flying Weight 266g 9.38oz
Control Throws 20mm Aileron and elevator - 40-50% exponential
Rudder - 80-100% exponential
C of G 165mm forward from the hinge line
Table of contents
Other 4max Toy manuals
Popular Toy manuals by other brands

3DHS
3DHS SLICK 580 Assembly manual

Eduard
Eduard Zoom P-61A interior S.A. quick start guide

Radica Games
Radica Games 74007 Electronic Barbie Balance Beam instruction manual

Hobbytrain
Hobbytrain BLS E-Lok Ae 6/8 manual

REVELL
REVELL Bell OH-58D Kiowa Assembly manual

Mega Construx
Mega Construx Call of Duty FDY73 instructions