4ms Spectral Multiband Resonator Use and care manual

Spectral Multiband Resonator
Firmware version 5 New Features Summary
December 5, 2016: Firmware version 5 is announced for the Spectral Multiband Resonator. Many new features and improvements have
been included, and all users are encouraged to update their SMR for free!
To download the new firmware
Go to http //4mscompany.com/smr.php
Click on “Manuals/Firmware”
Download/Save the .wav file for firmware version 5 (we do not recommend playing it from your browser)
To load the firmware into your SMR
Follow the instructions at the end of this document
•New Features in version 5:
◦1V Octave outputs Control up to 6 external VCOs with 1V/oct CV, for sequences, chords, and melodies
▪Holding down ROTATE while flipping to “Fast” enables 1V/octave outputs on Env Out jacks
▪Glissando (glide) can be enabled with the Pre/Post switch
▪In System Mode, adjust the 1V/oct tracking for 1V/oct outputs, in order to compensate for external VCOs that may
track slightly more or less than 1.00V/octave
▪User Manual pages 18 and 20
◦Transposition and fine tuning allows the SMR to be quickly tuned to external equipment
▪Each channel can be transposed from -6 to +6 semitones
▪Each channel can be fine-tuned up to 120 cents (a little over a half-step)
▪New light display features show the transposition and fine tuning
▪User Manual page 12
◦Forbidden Notes - select notes that will be skipped when rotating or spreading
▪Forbidden Notes can be saved into Settings Slots for use after power-down
▪User Manual page 16
◦Two-pass resonant filter - lusher tones and tighter filtering of the input signal
▪New algorithm filters out all background bleed-through by acting like two SMRs in series
▪RES (Q) knob fades in the second resonator for a much wider range of resonance values
▪Two-pass resonance has a slower attack and decay when “struck” with a trigger, so backwards strike effects can be
obtained
▪Original one-pass resonant filter available by turning Q knob down, or by selecting it System Mode
▪User Manual page 13 and 21
◦New major and minor scale banks
▪Major and Minor scales
▪Major chords Pentatonic, Major 6th and 7th chords, Augmented and Diminished 7th
▪Minor chords Blues Scales, Minor Pentatonic, Minor 6th/7th chords, Half Dim 7th
▪All scales and chords can be transposed to any key
▪User Manual, back page
◦New intuitive organization and display of scales and banks
▪Banks are now arranged into Color Groups (blue, pink orange, green, white)
▪Each Color Group has a theme for example Blue is Equal Temperament and Green is Modern
▪The six Env Out lights show the Color Group, and the current bank selection within the group
◦Env Out Trigger threshold level can be saved independently of channel audio level
▪Flip switch to “Pre” to cache the threshold levels set by the sliders. Then you can adjust the audio mix with the sliders
without changing the trigger thresholds
▪User Manual page 18, and “Beat-s ncing: Advanced Re-mixing” example patch, page 7
◦To adjust 1V/oct input (Freq jack) tracking, press Lock button 5 in Custom Scale mode
◦To adjust 1V/oct output (Env Out jack) tracking, press Lock button 6 in Custom Scale mode
◦Reduced noise in controls, cleaned up some scales
The following pages are excerpts from the User Manual. Read the full manual here http //4mscompany.com/SMR/manual/SMR-
manual-1.1.pdf

Six voice sequencer, chord machine and hexaphonic VCO controller
The SMR's Env Out jacks have a special feature where they can output 1V/octave CV to control external
VCOs. Since the SMR has many different chords and scales amongst which you can rotate, spread, lock, etc,
the SMR can be a powerful sequencer, arpeggiator, or chord generator.
1) Find up to 6 VCOs in your system and patch an audio output like sine or triangle from each one to a mixer.
You should be able to listen to all six at the same time, and control each VCO's level. Later you may wish to
2
6-channel mixer
(or other FX, etc)
Connect
SMR
audio
output to
mixer
when
tuning
VCOs to
SMR

run some VCOs through VCAs or effects or other processing (or even use one VCO to FM the next) – but if
you want to keep things simple, just run the VCOs directly to a mixer. Also run the SMR to the mixer so you
can monitor it. It's OK to use fewer than 6 VCOs, even a single VCO will produce fun results.
2) Enter 1V/oct mode on the SMR by holding down the ROTATE button while flipping the Fast|Slow switch to
“Fast”, as described on page 18 (1V/oct outputs).
3) Patch each of the six Env Out jacks on the SMR to the 1V/oct input on each of the six VCOs.
4) Turn down all the SMR sliders except one channel, and turn down all the VCOs in the mixer except the one
associated with that SMR channel. Use the VCO's frequency knob to tune it to the SMR's pitch. Repeat this
step for all six channels/VCOs. (Of course, this is purely optional since you are welcome to tune or de-tune to
suit your tastes and the requirements of the patch)
5) When you are satisfied with the tuning, go ahead and play! Spin the ROTATE knob and listen to the VCOs
track with the scale. If you have Morph turned up and Post/Pre flipped to Pre, then you'll hear a glissando
effect. Flip to Post to disable to effect, or just turn down Morph. The Morph time and the glide time are equal if
glissando is enabled.
6) Mixing in both the SMR and the VCOs at the same time can be interesting, especially if the SMR is
morphing and the VCOs are gliding (glissando).
7) Try FM'ing the SMR using the Freq jacks. The FM gets passed to the VCOs. You can even use one SMR to
sequence a second SMR which is controlling VCOs.
8) Try transposing some channels on the SMR (see Transposition section later in this manual). Hold down an
odd channel lock button and turn the left side Freq Nudge knob (or hold down an even channel and turn the
right side knob).
9) For an arpeggiation patch, run triggers into the Rotate → and Rotate ←- jacks. And/or run CV into the
Spread CV jack.
New in v5 : Fine Tuning with the Freq Nudge knobs
There are two Freq Nudge knobs, one for the odd channels, and one for the even channels. The
Odds Freq Nudge knob is the one on the left (next to channel 1), and the Evens Freq Nudge knob
is the one on the right (next to channel 6).
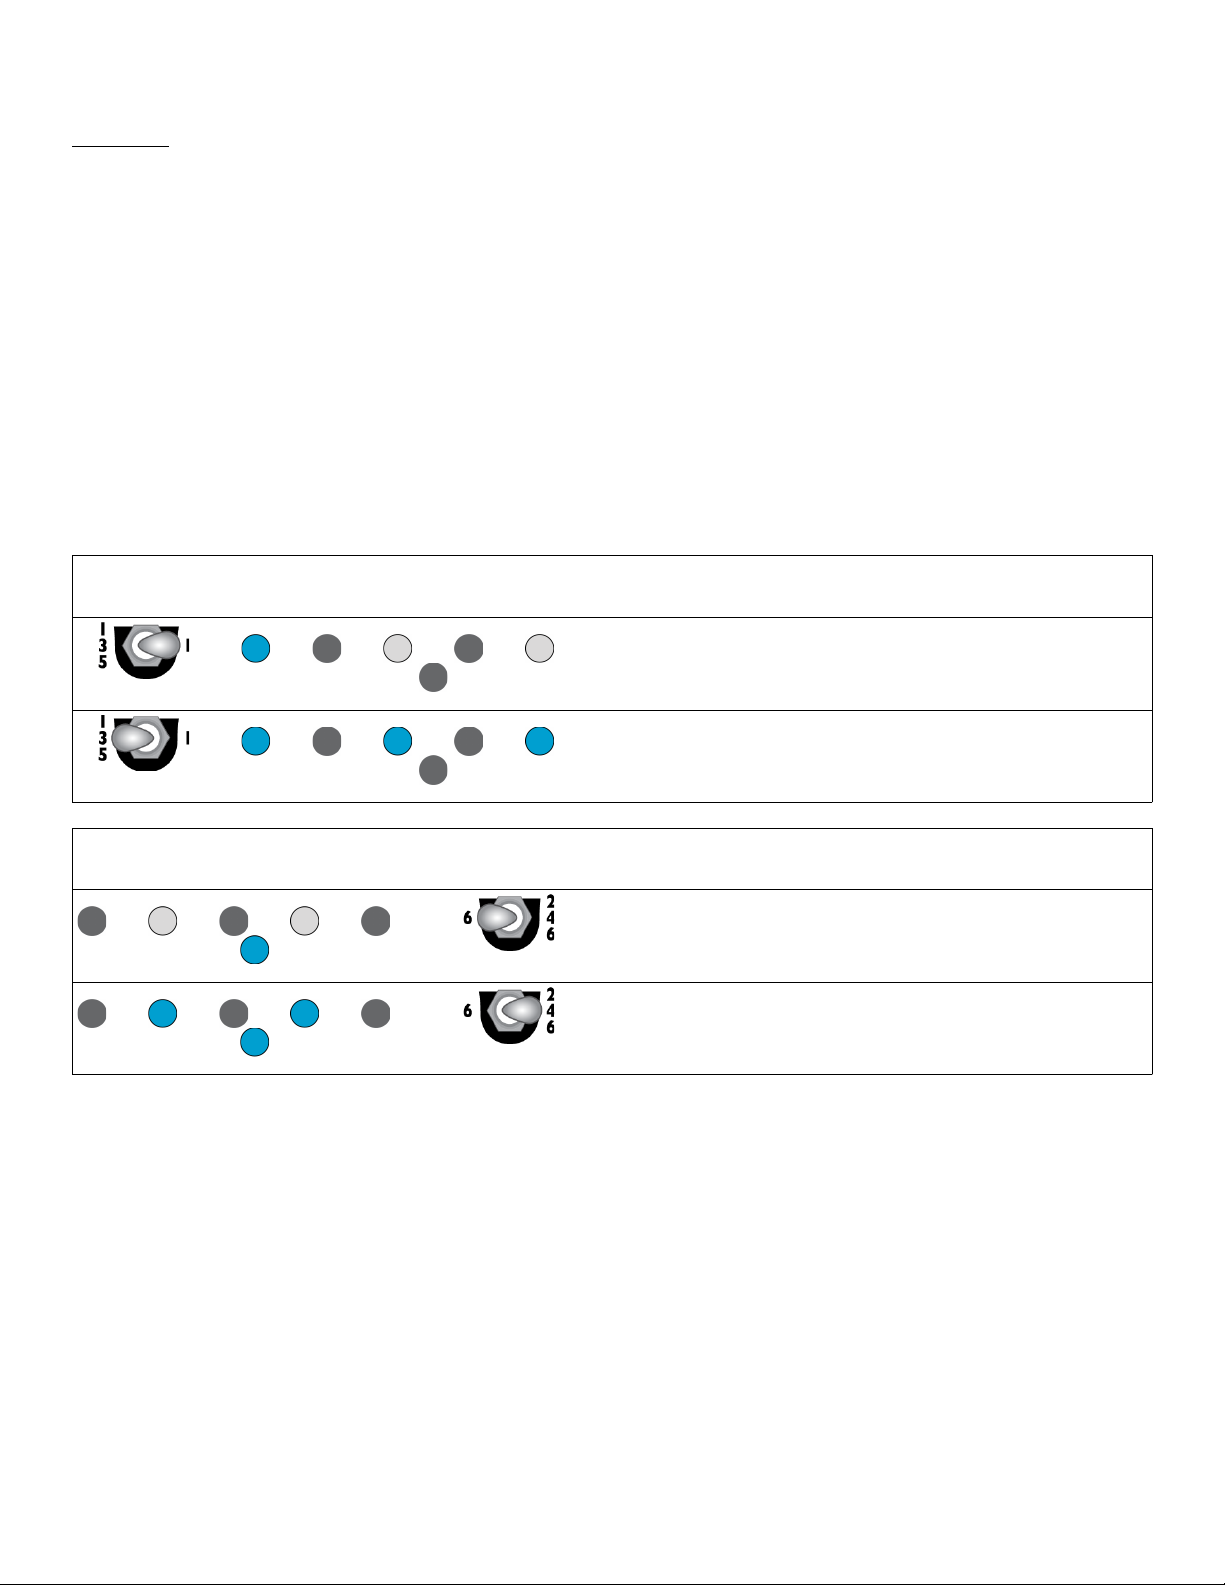
A switch labelled “135 | 1” or “6 | 246” selects whether the Freq Nudge knob controls all the odd or
even channels or just channel 1 or 6. So if the switch on the left is flipped to “135” then the Freq
Nudge knob (as well as the Freq jack and Lock jack below the Nudge knob) will control channels 1, 3, and 5.
On the other hand if the switch was flipped to “1”, then Freq Nudge (and the two jacks below it) will control just
channel 1. The same is true for the 246 | 6 switch on the evens side.
Note: The word “Lock” is written above the 135 | 1 switch, and it's a common beginner mistake to call this
switch the “Lock” switch. However the word “Lock” refers to the jack above the switch, not the switch. The
switch selects whether the Lock jack, Freq jack, and Freq Nudge knob control channels 1,3, and 5 or just
channel 1. Likewise, the same is true on the right side for the 6 | 246 switch.
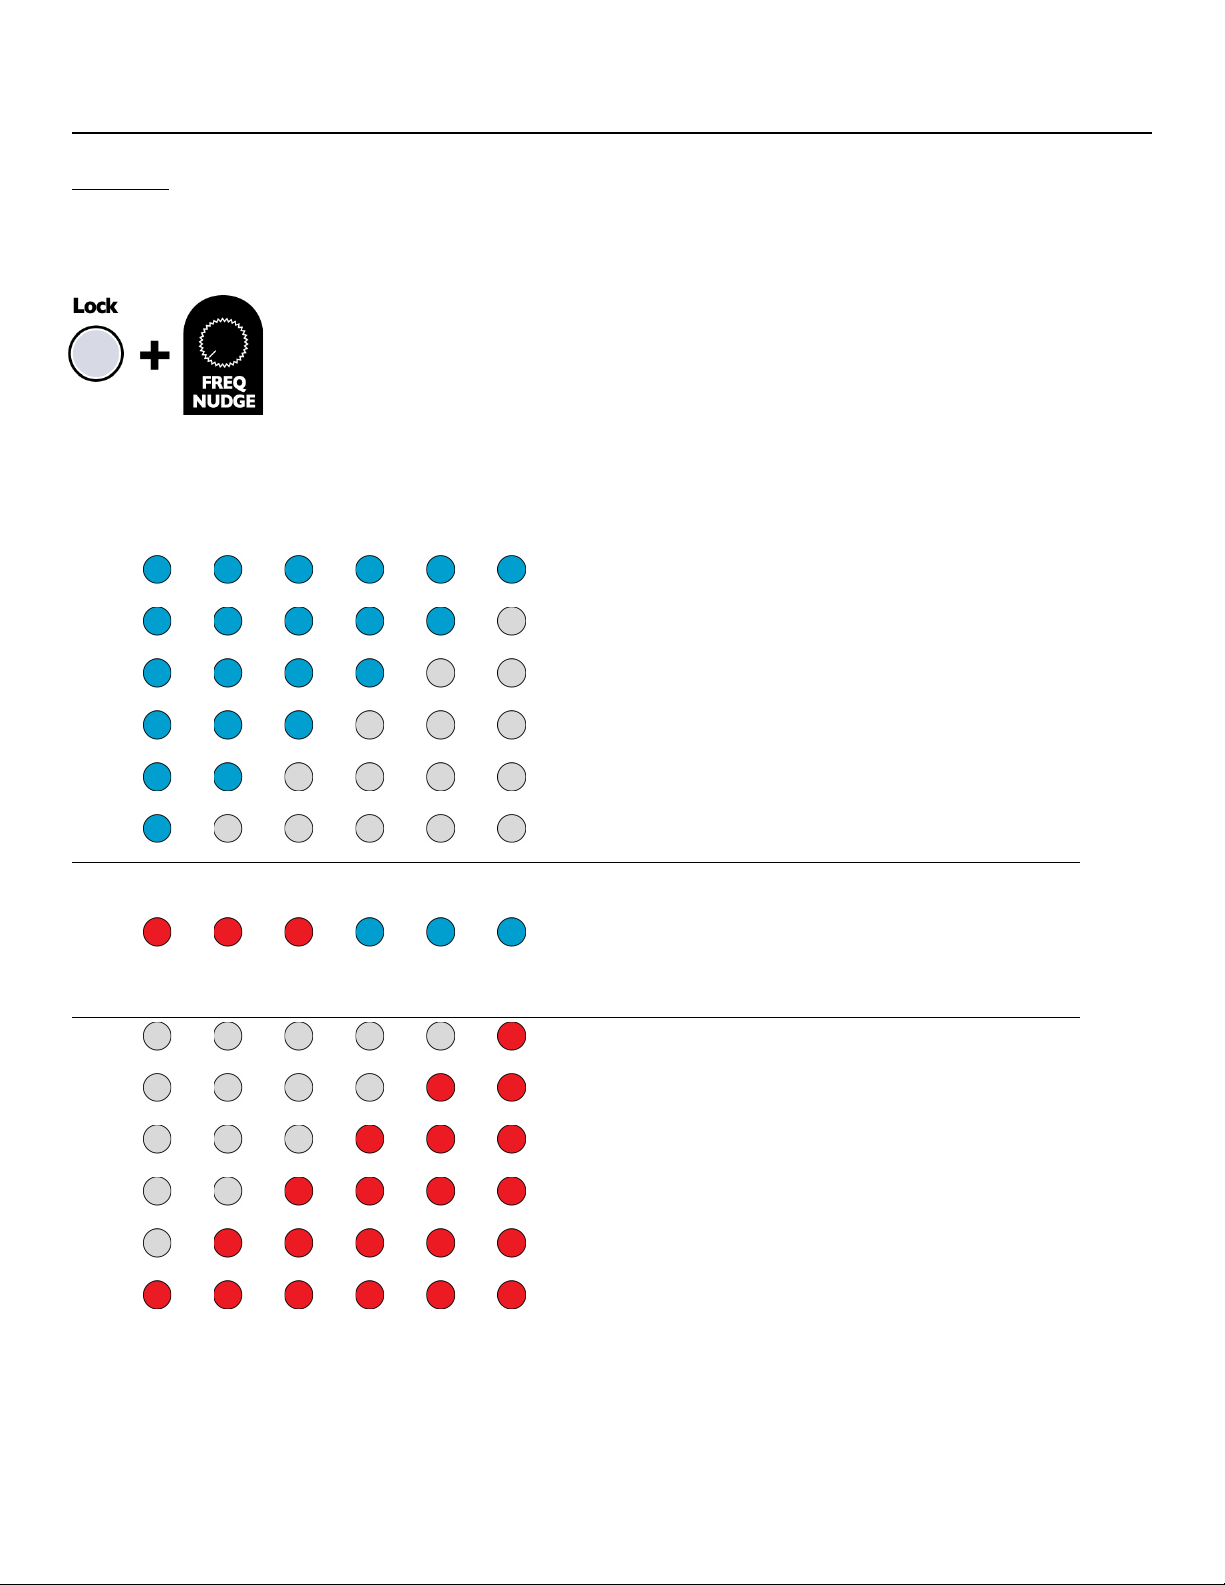
Freq Nudge's default position is at 0%, this means the frequency is not nudged and the notes in the current
scale will be unaffected. Thus if you wish to keep the channels in tune with the scale as it was programmed,
keep the Freq Nudge knobs all the way down. As you turn Freq Nudge up, the frequency will bend upwards. At
100%, the frequency will be shifted up by a little more than a half-step (about 120 cents, just over a semitone).
In firmware v4 and earlier, the Freq Nudge knobs blended linearly between adjacent notes in the scale. In
firmware v5, the knobs work exponentially, setting a precise number of cents (1/1200th of an octave). This is
useful for tuning to external instruments since you can tune using one note only and all other notes will track.
Locking a channel also locks the Freq Nudge setting. So you can nudge a channel up to an exact frequency
and then lock it, continuing to use Freq Nudge to nudge other channels without effecting the locked channel.
3

Light display of Freq Nudge
New in v5 When you turn either Freq Nudge knob, the channels that are effected will change color on their
Env Outs lights to indicate how much “Nudge” is assigned to that channel. After a second, the lights will go
back to their original function to indicate the signal on the Env Out jacks. Let's take an example if have the 6 |
246 switch flipped to 246 and you turn the Evens Freq Nudge knob, then the Env Out lights next to channels 2,
4, and 6 will change from white (no Nudge) to blue (a little over a semitone of Nudge upwards). At the same
time, the odd channel lights will turn off to show that you are using the Evens Nudge knob. Locking a channel
with the buttons also disables Nudging in the previous example if channel 4 happened to be Locked with its
lock button, then only channels 2 and 6 will show white/blue, and channel 4 will be dim.
If you flip the 135 | 1 or 6 | 246 switches, the channels that were effected will blink twice to attract your attention
before changing to dim or bright to indicate they are enabled or disabled by the switch. For example if you flip
from 135 to 1, then channels 3 and 5 will blink twice and go dim to indicate that the Freq Nudge knob (and the
jacks below it) are no longer effecting channels 3 and 5. If you flip back to 135, channels 3 and 5 will blink
twice and go bright to indicate they can be controlled now. A similar thing happens if you press a channel's
Lock button it will blink twice and then go dim or bright to indicate it's able to be controlled by the Freq Nudge
pot.
135 | 1
Switch
Env Out light display When turning Odds Freq Nudge knob...
Channel 1 is being Nudged (light is changing color)
Channels 2, 3, 4, 5, 6 are not effected (lights dm or off)
Channels 1, 3, 5 are being Nudged (lights changing
color)
Channels 2, 4, 6 are not effected (lights off)
Env Out light display 6 | 246
Switch When turning Evens Freq Nudge knob...
Channel 6 is being Nudged (light is changing color).
Channels 1, 2, 3, 4, 5 are not effected (lights dim or off)
Channels 2, 4, 6 are being Nudged (lights changing
color)
Channels 1, 3, 5 are not effected (lights off)
Experiment a bit with listening to which channels change pitch as you turn the Freq Nudge knobs. Watch the
lights change from white to blue to indicate how much each channel has been Nudged. Then flip the 135|1
and/or 246|6 switches, watch the Env Out lights, and listen again to see which channels are effected. The light
display is only there to help you know which channels are being changed when you adjust a control, and it
does not change the signal on the Env Out jacks.
Since multiple channels share a single Freq Nudge knob and the knob can also be used for Transposition, the
setting is only updated when the knob cross the actual Freq Nudge setting. Therefore if you want to quickly
clear the Freq Nudge setting, flip the switches to 246 and 135, and turn both Freq Nudge knobs fully up and
then full down. This will set all unlocked channels back to zero Nudge. To verify, check that the Env Out lights
turned white.
4

New in v5: Transposition (changing keys)
New in v5 Besides being able to fine-tune each channel using the Freq Nudge knob (see above), you also can
transpose each channel by an integer number of semitones, a maximum of 6 half-steps up or down. Each
channel can be transposed on the fly, while playing live, independently of other channels. This allows for real-
time chord modulations, key changes, etc.
To transpose a channel, hold down its Lock button and turn its Freq Nudge knob (left Freq
Nudge for odd channels, right Freq Nudge for even channels). The Env Out lights will
immediately change color to red and/or blue to show you how many steps the channel is
transposed. Red lights indicate downward transposition, and blue lights indicate upwards
transposition. So if you see 4 red lights, the channel is transposed down 4 semitones (2
whole steps). When the channel is not transposed (0), the display shows three red lights and three blue lights.
See the following chart
Env. Out light display:
# Semitones
Transposed
Key of C
becomes...
Transpose
Upwards
+6 F#
+5 F
+4 E
+3 D#
+2 D
+1 C#
= No Transposition (none) C
Transpose
Downwards
-1 B
-2 A#
-3 A
-4 G#
-5 G
-6 F#
The Transposition of a channel does not start changing until you turn the Freq Nudge knob past the point at
which the channel's transposition was last set. If no transposition has been set yet, then you must turn the Freq
Nudge knob to center (0) before any transposition will happen. This is useful if you want to check a channel's
transposition, just hold down its lock button and slightly wiggle its Freq Nudge knob. The Env Out lights will
show the current transposition without changing it.
5
}
}

Transposition is very useful with the Major and Minor scales in the Western Bank, which are tuned to C-major
and C-minor. With transposition you can set them to any key. For instance, if you want to play minor chords in
the key of E, you would go to the C-Minor scale bank (Blue group, Bank 2, Scale 1) and then transpose all six
channels up 4 semitones (4 blue lights). If you are tuning to another instrument or to something like A=432Hz,
you could use the Freq Nudge knobs to make fine-tuning adjustments.
You can transpose up to three odd channels or three even channels at the same time by holding down all their
Lock buttons while adjusting the odd or even Freq Nudge knob. You can transpose Locked channels, as well.
To clear transposition, you can either transpose the channel back to 0, or you can clear all transpositions by
holding down all six Lock buttons for two seconds. Any channel that's transposed will start flashing on its Lock
button. When you release the button, the transposition will be cleared back to 0. You can use this to “play”
transpositions live, by timing when you release each button. Also, if you transpose a channel a locked channel
and then clear all transpositions, its transposition will not be cleared until you unlock it. This is another way to
facilitate live performance.
Two Pass filtering: Resonance (Q)
New in v5 As you turn up the RES (Q) knob or apply CV, the channels move from low resonance to high
resonance at about 12 00. After this point, as you continue turning up RES (Q), a second resonator is cross-
faded in, which is essentially like running two SMR modules in series. This second resonator greatly increases
the total resonance and helps filter out virtually all background sounds, only allowing the pure tones of the
resonant frequencies to pass. This is called a Two-pass resonator and only exists in version 5 and later. In
firmware v4 and earlier, the RES knob's range from 0 to 100% is the same as firmware v5's range from 0 to
50% (there is no second resonator in v4 and earlier).
When used with triggers into the audio inputs, Two-Pass resonance with a high Q (80%-100%) slows down the
attack and decay. You can use this to get different reverse/backwards effects and play with the envelope
timings by adjusting Q.
Note: If ou want to emulate a particular sound found in the one-pass resonator of v4 firmware, ou can do so
b halving the RES(Q) knob setting. So if in v4 the knob was at 80%, turn it to about 40% with v5's Two-Pass
resonator. If ou prefer to use the classic SMR sound onl , ou can switch to the One-Pass filter mode in
S stem Settings (see page 21).
FFT (Spectral Plot) of SMR output with white noise input
RES knob at 100% (firmware v5)
Two-pass resonator
RES knob at 50% (v5) or 100% (v4)
One-pass resonator
RES knob at 10%
6

Banks and Scales display and organization
New in v5: As you turn the ROTATE knob while holding it down, you will notice the six Env Outs lights change
color. The dominant color of the lights tell you what bank Group you are in. There are five groups blue, pink,
orange, green, and white. Each group has a theme, for instance, the Blue Group is all Equal Temperament
scales. See the back page of the manual for all scales/banks/groups. One of the lights will be flashing to
indicate which Bank you've selected within the Group. So if all the lights are Orange-ish and the fourth light is
flashing, then you are in Orange Group, Bank 4 (and looking at the back page of the manual, that's Gamelan
Pelog). To get a feel for the organization, just try it hold down the ROTATE button while turning it, and watch
the Env Out lights. Notice that each Group has a dominant color, but the colors within the group have slight
variations. This helps distinguish the banks within a group.
Forbidden Notes
In firmware version 5 and later, you can tell the SMR to completely avoid certain notes
on the scale by “forbidding” the note. This is an advanced feature that lets you control
which notes will and will not be used when rotating and spreading. No matter what
you do, none of the six channels will go to a Forbidden note. One common use of this
feature might be to avoid playing high frequencies just Forbid all the high notes and
the SMR will only rotate around the low and mid notes. This also is useful for
arpeggiations and sequences (either using the SMR's resonators or controlling
external VCOs), you can tell the SMR which notes in the sequence/arpeggiation to
play or not play.
To Forbid a note, rotate/spread one of the channels to the note you want to be
avoided. Then hold down that channel's Lock button while you press the ROTATE
knob button. You can release both buttons at this point. The note that the channel
was on will be Forbidden, and the light on the light ring will turn gray. To confirm this
Forbid action, rotate or spread to another note. On the other hand, if you made a
mistake, you can immediately undo the Forbid action by repeating the Lock/ROTATE
button press. Once you've rotated or spread after forbidding a note, you cannot
undo or clear just that one particular Forbidden note. You can only clear all the Forbidden notes at once.
To clear all Forbidden notes, hold down all six Lock buttons and tap the ROTATE knob button.
Keep in mind that the Forbidden notes refer to positions on the ring of 20 lights. Changing the scale or bank
will not change the Forbidden notes. One interesting phenomenon arises due to the algorithms that force the
channels to maintain different frequencies forbidding multiple notes and rotating and spreading around them
repeatedly can mix up the order of the channels.
Tip you can set multiple Forbidden notes at once by holding down multiple lock buttons as you tap the
ROTATE button. However, you can only hold down a maximum of 5 Lock buttons at a time, since holding down
6 buttons and tapping ROTATE tells the SMR to clear all Forbidden notes.
When you save the current state in a Settings Slot (see later in this manual), the current set of Forbidden
Notes will be saved and will appear the next time you power on the SMR. Otherwise, if you do no explicitly
save your settings, the Forbidden notes will be cleared when you power down.
Env Out jacks: Trigger mode
When the switch is in the center position, the Env Out jacks are in Trigger mode. Trigger mode also tracks the
frequency content of the audio input signal, but it outputs triggers instead of CV. Whenever the amount of
frequency present exceeds a certain threshold, the jack will send a trigger. The jack will remain high as long as
7

the frequency content stays above the threshold. This is very useful for beat-syncing or triggering external
modules that track percussive content of an audio signal (see example patch). It's also useful for patching the
SMR to itself (Env Out → Rotate Trigger jacks and Lock jacks)
Pre | Post (trigger mode)
The threshold is set by the channel's slider (and the Level CV jack). The Pre/Post switch must be set to Post to
adjust the threshold. You typically need to adjust the threshold manually to get a good trigger pattern.
New in v5 Once you've set the thresholds, flip the switch to Pre and the threshold levels will be saved. At this
point you can freely adjust the audio mix using the sliders without changing the thresholds. This is crucial for
advanced beat-syncing (see example patch), since you can get all the triggers dial-in and then mix the audio
live. Note: if ou flip back to Pre, the saved threshold levels will be erased. Threshold levels are never saved
after power-down.
Env Out Jacks: 1V Octave outputs
In firmware version 5 and later, holding down the ROTATE button while flipping the
Fast | Slow switch to “Fast” will make the Env Out jacks output 1V/Octave CV for each
channel. This is a powerful feature that allows you to control up to 6 external VCOs or
voice modules, creating sequences, arpeggiations, chords, etc. You can even tune the
VCOs to the SMR to create controllable twelve-voice harmonies. You also can use the
SMR's Transposition and Freq Nudge features (see page 11) to transpose and fine-
tune or de-tune the external VCOs.
The 1V/oct outputs track across 8 octaves (C1 – C9). The Env Out lights will be
brighter to indicate higher pitches, and dimmer for lower pitches. To turn off 1V/octave output mode, flip the
Fast | Slow switch to any other setting.
Pre | Post (1V oct mode)
You also can add glissando (glide) to the 1V/oct CV outputs by flipping the Pre/Post switch to “Pre”. The
glissando/glide time is set by the Morph knob/jack. As the SMR morphs from one note to another, the 1V/oct
output will pitch bend from the first note to the second. To turn glissando off, flip the switch to “Post”. At this
setting, the 1V/oct output will stay at the first note and then sharply jump to the second note until the morph is
complete. See the scope shots below
1V/oct output on Env Out jack
Switch flipped to Post = no glissando
1V/oct output on Env Out jack
Switch flipped to Pre = glissando
Any changes to the resonant frequency of the channel (Transposition, Freq Nudge, Freq jacks, Scale/Bank,
Rotation and Spreading) will be reflected by the 1V/oct output. Except when bending between two notes with
glissando, each channel's 1V/oct output always reflects the resonant frequency of that channel. Thus your
VCOs and the SMR can be tracked together no matter how you patch the SMR.
8

Adjust 1V oct output tracking (Env Out jacks in 1V oct mode)
The 1V/octave tracking of the Env Out jacks when in 1V/oct mode can be fine tuned. This allows you to
compensate for external VCOs that do not have tracking adjustments of their own. The exponential tracking
can be adjusted by about +/-10%.
To change the 1V/oct output tracking
1) Enter 1V/oct mode by holding down ROTATE while flipping the Fast|Slow switch to Fast (see page 18).
2) Enter Custom Scales mode by tapping the ROTATE button 10 times rapidly.
3) Use the ROTATE knob and button to select a note and scale that you want to use as a test. You may find it
useful to program a few octaves into adjacent notes in a custom scale, since octaves are a nice way to tune.
This is fast and easy to do since slider #1 is an octave control. See Custom Scales section on previous page.
4) Patch the channel 1 Env Out jack into an external VCO's 1V/oct jack.
5) Tune the VCO using its frequency or pitch knob to the frequency you hear on the SMR's output.
6) Rotate the SMR up and down the scale and see if the VCO and SMR stay in tune.
7) If the VCO and SMR go too far out of tune for your taste (and you can't fix it by simply tuning the VCO's
frequency knob), then adjust the SMR's 1V/oct output tracking as follows
7a) Tap the Channel 6 Lock button so that it turns off
7b) Set sliders 5 and 6 to center position
7c) Rotate between two notes on the SMR that are at least one octave apart, while listening to the
difference in pitch of the SMR and the VCO
7d) Adjust slider 5 (coarse amount) and slider 6 (fine amount), as well as periodically re-tuning the
VCO's frequency knob, until you can rotate back and forth between notes while keeping both devices in
tune
7e) If you want to switch to editing a Custom Scale instead, tap the channel 6 Lock button to stop
editing the tracking, and then tap the Channel 1 Lock button to start editing the Custom Scales (as
described in Custom Scales section above)
Setting slider 5 and 6 higher means the VCO will be more sharp when going from a low to high octave; setting
the sliders lower means the VCO will be more flat when going from a low to high octave.
At all times, make sure the SMR's Fast/Slow switch stays at Fast, and the Freq Nudge knobs are all the way
down, and nothing else is plugged into the SMR besides the Env Out (1V/oct) output and the audio output
cables.
When finished, hold ROTATE for five seconds. The tracking information will be saved into memory. If you want
to restore the factory default setting, put both sliders 5 and 6 in the center and then save it. Note that even
though the tracking adjustments are made in Custom Scale mode, they apply globally to all scales and banks,
not just the Custom Bank.
Filter Type mode
There are three filter modes available in the SMR One-Pass, Two-Pass, and BpRe.
Firmware v4 and earlier had only One-Pass (default) and BpRe.
In Firmware v5, Two-Pass is added and made the default.
One-Pass mode is the classic SMR sound, it's a simple resonator based on an algorithm from Max Matthews
and Julius O. Smith III.
Two-Pass is essentially the same as running two SMR One-Pass resonators in series. In Two-Pass mode,
turning the RES (Q) knob down to a position between 0% and 50% makes the SMR behave as if it were in
One-Pass mode that is to say, One-Pass's range from 0% to 100% has been squeezed into Two-Pass's range
from 0% to 50%. Turning the RES (Q) knob up past 50% fades in the second resonator. After about 90%
almost all of the background sound is filtered out, leaving just the resonant frequencies. At high Q settings,
Two-Pass responds to triggers on the audio input almost with a very slow attack, giving you an almost
backwards struck effect.
BpRe is an experimental filter mode. The timbre is subtly different, and the decay when struck with a trigger is
9

more exponential. However, the BPRe filter type cannot be tracked 1V/octave. Thus the Freq jacks and Freq
Nudge knobs do a linear frequency shift (will not track to external gear if tuned with the jack or knob).
To change filter types, enter System Mode and turn the Odds Freq Nudge knob all the way down. Then rapidly
turn it all the way up and the all the way down. This will toggle between Two-Pass and One-Pass mode. When
in One-Pass mode, you can rapidly turn the Evens Freq Nudge knob in the same way to toggle between One-
Pass and BpRe mode. When the mode is changed you will hear the audio output change, so listen carefully.
There is no visual indication of what mode you're in, but you can easily tell with two quick tests
1) Unplug the IN jacks and turn Q slowly from 0% to 100%, if you hear the white noise in the background
disappear around 90-100% then you are in Two-Pass Mode; if it never goes away completely, you are in One-
Pass mode.
2) Input a 0-5V triangle wave into one of the Freq jacks if you hear the pitch of one or more channels go up 5
octaves then you are in Two-Pass or One-Pass; if you hear the pitch bend by less than an octave then you are
in BpRe.
Summary of Advanced control settings
Transpose channel -6 to +6 semitones
Channel Lock + Evens/Odds Freq Nudge
(red/blue lights show amount of transposition)
Hold all six Locks for 2 seconds to clear Transposition
Forbid Note (that the channel is currently assigned to)
Channel Lock + tap ROTATE knob
(note on the light ring goes dim)
Press all six Locks + ROTATE to clear Forbidden notes
Q-Lock (locks the channel's Q value)
Channel Lock + turn RES (Q)
(Lock button blinks)
1V Octave output mode
Hold down ROTATE while flipping switch to Fast
(Env Outs jacks output 1V/oct CV)
Pre/Post selects Glissando On/Off
Change scale banks
Hold down ROTATE while turning
(lights show color of current bank, see back page)
10

Updating firmware with the Audio Bootloader
The SMR contains a bootloader that is used to update the firmware by playing an audio file into odds IN jack.
Firmware audio files can be downloaded at http //4mscompany.com/ smr.php
1. To enter bootloader mode, power off the SMR and connect a computer or smart phone audio output to
the odds IN jack. Either a stereo or mono cable is fine. Plug the evens OUT jack to an amp/speakers so
you can listen.
Remove your phone case, it may be preventing the cable from fully plugging in.
2. Set the computer phone's volume is at 100% and the audio player software is also at 100% volume.
Turn off all audio and vibrate notifications (use Airplane mode).
3. Hold the ROTATE button down while powering the SMR on. Keep holding it down, and release the
button when you see just a single light on, slowly changing color. The SMR is ready to receive
firmware.
4. Begin playing the file. Immediately you should see the slider LEDs do a sequential animation, and the
light ring slowly filling up with lights, and then clearing, then filling up again. Do not interrupt the
process! You can monitor the audio by listening to the evens Lock jack or the audio OUT jacks.
5. If at any time two of the Lock lights turn on (channels 2 and 3, or channels 2 and 4) and the other lights
stop animating, then an error has occurred. Verify the cable is not loose, all sounds/vibrate/notifications
are off, and that you have downloaded the audio file completely (avoid streaming or playing from the
browser). Check the volume is at 100%. Remove the protection case from your smart phone. Stop the
audio file, reset it back to the start, and tap the ROTATE button to reset. The single flashing light should
come on and the Lock lights should turn off. Play the file from the beginning again.
The open-source licensed source files (in C, for compiling with gcc-arm) can be found at
https //www.github.com/4ms/SMR
The audio files are not at this location, they are available from http //4mscompany.com/smr.php
Firmware Version
To view the firmware version, tap the ROTATE button 10 times rapidly to enter “Custom Scales” mode. Starting
with Firmware version 2, the Blue/Green/Red elements of the Env. Outs LEDs read as a binary code of the
firmware version number, with Channel 1 Red being the least significant bit, and Channel 6 Blue being the
most significant bit.
Firmware version 1: All Env Out LEDs normal colors
Firmware version 2: Channel 1 Green
Firmware version 3: Channel 1 Yellow
Firmware version 4: Channel 1 Blue (earl 2016)
Firmware version 5: Channel 1 Pink (Dec. 2016)
11

12

Blue Group = Equal Temperament
Bank 1
Major scale/chords
(key of C-maj unless
transposed)
Scale 1 Major chords
Scale 2 Major 6th chds
Scale 3 Major 7th chds
Scale 4 Aug. chords
Scale 5 Aug. 7th chords
Scale 6 Dom 7th chords
Scale 7 Pentaton. (1/2)
Scale 8 Pentaton. (2/2)
Scale 9 Major Scale C1-
Scale 10 Maj. Scale B3-
Scale 11 Maj. Scale A6-
Bank 2
Minor scale/chords
(key of C-min unless
transposed)
Scale 1 Minor chords
Scale 2 Minor 6th chds
Scale 3 Minor 7th chds
Scale 4 Half Dim7 chds
Scale 5 Minor Pent C1-
Scale 6 Minor Pent C5-
Scale 7 Blues C1-
Scale 8 Blues F4-
Scale 9 Harm.Min C1-
Scale 10 Harm.Min. B3-
Scale 11 Harm.Min. A6-
Bank 3
Single Western Intervals
(key of A unless
transposed)
Scale 1 Octaves + m2
Scale 2 Octaves + M2
Scale 3 Octaves + m3
Scale 4 Octaves + M3
Scale 5 Octaves + P4
Scale 6 Octaves + d5
Scale 7 Octaves + P5
Scale 8 Octaves + m6
Scale 9 Octaves + M6
Scale 10 Octaves + m7
Scale 11 Octaves + M7
Bank 4
Western Triads
(key of G unless
transposed)
Scale 1 Major 2+minor 2
Scale 2 Major 3+dim. 5
Scale 3 minor 3+5ths
Scale 4 Major 3+5ths
Scale 5 4ths + 5ths
Scale 6 Major 3+Major 6
Scale 7 minor 3+minor 6
Scale 8 minor 3+Major 6
Scale 9 minor 3+minor 7
Scale 10 5ths+minor 7
Scale 11 5ths+Major 7
Bank 5
Chromatic Scale
(Half-steps)
Scale 1 E2 - C4
Scale 2 A#2 - F#4
Scale 3 E3 - C5
Scale 4 A#3 - F#5
Scale 5 E4 - C6
Scale 6 A#4 - F#6
Scale 7 E5 - C7
Scale 8 A#5 - F#7
Scale 9 E6 - C8
Scale 10 A#6 - F#8
Scale 11 E7 - C9
Bank 6
Diatonic Scales
(Equal Temperament)
Scale 1 A2 - B5
Scale 2 A5 - B8
Scale 3 B2 - C#5
Scale 4 B5 - C#8
Scale 5 C2 - D5
Scale 6 C5 - D8
Scale 7 D2 - E5
Scale 8 D5 - E8
Scale 9 E2 - F#5
Scale 10 E5 - F#8
Scale 11 F4 - G7
Pink Group = Just Intonation
Bank 1
Single Intervals
(key of A, Just Int.)
Scale 1 Octaves + m2
Scale 2 Octaves + M2
Scale 3 Octaves + m3
Scale 4 Octaves + M3
Scale 5 Octaves + P4
Scale 6 Octaves + d5
Scale 7 Octaves + P5
Scale 8 Octaves + m6
Scale 9 Octaves + M6
Scale 10 Octaves + m7
Scale 11 Octaves + M7
Bank 2
Western Triads
(key of G, Just Int.)
Scale 1 Major 2+minor 2
Scale 2 Major 3+dim. 5
Scale 3 minor 3+5ths
Scale 4 Major 3+5ths
Scale 5 4ths + 5ths
Scale 6 Major 3+Major 6
Scale 7 minor 3+minor 6
Scale 8 minor 3+Major 6
Scale 9 minor 3+minor 7
Scale 10 5ths+minor 7
Scale 11 5ths+Major 7
Bank 3
Diatonic Scales
(Just Intonation)
Scale 1 A2 - B5
Scale 2 A5 - B8
Scale 3 B2 - C#5
Scale 4 B5 - C#8
Scale 5 C2 - D5
Scale 6 C5 - D8
Scale 7 D2 - E5
Scale 8 D5 - E8
Scale 9 E2 - F#5
Scale 10 E5 - F#8
Scale 11 F4 - G7
Orange Group = Non-Western Tunings
Bank 1
Indian Pentatonic
Scale 1 E0 to ~C#3
Scale 2 E1 to ~C#4
Scale 3 E2 to ~C#5
Scale 4 E3 to ~C#6
Scale 5 E4 to ~C#7
Scale 6 E5 to ~C#8
Scale 7 E6 to ~C#9
Scale 8 Spread1, 120Hz-
Scale 9 Spread2, 120Hz-
Scale 10 Spread1, 20Hz-
Scale 11 Spread2, 20Hz-
Bank 2
Indian Shrutis
Scale 1 16.35 – 31.04Hz
Scale 2 32.7 – 62.1Hz
Scale 3 65.4 – 124Hz
Scale 4 131 - 248Hz
Scale 5 262 - 497Hz
Scale 6 523 - 993Hz
Scale 7 1046 - 1987Hz
Scale 8 2093 - 3973Hz
Scale 9 4186 - 7947Hz
Scale 10 8.3k – 15.9k
Scale 11 16.7k - 20k
Bank 3
Mesopotamian
Scale 1 ISHARTUM A1
Scale 2 ISHARTUM A4
Scale 3 EMBULUM A1
Scale 4 EMBULUM A4
Scale 5 NIDMURUB A1
Scale 6 NIDMURUB A4
Scale 7 QUABLITUM A1
Scale 8 QUABLITUM A4
Scale 9 KITMUN A1
Scale 10 KITMUN A4
Scale 11 MITUM A1
Bank 4
Gamelan Pelog
Scale 1 Java (5 notes)
low
Scale 2 Bali (7 notes) low
Scale 3 Pelog, var1, low
Scale 4 Pelog, var2, low
Scale 5 Pelog, var3, low
Scale 6 Java (5 note) mid
Scale 7 Bali (7 note) mid
Scale 8 Bali (7 note) high
Scale 9 Pelog, var1, high
Scale 10 Pelog, var2, hi
Scale 11 Pelog, var3, hi
Green Group = Modern Tunings
Bank 1
Wendy Carlos's Alpha
scale (selected notes)
Bank 2
Wendy Carlos's Alpha
scale (more selected
notes)
Bank 3
Wendy Carlos's Gamma
scale (selected notes)
Bank 4
17-notes/octave
Scales are arranged
consecutively from
13.75Hz to 20kHz
Bank 5
Bohlen-Pierce Tritave
Every 13 notes the
frequency triples.
Consectutive scales
Bank 6
“296” EQ Frequencies
Each scale is shifted up
50 cents from previous
White Group = Custom Scales (user-programmable)
13
Table of contents
Other 4ms Recording Equipment manuals
Popular Recording Equipment manuals by other brands

Studio Technologies
Studio Technologies M232-00151 user guide

Telecast
Telecast Python II instruction manual

Philips
Philips CDR779 Service manual

GRASS VALLEY
GRASS VALLEY Turbo quick start guide

Panasonic
Panasonic SVSR100 - SD AUDIO RECORDER operating instructions

Sinclair
Sinclair KNX-02 Installation & owner's manual