manuals.online logo
Brands
  1. Home
  2. •
  3. Brands
  4. •
  5. A Stone Fitness
  6. •
  7. Fitness Equipment
  8. •
  9. A Stone Fitness Ripcords Door Hook User manual

A Stone Fitness Ripcords Door Hook User manual

For more information and to view
our complete line of Ripcords®
products, including the Circuit7®
DVD, please visit us online at
DISCLAIMER www.ripcords.com/disclaimer
IMPORTANT! Please take the time to read these instructions before you start using the RIPCORDS®, RIPCORDS®
Leg Cords, and the Door Attachment (Door Hook). Prior to starting, consult your physician, warm up and inspect
your equipment. It is your responsibility to make sure you are physically able and the equipment is sound enough
to use every time you start.
DO NOT WRAP RIPCORDS® AROUND ANY PART OF YOUR BODY, INCLUDING WRISTS, LEGS OR ANY OTHER BODY PART.
WRAPPING RIPCORDS® AROUND BODY PARTS MAY RESULT IN INJURY. NEVER, UNDER ANY CIRCUMSTANCES WRAP
RIPCORDS® NEAR OR AROUND YOUR NECK. WRAPPING RIPCORDS® AROUND THE NECK MAY RESULT IN CHOKING. AT
ALL TIMES, KEEP RIPCORDS® AND THE DOOR HOOK OUT OF THE REACH OF SMALL CHILDREN.
CARE AND CAUTION – READ CAREFULLY
All RIPCORDS® have undergone manufacturer’s testing and examination. Please take the time to read over the following
safety precautions and follow these easy care steps:
Do not allow your RIPCORDS® to do the following as they promote premature wear and tear.
a) Rest in direct heat or cold d) Come in contact with sharp edges
b) Be stored in direct sunlight e) Be stored in a stretched position
c) Be left outdoors for prolonged periods of time
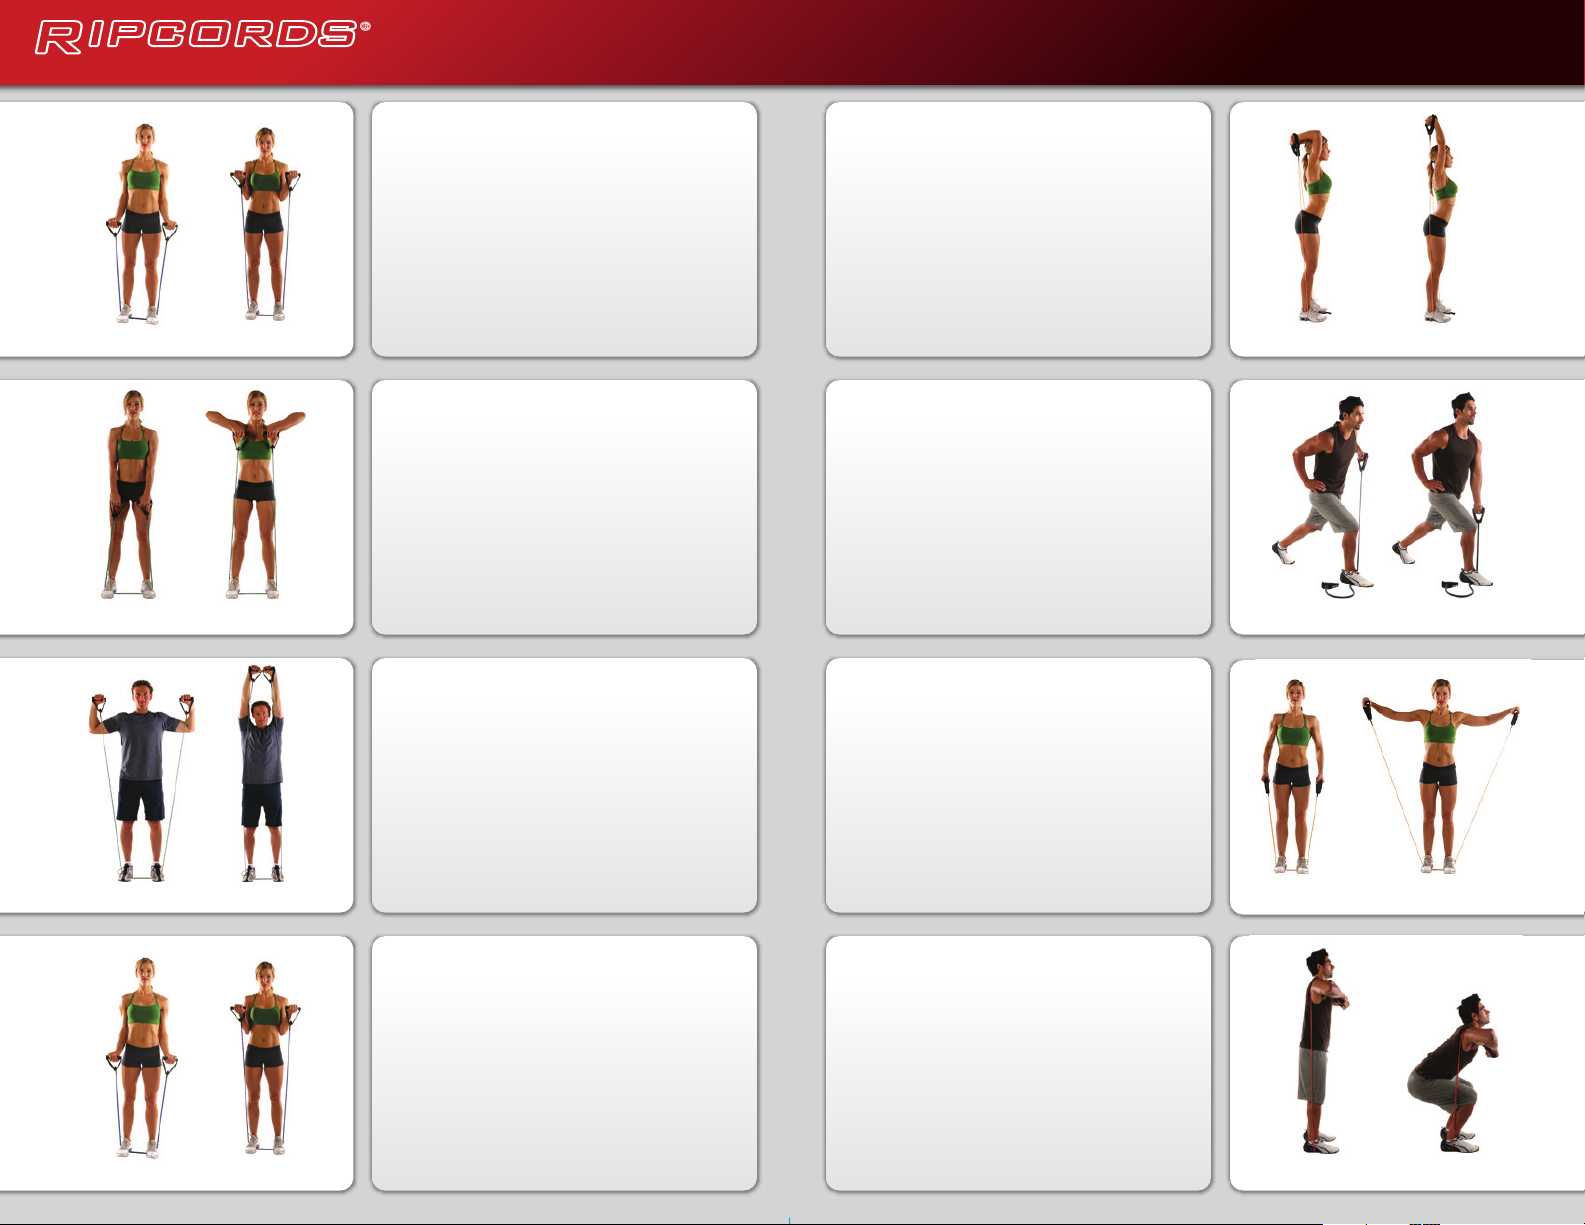
WORKOUT INSTRUCTIONS
1) Warm up prior to starting any RIPCORDS® routine.
2) Examine your RIPCORDS® and Door Hook attachment for cracking, cuts or tears prior to any workout. If there are any
defects such as ripping or tearing, discontinue use.
3) Perform smooth and continuous repetitions avoiding over-stretching the band.
4) The Door Hook attachment goes in the hinge side of the door ONLY and the door MUST BE LOCKED and in a location
where no other person can unlock the door without your knowledge.
CAUTION: Do not attach the Door Hook to any other object, as it may not provide the stability required.
5) Be careful not to allow the RIPCORDS® to slide off of a surface and snap back at you. Never use the handles with your
feet or attach them to any object that is not immovable.
6) Wear proper footwear when using RIPCORDS®. Always work with a stable base. Always wear closed toe shoes; never
work out in stockings or bare feet.
7) Breathe properly and do not hold your breath. Exhale when you are contracting a muscle group and inhale during the
stretching of the muscles.
8) Begin slowly. We recommend beginning with the lightest tension to build a foundation and give your body the chance to
adapt to the resistance. Work up to heavier RIPCORDS® only when your body is ready.
9) Use RIPCORDS® only as directed (Please visit our website www.ripcords.com for further exercise details). Never
attempt to hang from your RIPCORDS® or hang any object from your RIPCORDS®.
13) Children below the age of 16 should only use RIPCORDS® under the supervision of a responsible adult. Such
supervision should ensure that the child uses the equipment as designated.
14) Follow the programs and procedures outlined in the RIPCORDS® CIRCUIT7® and www.ripcords.com.
LIMITED WARRANTY
YOUR DUTIES AS PURCHASER AND STEP-BY-STEP PROCEDURES FOR YOU TO FOLLOW:
1. Inspect every package purchased for missing or factory-defective parts caused by the manufacturer.
2. Follow and comply with instructions supplied by RIPCORDS® in this guide or separately; heed all warnings and your
physician’s recommendations.
3. Inform RIPCORDS® by telephone or mail as to any missing part; send any defective or damaged product back and
RIPCORDS® will replace products at no charge to you other than Shipping and Handling costs calculated from your
shipping address. You must supply your name, address and an explanation of what happened for RIPCORDS® to properly
fulfill your warranty. RIPCORDS® reserves the right to change the Shipping and Handling fees as necessary.
4. Inspect equipment before and after every use for scratches, cracks, and abrasion spots. Discontinue use of any part that
exhibits these or any other types of damage.
5. All RIPCORDS® will eventually break (though this will usually take years to occur). It is your responsibility to ensure
that such a break does not injure you in any way. Please feel free to exchange your RIPCORDS® according to the Lifetime
Warranty.
ANY QUESTIONS?
If you have any questions regarding RIPCORDS® or any other Astone® Fitness products, exercises or explanations, it your
responsibility to contact RIPCORDS® for clarification by visiting us a
www.ripcords.com or emailing [email protected].
We are here to support your health, and help you achieve your fitness goals.
© 2010 Astone Fitness Ltd. Printed in the US.
Thank you for purchasing Ripcords®.
These instructions are only to be used in conjunction with the full disclaimer,
release and safety instructions found at www.ripcords.com/disclaimer
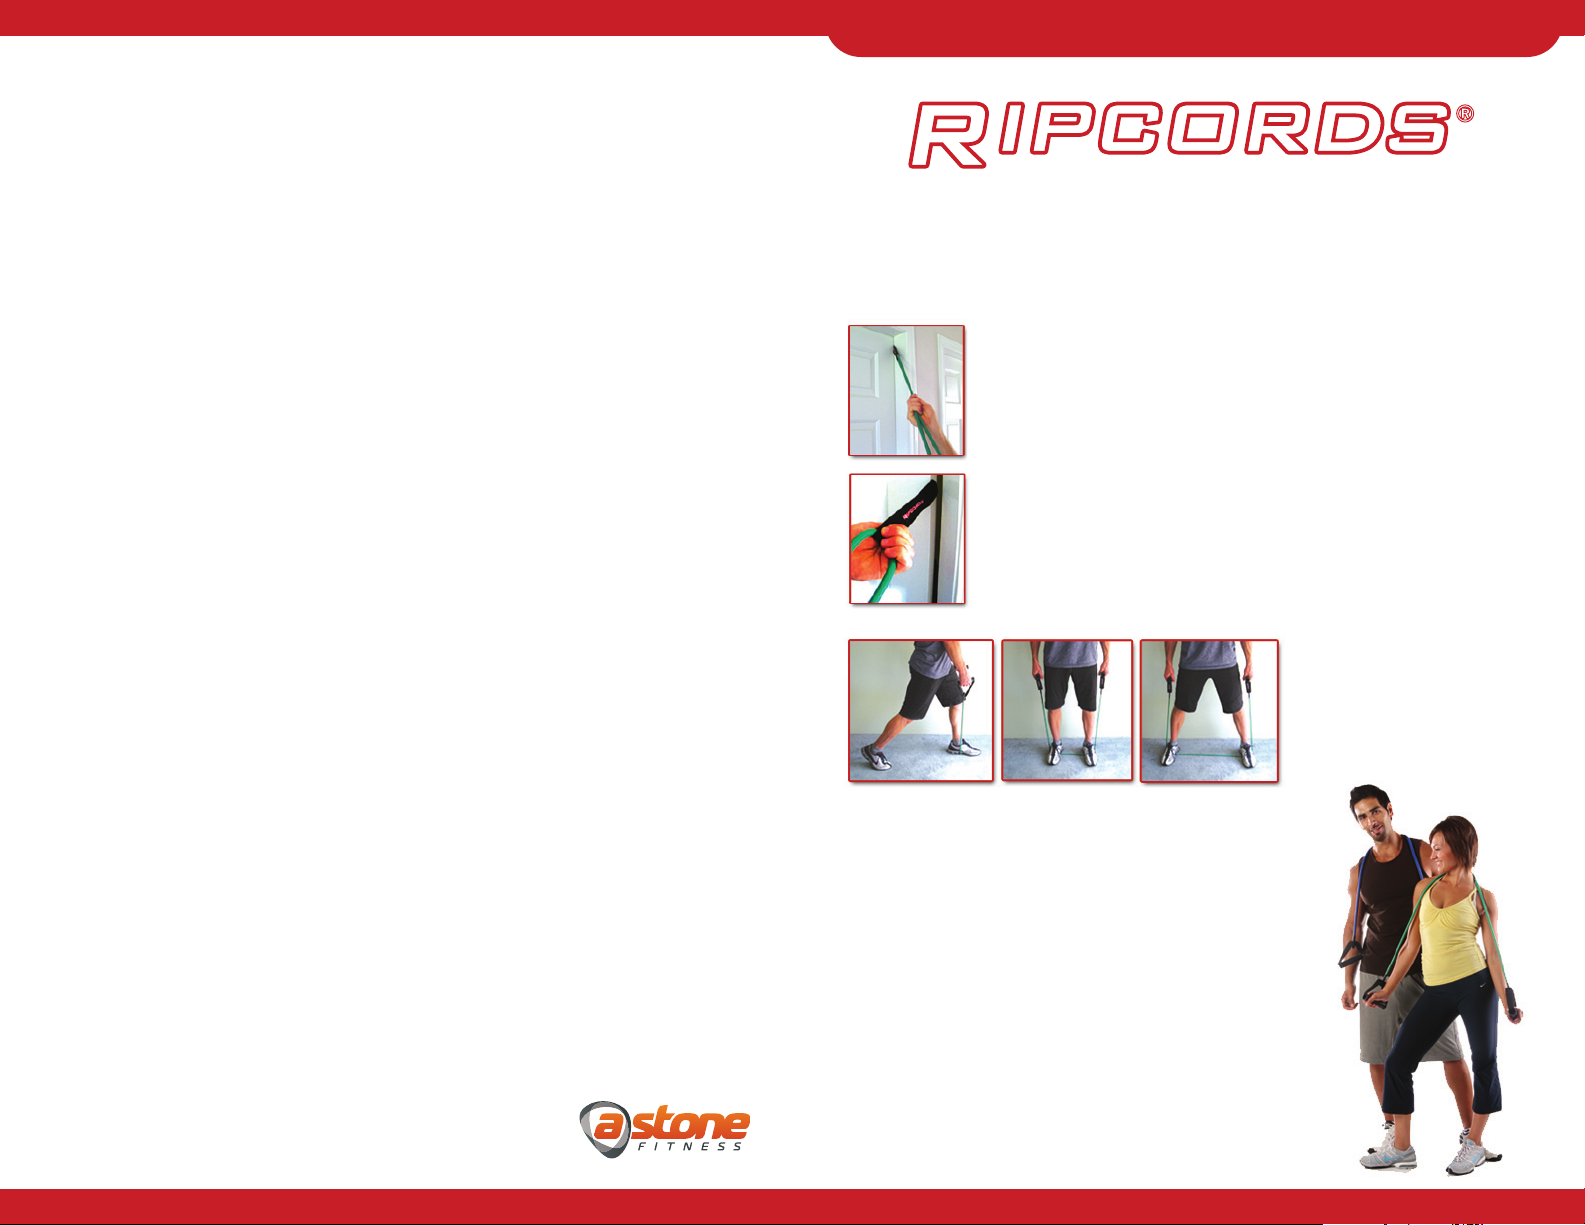
H O W T O AT TA C H T H E D O O R H O O K
Open the door and insert the thick end of the Door Hook into the opening
between the door and the door frame. The Door Hook locks in the closed door
when the thick end is inserted just past the door frame. Place one handle of
the ripcord through the opening of the Door Hook and pull it through until
both sides are of equal length.
Ensure the door is closed and locked before starting any exercise. Pull on the
ripcord and Door Hook to make sure it is securely attached before beginning
any exercise. Do not use any door that does not have 3 secure hinges and that
cannot be locked.
While each exercise has a
specific stance, you can add
additional resistance by using the
wide stance or reduce resistance
by using the split stance.
SPLIT STANCE SHOULDER WIDTH WIDE STANCE
WWW.RIPCORDS.COM
INSTRUCTION MANUAL
WWW.RIPCORDS.COM
START FINISH
BICEP CURLS
TRICEP EXTENSIONS
START FINISH START FINISH
BICEPS
START Stand on the Ripcords® with your feet
shoulder width apart. Grip a handle in each
hand and position your arms at the sides of your
body.
FINISH Bring your hands up to shoulder height
whilekeeping your wrists firm and your elbows
bent at your sides. Return to starting position and
repeat.
TRICEPS
START Stand on the Ripcords® with your feet
shoulder width apart. For less resistance stand in a
split stance. Grasp both handles and bring both
hands behind your neck with your elbows pointing
upwards.
FINISH Bring your hands up to shoulder height
while keeping your wrists firm and your elbows
bent at your sides. Return to starting position and
repeat.
UPRIGHT ROW
START FINISH
BACK
START Stand on the Ripcords® with your feet
shoulder width apart. Keep your back straight
and hold both handles in front with your palms
facing your body.
FINISH Lift your arms upward until they reach
your upper chest. Keep your hands approximately
shoulder width apart. Your elbows should remain
above your hands throughout the movement.
Return to starting position and repeat.
OVERHEAD PRESS
START FINISH
SHOULDERS
START Stand on the Ripcords® with your feet
shoulder width apart. Grip a handle in each hand
and bring your arms in front of your body to chin
height. Keep your hands shoulder width apart and
hold the Ripcords® on the inside of both arms.
FINISH Press upwards in a triangle movement
until your hands meet each other above your head.
Be sure not to lock your arms at the top. Focus on
keeping a slight bend in the elbows. Return to
starting position and repeat with your other leg.
SPLIT SQUAT
START FINISH
LEGS
START Stand in a split stance and position your
front foot on the Ripcords® and back foot one leg’s
length (3-4 feet) behind your body. Hold the
handles and position your hands at shoulder height
in front of your body.
FINISH Bend both legs and balance on the toe of
yourback foot as you lower. Keep your back knee
above the floor. Ensure that you do not bend your
front knee more than 90 degrees or past your front
toes. Return to the start and repeat.
START FINISH
S
T
A
R
T
F
INI
S
H
ONE ARM ROW
BACK
START Stand with your front foot on the Ripcords® and
back foot behind your body. Grab one handle with the
opposite arm of your front leg and rest the other handle
on the floor. Keep your back and head straight; bend
forward from your waist.
FINISH Pull upwards, keeping your elbow and hand
tight to your body until you reach the mid chest. To
increase resistance, reduce the distance between your
front foot and the handle. Return to starting position
and head straight; bend forward from your waist.
LATERAL RAISE
SHOULDERS
START Stand on the Ripcords® with your feet
shoulder width apart. Hold the handles with your
arms at the sides of your body, wrists facing in.
FINISH Bring both arms up and away from the
sides of your body to shoulder height. Keep your
elbows slightly bent throughout the motion. Return
to starting position and repeat.
SQUAT
LEGS
START Stand on the Ripcords® with your feet
shoulder width apart. For less resistance stand in a
split stance. Grasp both handles and bring both
hands behind your neck with your elbows pointing
upwards.
FINISH Bring your hands up to shoulder height
while keeping your wrists firm and your elbows
bent at your sides. Return to starting position and
repeat.
START FINISH
START FINISH

Other A Stone Fitness Fitness Equipment manuals

A Stone Fitness THE HUMAN TRAINER OLYMPIC RINGS User manual

A Stone Fitness

A Stone Fitness THE HUMAN TRAINER OLYMPIC RINGS User manual

A Stone Fitness Ripcords Installation guide

A Stone Fitness

A Stone Fitness Ripcords Installation guide

A Stone Fitness Fitness Equipment User manual

A Stone Fitness

A Stone Fitness Fitness Equipment User manual

Popular Fitness Equipment manuals by other brands

Saratoga Spa Spirit 690 Assembly guide

Saratoga Spa

Saratoga Spa Spirit 690 Assembly guide

Body Craft BC-F602 Assembly and operating instructions

Body Craft

Body Craft BC-F602 Assembly and operating instructions

Puretec Marcy Pro SM-4903 manual

Puretec

Puretec Marcy Pro SM-4903 manual

Contour Core Sculpting System II use and care manual

Contour

Contour Core Sculpting System II use and care manual

DUVLAN YR-DVL3014 user manual

DUVLAN

DUVLAN YR-DVL3014 user manual

Valor Fitness BD-7 owner's manual

Valor Fitness

Valor Fitness BD-7 owner's manual

Teeter Power VI-GL Assembly & use instructions

Teeter

Teeter Power VI-GL Assembly & use instructions

Xterra 16414870 owner's manual

Xterra

Xterra 16414870 owner's manual

BM FITNESS IMPULSE 2 Assembly instructions

BM FITNESS

BM FITNESS IMPULSE 2 Assembly instructions

Ironman Fitness 5800 owner's manual

Ironman Fitness

Ironman Fitness 5800 owner's manual

BH FITNESS M030 Instructions for assembly and use

BH FITNESS

BH FITNESS M030 Instructions for assembly and use

Movement Rock Air Power owner's manual

Movement

Movement Rock Air Power owner's manual

Gold's Gym Stride Trainer 350 user manual

Gold's Gym

Gold's Gym Stride Trainer 350 user manual

FYTTER CRM003RNG manual

FYTTER

FYTTER CRM003RNG manual

LSG GBH-300 owner's manual

LSG

LSG GBH-300 owner's manual

Sole Fitness SFT160 owner's manual

Sole Fitness

Sole Fitness SFT160 owner's manual

Pivot Fitness HR3240 owner's manual

Pivot Fitness

Pivot Fitness HR3240 owner's manual

FITFIU FITNESS GYM-300 instruction manual

FITFIU FITNESS

FITFIU FITNESS GYM-300 instruction manual

manuals.online logo
manuals.online logoBrands
  • About & Mission
  • Contact us
  • Privacy Policy
  • Terms and Conditions

Copyright 2025 Manuals.Online. All Rights Reserved.