AAMP Global M2M IN MOTION DCRCAM1 Assembly instructions

DCRCAM1
HARDWARE INSTALLATION MANUAL

tel | 727-732-2727
2.
DCRCAM1
HIGHLIGHTS:
Thank you for purchasing
M2M in Motion
M2M IN MOTION’S DCRCAM1 comprehensive video telematics
camera mounts directly to the vehicle’s dash or windshield
with a Plug-and-Play installation directly into the vehicle
OBD-II port, the device is always connected to relay vehicle
and driver information back to you through the M2M in
Motion web and mobile app.
• Two camera video recording (interior and forward-facing)
• Possible impact or incident notication
• Tamper and camera disconnected alert
• Geofencing – enter or exiting notication
• Always on design with battery rundown protection
• *Optional wi hot spot
• Onscreen vehicle information
FEATURES
• Trip history with video replay
• Parking motion sensing and recording in Guard Mode
• Web and mobile applications supported
• Unauthorized tamper and power disconnect notication
• Audio Streaming (on/o) enables audio from the camera embedded mi-
crophones when streaming live or historical video footage in the Web App.
• Audible Alerts, alerting the driver whenever a notable event occurs.
• On-screen messaging from the Web portal to dispatch and send real-time
messages to Camera screen
• 4G/LTE data transmission for instant notication of events
• Plug and play OBD II installation with ECM data for J1979 (light duty CAN)
and soon, *J1939 *feature coming soon
• Mobile hot spot is optional and must be requested. Users may incur
additional data
• Charges for monthly usage of more than 500MB per month per camera.
1GB of data is $10 per month per camera.

4.
tel | 727-732-2727
OPTIONAL INSTALLATION ACCESSORY
• AHRHW (*required for hardwire installations)
WHAT’S INCLUDED:
+ DCRCAM1 Camera
+ FM activation support card
+ Adhesive mount
+ Adhesive cable clips
+ OBDII cable
+ Micro SD card (256 GB)
+ Allen key
+ Alcohol cleaning wipe
1. After inserting the SD & SIM card
into the camera’s small slot as seen
below
2. Use the Allen Key and two small
screws provided to add the securi-
ty cover plate
SIM/SD CARD INFORMATION
INSTALLATION DETAILS
• Select the location to mount the camera, is it recommended that the
camera be mounted in the center of the windshield behind the rearview
mirror with the camera lens facing forward or in the center of the vehicles’
dashboard.
• Clean the pre-selected mounting location with the Alcohol prep wipe
provided.
• Remove the 3M camera mounting adhesive backing.
• The SIM cards are pre-installed and activated.
• The 256 GB SD cards are shipped separately in the camera box you will need
to insert the provided SD card into DCRCCAM1.
* The SD card slot is located on the bottom right hand side of DCRCAM1

tel | 727-732-2727
6.
INSTALLATION PROCEDURE
DCRCAM1
(PLUG AND PLAY OBD II CABLE)
STEP 1:
STEP 2:
STEP 3:
STEP 4:
STEP 5:
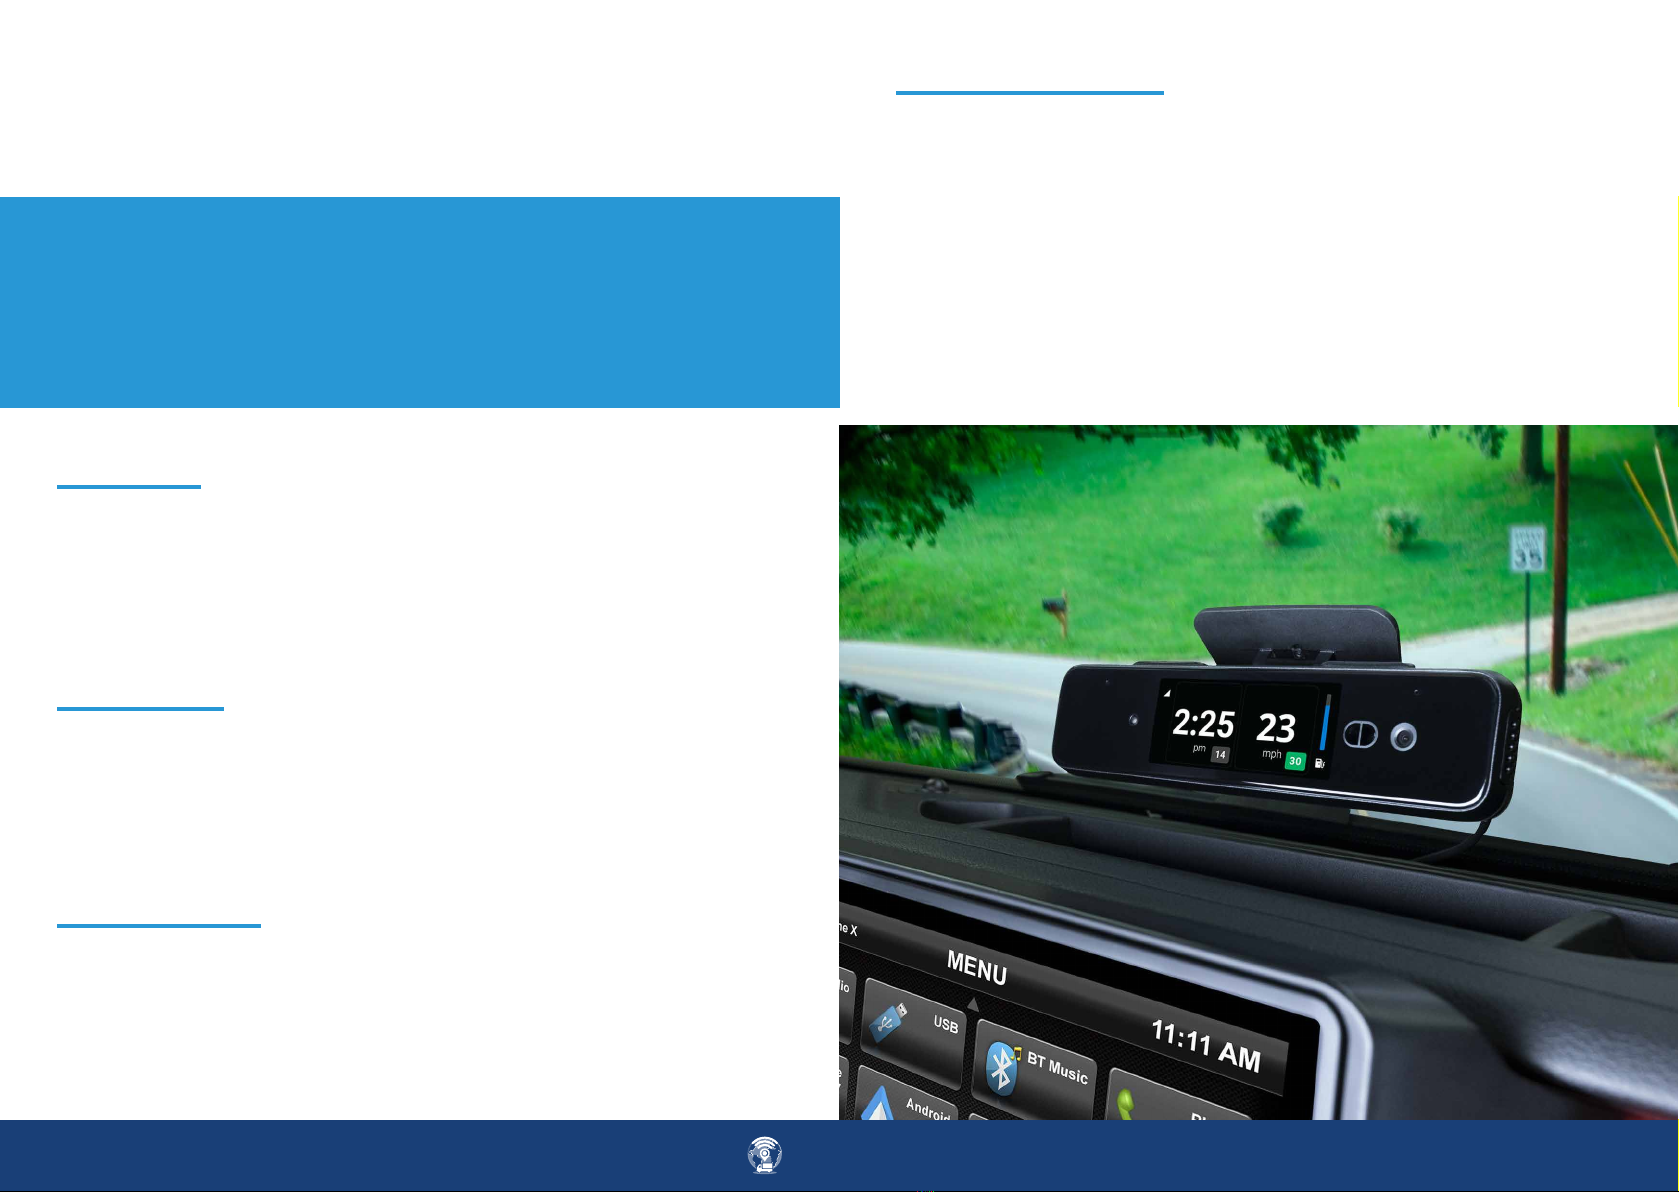
Mount the camera to the windshield or dashboard by rmly pressing the
camera in place for 30 seconds.
(Ensure the camera lens is facing forward with an unobstructed view of the road)
To adjust the camera angle use the provided Allen key and adjust the mount-
ing bracket until you get the desired angle and then tighten the mount in
place.
Once the camera’s angle is set, plug in the cameras power cable and secure
the cable in place using the two phillips screws provided, route the power
wire up towards the headliner or front windshield seem and then route the
cable left and down the driver’s A-pillar into the drivers’ dashboard area near
the factory OBD II port and plug the DCRCAM1 connector into the OBD II port.
Secure the excess power cable extension into the headliner or under the
dash area with the mounting adhesive tabs included with the camera.
Ensure the plastic protective lm is removed from front facing and interiror
facing lenses.
HARDWIRED INSTALLATION PROCEDURE
FOR ACCESSORY CABLE PART # AHRHW
*Note – IF a non-OBD II cable is used the camera will default to power on when
the camera senses movement and power o when the vehicle is parked and will
not provide any DTC, FUEL, OR VEHICLE NETWORK INFORMATION.
*Note if you do not have an account already set up note the camera serial num-
ber that is located on the product box, activation card, or on the bottom of the
camera, you will need this information when requesting an account set up at
m2minmotion/.com/getstarted
Using optional cable Part # AHRHW:
Confirming the final installation:
Red- Connect to 12-volt constant power or directly to the vehicle’s battery
Black- connect to the vehicle’s chassis ground using a self-tapping grounding
screw and ground ring terminal or directly to the vehicle battery.
1. Once the camera is connected, place the vehicle outside with an unob-
structed view of the sky and start the vehicle and let it run for 5 minutes
allowing time for the DCRCCAM1 to communicate with the vehicle’s network.
2. Login into the M2M account and conrm the vehicle is tracking and video is
streaming.

tel | 727-732-2727
8.
Configuring your New Dash Camera:
Many custom congurations can be made to the DCRCAM1 camera via the
M2M in Motion web application or mobile APP.
To enable the audio streaming, the account administrator must send in a
request to our support team to enable the audio streaming by device serial
number or request an account in it’s entirety to have audio streaming ena-
bled. This includes Event, Continuous, and Gesture videos.
Audio Streaming is set to ‘Disabled’ by default. Enable the Audio Streaming
setting to hear the audio from Raven’s microphones when you are stream-
ing live or from historical video footage.
*Note: Two-way audio is not supported.
Driver Alerts sound a chime, alerting the driver whenever a notable event
occurs. The most common Audible event is the speeding event.
Audible Alerts are ‘Enabled’ by default. To disable Audible Alerts, from the
‘Driver Alerts’ section, use the toggle button and disable ‘Audible chimes
for events’.
•Audio- Enable/disable audio recording and streaming
• Cameras- Enable/disable the road- or cabin-facing cameras
• Driver Alerts-Enable/disable in-vehicle alerts (i.e., Speeding)
• Gestures- Enable/disable triggering short video recording with gesture
USER Congurable options
Audio Settings
Audio Streaming
Driver Alert Settings
Enable/disable either Road facing or Interior cameras. In some cases, you
may want to temporarily or permanently disable either the road or cab-
in-facing camera depending on local laws or preferences. Default setting is
both cameras are enabled.
Contact your M2M Sales or Tech Support for the other congurations.
Camera view conguration

10.
tel | 727-732-2727
TROUBLESHOOTING
DCRCAM1 won’t power on:
Can’t access the DCRCAM1 account:
Display shows no SD Card:
• Plug and play installation - Check the vehicle OBD II port for 12 Volt + pow-
er on pin 16 and conrm ground in Pin 5 , the the port does not have power
refer to the vehicle manaul and check the DLC/Aux fuse and replace fuse if it
is blown.
All cameras require an account acceptance agreement and payment meth-
od, if you have not set up your account or did not receive a welcome email
from M2M in motion – Please locate the serial number noted on the Invoice,
product box, or base of the camera and web search m2minmotion.com/get-
started or contact support at 727-732-2727
The DCRCAM1 is shipped with a specic class 256 MB sd card that needs to
be inserted into the camera, if the card is inserted but not showing-Power o
the camera by turning o the vehicle’s ignition or pressing the power reset
button located on the base of the camera and allow the camera to reboot.
• Hardwired installation - using the AHRHW Accessory cable, conrm the
connections-12 Volts+ on the Red wire and chassis ground on the Black wire-
and conrm the 3 AMP fuse is good.
Camera display information is blank:
All passenger vehicles built in 2008 + that have a working CANBUS communi-
cation port (OBD II) have the ability for the DCRCAM1 to read vehicle informa-
tion like DTC codes, Feul, speed, RPM. If the camera display is black the may
be an issue with your vehicle please contact support to validate the installa-
tion and help resolve it.
If you installed the camera using the AHRHW accessory hardwired cable there
will be no vehicle Information and the screen will display the forward live
video feed and turn on and o when the vehicle is in motion- Note Power o
is delayed until motion is not detected.

12.
tel | 727-732-2727
Road Facing Camera
Audio
Cabin Facing Camera
Sensors
140-degree eld of view
High-delity speaker
130-degree eld of view
Proximity
Sony STARVIS CMOS sensor
Dual noise-canceling microphones
Omni Vision CMOS sensor
GPS
1080p recorded video
720p recorded video
Accelerometer
720p live streaming video
Gyroscope
AT commands, UDP
Magnetometer (Compass)
High-quality infrared night vision sensor
Air pressure
PTCRB, FCC
Temperature
TECHNICAL SPECIFICATIONS
DCRCAM1
Connectivity
Power
Size:
LTE
CAN Bus
Height: 2.0″
Wi-Fi
USB (Micro-B)
Width: 1.1″
Bluetooth, BLE
Powered by the OBD-II port with intelligent
power management
Length: 7.75″
OBD-II
Backup battery if DCRCAM1 is unplugged
Weight: 0.37lbs
Storage
Security
Processor
16GB Internal storage
Encrypted cloud storage
Qualcomm Snapdragon 650 64-bit
hexa-core CPU
MicroSD card slot up to 256GB
Secure web transfer (TLS 1.2)far)
Thank for your purchase of the
M2M in Motion product
If you have any questions or concerns in regards to products or features,
Please contact our support team at
m2minmotion.com/getstarted or contact support at
727-732-2727

CONTACT US
m2meetmotion.com
IUG_DCRCAM1 REV031422
Table of contents
Other AAMP Global Automobile Accessories manuals

AAMP Global
AAMP Global PAC AP4-CH21 User manual

AAMP Global
AAMP Global PAC SR-GM14H User manual

AAMP Global
AAMP Global PAC AP4-FD21 User manual

AAMP Global
AAMP Global PAC RP4-FD11 User manual

AAMP Global
AAMP Global PAC AmpPRO AP4-FD31 User manual

AAMP Global
AAMP Global PAC RadioPRO RPK5-GM4101 User manual
Popular Automobile Accessories manuals by other brands

ICON Vehicle Dynamics
ICON Vehicle Dynamics 17-UP FSD PRO Series installation instructions

Ecco
Ecco ED37777 Series Installation and operation instructions

Whispbar
Whispbar K493W Fitting instructions

MadJax
MadJax CONVEX MIRROR 03-035 installation instructions

DVB
DVB LBBR-06 installation manual

Porsche
Porsche Mobile Charger Driver manual