AAT C-max User manual

C-max
Translation of the original user’s manual
Stair Climbing System

CE Declaration of conformity
The company AAT Alber Antriebstechnik GmbH herewith declares that the
products of the stair climbing system C-max were developed and manufac-
tured in concordance with the current regulations of the European Union,
EEC Guidelines 93/42/EWG.
This declaration becomes void if the above mentioned devices have been al-
tered without the consent of AAT Alber Antriebstechnik GmbH.
CE
Signature of the manufacturer:
Markus Alber
Managing shareholder
AAT Alber Antriebstechnik GmbH
The stair climbing system C-max has been
tested successfully according to the
ISO/FDIS 7176-23 by the Technical
University Berlin.
2
C-max
AAT Alber Antriebstechnik GmbH
P.O. Box 10 05 60 · D-72426 Albstadt
Tel.: +49 - 74 31 - 12 95 0 · Fax.: 12 95 35
info@aat-online.de · www.aat-online.de
c-max_gb_11/08

Table of contents
CE Declaration of conformity ............ 2
Table of contents ................. 3
1 General information..................... 5
1.1 Instruction .................... 5
1.2 Care and maintenance ............... 5
1.3 Warranty and liability................ 5
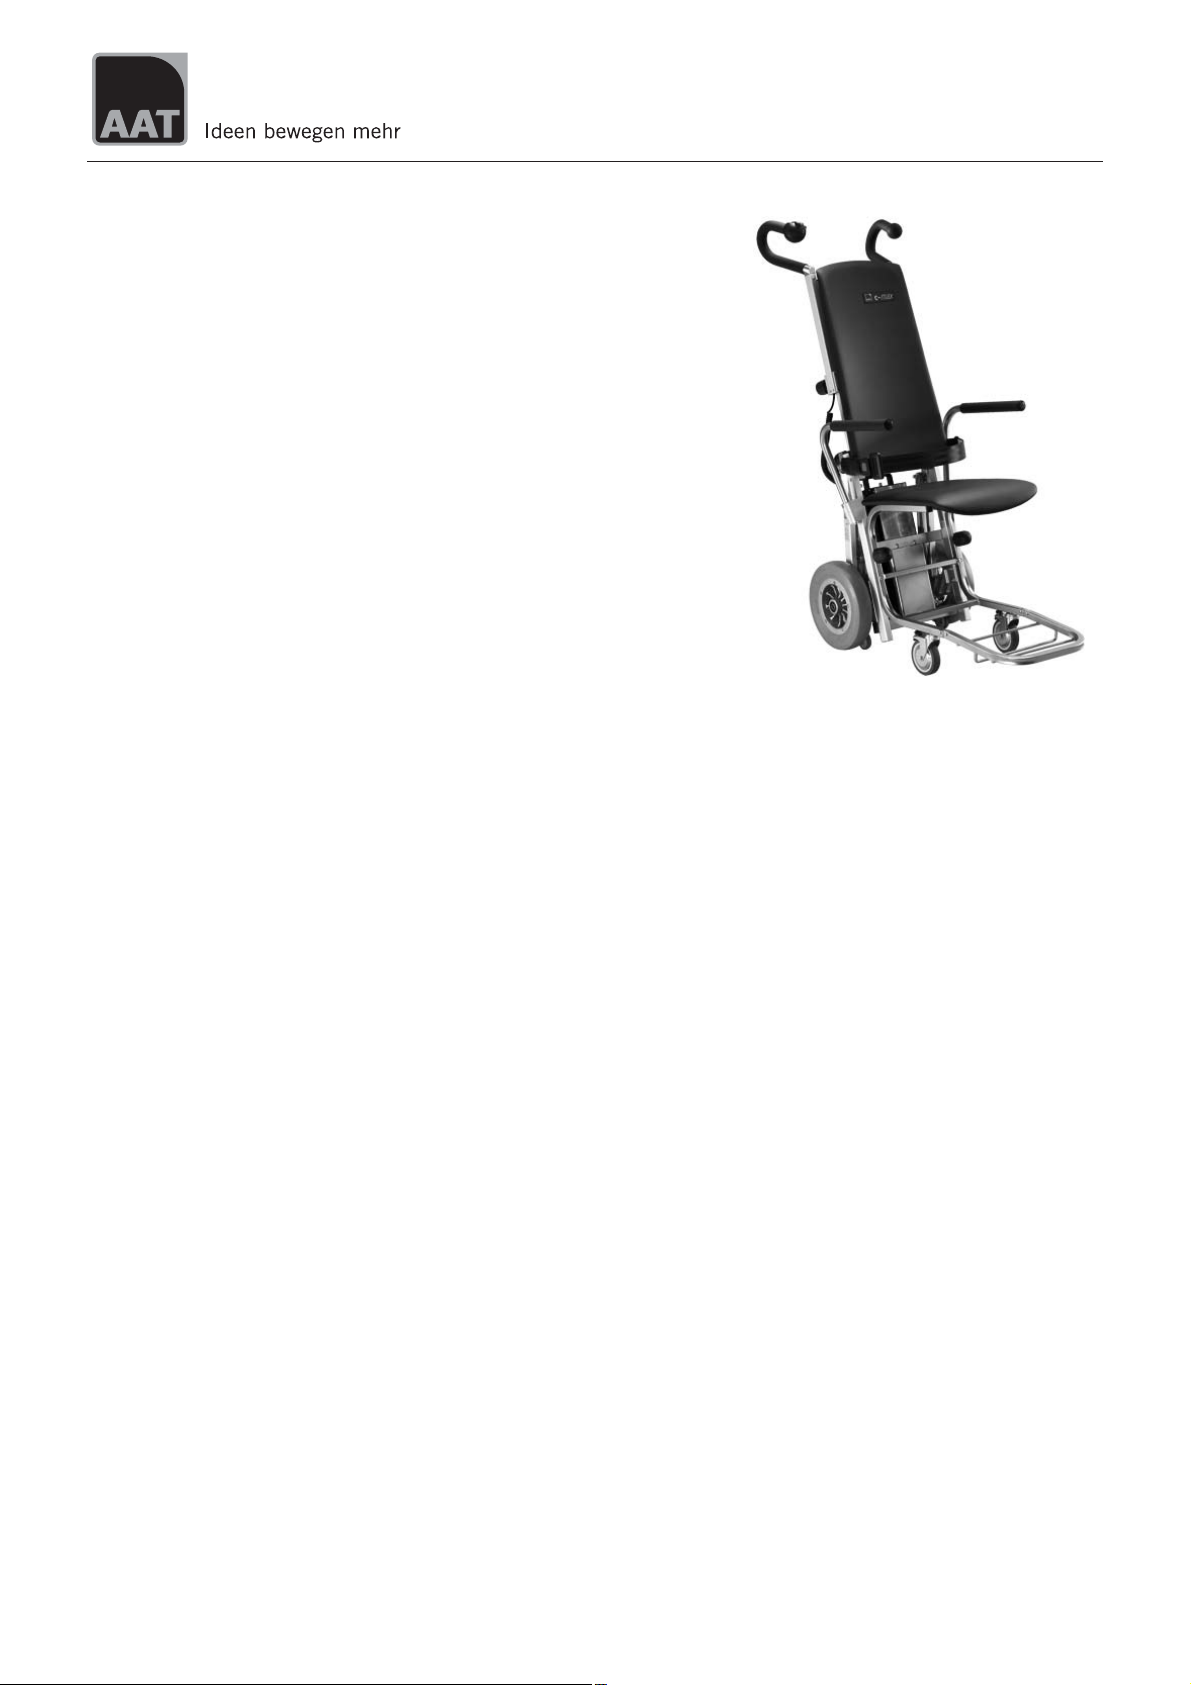
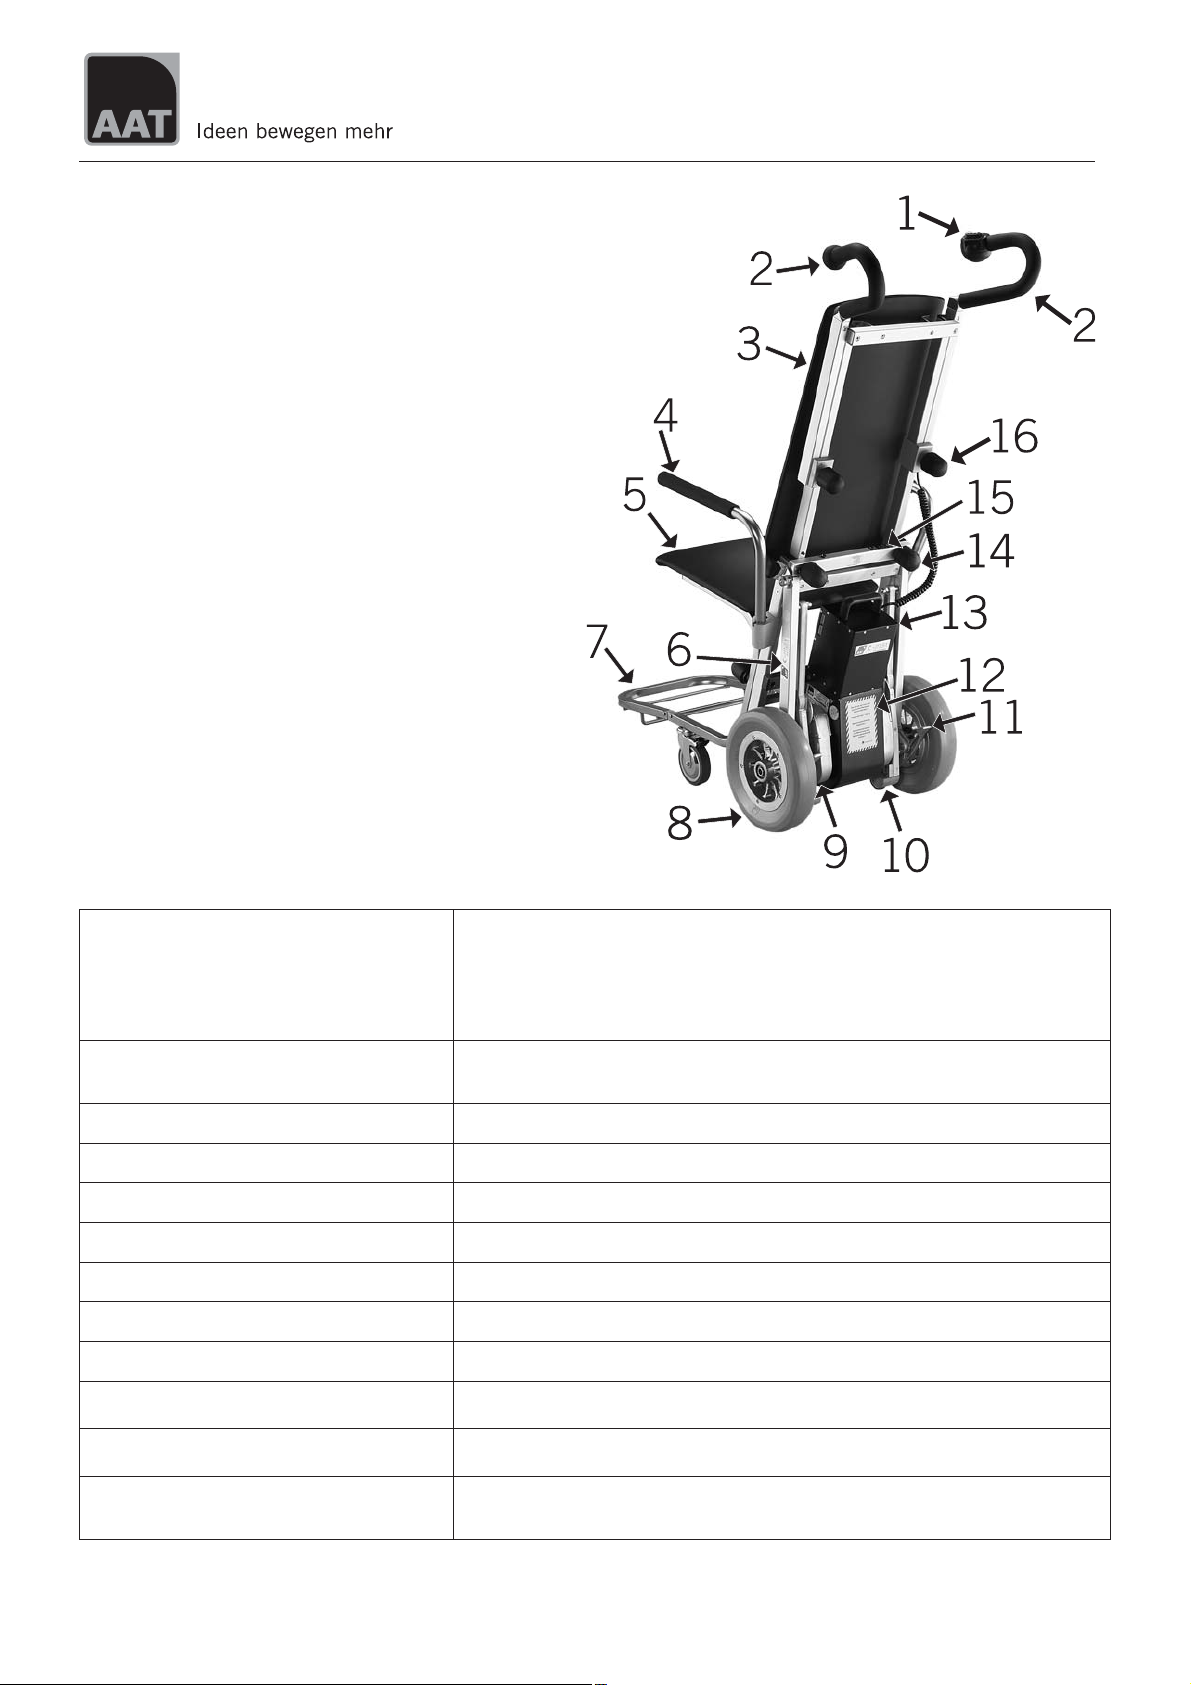
2 Description of the product.................. 6
2.1 Adequate use ................... 6
2.2 Features of the C-max ............... 7
2.3 Technical data................... 7
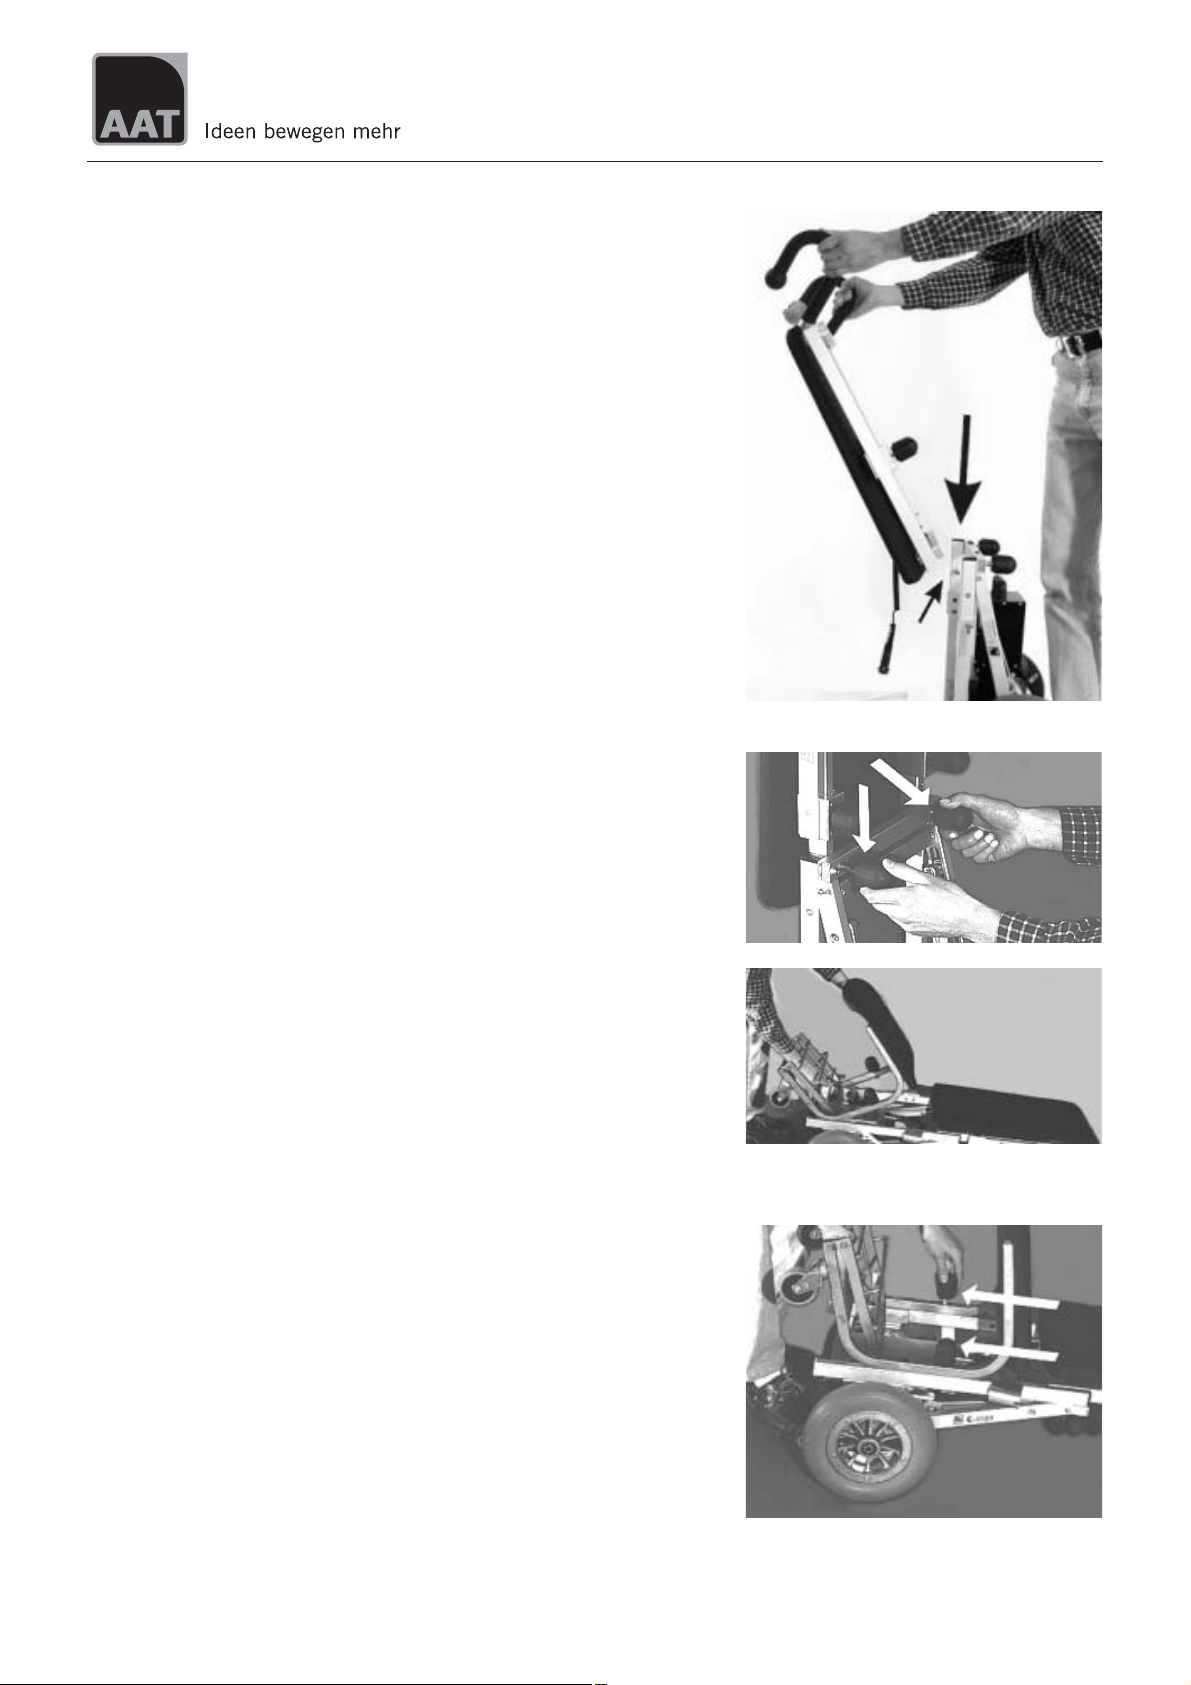
3 Assembly.......................... 8
3.1 Attach the back rest to the climbing frame ..... 8
3.2 Affix the back rest ................. 8
3.3 Attach the C-part plus seat to the climbing frame . . 8
3.4 Affix the C-part .................. 8
3.5 Helix cable .................... 9
3.6 Attach the battery pack............... 9
3.7 Detach the battery pack .............. 9
3.8 Arm rests ..................... 10
3.9 Handles ...................... 10
4 Safety instructions ..................... 11
4.1 Instruction .................... 11
4.2 Safety brakes ................... 11
4.3 Lining of the climbing foot ............. 11
4.4 Lifting capacity .................. 11
4.5 Care and maintenance ............... 11
4.6 Condition of paths, walkways etc. .......... 11
4.7 Charge of the batteries ............... 11
4.8 Transport ..................... 11
5 Operation ......................... 12
5.1 Maximum lifting capacity.............. 12
5.2 Control light .................... 12
5.3 Helix cable connector ............... 12
5.4 Battery pack .................... 12
5.5 Safety brakes ................... 12
5.6 Lining of the climbing foot ............. 12
6 Instructions for operation .................. 13
6.1 Operational components .............. 13
6.2 Single step control ................. 14
6.3 Climbers ..................... 15
6.4 Safety brakes ................... 15
6.5 Transportation of person with the C-max .... 16
6.6 Operation on level ground ............. 17
6.7 Adjust the handles ................. 17
6.8 Tilting the stair climbing system .......... 18
6.9 Operation on slopes ................ 18
6.10 Climbing upstairs ................. 19
6.11 Climbing downstairs ................ 22
6.12 Laying the C-max on the stairs ........... 24
6.13 Transport ..................... 24
3
C-max

7 Accessories ........................ 25
7.1 Battery pack .................... 25
7.2 Exchange the battery pack ............. 25
7.3 Charging cable for your vehicle ........... 25
8 Care and maintenance ................... 26
8.1 Charger ...................... 26
8.2 Battery pack .................... 27
8.3 Sealed lead acid batteries ............. 27
8.4 Charging the battery pack ............. 28
8.5 Fuses ....................... 28
8.6 Tighten driving chain................ 29
8.7 Check brake lining ................. 29
8.8 Check the climbing foot’s lining .......... 29
8.9 Cleaning ..................... 30
9 Warranty and liability .................... 31
9.1 Warranty ..................... 31
9.2 Liability ...................... 31
4
C-max

1 General information
Congratulations! With the acquisition of this stair climbing system you have
a device that will quickly become a reliable and indispensable partner in
transporting physically disabled people.
With the C-max you are able to transport persons safely and effortlessly up-
and downstairs; even winding stairs are no problem for the C-max.
Driving on slopes is also possible. The safety brakes on both sides of the
C-max ensure your safety.
Naturally the C-max is also suitable to drive on level ground. The device is
lightweight, flexible and does not take up much space.
The c-max is capable of climbing stairs up to a step heigth of 21 cm. The mi-
nimum depth of the step’s surface must be 14 cm, regardless of the type of
stairs (regular straight stairs or winding stairs).
The necessary step width concerning straight stairs is the width of the c-max
plus an extra 10 cm for manoeuvring.
1.1 Instruction
This user’s manual will instruct you step by step about the safe and adequa-
te use of the C-max.
Operating the C-max takes a certain skill. In the interest of your safety only
trained personnel may use the C-max.
FPlease read this user’s manual carefully and particularly take note of
the safety instructions before you use the C-max for the first time.
1.2 Care and maintenance
One of the most important aspects concerning the maintenance of the C-max
is charging the sealed lead acid batteries. They are part of the battery pack
and must be charged every time after using the device.
Other than that your C-max does not need much care or maintenance. More
extensive instructions you find in chapter 8.
1.3 Warranty and liability
For damage that was caused by inadequate use disregarding this manual we
assume no liability whatsoever. (Please read chapter 9 for more detailed in-
formation concerning warranty and liability).
5
C-max

2 Description of the product
2.1 Adequate use
Please use the C-max exclusively for the transportation of physically disab-
led persons.
Said persons should be able to sit properly without help, otherwise you
should secure them with a safety belt. The latter is an accessory available at
AAT Alber Antriebstechnik GmbH.
In addition, the arms of the person to be transported should not protrude
over the arm rests during the transportation process.
FIn the interest of your safety you may not use the stair climbing devi-
ce C-max on escalators or moving belts!
FTransporting other kinds of loads is explicitly prohibited!
FOnly authorized operators may use the s-max. Therefore never leave
the s-max unattended.
FPlease do not use the c-max in the rain or generally in wet conditions
due to the following potential safety hazards, e.g. danger of slipping,
restricted braking effect etc.
6
C-max
Mastering stairs
Driving on level ground
Driving on slopes

2.2 Features of the C-max
1 = control unit
2 = handles, adjustable
3 = back rest
4 = arm rest, swivels out
5 = C-part plus seat
6 = climbing frame
7 = foot rest, folds in
8 = main wheel
9 = lever with chain drive
10 = climber and climbing foot
11 = safety brake
12 = power unit
13 = battery pack
14 = tightening knobs for the back rest
15 = single step switch
16 = tightening knob for the handle
2.3 Technical data
7
C-max
measurements
height = 1090 mm
width without arm rests = 440 mm
width with arm rests attached = 485 mm
depth with the foot rest folded in = 730 mm
depth with the foot rest folded out = 915 mm
weight climbing frame = 17,2 kg, C part plus seat = 4,6 kg, back rest = 4,3 kg,
both arm rests = 1,2 kg, battery pack = 4,4 kg, total weight = 31,7 kg
maximum lifting capacity 120 kg
batteries 2 x 12V/5Ah sealed lead acid
direct current motor 24 V
climbing speed 8 - 23 steps / minute, continually adjustable
capacity with one battery pack 15 - 30 floors, depending on the load
maximum height of step 21 cm
noise level the device’s A weighted noise level lies typically below 70 dB (A)
Storing/operating temperature,device 0°Cupto+60°C/-30°Cupto+50°C
Storing/operating temperature,batteries 0°Cupto+60°C/-30°Cupto+50°C
vibrations the weighted RMS value of acceleration the upper body is exposed to lies
typically below 2.5 m/s²

3 Assembly
With a few movements you can assemble the C-max by means of several fix-
tures and tightening knobs. Disassembly is just as easy.
3.1 Attach the back rest to the climbing frame
Put the back rest onto the guide pins on top of the climbing frame.
3.2 Affix the back rest
Fix the back rest tightly to the climbing frame with the two tightening knobs.
FAlways make sure that the back rest is securely fastened to the clim-
bing frame.
3.3 Attach the C-part plus seat to the climbing frame
Put the C-part plus seat onto the climbing frame; the locating bolts of the
C-part fit into the corresponding holes in the frame.
3.4 Affix the C-part
Fix the C-part tightly to the climbing frame with the two tightening knobs.
FAlways make sure that the C-part plus seat is securely fastened to
the climbing frame.
8
C-max

3.5 Helix cable
Put the connector of the helix cable into its socket located on the power
unit's housing. Lock the connector by pushing up the latching.
FBe catious that neither connector nor socket become wet by e.g. wa-
ter or snow - this may cause a short circuit between pins and result in
severe malfunction of the system
3.6 Attach the battery pack
Push the battery pack into its fixture by means of the guiding pins on top of
the power unit's housing. This establishes the power connection and locks
the battery pack.
3.7 Detach the battery pack
Unlock the battery pack by pressing the release button on top of the battery
pack until it engages.Then lift out the battery pack.
9
C-max

3.8 Arm rests
Insert arm rests on both sides.
FPlease always make sure that the stop bolts snap in their appropriate
notches.
3.9 Handles
Adjust handles to the appropriate height on both sides (see chapter 6.7)
then fasten them with the tightening knobs .
FAfter adjusting the handles, always make sure that they are securely
fastened.
10
C-max

4 Safety instructions
FFor the safe operation of the C-max it is highly important that you pay
close attention to all instructions regarding operation and safety stres-
sed in this user’s manual.
4.1 Instruction: The C-max may only be operated by trained personnel. In
addition, the operator should be capable of lifting 1/3 of his or her own weight.
Minors are not allowed to use the C-max; exempt from the above are adoles-
cents over 16 years of age who have been trained under supervision to operate
the C-max. While using the C-max you should always wear good shoes that do
not slip.
4.2 Safety brakes: Please check the safety brakes each time before using
the C-max (see also chapter 6.4 and 8.9). The safety brakes, particularly the
knurled surface of the brake drums in the wheel rims, must be cleaned weekly
with alcohol to ensure the optimum braking effect.
FNever use suds or greasy cleaners.
After cleaning the safety brakes must be checked as described in chapter 6.4
4.3 Lining of the climbing foot: Please check regularly whether the lining
of each climbing foot is still sufficient (see chapter 8.10).
4.4 Lifting capacity: The stated maximum lifting capacity may not be ex-
ceeded. Please also read chapter 5.1.
You may under no circumstances use the C-max to transport goods.
4.5 Care and maintenance: Please make sure that you charge the battery
pack after each use of the C-max.
When the C-max is at a standstill for a while, please turn the device off, i.e. the
ON/Off switch needs to be on 0.
If the working elements of the device block, turn the C-max off immediately.
FRepairs may be done by authorized dealers or the manufacturer only.
Please exclusively use AAT Alber parts and accessories.
Please note the extensive care and maintenance instructions in chapter 8.
4.6 Condition of paths, walkways etc.: Please make sure that the paths
and walkways you use with the C-max are free of obstacles and not slippery.
Avoid operation on damaged stair linings, snow, ice, etc.
FThe C-max may not be used in wet and rainy conditions.
4.7 Charge of the batteries: You should only use the C-max with fully char-
ged batteries. In case the batteries run low on the stairs (a sequence of 3 flas-
hes repeated every 2.5 seconds) the available charge of the batteries is
sufficient to transport the person safely to the bottom of the stairs. Driving
downstairs the motor works as a generator, thus recharging the batteries. The
potential steps downward, therfore, are not limited.
4.8 Transport:
FMake sure you never lift the device at the frame (see chapter 6.13).
FAlso please always turn off the c-max for transportation!
11
C-max

5 Operation
5.1 Maximum lifting capacity
Please make sure that the maximum lifting capacity is not exceeded.
5.2 Control light
After turning on the device, the control light should light up and stay on.
Flashing of the control light indicates malfunction.
Further information on malfunction you find in chapter 6.1.4
5.3 Helix cable connector
Check whether the connector of the helix cable is plugged into the hou-
sing of the power unit and locked each time before you use the C-max.
5.4 Battery pack
Please make sure that the sealed lead acid batteries are fully charged be-
fore you use the C-max for the first time.
Extensive instructions you find in chapter 8.4.
5.5 Safety brakes
Before operating the C-max check the safety brakes every single time. Ex-
tensive instructions you find in chapter 6.4.
5.6 Lining of the climbing foot’s lining
Please check regularly whether the lining on each climbing foot is still
sufficient.
Further instructions you find in chapter 8.10.
12
C-max

6 Instructions for operation
Before we get to the actual instructions for operation, we would like to intro-
duce the C-max’s most important components to you:
6.1 Operational components
The control unit is situated on the right handle and consists of an UP/DOWN
switch , a speed control , a safety chip for the engine immobiliser and
an ON/OFF switch .
FIt is possible to supply you with a left-handed control for additional
charge.
6.1.1 ON/OFF switch
During a longer standstill, please turn the C-max off by pushing the rocker
switch on “O”.
The C-max is equipped with an electronic turn-off mechanism, i.e. if the de-
vice is on and not in use for about 5 minutes, it turns itself off automatically.
In such case you need to turn the device first OFF and then ON again.
6.1.2 UP/DOWN switch
With the UP/DOWN switch you activate the climbing mechanism up- or
downstairs.
6.1.3 Speed control
The speed control enables you to adjust the speed continuously.
When you use the C-max for the first time, please choose the lowest speed.
6.1.4 Safety Chip for the engine immobiliser
The Up/Down switch only works if you put the safety chip for the engine im-
mobiliser into its slot. Please make sure that the chip is properly set to ensu-
re safe and continuous operation.
If you do not put in the chip you can turn on the s-max, but you cannot drive
with it. This feature makes sure that no unauthorized person uses the devi-
ce.
13
C-max

6.1.5 Control light to indicate malfunction
After turning on the C-max the green control light (LED) lights up and re-
mains lit, which indicates that the stair climbing system is in order and rea-
dy to use.
Potential malfunction is indicated by a light diode. After a period of 3 se-
conds each time a blinking signal is repeated.
In case of malfunction, turn the device first off and then on again. If there is
still an indication of malfunction, charge the batteries in case of low battery
charge. For all other cases of malfunction, please call your local dealer.
6.2 Single step control
The single step switch is located on the climbing frame (see pictures).
Please activate the single step mode to practise and in particular to climb
winding stairs.
If you activate the ON/OFF switch in that mode, the device will climb only
one step at a time. The climbing system stops in the correct position, even if
you press the ON/OFF switch continuously.
The climbing mechanism cannot unintentionally be activated. You can take
your time to move the main wheels to the next step’s edge.
FTo continue climbing you simply release the UP/DOWN switch and
then press it again.
The arrows with the dotted line symbolize the interruption of the climbing
process, i.e. the single step mode is activated. To do that you press the ro-
cker switch on I. By contrast, if you press the rocker switch on Oit signifies
the uninterrupted climbing process, i.e. the single step mode is OFF.
14
C-max
Number of flashes Indicated malfunction
1 overload of the device
2 battery pack, undervoltage
3 overvoltage
4 UP/DOWN switch or its supply line is damaged
5 defective electromagnetic brake
6 malfunction of electronics
I

6.3 Climbers
The climbers (see picture) must be pulled in to topmost position by means
of the UP/DOWN switch if you want to :
•drive on level ground and on slopes
•check the safety brakes
•begin climbing upstairs or downstairs
6.4 Check safety brakes
There are safety brakes located on the climbing frame on both sides.
FPlease check the safety brakes each time before you use the C-max.
You may check the brake effect either on top of the stairs or on level ground
as described in 6.4.1 and 6.4.2.
6.4.1 Test the required brake effect
Tilt the C-max backwards until the back rest is in an almost horizontal positi-
on (see picture).
If the C-max cannot be pushed forward by the handles in said position, but
merely rolls backwards, then the required brake effect for the safe operation
of the C-max is granted (see picture).
6.4.2 Test the required brake effect at the top edge of the stairs
FPlease make this test without a person sitting in the chair.
Tilt the device backwards to its regular climbing position (see chapter 6.8)
and drive forward to the first step’s edge. If you cannot push the device over
the edge of the step, the required braking effect for a safe operation of the
C-max is granted.
FImportant: If the required brake effect is not guaranteed, you may,
under no circumstances, use the C-max any more. Please contact
your local AAT Alber dealer or the manufacturer immediately.
15
C-max

6.5 Transportation of people with the C-max
Please note that the C-max was developed to be operated by one person. Al-
ways use both hands when using the device.
FPlease practice driving with the C-max on level ground, slopes and
climbing up- and downstairs at first without a person sitting in the
chair! Whenever you practice, please make sure that nobody is stan-
ding in the potentially dangerous spot directly below the C-max on a
slope or stairs.
We suggest that you practice climbing up- and downstairs with the single
step mode activated (see chapter 6.2). Also choose the lowest climbing
speed for practicing (see chapter 6.1.3)
FPlease do not exceed the maximum lifting capacity (see chapter 5.1)
FIn the interest of your safety please always operate the s-max from
behind, never sideways.
When seating a person on the C-max please be aware of:
6.5.1 Secure stand of the C-max
When a person is seated on the C-max, the device must stand securely on the
ground. Therefore the climbers must be extended in such a way that they
touch the ground and support the device (see picture).
Turn the C-max on by pressing the ON/OFF switch.
Now activate the UP/DOWN switch direction UP until the climbers touch the
ground.
6.5.2 Swivel out or remove the arm rests
When a person is seated, the arm rests can be swivelled out or, if necessary,
removed entirely. After the person is seated, please bring the arm rests into
their original position.
6.5.3 Fold out the foot rest
When a person is transported, please fold out the foot rest (see picture),
and, if necessary, help the person to place his/her feet on it.
16
C-max

6.6 Operation on level ground
After the person has been properly seated, you may transport him or her ef-
fortlessly on level ground (see picture)
FPassing over thresholds pulling the C-max backwards is much easier
than pushing it forwards over them.
6.7 Adjust the handles
For climbing stairs or driving on slopes, comfortably and safely, adjust the
height of the handles approximately to the level of the operator's shoulders.
FAfter adjusting the handles, always make sure that they are securely
fastened.
17
C-max

6.8 Tilting the stair climbing system
To drive on slopes or to climb stairs you must tilt the C-max, which can be
done easily by means of the climbers.
1. Turn on the C-max by pressing the ON/OFF switch.
2. Press the UP/DOWN switch direction DOWN until the climbers lift
the main wheels at least 1-2 cm off the floor (see picture).
3. Put your foot on the power unit’s housing and tilt the C-max slightly
toward you until you feel that the C-max is balanced.
4. The C-max is balanced if you feel neither pull nor push in the hand-
les.
5. In order to drive on level ground, the climbers must be pulled in enti-
rely
If you tilt the C-max further, or too much, the safety brakes engage and the
C-max can't be moved forward any more.
6.9 Operation on slopes
To drive on a slope, make sure the handles are adjusted appropriately (see
chapter 6.7), then tilt the C-max slightly backwards (see chapter 6.8).
FFor safety reasons we recommend you to ask another person to assist
when driving on a slope..
6.9.1 Downhill
Drive forward to the edge of the slope. In order to slow down you need to tilt
the C-max a bit more.
6.9.2 Uphill
Please drive backwards up a slope. In order to slow down you need to tilt the
C-max a bit more.
18
C-max

6.10 Climbing upstairs
FPlease always practice climbing stairs without a person and by acti-
vating the single step mode plus the lowest climbing speed.
The climbing process can be accomplished quickly and without problems if
you adhere closely to the following instructions.
A tip before you start:
FDuring the climbing process always pull the C-max slightly towards
you, so that the device automatically moves to the next higher step.
1. Adjust the handles to the appropriate height (see chapter 6.7)
2. Turn the C-max on by pressing the ON/OFF switch.
3. Activate the single step mode if necessary (see chapter 6.2)
4. Pull in the climbers to their topmost position by pressing the
UP/DOWN switch (see chapter 6.3).
5. Tilt the C-max slightly toward you (see chapter 6.8).
6. Drive backwards to the stairs and move up 2 to 3 steps
Now the C-max is in its initial position for climbing upstairs.
FMake sure that both main wheels touch the lowest step
19
C-max

7. The climbing process takes place in two intervals.
The first interval starts by pressing the UP/DOWN switch, direction
UP. The climbing process begins here with the power unit initiating
the movement of the climbers downward
8. After the climbers reach the floor, they assume the load of the
main wheels while the main wheels and the frame are lifted at the
same time.
20
C-max
Other manuals for C-max
2
Table of contents
Popular Stairlift manuals by other brands

Harmar Mobility
Harmar Mobility Pinnacle SL600CE owner's manual

MOBILE STAIRLIFT
MOBILE STAIRLIFT EVACUATION CHAIR instruction manual

AmeriGlide
AmeriGlide Rubex Stair Lift owner's manual

OTOLIFT
OTOLIFT Otolift Line user manual

Lippe Lift
Lippe Lift T80 Assembly manual

AmeriGlide
AmeriGlide Vesta owner's manual