INDUSTRIESTRASSE 2 +41´44´950´10´10 WWW. ELEKTROPLANET.CH
CH-8335 HITTNAU +41´44´950´10´44 INFO@ELEKTROPLANET.CH
Slave: 220-240V AC / 176-275V DC
Self Contained: +5°C ... +35°C Slave 0°C ... +35°C
EN 60598-1, EN 60598-2.22, VDE 0711, IEC 62034
NiCd 7.2V – 4Ah (Self Contained)
7LED’S (11 .0 W)
Technical Specifications
Self Contained: 230-240V 50Hz
Carefully read this instruction leaflet before installing or using the luminaire. This leaflet
provides important information about the correct installation, use, maintenance and disposal of
this product.
Please observe the following guidelines:
1. The luminaire should only be installed by qualified personnel and the installation must be
in accordance with European installation requirements HD 60364 and additional local
regulations.
2. This product may not be modified in any way what so ever or used for a purpose or in an
environment other than for which it is designed. Failing to observe these guidelines will
invalidate the warranty and the CE-compliance of this product.
3. Before installing the luminaire, the supply must be isolated.
4. The light source in this luminare is non-replaceable.
INSTALLING AND CONNECTING
The luminaire should be connected to the voltage equivalent to that indicated on the type label.
This luminaire is fitted with a terminal block suitable for loop-in-loop-out connection. The earth
terminal is provided for convenience of wiring through only and should not form part of any
protective shield. For further information on the different connection possibilities, see the
instructions in this instruction leaflet.
SELF-TESTING
All self contained versions of this luminaire are equipped with an automatic self-testing system
that continuously monitors battery operation, the light source(s) and the electronics. The
amber LED’s will indicate when one of these component is not working properly. To prevent all
luminares starting the test sequence at the same time, an odd and even function is available.
All even luminares start the test sequence as normal; all odd luminares start the test sequence
24 hours later. The luminaire can also be tested manually with the test button. When pushing
the button previous errors will be "reset" and the battery will supply the LED's. After 5 seconds
an eventual error will be displayed. The test schedule can be reset by pushing the test button
for 10 seconds.
For more detailed information on the different testing schedule and meaning of the indications,
see further in this instruction leaflet.
FLX / CIS - NAVEO
Self Contained luminares can be equipped with a CIS communication module (COM-Box: FLX /CIS).
See the COM-box instruction leaflet for further details.
FLX
Slave luminares can be equipped with a FLX communication module (COM-Box: FLX).
See the COM-box instruction leaflet for further details.
BATTERY
A fault will occur when test results for duration no longer meets the requirements
indicated for the luminaire. The batteries must then be replaced. Please see the
label on the batteries for the type required. Given the technical life of the battery,
it is recommended to replace them after 4 years. When the battery is replaced
and the mains supply restored, the amber LED indicating a battery failure will
disappear after a successful duration test.
Used batteries must be replaced or disposed of as household chemical waste.
PLEASE NOTE!
Constant voltage is required and the batteries must be sufficiently charged for emergency
lighting to function properly. Failure to observe this requirement can damage the batteries, the
lightsource or in worst-case scenario, the luminaires electronics.
INSPECTION AND MAINTENANCE
VanLien strongly advises annual inspection of your emergency lighting installation.
EN
ALTOLUX
Zentralbatterie: 220-240V AC / 176-275V DC
Einzelbatterie: 230-240V 50Hz
Einzelbatterie: +5°C ... +35°C Zentralbatterie: 0°C ... +35°C
EN 60598-1, EN 60598-2.22, VDE 0711, IEC 62034
Technische Daten
Vor der Installation bzw. Inbetriebnahme ist diese Verpackungsbeilage gründlich durchzulesen.
Hier finden Sie wichtige Informationen zur richtigen Installation, Nutzung, Wartung sowie
Entsorgung des Produkts.
Folgende Vorschriften sind zu beachten:
1. Die Installation, Wartung und / oder der Austausch von Teilen der Leuchte dürfen nur von
qualifiziertem Personal durchgeführt werden. Die Installation muss gemäß DIN VDE 0100
(EN 60364) und zusätzliche lokale Regelungen vorgenommen werden.
2. Dieses Produkt darf in keiner Weise verändert bzw. zu einem Verwendungszweck oder in
einer Umgebung eingesetzt werden, für die es nicht konstruiert wurde. Sollte dies
dennoch geschehen, erlöschen Gewährleistung und CE-Kennzeichnung.
3. Vor Installation und Montage ist in jedem Fall die Netzspannung abzuschalten.
4. Das Leuchtmittel in dieser Leuchte kann nicht ersetzt werden.
INSTALLATION UND ANSCHLUSS
Die Leuchte ist entsprechend den Angaben auf dem Typenschild an die Netzspannung
anzuschließen. Diese Leuchte ist mit Klemmen für Durchgangsverdrahtung ausgestattet. Der
Anschluss des Erdungsleiters ist daher nicht erforderlich, es sei denn, er wird für die
Weiterleitung benötigt. Für weitere Informationen über die verschiedenen Anschlussmögli-
chkeiten, siehe die Hinweise in dieser Gebrauchsanweisung.
SELBSTÜBERWACHUNG
Alle Einzelbatterie-Versionen dieser Leuchte verfügen über einen automatischen Funktions-
test. Damit wird die einwandfreie Funktion der Batterie, des Leuchtmittels und der Elektronik
automatisch überwacht. Sobald eine der Komponenten nicht fehlerfrei funktioniert, leuchtet
eine gelbe (amber) LED auf. Um zu verhindern, dass alle Leuchten zur gleichen Zeit getestet
werden, stehen Testpläne "gerade und ungerade" zur Verfügung. Alle Leuchten mit gerader
Adresse starten den Test normal und alle ungeraden Leuchten starten 24 Stunden später. Die
Leuchte kann über die Test-Taste manuell getestet werden. Durch Drücken der Test-Taste
werden alte Fehlermeldungen zurückgesetzt und die Leuchte funktioniert im Batteriebetrieb,
solange die Test-Taste gedrückt wird. Sollte die Leuchte fehlerhaft sein, wird dies 5 Sekunden
nach dem Start der Betätigung der Test-Taste angezeigt. Durch das Betätigen der Test-Taste
für mindestens 10 Sekunden kann der Ablauf des automatischen Testzyklus zurückgesetzt
werden.
Für weitere detaillierte Informationen über die verschiedenen Testsysteme und die Bedeutung
der Anzeigen, siehe weiter unten in diesem Merkblatt.
BUS-LEUCHTEN (COM-BOX)
Einzelbatterieleuchten können für die Bus-Überwachung ausgestattet sein (COM-Box: BUS).
FLX-LEUCHTEN (COM-BOX)
Zentralbatterieleuchten können mit dem FLX-Baustein ausgestattet sein (COM-BOX FLX).
BATTERIEN
Wenn die geprüfte Überbrückungszeit der vorgegebenen Nennbetriebsdauer
nicht mehr entspricht, wird eine Fehlermeldung angezeigt. Die Batterien sind
dann auszutauschen. Angesichts der technischen Lebensdauer der Batterie,
wird empfohlen, sie nach 4 Jahren zu ersetzen. Wenn die Batterie ersetzt und die
Stromversorgung wieder hergestellt wurde, verlischt die gelbe (amber) LED nach
einem erfolgreichen Dauertest. Hinweise zur Batterie befinden sich auf dem
Aufkleber an den Batterien.
ACHTUNG!
Damit Notbeleuchtungsanlagen ordnungsgemäß funktionieren können, muss eine konstante
(Bau-) Spannung vorhanden sein. Darüber hinaus müssen die Batterien ausreichend geladen
sein. Ist dies nicht der Fall, können die Batterien, das Leuchtmittel oder schlimmstenfalls die
Elektronik in der Leuchte beschädigt werden.
WARTUNG UND INSPEKTION
Es wird dringend geraten, mindestens einmal pro Jahr eine Wartung und Inspektion Ihrer
Sicherheitsbeleuchtung durchzuführen.
NiCd 7.2V – 4Ah (Einzelbatterie)
7LED’S (11 .0 W)
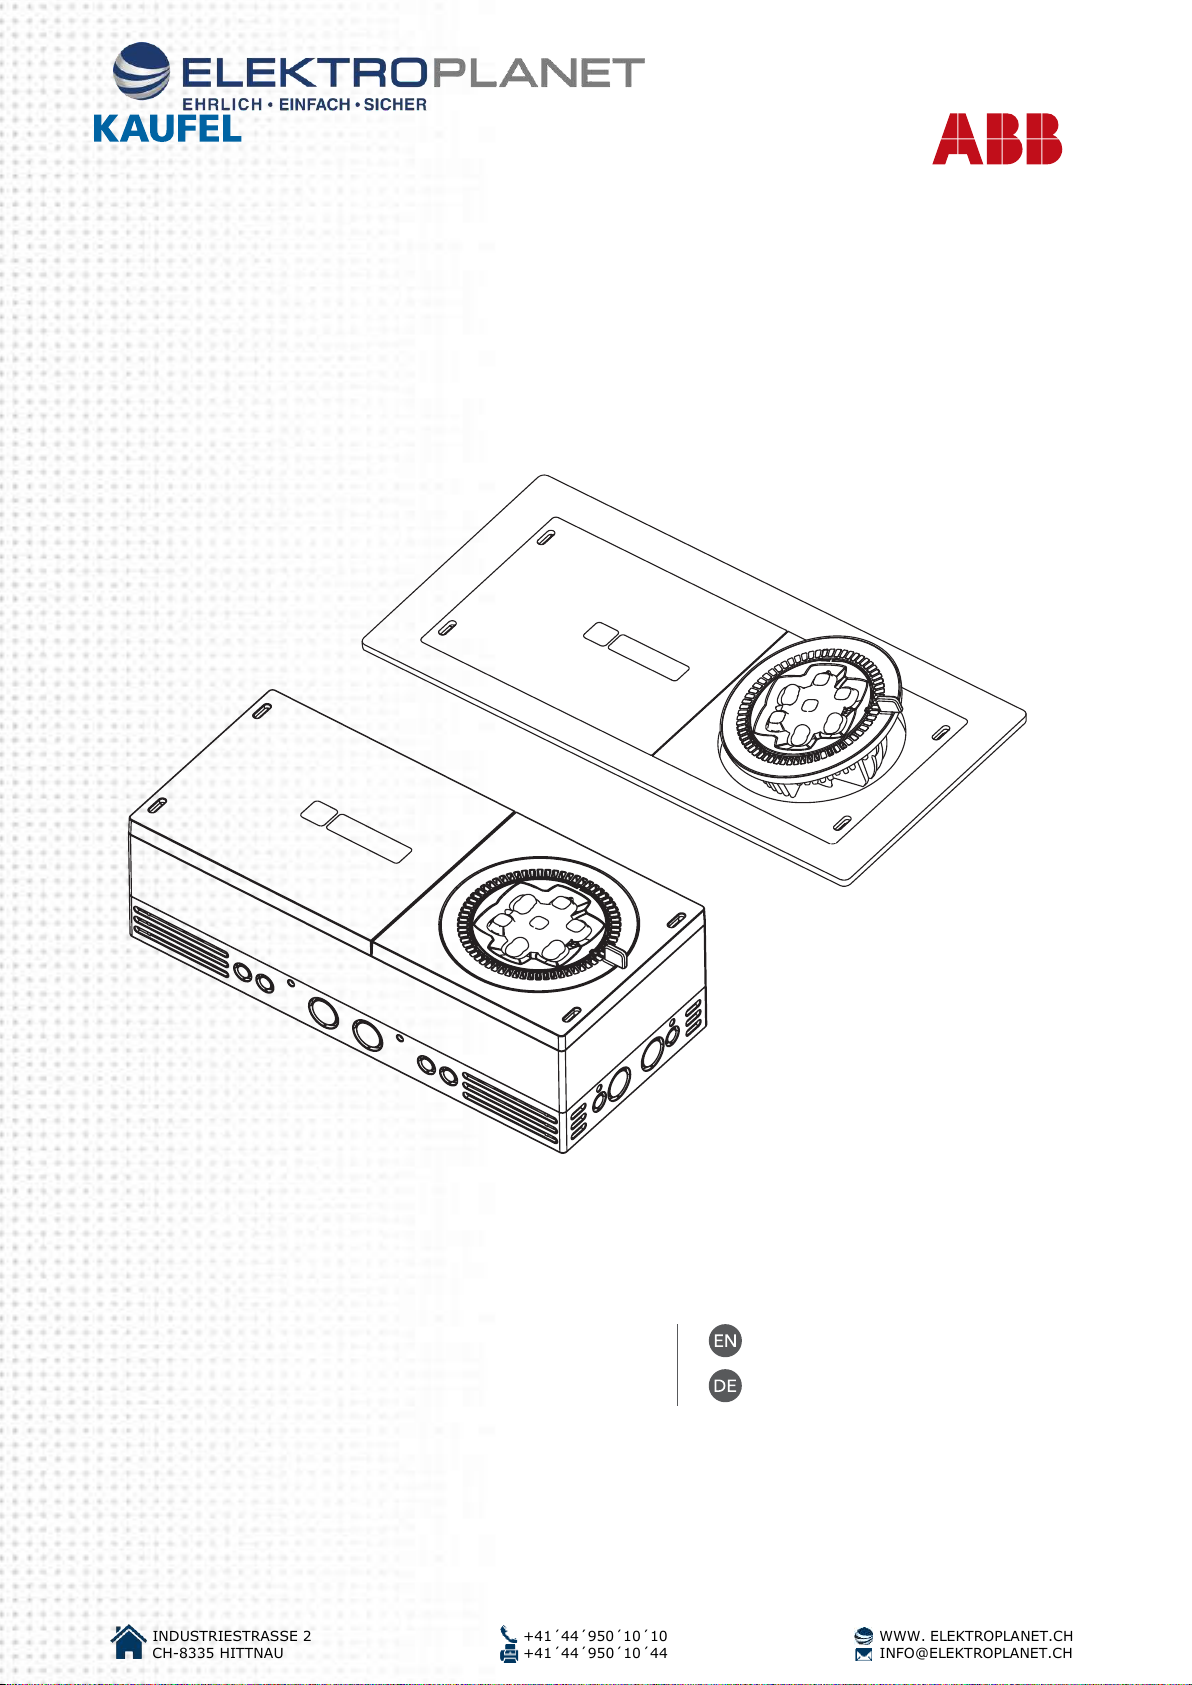
326 mm
143 mm
326 mm
79 mm
62 mm
143 mm
388 mm
204,8 mm
123,5 mm
TEST BUTTON
TEST-TASTE
326 mm
143 mm
108,8 mm