Abbott SoToxa TOX400P User manual

USER GUIDE
EN FOR FORENSIC USE ONLY
SoToxa™

SOTOXA™ MOBILE ANALYZER | USER GUIDE1 | EN
TABLE OF CONTENTS
Contents
1. Introduction 1.1 Intended use 3
1.2 Test principle 3
1.3 SoToxa™ Mobile Analyzer specifications 4
1.4 Transport and unpacking 4
1.5 Accessories 5
1.6 Special features 5
1.7 Data handling 5
1.8 Safety warnings and precautions 5
1.9 Analyzer calibration 6
1.10 Maintenance and cleaning 6
1.11 Servicing 6
1.12 Warranty 7
1.13 Drug abbreviations 7
2. Getting started 2.1 SoToxa™ Mobile Analyzer at a glance 8
2.2 User interface and symbols 9
2.3 Control keys 10
2.4 Setting up 10
2.5 Power connection 10
2.6 Battery power 10
2.7 Charging the analyzer 11
2.8 Tilt sensor 11
2.10 SD card slot 12
2.11 Silica gel packs 12
3. Printer 3.1 Connecting the printer 12
3.2 Loading paper 12
3.3 Charging the printer 12
4. Start-up 13
5. Using the Help Function 13
6. Running a Drug Test 6.1 Initiating a drug test 14
6.2 Inserting the test cartridge 14
6.3 Test cartridge identification and verification of the expiry date 14
6.4 Sample collection 15
6.5 Test in progress and interpretation of results 15
6.6 Completing the questionnaire 16
6.7 Printing results 17
6.8 Data export 17
6.9 Completing the test 17
7. QC Tests 7.1 What are the QC tests? 18
7.2 How often should the QC tests be carried out? 18
7.3 Running the QC tests 18
7.4 QC lockout 19
8. Main Menu 8.1 Accessing stored results 19
8.2 Analyzer summary 21
8.3 SoToxa™ Mobile Analyzer settings 23
8.4 Installed cartridges and updating cartidge types 26
8.5 Installed questions 27
8.6 Exporting diagnostic data 27

SOTOXA™ MOBILE ANALYZER | USER GUIDE2 | EN
TABLE OF CONTENTS
9. Downloading results to the Software 28
Application Suite
10. Shutdown Procedure 10.1 Turning the analyzer o 28
10.2 Automatic shutdown 28
11. Technical Support, Codes and Troubleshooting 11.1 Technical support 29
11.2 Codes and troubleshooting 29
12. End of Operational Life 12.1 Return of components 31
13. Customer Service 31

SOTOXA™ MOBILE ANALYZER | USER GUIDE3 | EN
1. INTRODUCTION
For forensic use only.
The SoToxa™ Mobile Analyzer is intended to be used in conjunction with the SoToxa™ Test Kit for screening for the presence of drugs of abuse and/or their
metabolites in oral fluid. For forensic use only.
This assay is for the analysis of oral fluid samples only. Testing of inappropriate samples will not give valid results. A positive result indicates presence of the
drug or its metabolites but does not indicate level of intoxication, administration route or concentration in the oral fluid. A negative result may not necessarily
indicate drug-free oral fluid. Negative results can be obtained when a drug is present but below the cuto level of the test.
A positive test result should be confirmed by a second test method such as GC-MS (Gas Chromatography-Mass Spectrometry) or LC-MS (Liquid
Chromatography-Mass Spectrometry).
Please read this user guide and the test kit instructions for use carefully, prior to using the analyzer.
TOX400P | TOX400PFUO | TOX400SFUO
1. Introduction
1.1 Intended use
The SoToxa™ Mobile Analyzer is intended to be used in conjunction with the SoToxa™ Test Kit for screening for the presence of drugs of
abuse and/or their metabolites in oral fluid. The product is for forensic use only. It is not for home use or for use within a therapeutic, clinical
or workplace setting.
A positive test result should be confirmed by a second test method such as GC-MS (Gas Chromatography-Mass Spectrometry) or LC-MS
(Liquid Chromatography-Mass Spectrometry).
1.2 Test principle
1.2.1 The SoToxa™ Mobile Test System consists of the SoToxa™ Mobile Analyzer, and the SoToxa™ Test Kits which contain the SoToxa™ Test
Cartridge and the SoToxa™ Oral Fluid Collection Device.
1.2.2 The analyzer is a digital imaging device which uses advanced image processing algorithms to accurately determine the line intensity on the test
cartridge.
1.2.3 The test cartridge is a chromatographic immunoassay. This is a single use, disposable cartridge that contains dried reagents and a liquid buer
solution.
1.2.4 The test cartridge is inserted into the analyzer and is warmed by the analyzer to optimum testing temperature.
1.2.5 Oral fluid is collected using the collection device supplied within the test kit. This is a single use, disposable collection device. The donor must
actively swab the collection device around the gums, tongue and inside the cheek, until the sample presence indicator starts to turn blue.
1.2.6 The collection device is then inserted into the test cartridge.
1.2.7 During the testing process, the oral fluid is combined with a buer solution, mixed and then incubated before being applied to the
immunoassay test strips housed within the cartridge.
1.2.8 The oral fluid flows by capillary action along the test strips, carrying with it labelled anti-drug antibodies which is released from pads on the
strips and in the sample reservoir.
1.2.9 At designated zones on the strips, drug protein conjugate has been applied in bands which are invisible to the human eye. In the absence of a
drug in the sample, the anti-drug antibodies will bind to the drug protein conjugate to form a line. In the presence of a drug the formation of
this complex will be diminished, forming a weaker line.
1.2.10 On receipt of the analyzer by the user, the analyzer is already configured by the manufacturer to read specific cartridge types. Additional
cartridge types can be added by the user by application of cartridge updates (see section 8.4 Installed cartridges and updating cartridge types).
1.2.11 The analyzer ‘reads’ the line intensity on the test strips. The detected line intensity is compared with a predetermined threshold derived from
equivalent concentration curves, to report qualitative results.
1.2.12 Test results are displayed on the analyzer screen and can be printed using the printer.
1.2.13 The test cartridge is then removed from the analyzer and disposed of in accordance with local and Federal regulations.

SOTOXA™ MOBILE ANALYZER | USER GUIDE4 | EN
1. INTRODUCTION
1.3 SoToxa™ Mobile Analyzer specifications
ANALYZER
Dimensions (inches) L 8.75 x W 3.5 x H 2.5
Weight Approximately 1.5 lbs.
Detection system Digital imaging device.
Controls Test cartridge and collection device sensors. Test cartridge recognition using 2D barcodes for identifying cartridge type, ID, batch
and expiry date. Sensor providing feedback on angle of inclination of analyzer. Test cartridge heating with temperature control.
Internal start-up checks and process controls during testing. Quality control test cartridges.
Display LCD color screen 3.2ʺ.
User interface Five way navigation key, left and right select keys, power button, reset button.
Electrical rating 15V 3A (via external PSU). The analyzer should only be charged/powered by the supplied PSU and cables.
Languages English (US), Spanish (US) and French (CAN).
Memory Data storage capacity of over 10,000 tests.
SD card SD card connectivity for firmware and test cartridge updates and export of analyzer diagnostic data.
USB Interface To communicate with the Software Application Suite if required.
Printer Connection to Martel MCP7810-323 printer for printing test reports.
OPERATING CONDITIONS
Temperature 41°F to 95°F* is the operational temperature for running a test.
Note: the rated safe electrical operating temperature of the analyzer is 32°F to 104°F, but tests must be run between 41°F to 95°F.
Test cartridges must not be at 23°F for more than 10 minutes.
Relative humidity 20 to 80% non-condensing.
Storage temperature -4°F to 113°F
Environment Protect the analyzer from direct sunlight, humidity and dust.
POWER SUPPLY
Mains power Input: 100-240V AC 50-60Hz 1.1A | Output: 15V DC 3A
Battery power 3.2Ah 11.1V lithium battery.
Car (optional) Input: 10 to 15V DC | Output: 15V DC 3A
PRINTER
Dimensions (inches) L 6 x W 3 x H 2
Weight 1 lb
Controls Power button
* Operation within the temperature range of 41°F to 95°F will be tested at 20 to 80% RH, however due to testing limitations it is not possible to accurately control humidity
below 50°F. The SoToxa™ Mobile Analyzer is operational down to 41°F at un-quantified relative humidity.
1.4 Transport and unpacking
The SoToxa™ Mobile Analyzer and its accessories are supplied in a convenient Carry Case, and all have been fully inspected and tested. Upon
receiving the SoToxa™ Mobile Test System, immediately inspect the contents of the case for any transportation damage or missing items (see
list of accessories). If any sign of damage is found, or if any items are missing, contact Customer Service.
The case is designed to allow the analyzer and accessories to be used from within the case, however the analyzer can be removed if required. It is
recommended that the analyzer is operated and transported in the case, and is secured by the velcro straps to prevent movement when in transit.

SOTOXA™ MOBILE ANALYZER | USER GUIDE5 | EN
1. INTRODUCTION
1.5 Accessories
The following items are supplied with the SoToxa™ Mobile Analyzer:
• SoToxa™ Mobile Analyzer User Guide CD-ROM.
• Carry Case.
• Power supply unit and power cable.
• Micro USB cable for connection to a PC if Software Application Suite is used.
• QC test cartridge set (PQC and NQC).
• Printer and RJ12 printer cable.
The following optional items may also be supplied with your analyzer:
• Software Application Suite CD-ROM.
• Car power supply.
The following item may be required, but is not supplied with the SoToxa™ Mobile Test System:
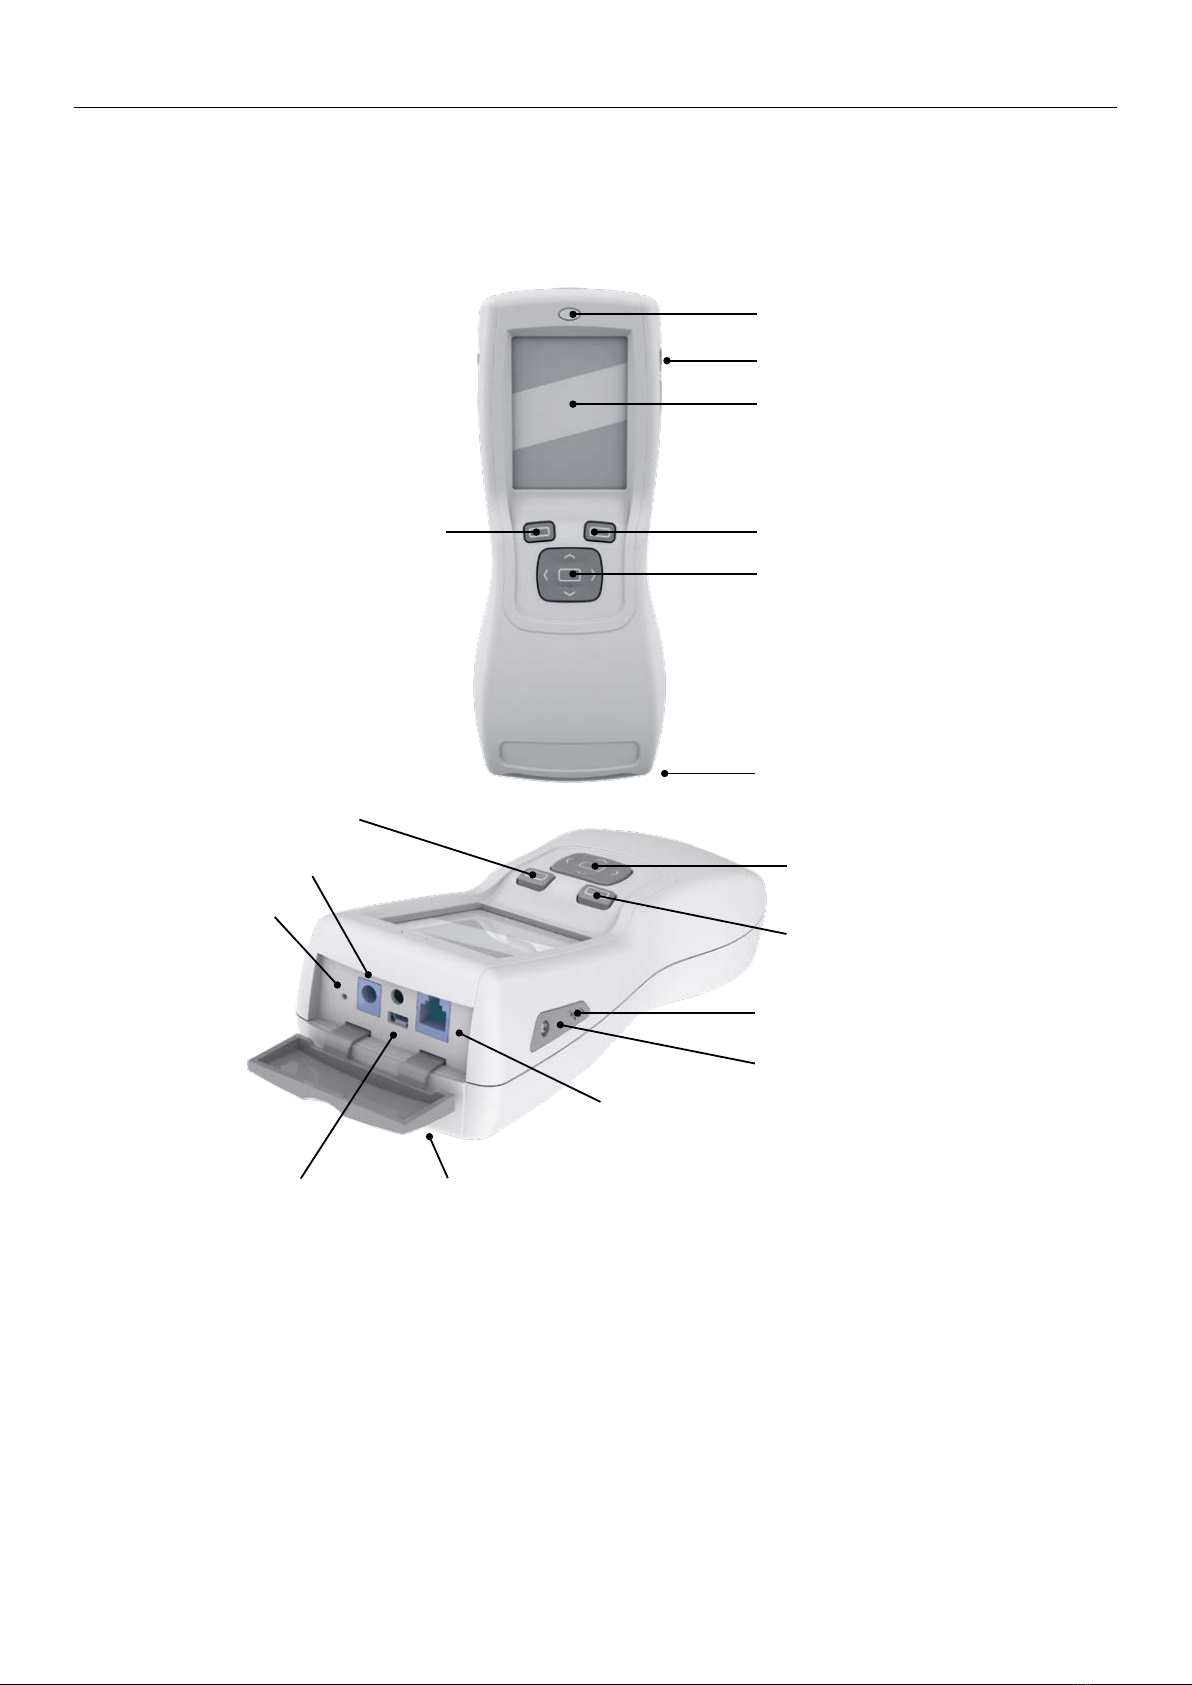
• Small Phillips head screwdriver. This tool is required to access the SD card. Refer to section 2.9 SD card slot.
1.6 Special features
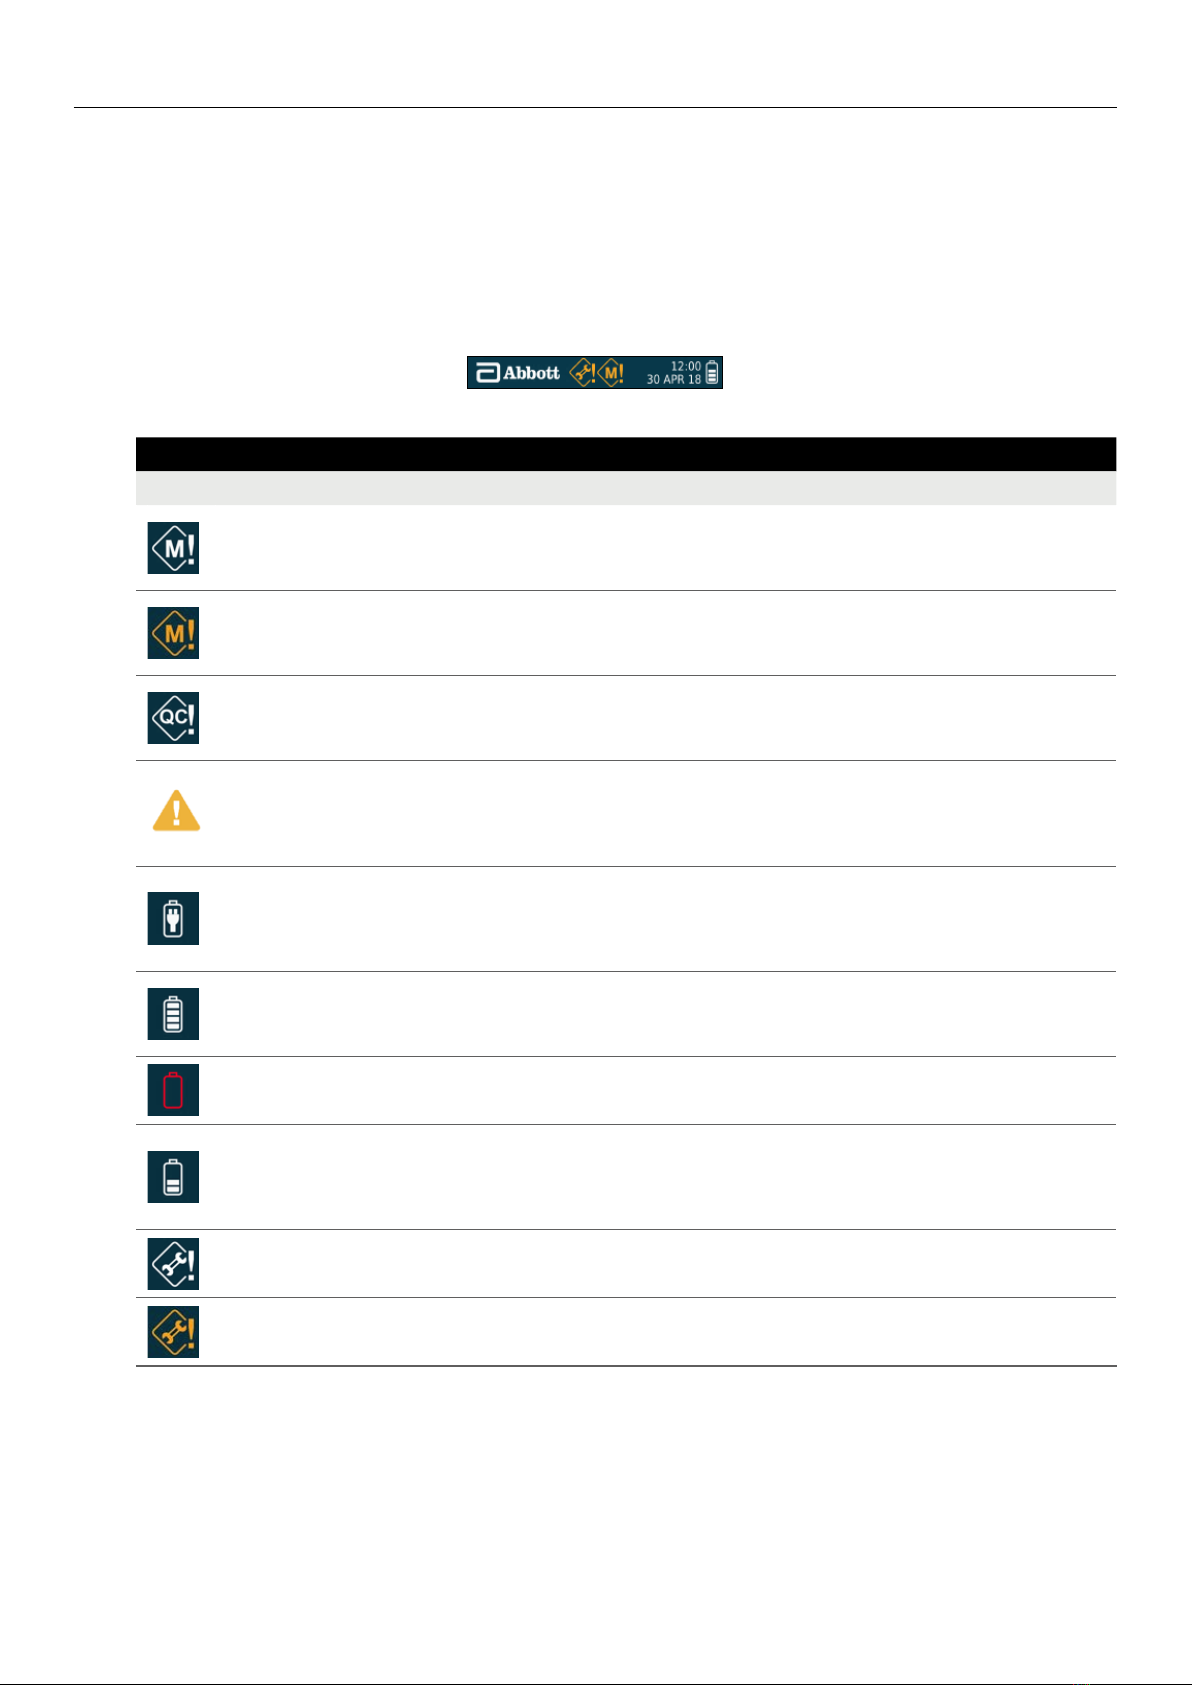
• The SoToxa™ Mobile Analyzer guides the user through the testing process with a series of on-screen messages and prompts and also has an
on-board ‘Help’ function providing on the spot support if required.
• The analyzer automatically performs a series of start-up checks along with process controls during testing to ensure correct operation.
The analyzer will not allow a test to be carried out or be continued if a malfunction is detected.
• The analyzer is provided with a positive and negative quality control test cartridges (PQC and NQC). It is recommended that these
performance checks are carried out at least once on each day of testing. The QC Tests can be enforced at defined time intervals.
Please refer to section 7 QC Tests, for further information.
• The analyzer has internal sensors to detect the presence and position of the SoToxa™ Test Cartridge and SoToxa™ Oral Fluid Collection
Device. If the test cartridge and collection device are not detected, are detected at the wrong time in the test protocol, or are removed
from the analyzer prematurely, the test may be abandoned.
• The analyzer reads and stores cartridge information from the test cartridge barcode. If the test cartridge has expired, the test will not
be continued.
• New test cartridge types must be installed on the analyzer via the SD card or the Software Application Suite before use. Updates will be
provided by the manufacturer.
• The analyzer should be positioned horizontally and kept flat when in use. User feedback on the tilt angle of the analyzer is provided on the
screen. If the analyzer is tilted out of the operational range, the test may be abandoned. Refer to section 2.8 Tilt sensor for more information.
• The analyzer detects and monitors test cartridge temperature and uses a heating element to warm the test cartridge to optimum temperature
for testing.
1.7 Data handling
• The SoToxa™ Mobile Analyzer is capable of data entry (donor questionnaire), SoToxa™ Test Cartridge identification via the test cartridge
barcode, storage of test data and connectivity to the printer, PC and SD card.
• All results are stored in an on-board archive and may be retrieved and viewed on the analyzer at any time after the test.
• Test results can be printed using the printer. Results can be printed immediately following the test and can be reprinted from the archive
at a later date.
• Test data can be exported from the analyzer to the Software Application Suite, when this has been installed on a PC. The Software
Application Suite enables additional data to be added to test results (donor ID, tester ID), stores and re-prints test data, and generates and
prints reports from test data.
• Firmware upgrades and new test cartridge configurations can be uploaded to the analyzer from an SD card, when these are released by
the manufacturer.
When test data is downloaded to the Software Application Suite it is automatically deleted from the analyzer.
1.8 Safety warnings and precautions
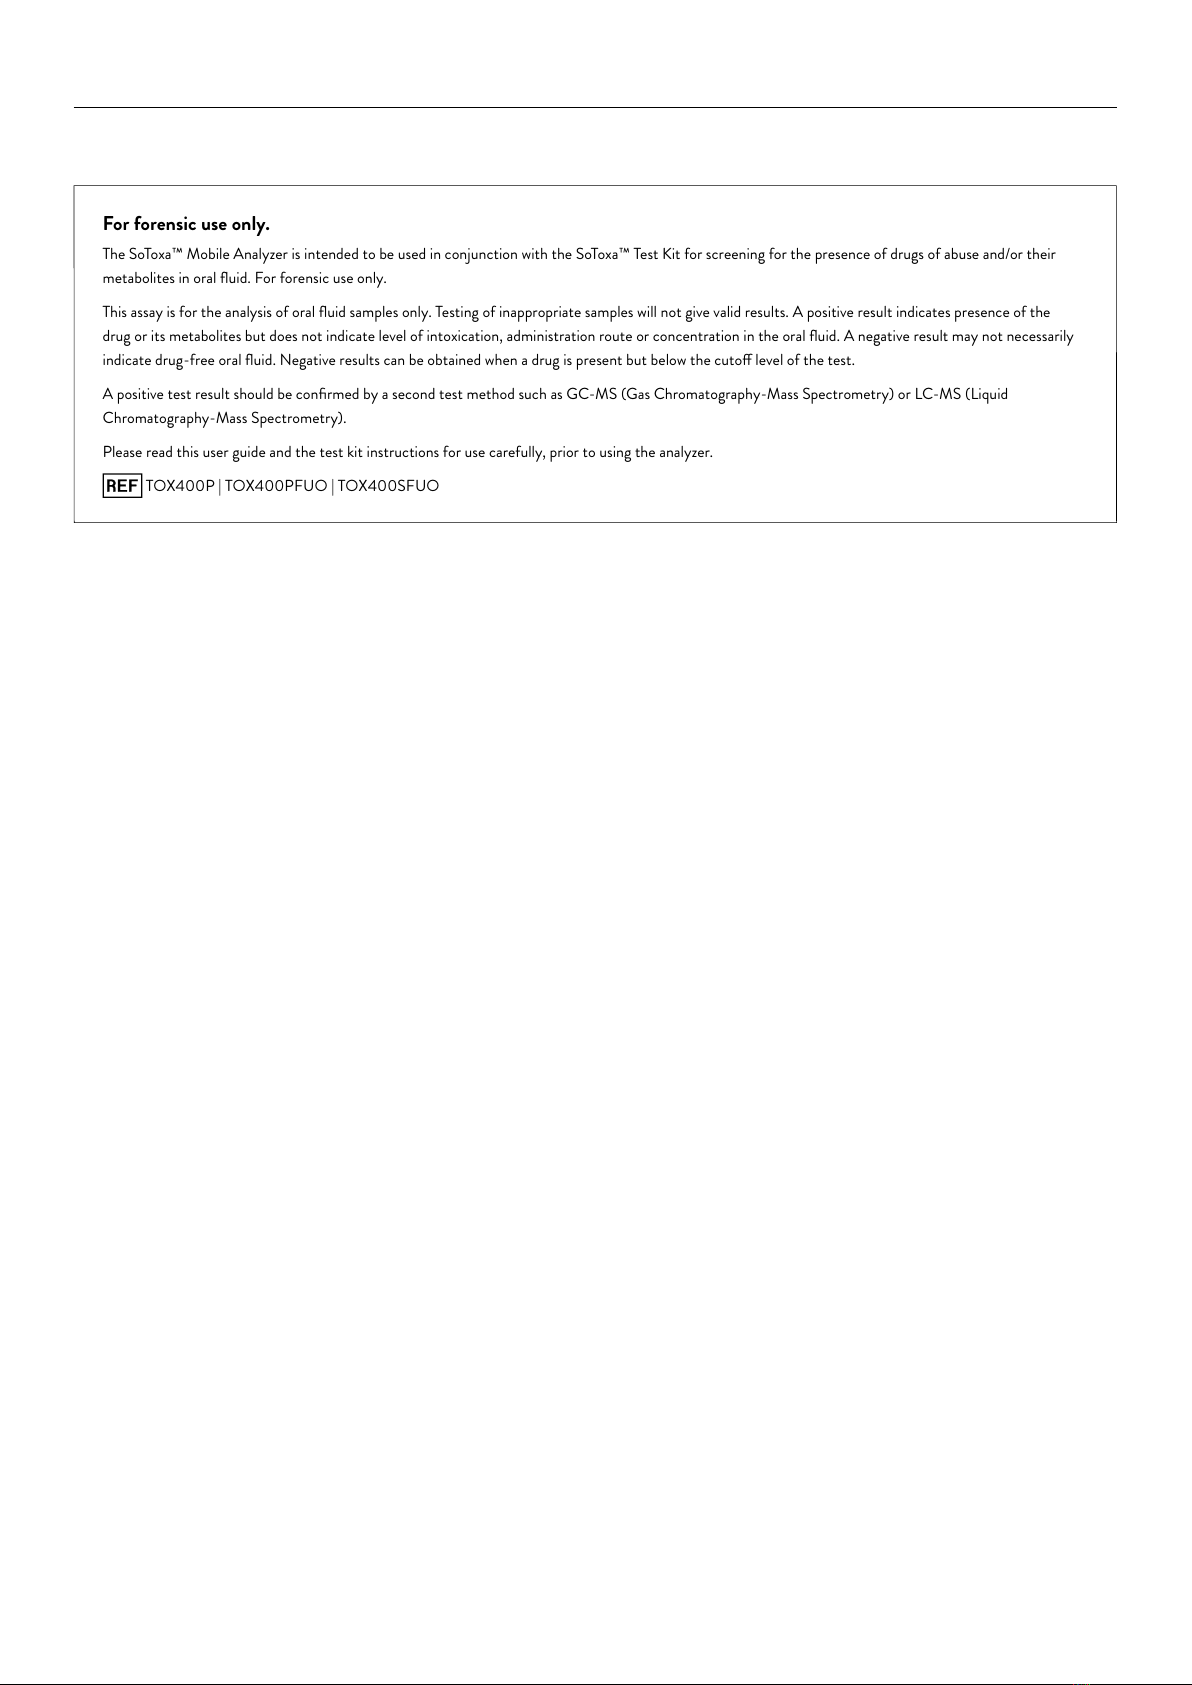
• The SoToxa™ Mobile Analyzer is for forensic use only. It is not for home use or for use within a therapeutic, clinical or workplace setting.
• WARNING: The analyzer and SoToxa™ Test Cartridges generate a weak magnetic field, which may interfere with the operation of cardiac
implant devices such as pacemakers. Always maintain a safe distance of separation between the SoToxa™ Mobile Test System and any
implanted device. If you feel unwell whilst using the analyzer, stop using the system and consult your physician.
• Only use the power supply unit (PSU), printer, USB and other associated cables supplied with the analyzer as described in this user guide. If
any part of the equipment is used in a manner not specified by the manufacturer, the protection provided by the equipment may be impaired.
Contact Customer Service if in any doubt regarding power supplies and cables for use with the system.

SOTOXA™ MOBILE ANALYZER | USER GUIDE6 | EN
1. INTRODUCTION
• Please ensure that the mains supply cable for the power supply unit is appropriately rated and approved as per the applicable
national requirements.
• As with any electrical instrument or equipment, care is required when handling the analyzer to ensure that it is not subjected to heavy shocks or
dropped from any height. Never exert undue force on the surface of the display, or expose any part of the analyzer to sharp or abrasive objects.
• Use the analyzer indoors when connected to A/C power.
• Do not open the analyzer. The analyzer contains no user serviceable parts. Any unauthorized opening of the analyzer can cause hazards and
will invalidate warranty claims.
• It is highly recommended that all PCs supporting the Software Application Suite (if used) carry up-to-date antivirus software.
• The test cartridges are designed for single use only – do not attempt to re-insert a used test cartridge into the analyzer.
• Do not insert fingers or objects other than the test cartridge into the test cartridge slot. This may result in harm to the user or damage to
the analyzer.
• Do not use dirty or damaged test/QC cartridges as this may damage the analyzer or cause an invalid test result.
• Do not use the analyzer or any of its electrical accessories if these appear to be damaged. Contact Customer Service to arrange for
replacement parts.
• Do not use the analyzer near a magnetic source.
• Do not ingest the silica gel packs.
• Do not open power supply casing or printer.
• Allow the analyzer to reach ambient temperature before use. If moving the analyzer between storage and operating environments of
dierent temperatures or humidities, this may take at least 30 minutes. If climatic dierences are significant, allow more than 30 minutes for
the analyzer to acclimatise. It is the responsibility of the user to ensure the date and time settings are correct.
1.9 Analyzer calibration
The SoToxa™ Mobile Analyzer is factory calibrated and does not require any further calibration by the user.
However, it is recommended to carry out a regular performance check using the quality control test cartridges provided with the SoToxa™
Mobile Test System (see section 7 QC Tests).
1.10 Maintenance and cleaning
If required, the exterior of the SoToxa™ Mobile Analyzer and its accessories can be wiped with a lint free cloth or a damp cloth with mild
detergent. Wipe away any spillages immediately. Do not use abrasive cloths or other material, and do not allow the unit to come into contact with
any potentially corrosive substances. If using a damp cloth, ensure the analyzer is turned o and disconnected from mains A/C power.
DO NOT try to clean inside the analyzer or open the analyzer for cleaning.
The analyzer does not contain any user serviceable components. If a fault is suspected or routine factory maintenance is required, then please
contact Customer Service.
1.11 Servicing
The SoToxa™ Mobile Analyzer requires an annual service which must be carried out by a qualified service engineer. It is important to
have your analyzer serviced annually to ensure it is performing correctly. This requires the analyzer and accessories to be returned to the
manufacturer or authorised servicing facility for a short period of time.
The date that the next service is next due can be viewed in the analyzer summary screen, and the analyzer will automatically display the
service symbol in the status line when service is due in less than one month. If the analyzer is not returned to the manufacturer for servicing
within this time, the symbol will turn from white to orange.
Service status (OK, due or overdue) will be displayed in the test details for each test and will also be printed on test printouts.
Accuracy of tests carried out on an analyzer which is overdue a service, may be reduced. Failure to return the analyzer for annual service will
invalidate warranty claims.

SOTOXA™ MOBILE ANALYZER | USER GUIDE7 | EN
1. INTRODUCTION
To view the date when the next service is due:
Step 1: From the main menu, select the Analyzer Summary option.
Step 2: The following screen will display the servicing status, scroll down to view the due date of the next service:
Please contact Customer Service to arrange servicing when required. The analyzer and accessories must be returned in the Carry Case for
protection in transit.
1.12 Warranty
The SoToxa™ Mobile Analyzer is covered by an initial 12 month manufacturer’s guarantee. The guarantee covers all mechanical or electrical
faults and firmware or hardware failures. The manufacturer’s guarantee does not cover the systems for loss, theft or damage caused by the user.
Following the expiration of this warranty, we recommend taking advantage of an extended warranty option for your analyzer. Please contact
Customer Service for details.
1.13 Drug abbreviations
DRUG ABBREVIATIONS
Abbreviation DRE Abbreviation Drug Name
AMP CNS STIM-AMP Amphetamine
BZO CNS DEPR-BZO Benzodiazepines
COC CNS STIM-COC Cocaine
MAMP STIM-MAMP/XTC Methamphetamine
OPI NARC-OPI Opiates
THC Cannabis Cannabis
Step 1 Step 2

SOTOXA™ MOBILE ANALYZER | USER GUIDE8 | EN
2. GETTING STARTED
FIVE WAY NAVIGATION KEY
LEFT SELECTION KEY
SPEAKER
SD CARD COVER PANEL
RJ12 PRINTER CONNECTOR
RUBBER FLAP
USB CONNECTOR
POWER SUPPLY CONNECTOR
RESET BUTTON
RIGHT SELECTION KEY
CHARGING STATUS LIGHT
LCD SCREEN
RIGHT SELECT KEY
FIVE WAY NAVIGATION KEY
LEFT SELECT KEY
TEST CARTRIDGE SLOT
POWER BUTTON
2. Getting started
2.1 SoToxa™ Mobile Analyzer at a glance

SOTOXA™ MOBILE ANALYZER | USER GUIDE9 | EN
2. GETTING STARTED
2.2 User interface and symbols
The SoToxa™ Mobile Analyzer has a color screen which will display graphics and text to guide the user through the test process, give feedback
on the status of the test and the analyzer and alert the user to any errors that may occur during use. The analyzer also has a speaker and
will produce various sounds as alerts or to tell the user when a test is complete. See section 8.3 SoToxa™ Mobile Analyzer Settings, for more
information on how to alter the screen backlight and volume settings of the analyzer.
The analyzer screen displays date and time at all times. You will also see symbols appearing on the screen from time to time giving more
information on the status of the analyzer. These symbols will be displayed in the status line at the top of the screen, alongside the date and time.
The symbols used by the analyzer and their meaning, are shown below:
SOTOXA™ MOBILE ANALYZER SYMBOLS
Symbol Meaning
Memory symbol (white): The appearance of this symbol indicates that the analyzer is close to reaching maximum storage capacity for stored test
results. Refer to section 9 Downloading results to the Software Application Suite for instructions on how to download test data to make more memory
space available. To view how much memory space is remaining, refer to section 8.2.1 Results storage capacity.
Memory symbol (orange): When memory storage capacity is reached, the white memory symbol will turn orange. The oldest tests stored on the
analyzer will be overwritten with new test results. To back up stored test data and make more space available, refer to section 9 Downloading results
to the Software Application Suite. If the Software Application Suite is not being used, please contact Customer Service for advice.
QC Lockout symbol: The appearance of this symbol indicates that the Quality Control (QC) checks with the PQC and NQC cartridges have
not been successfully completed in the defined time period. No further drug tests can be initiated until the quality control checks have been
completed. Refer to section 7 QC Tests for more information.
Tilt warning symbol: The appearance of this symbol means that the analyzer has been tilted beyond the acceptable range for testing. This symbol
is accompanied by a beeping sound (if the analyzer sound is switched on). The analyzer must be returned to horizontal immediately and kept flat
during testing. If the analyzer is tilted beyond the acceptable range for too long, this may result in a test error or damage to the analyzer. Refer to
section 2.8 Tilt sensor for more information.
Power connection symbol: This symbol is shown when the internal battery is fully charged and the analyzer is connected to an electrical outlet
via the power cable. If the internal battery is not fully charged, then the battery charging symbol will be shown. If this symbol, or the battery
charging symbol does not appear when connected to an electrical outlet, check that the power cable connections are secure and that the
electrical outlet is active. Refer to section 2.5 Power connection for more information.
Battery status symbol: This symbol is displayed to show that the analyzer is operating from battery, rather than the electrical outlet. If the
analyzer is not connected to an electrical outlet, the battery status symbol will be displayed. The level of battery power remaining is indicated by
the number of shaded blocks. When all the blocks are shaded, the battery is full.
Critical battery level: The battery status symbol will change to a red outline with the last block shaded red when the battery reaches a critical
level. The analyzer will need to be connected to an electrical outlet and charged.
Battery charging symbol: This is the same symbol as the battery status symbol but the number of shaded blocks will increase and decrease
to indicate charging. This symbol will be displayed when the analyzer is connected to an electrical outlet and is charging. The analyzer will
automatically begin to charge when connected to the electrical outlet, if the battery is not full. Once the battery is charged, this symbol will be
replaced by the power connection symbol. Refer to section 2.7 Charging the analyzer for more information.
Service symbol (white): This symbol will appear on the status line when the annual service date for the analyzer is due in less than one month.
To view the service due date, refer to section 1.11 Servicing. Contact Customer Service to arrange a service for the SoToxa™ Mobile Test System.
Service symbol (orange): When service is overdue, the service symbol will turn orange. Contact Customer Service to arrange a service for the
SoToxa™ Mobile Test System. Accuracy of test results may be reduced if a service is overdue.

SOTOXA™ MOBILE ANALYZER | USER GUIDE10 | EN
2. GETTING STARTED
2.3 Control keys
The SoToxa™ Mobile Analyzer has a five-way navigation button and the left and right soft keys. Please see section 2.1 SoToxa™ Mobile Analyzer
at a glance, which shows the location of these buttons.
The left and right selection keys can be used to select the corresponding on-screen buttons which will appear at the bottom left and right hand
corners of the screen when input is required from the user. For example, if the screen below appears, pressing the left selection key would take
the user to the menu while pressing the right selection key would take the user to the help function associated with this step.
The five way navigation key can be used to scroll up, down, left and right by pressing the top, bottom, left or right edge of the button
respectively. For example, if the screen below appears, the five way navigation key can be used to move the highlighter bar up and down
through the list of test results. Pressing the center of the five way navigation key selects the option that is highlighted on the screen and can be
used instead of the left and right selection keys for ‘OK’ and ‘Enter’.
2.4 Setting up
The SoToxa™ Mobile Analyzer does not require any installation steps. The analyzer can be connected to mains power, to the printer and to a
PC using the cables provided in the system Carry Case. Use only the connections and printer provided. Alternative connections and printers
should not be used as these may be unsafe or incompatible with the analyzer.
If using the Software Application Suite, this will need to be installed onto a PC. Please refer to the Software Application Suite User Guide
which can be found on the Software Application Suite CD-ROM.
2.5 Power connection
The SoToxa™ Mobile Analyzer can be powered from a power outlet or by its internal batteries. To connect the analyzer to the power outlet:
Step 1: Insert the AC power cable into the power supply unit.
Step 2: Connect the power supply unit to the power supply connector, located at the top of the analyzer.
Step 3: Connect to the corresponding AC power socket.
Step 4: Turn on the analyzer by pressing the power button.
Step 5: If a power outlet is connected when the analyzer is running from batteries, the analyzer will switch to the outlet as a power source. When the
analyzer is connected to a power outlet the power connected symbol will be displayed in the status line:
Do not use cables or power supply units that are damaged as there may be risk of electric shock.
If the analyzer battery requires charging, the battery charging symbol will be displayed when the analyzer is connected to the
power outlet.
2.6 Battery power
The SoToxa™ Mobile Analyzer will automatically operate from battery when turned on if not connected to a power outlet. If outlet power is
lost or interrupted, the analyzer will switch to battery power automatically. To switch to battery power when in use, simply disconnect the
analyzer from the power outlet.
When running the analyzer on battery power, the battery charge level is displayed by the battery status symbol within the status line as
shown below:

SOTOXA™ MOBILE ANALYZER | USER GUIDE11 | EN
2. GETTING STARTED
The number of tests that the analyzer can perform from one full battery charge will vary depending on the type of SoToxa™ Test Cartridge
that is being used, the environmental conditions, the age of the analyzer, whether results are printed and whether the questionnaire
function is being used.
If the battery level reaches critically low level the screen will display a nearly empty battery symbol with the final bar red. The battery symbol
in the status bar will have a red outline. The screen will appear for a few seconds before the analyzer turns o.
See the following section 2.7 Charging the analyzer, for how to charge the Analyzer when the batteries are low.
2.7 Charging the analyzer
The SoToxa™ Mobile Analyzer is supplied with a partially charged battery which is secured within the analyzer. To charge the battery, connect
the analyzer to an electrical outlet as follows:
Step 1: Insert the AC power cable into the power supply unit.
Step 2: Connect the power supply unit to the power supply connector port located at the top of the analyzer.
Step 3: Connect to the corresponding AC power socket.
Upon connecting the power outlet the charging status light above the display will illuminate. A red light means the battery is charging, a green
light indicates the battery is fully charged.
The charging status light will only be illuminated when connected to an electrical outlet.
In order to ensure maximum battery life, charge the analyzer battery for a minimum of 5 hours before running the analyzer on
battery power.
It is recommended to charge the printer every time the analyzer is charged; if the SoToxa™ Mobile Test System is in storage, the analyzer and
printer should be charged every 2-3 months to ensure the batteries remain in good condition.
2.8 Tilt sensor
The SoToxa™ Mobile Analyzer should be used in a horizontal plane, and once the SoToxa™ Oral Fluid Collection Device has been inserted it
must be kept as still and flat as possible throughout testing to prevent disruption to the test. The analyzer has a built-in tilt sensor which will
display a warning on the screen when the analyzer is tilted beyond the acceptable range. If tilting is not corrected immediately, this may
result in a test error.

SOTOXA™ MOBILE ANALYZER | USER GUIDE12 | EN
2. GETTING STARTED | 3. PRINTER
2.9 SD card slot
The analyzer has a microSD card slot. Refer to section 2.1 SoToxa™ Mobile Analyzer at a glance for the location of the SD card cover panel. The
SD card socket can only be accessed by unscrewing the SD card cover panel. For this, a small Phillips head screw driver is needed. This tool is not
supplied with the system. Please contact Customer Service if access to the SD card is required.
The SD card can also be used for applying firmware updates to the analyzer, adding new test cartridge types or versions to the analyzer and
exporting of diagnostic data from the analyzer to the card. Information on how to use the SD card for updating information on the analyzer is
covered in section 8.2.2 Updating firmware.
2.10 Silica gel packs
Each foil wrapped SoToxa™ Test Cartridge is packed with a silica gel packet. The silica beads are designed to change in color when moist and act
as an indication that the SoToxa™ Test Kits have been stored correctly and have not been exposed to water vapor in the air. The silica packs are
made from an environmentally friendly, synthetic silica indicating gel that is impregnated with a color changing agent.
The silica gel packs are yellow/orange when dry, indicating that the kit has been stored correctly and has not been exposed to the external
environment. When moisture has been absorbed, the silica packs will turn to light green, indicating that water vapour has entered the packaging.
The silica gel pack should be checked each time a test cartridge is opened. If the silica gel pack is green, discard the test cartridge and
contact Customer Service, as the performance of the product may have been compromised. If the silica gel has burst, discard the test
cartridge and contact Customer Service.
Slight discoloration of the silica beads is normal. When the majority of the beads within the pack are green, the test cartridge should not be used.
3. Printer
3.1 Connecting the printer
To connect the SoToxa™ Mobile Analyzer to the printer use the RJ12 connector cable provided. Attach this cable to the base of the printer and
to the RJ12 printer connector on the top of the analyzer, behind the rubber flap. Refer to section 2.1 SoToxa™ Mobile Analyzer at a glance for
the location of connections. Switch the printer on by pressing the power button on the top of the printer. The green status light on the printer
will then come on. To turn the printer o, press the power button again so that the status light goes o.
3.2 Loading paper
The printer is supplied with one roll of paper already loaded. To load a new roll of paper into the printer, open the paper cup lid and remove
the spool and any remaining paper. Reel o a few inches from the new roll of paper and hold approximately 2 inches of paper outside of the
printer. Place the new roll into the paper reservoir with the paper feeding forwards from the bottom of the roll and the leading edge over the
tear bar. Close the lid by applying equal amounts of pressure on each side of the paper cup lid until the lid is in the locked position.
Please contact your distributor or Customer Service to order replacement printer paper rolls.
3.3 Charging the printer
The printer will only charge when it is oine and connected to the SoToxa™ Mobile Analyzer via the RJ12 printer cable and when the
analyzer is powered by the mains. This is indicated by the printer’s green LED status light flashing every 1-2 seconds.
The printer will not charge if it is online, indicated by the printer status light remaining on; or if the analyzer is not connected to the mains.
The printer will take approximately 2-3 hours to charge.
See section 2.5 Power connection, for more information on how to connect the analyzer to the mains.

SOTOXA™ MOBILE ANALYZER | USER GUIDE13 | EN
4. START-UP | 5. USING THE HELP FUNCTION
4. Start-up
Important – Please read the instructions for use in full provided with the SoToxa™ Test Kit, prior to commencing a test.
Turn on the SoToxa™ Mobile Analyzer by pressing on the power button situated on the right hand side. The analyzer will perform start-up
checks during the start-up process to make sure it is in a good operating condition. During this testing, the start-up screen will be displayed:
The analyzer will not be able to run start-up checks if a SoToxa™ Test Cartridge is already inserted. Please remove the test cartridge
before switching on.
A new test cannot be initiated if the analyzer is already connected to the Software Application Suite. Disconnect the USB cable before
inserting a new test cartridge.
The operational temperature range for running a test is between 41°F to 91°F. Outside of this range the following message will
be displayed:
Allow the analyzer to reach ambient temperature before use. If moving the analyzer between storage and operating environments
of dierent temperatures or humidities, this may take at least 30 minutes. If climatic dierences are significant, allow more than
30 minutes for the analyzer to acclimate.
5. Using the Help Function
The SoToxa™ Mobile Analyzer will display instructions and prompts on the screen to guide the user through the test process. When an action
or user input has been completed, these screens will update automatically to lead on to the next step.
The analyzer has an on-board help function which provides additional guidance. To access the help screens, press the right select key when the
help button is displayed on the screen. The help option can only be accessed if the help button is shown – see the example below. If additional
help is required, please contact Customer Service for assistance.

SOTOXA™ MOBILE ANALYZER | USER GUIDE14 | EN
6. RUNNING A DRUG TEST
6. Running a Drug Test
6.1 Initiating a drug test
Ensure the instructions for use insert supplied with the SoToxa™ Test Kit has been read carefully before beginning a test. If additional
guidance is required please contact Customer Service.
Step 1: Refer to section 4 Start-up to switch on the SoToxa™ Mobile Analyzer.
Step 2: When the analyzer is ready to begin a test, the screen below will appear:
6.2 Inserting the test cartridge
Step 1: Remove a new SoToxa™ Test Cartridge from the foil wrapper.
The test cartridges and SoToxa™ Oral Fluid Collection Device are designed for single use only and must be disposed of after use.
DO NOT re-insert a used test cartridge into the SoToxa™ Mobile Analyzer or re-use the collection device.
Step 2: Check the silica gel pack is yellow. If the silica gel is green, discard the test as the performance of the product may have been compromised.
See section 2.10 Silica gel packs, for more information.
Step 3: Insert the test cartridge into the cartridge slot on the front of the analyzer.
6.3 Test cartridge identification and verification of the expiry date
Following insertion of the SoToxa™ Test Cartridge, the SoToxa™ Mobile Analyzer will read the barcode to identify the test cartridge and verify
that it is within its expiry date. The analyzer will also check that the test cartridge type is installed on the analyzer. If the test cartridge has expired,
it must not be used and the testing process must be restarted with a new test cartridge that is within its expiry date.
If the test cartridge is not valid, refer to section 11 Technical Support, Codes and Troubleshooting.
Step 1 Step 2 Step 3

SOTOXA™ MOBILE ANALYZER | USER GUIDE15 | EN
6. RUNNING A DRUG TEST
6.4 Sample collection
Following SoToxa™ Test Cartridge identification and verification of the expiry date, the screen below will be displayed. For additional
guidance on each step of the test process, select the help function on the SoToxa™ Mobile Analyzer screen or refer to the instructions for use
insert supplied with the SoToxa™ Test Kit.
Step 1: Ask the donor to remove the SoToxa™ Oral Fluid Collection Device from the packaging, ensuring they hold the plastic stem of the collection
device, and then place it in the mouth.
Step 2: The donor must actively swab the collection device around the gums, tongue and inside the cheek, until the sample presence indicator starts
to turn blue.
Step 3: Insert the collection device into the test cartridge (this should already be inserted into the analyzer). Gently push the collection device all the
way into the test cartridge to the stop position.
Once the sample collection device has been inserted, the analyzer should be kept in a horizontal plane remaining as still as possible
throughout testing. If the analyzer is tilted beyond the acceptable range, this warning symbol will appear on the screen:
Correct the orientation of the analyzer immediately to prevent disruption to the test. See section 2.8 Tilt sensor, for more information about the
tilt sensor.
6.5 Test in progress and interpretation of results
When the SoToxa™ Oral Fluid Collection Device has been inserted into SoToxa™ Test Cartridge in the SoToxa™ Mobile Analyzer, the screen will
display ‘test in progress’ and a countdown timer will appear. The time it takes to analyze results depends on the type of test cartridge being used.
When the analyzer has finished processing the test, a results screen will be displayed. Results are displayed as positive, negative or invalid
against each drug group.
Step 1 Step 2 Step 3

SOTOXA™ MOBILE ANALYZER | USER GUIDE16 | EN
6. RUNNING A DRUG TEST
Negative: This indicates that the drug concentration in the oral fluid sample is below the designated cuto level for that specific drug.
Positive: This indicates that the drug concentration in the oral fluid sample exceeds the designated cuto level for that specific drug.
Invalid: A result could not be provided for that specific drug.
Select OK using the right select key to move onto the next screen.
On occasion prior to the results screen being displayed you may see an additional analysis screen which is shown below. This screen may be
present for a maximum of 60 seconds.
6.6 Completing the questionnaire
The SoToxa™ Mobile Analyzer allows additional donor information to be captured alongside the test result. If the questionnaire set has
been enabled on the analyzer, the questionnaire will be entered following the results screen. The questionnaire can be enabled or disabled by
changing the analyzer settings. Refer to section 8.3.6 Questionnaire for instructions on how to enable and disable the questionnaire.
The questions included in the questionnaire can be configured using the Software Application Suite. If the Software Application Suite is not
being used, the analyzer will use the standard questionnaire set.
Step 1: Use the five way navigation key to scroll up or down to select the correct information.
Step 2: Any of the individual questions can be skipped by either selecting Skip, or scrolling through the options until Skip or –is reached.
Step 3: To make a selection, press OK.
Step 4: At the end of the questionnaire, a summary of the information entered will be displayed.
Step 5: If the information is correct, select OK using the right select key or if something needs to be changed, select Back with the left select key to
return to the questions.
Step 6: Selecting OK will accept the questionnaire and move on to the next screen.
Step 3 Step 4

SOTOXA™ MOBILE ANALYZER | USER GUIDE17 | EN
6. RUNNING A DRUG TEST
6.7 Printing results
If the results and questionnaire (if used) have been accepted, the SoToxa™ Mobile Analyzer will give the option to print results.
Step 1: If not already connected, attach the printer to the analyzer (refer to section 3.1 Connecting the printer) and ensure the printer is switched on.
Step 2: To print results, select Yes using the left select key.
Step 3: Failure to connect or switch on the printer will lead to the print failure screen. Check connections, switch on the printer and select Retry to
return to the previous screen. Alternatively select Cancel to skip printing.
Step 4: After printing is complete, the print option screen will be displayed again to give you the choice to print additional copies of results.
Step 5: If printing is not required, select No on the print option screen.
6.8 Data export
If the analyzer is configured to send a JSON packet to a host computer instead of printing (refer to section 8.3.9 Printer port), the SoToxa™
Mobile Analyzer will give the option to export test results instead of printing results.
Step 1: If not already connected, attach the appropriate RJ11 cable to the analyzer and to the Host PC, and ensure the host computer is ready to receive
the test results from the analyzer.
Step 2: To export data, select Yes using the left select key.
Step 3: After export is complete, the analyzer will proceed to the next screen.
Step 4: If data export is not required, select No on the data export screen.
6.9 Completing the test
At the end of testing when results have been displayed and printed (if required), the SoToxa™ Mobile Analyzer will prompt the user to remove
the SoToxa™ Test Cartridge. Do not remove the test cartridge by pulling the SoToxa™ Oral Fluid Collection Device and do not attempt to
remove the collection device from the test cartridge.
Dispose of the used test cartridge and collection device according to local and Federal regulations.
Take care when removing the test cartridge as the underside of the cartridge may be hot. Handle the test cartridge by the side edges.
Step 2 Step 2 Step 3

SOTOXA™ MOBILE ANALYZER | USER GUIDE18 | EN
7. QC TESTS
7. QC Tests
7.1 What are the QC tests?
QC stands for Quality Control. Two reusable QC test cartridges are supplied with the SoToxa™ Mobile Analyzer:
• Positive Quality Control (PQC)
• Negative Quality Control (NQC)
These two QC test cartridges are tested in sequence to check that the analyzer is interpreting test cartridge results correctly. If the QC tests
pass, this means that the analyzer is working correctly.
7.2 How often should the QC tests be carried out?
It is recommended that you carry out the QC tests once on each day that the SoToxa™ Mobile Analyzer is used. If required, the QC tests can be
enforced at defined time intervals. Refer to section 8.3.8 Periodic QC for instructions on how to enable and disable QC Lockout.
7.3 Running the QC tests
Step 1: Check that both QC test cartridges are clean and undamaged. If the QC test cartridges are marked, please contact Customer Service.
Step 2: Insert one of the two QC test cartridges, the cartridge will be analysed automatically. The order in which the QC test cartridges are inserted is not
important, as the SoToxa™ Mobile Analyzer is able to recognize the cartridge that has been inserted and will analyse it accordingly.
Step 3: Once analysis of the first QC test cartridge is finished, the SoToxa™ Mobile Test System will prompt you to remove the current test cartridge
and insert the other QC test cartridge. Note that if QC failed on the first cartridge, QC testing will be abandoned; see step 5.
Step 4: Following analysis of the second QC test cartridge, results of the QC test will be displayed as ‘QC Results: Pass’ or ‘QC Results: Fail’.
Step 5: If the QC tests have failed, contact Customer Service. Do not continue testing.
Step 6: After acknowledging the results by selecting OK, the analyzer will prompt you to remove the test cartridge, to complete the QC testing.
Step 7: If you wish to print the QC results, please select the View Results option from the main menu to print the individual QC tests. See section
8.1 Accessing Stored Results.
Step 2 Step 2
Step 3
Step 4 Step 6
Step 4

SOTOXA™ MOBILE ANALYZER | USER GUIDE19 | EN
7. QC TESTS | 8. MAIN MENU
7.4 QC lockout
If the PQC and NQC cartridges have not been successfully completed in the defined time interval, no further drug tests can be initiated until
the quality control checks have been completed.
The following screen will be displayed when a test cartridge is inserted if the analyzer is in lockout mode. The QC lockout symbol will also be
displayed in the status bar.
Press the right soft key to exit and then insert either one of the two QC cartridges to initiate the QC testing as described in the section above.
8. Main Menu
The SoToxa™ Mobile Analyzer main menu screen (shown on the right below) can be reached from the default screen (shown on the left
below) by pressing the left selection key.
From this screen you can access stored results, view the analyzer summary and settings and check the SoToxa™ Test Cartridges that are
installed on the analyzer. See the following sections for more details.
8.1 Accessing Stored Results
The SoToxa™ Mobile Analyzer will store test information and results which can then be viewed and printed.
8.1.1 View results from memory
Step 1: From the main menu, select the View Results option.
Step 2: The stored results screen will display the last 100 tests performed if they haven’t been downloaded to the Software Application Suite. Select
the test you wish to view using the five way navigation key to scroll up and down through the tests, then press the Options button using the left
selection key. The most recent tests are at the top of the screen. Tests are identified by a unique test ID number. This number is also printed on
the results printout.
Step 1
This manual suits for next models
2
Table of contents
Other Abbott Test Equipment manuals