abi IMAGE IQBoardA User manual

User Manual for IMAGE
IQBoardA Interactive Whiteboard
Software Version 4.2
Copyright(C) 2007ABrighter Image Pty Ltd
Web: www.abimage.com.au
Tel: +02 9938 6866
Fax: +02 9938 6899

Contents
Brief Introduction............................................................................................................ 4 -5
1:Specifications ................................................................................................................5
2: Warning prior to Installation.........................................................................................6
Installation Method ........................................................................................................ 7-10
1: Installation of Hardware ........................................................................................... 7-9
2: Installation and Uninstall of Software.........................................................................10
Uninstall software ....................................................................................................10
3: Connect the data line.................................................................................................10
4: Orientation .................................................................................................................10
Hardware use............................................................................................................... 11-12
1: Usage of Board Column HotKeys ..............................................................................11
2: Usage of Toolbar.................................................................................................. 11-12
3: Operation Hints ..........................................................................................................12
Use of the Whiteboard Software ............................................................................... 13-21
1: Menu...........................................................................................................................13
2: Windows/Board ..........................................................................................................14
3: Control Box Toolbar ............................................................................................. 14-15
4:Draw Toolbar ......................................................................................................... 15-18
5. Board Software Tools........................................................................................... 19-21
Taskbar Menu.....................................................................................................................22
Editing Objects ............................................................................................................ 23-24
Page and Resource Manager................................................................................... 24-25
Other Features ..................................................................................................................26
Pen Operation and Maintenance ..................................................................................27
FAQs................................................................................................................................ 28-29
Whiteboard Maintenance................................................................................................30
Product Service and Copyright .....................................................................................31

Brief Introduction
The IMAGE IQBoardA Interactive EWB is the latest equipment for teaching, training
and conference presentation. It incorporates the latest high-tech research results, such
as top electronic technology, software technology, internet technology, etc. It will be the
major instrument for modern information-based teaching, conference, distance
education and training, gradually substituting for traditional teaching methods and
conference mode. It may be used by any profession in different situations
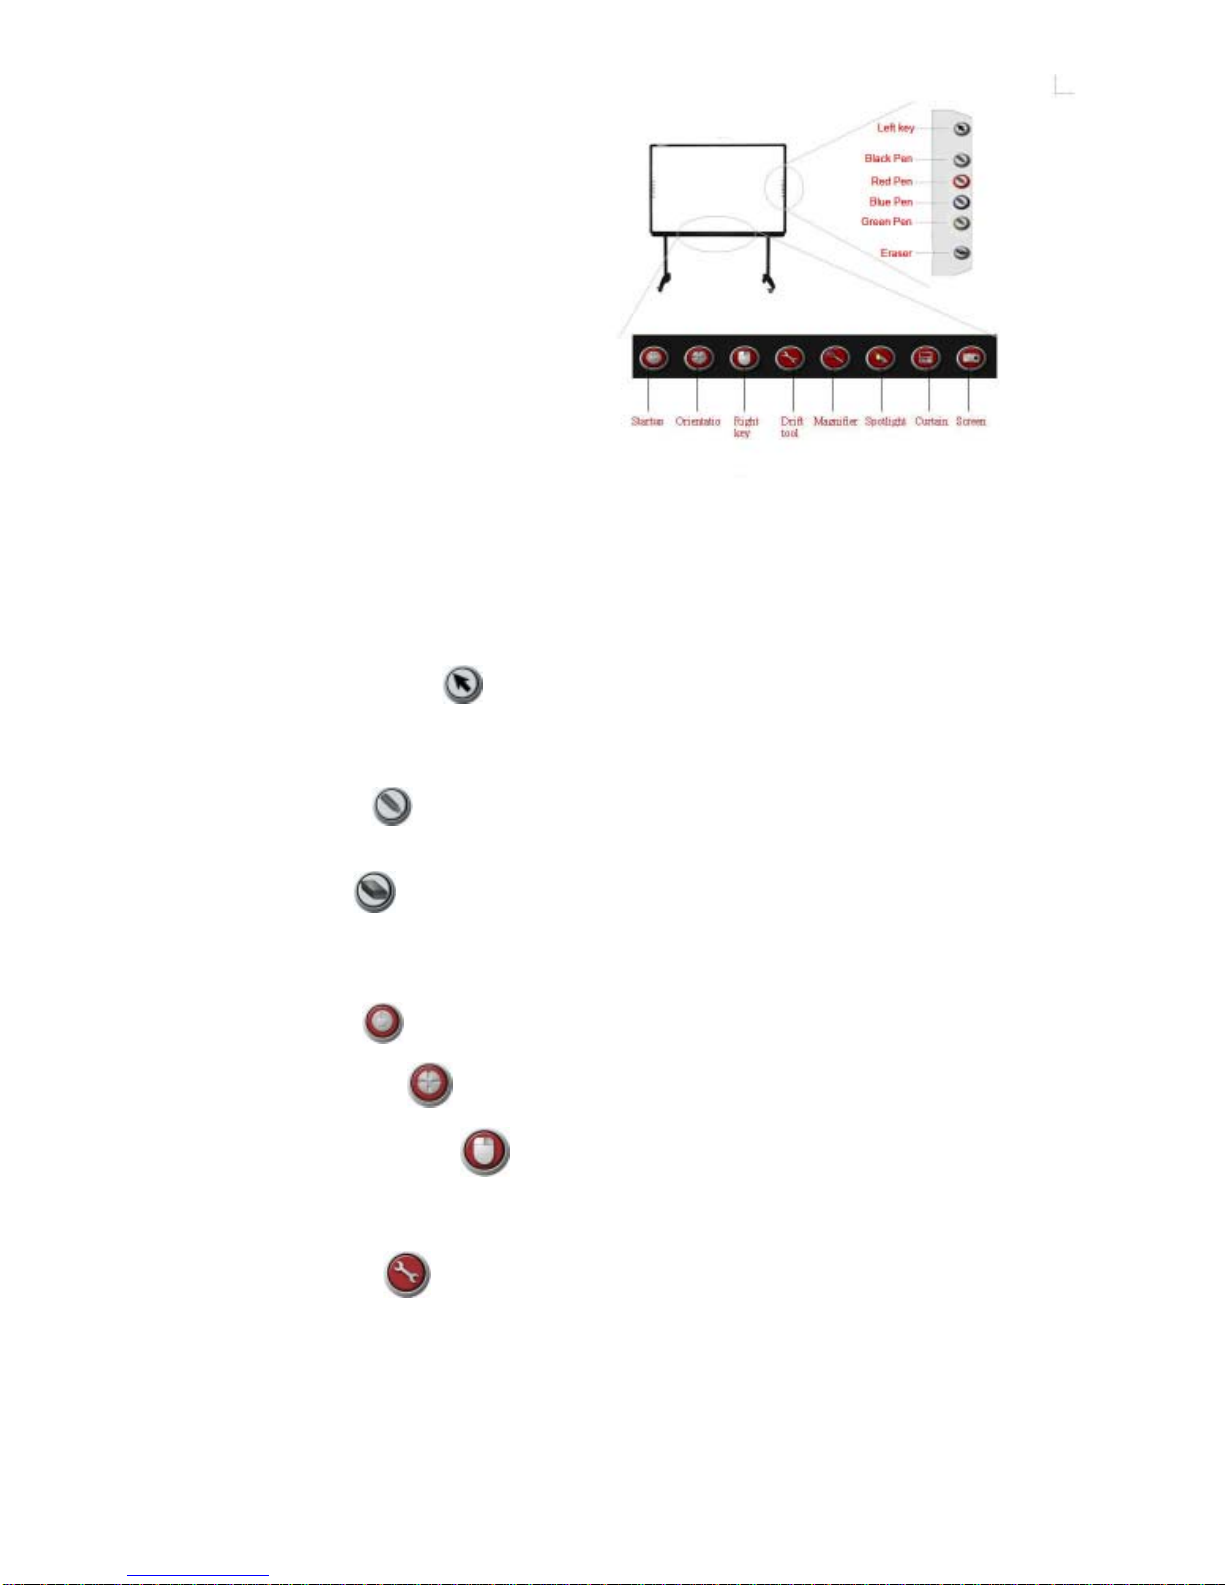
The IMAGE IQBoardA provides abundant function hotkeys and software functions. It
provides users with reliable, rapid and nimble operation. Its functions are as follows:
1.Operationtechnology:Electromagnetictechnology.
2.System supported: Laptop,PC; Multi-country-language;Win2000/ XP/2003.
3.Board Design:Matt,high intensity, lowreflection composite materials,high anti-
abrasion, anti-chemical erosion, diffuse reflection surface eliminating bright spots,
large angle of visibility, high-luminance, fine definition, especially suitable to be a
projection screen for good projection effect, achieving same vision result for viewers in
different positions, and enabling extended periods of viewing.
4. Physical properties: Supports any kind of projector image resolution; 1.5cm
Induction Height for writing or clicking; 240/S processing rate; High response rate,
sensitive operation.
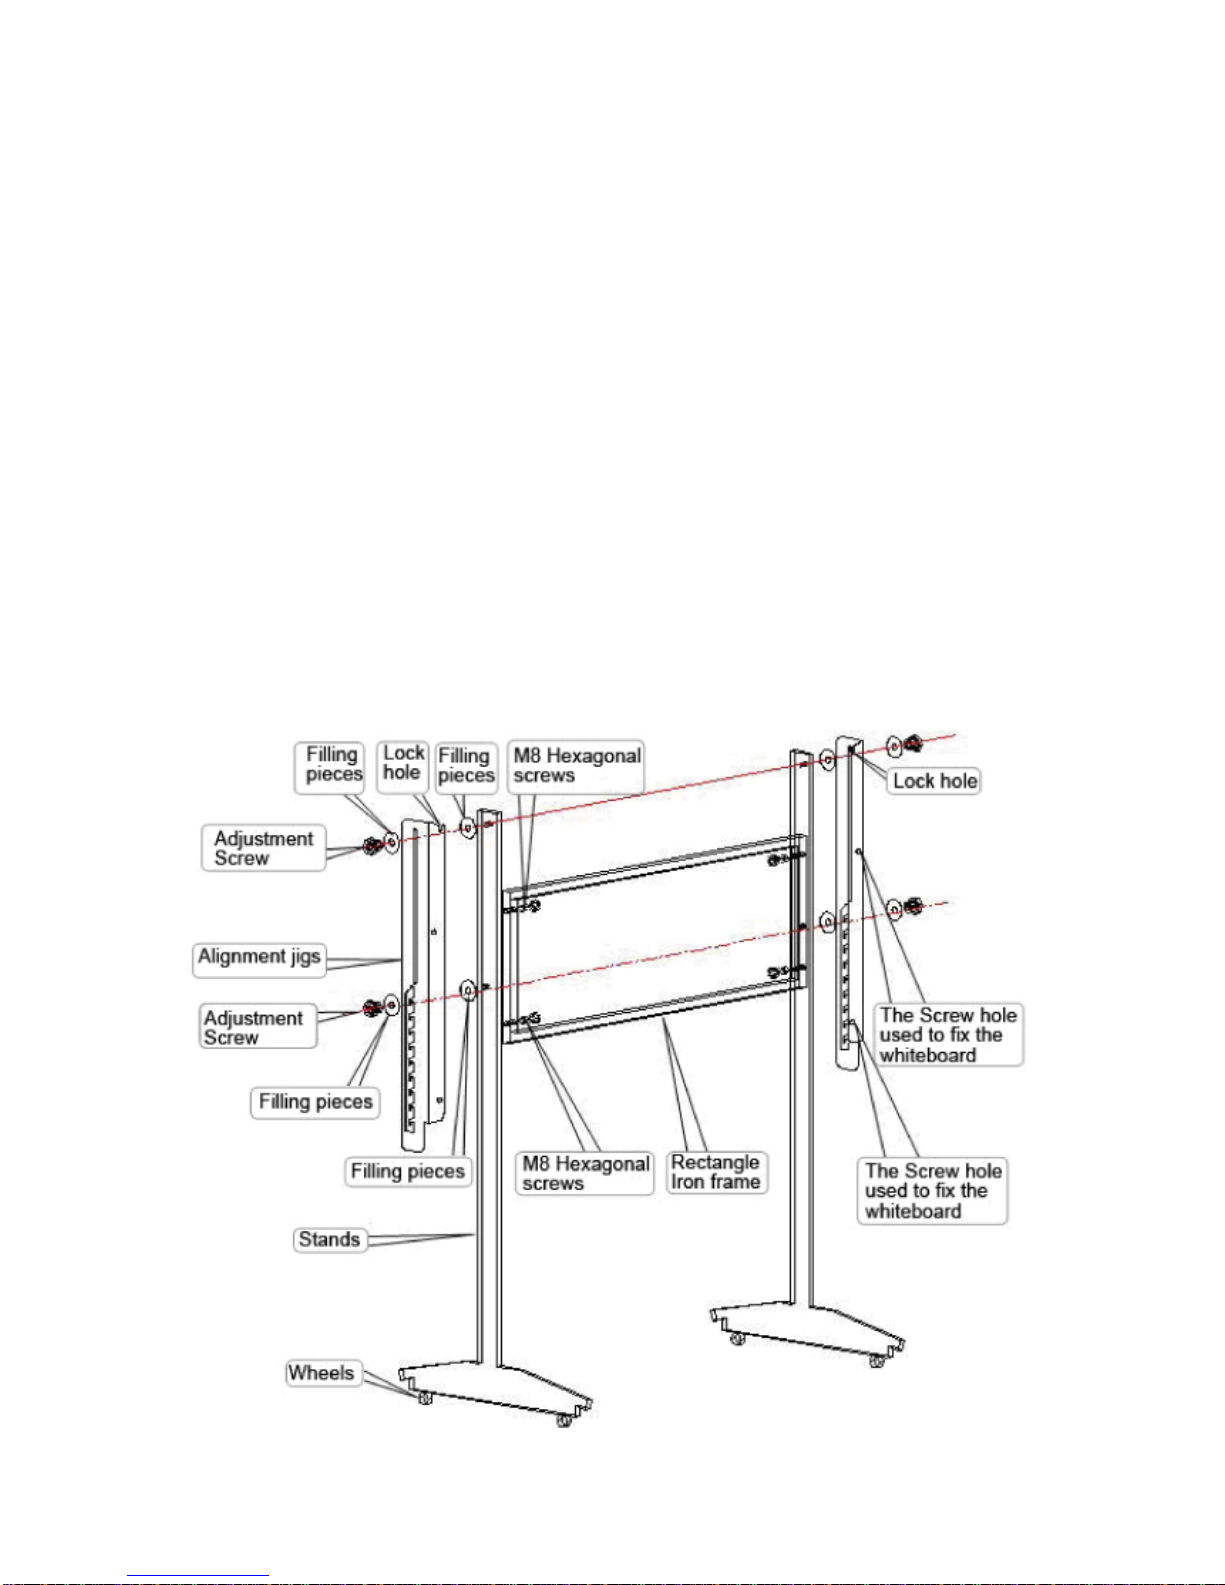
5. Installation: Hanging Mode (Standard Configuration); Moveable Stand (Selected
Configuration). Descending and ascending height ranges from 1.85M to 2.2M.
6. Computer Connection: Standard USB slot, Plug & Play, no need of external power.
10m of connection length. (max 20m extended cable in addition is acceptable).
7. Driver: Corresponding hardware driver and USB driver are needed (supplied).
8. Softwarefunctions:
1)Enables PC interaction,saveand print, sendemail, copy and paste,write and
erase, capture screen, move and zoom, revolve combination, hyperlink, transmit
export, spotlight, magnification, reveal and so on.
2) Mode storehouse, figure label storehouse, standard figure storehouse auto-edit
functions are provided. Support figure format such as JPG, GIF, and figure
stratification technology.
3) Real time video can be saved as AVI format; auto-control of video play, video
handwriting labels are supported by operating system above WINDOWS SP2.
4)Save original label trace of PPTinits original format, and operate directlyin the
relevantapplication software.
5)Edit functions oftext, figureandimage.
- 4 -

Item no. 1-660A 1-680 A 1-6100 A 1-6120 A
Panel Dimension 1270*990*38mm 1660*1270*38mm 2160*1270*38mm 785*1570*38mm
Diagonal 60” 80” 100” 120””
Writing Area 1150*870mm 1586*1196mm 2085*1196mm 2667*1530mm
Pen Holder Dimension 600*40*90mm 900*40*90mm 1300*46*90mm 1300*46*90mm
Format 4:3 4:3 16:9 16:9
Package Dimension 1400x1120x200mm 1780x1400x180mm 2280*1400*180mm 2860*1400*180mm
Label net weight 12±1kg 22±1Kg 35±1 kg 45±1 kg
Package weight 19±1kg 33±1Kg 45±1kg 55±1 kg
Specification and Configuration
1. Product specification Code
“A” stands for Electromagnetic technology code & the number 60, 80, 100, or 120 is the
diagonal length in inches.
2. Standard package supplied:
ElectromagneticEWB (ModelA):
# White Board (1),
#Whiteboard Pen (2),
#Wallhangingbracket (1),
# USB cable (1),
#Manual(1),
#CD containing driverandsoftware (1).
3.System Requirements
# PC: Pb!800, 128MB RAM, 1G HDD, one USB port;
# OS: Win2000/XP/2003;
#Projector: 1024*768,Keystone correction functionavailable, VGAport.
6)Achieveslong-distanceinteractiveteachingthroughInternet andIntranet.
7)Provides various working modes,suchas mouse, writingand sign note, editand
long-distanceinteraction, etc.
8)Softwareupgrades provided FREE. Visitwebsitewww.abimage.co.au forthe
latestsoftwareversion.
Whiteboard Specifications:
- 5 -

Warning prior to Installation
zDo not lookdirectly at theprojector light.
zDon’t leave cables that may causing tripping. If the cables must be put on the floor,
straighten and tapethemto thefloor using“gaffer” tape.
Environment
zPlease do not put any electrical wiring within 50cm of the EWB.Avoid producing
and electrical or magnetic disturbance that may affect the normal usage of the
equipment.
zAvoid using the EWB in dusty, damp or smog bound environments.
zRead the EWB Maintenance section (p.19) prior to installation and use.
Projecting
zUse the projector output format that matches the IQBoardA that is being used..
zWhen ceiling mounting the projector, please make the projector lens level with
the top edge of the EWB. The centre of the lens must on the horizontal centre
of the Whiteboard. The distance from the screen is determined by the optics of
the projector. Keystone correction should be used if necessary.
zThe Image of the projector must be in the center of the effective area, as Figure
2-1.
The blue area is the
effective area of
Whiteboard. (The image
should not be on the pen
colour hot keys)
Transportation
zIt is suggested to repack the digital interactive whiteboard with the original
packaging provided when long distance transportation is necessary. If the original
package is unavailable, insert as much padding as possible between all the
components to avoid damage from vibration or crash.
Consumables
zMake sure only genuine IMAGE EWB or components are used.
Extended Cable
zWhen the USB data line needs to be extended, please use shielded twisted
pair (Max length should be less than 30m, otherwise there may be loss of signal).
- 6 -

1: Installation of Hardware
Installation Method for Wall Mounting
Accessories:
Number Description Amount Image
1 Tapping Screws 5
2 Plugs 5
3 Hanging Support Bar 1
Steps: The height of the Hanging Support Bar, (as Figure 3-1) should be 190 cm
above floor. Fix the middle screw hole first, and then fix other 4 after checking with
a level, using the instructions below, depending on whether concrete, plaster or
wooden wall.
(1) Concrete wall or brick wall: Drill a hole with masonary drill (size 8), hammer
the green rawlplugs into the hole, fix hanging bar onto the wall with tapping screws,
and hang white board onto the hanging bar. Refer to Figure 3-2.
(2) Plaster wall: Drill a hole with metal drill bit (size 6), screw the wallmate screws
into the hole without damaging the plaster, fix hanging bar onto the wall with tapping
screws, and hang white board onto the hanging bar.
(3) Wooden wall: Fix hanging bar directly with screws, plugs are not needed.
- 7 -

2.InstallationofStand
Note: Stand is optional; there may be no stand in your package of products.
Accessories:
Number Description Qty Image
1 Wheels 4
2 Stands 2
3 Rectangular frame 1
4 Alignment brackets 2
5 Washers 8
6Adjusting Screw 4
7 M6 Hex Socket Screw 4
8 Hex screws (size M8) 4
9 White gloves 1
10 Inner hexagonal spanner 1
11 spanner (size 17 and 19) 1
- 8 -

The installation method is as per the following pictures:
(1) Firstly, fix two wheels to each stand foot.
(2) Fix Rectangular frame into both stand uprights with 4 inner hexagonal screws
of size M8.
(3) Fix the Alignment jigs onto the outer edge of the stand and ensure sawtooth
faces down. Locate the sawtooth first on the Alignment jigs to the Alignment
screws to make the height of the Alignment jigs is the lowest. That will be
convenient for later installation.
(4) Screw down the two inner hexagonal screws (size M6) into the rear of the
Whiteboard. (Do not screw down to tight, remain the distance 3mm)
(5) Lock the screw that on the rear of the Whiteboard with locking hole that on
the top of the alignment jigs. Then screw down the screw.
(6) Use two hexagonal screws (size M6) to fix the underside of the Whiteboard
rear.
(7) Use the adjusting screw to confirm the height of the Whiteboard. Complete
installation.
- 9 -

2: Installation and Uninstall of Software
Install Interactive software
Note: There are 2 software programs to load. Please double click on the software
in the CD supplied, and follow the instructions:
a. IQBoardET - Board drivers and calibration software
b. Setupliben - Board Presentation software
(1) Do not connect the data line before installing the software.
(2) Lowest Specification of PC: Pentium III (500MHz)or aboverecommended, 128MB
RAM, 1G HDD, one USB port, Resolution:1024×768 (16bit high color orabove)
(3) System Requirement: MSWindows 98/Me/2000/XP
(4) Some special functions may be limited by the OS used.
Run the “Setup.exe” on the CD and install it according the following steps:
Please select “Yes, I agree to this agreement” in the “Software License Agreement”, and
enter the user information and product register number when installing. Then finish the
installation according to the prompt on the Installation Interface.
Uninstall
ClickStart> Programs >Returnstar Electronic WhiteboardSoftware >Uninstallto uninstall
this software. You also can open “Control Panel”, select “Add/Remove Programs”, and in
thelist of currentlyinstalledPrograms, select “ReturnstarElectronic WhiteboardSoftware”,
then press the “Change/Remove” button to remove.
- 10 -
3: Connect the Data Line
The connection from the PC to the Board is via the cable supplied with the board. The PC
connectionis via USBandthe power tothe board is suppliedvia the USB. Ensurethat the
pushconnectorsfromtheboardpentraytotheboardareproperlyconnectedalso.If installing
succeeds, the indicator light of digital EWB will be green; if the indicator light is not lit,
the data line connection has not been successful; if it is red, the connection is not stable.
See FAQs for help with any problem.
4. Board Orientation:
Thewhiteboardmustbeoriented(calibrated)so thatthepen iscorrectlylocated bytheboard
software.Todothis,clickonthe“Position”buttonintheIQBoardETprogram.The whiteboard
mustbe connected toyour PC,andthe projectormust be projectingthe PC imageonto the
boardto be ableto use thecalibrationsoftware.A blank whitescreen will bedisplayedwith
aredcross hair.Clickon the centre of the cross hair
withthe electromagneticpen supplied. Repeat the
procedureas the crosshairs move aroundthe board
(totalof 9 crosshair locations). When pressing,
the pen must be vertical to the EWB. If you click
in the wrong position, you need to start the
calibration procedure again. After completing
the calibration, it will shut off automatically.

Board Hardware Use:
Thereare two identical pencolumnson the two sidesof the EWB, soyou can operate itat
bothsidestosatisfyyour needs.Therearesixfunction buttonsinthepencolumns, pressthe
buttononceortwicechangesthefunction.Thereistoolbaratthebottom.Ithaseightcommon
toolbars;you canopen orexit the correspondingtoolbar tocontrol theEWB directly.These
optionsare providedfor yourconvenience.
Button Column on either side of Board:
1. Left Mouse Key: Press button,you canuse electronicpen toclick, double-clickand
mouse drag. Double click on a file or icon to open the file or icon.
2. Pen: Thereare four“Pen” buttonswith fourdifferent colours,black, red,blue andgreen in
turn.Afterpressing button,youcan writeinthe correspondingcolour with theelectronic
pen.You canchangethe pencolour propertiesvia themainControl Panel.
3. Eraser: Press button,and you canrubout the selectedwritten contents ordrawing.
You canchange thepencolour propertiesvia themain ControlPanel.
Toolbar Buttons:
1. Startup: Press button to start EWB program directly.
2. Orientation: Press buttonto display theorientation(calibration) interface.
3. Right Mouse Key: Press button,and electronicpenwill turninto aright mousekey,
soclickingonthe boardoncewill actasa rightmousekey.Note:Asthe rightmousekey isnot
usenoften,thefunctionwillonly workonce andthenrevert toleftmouse key.
4.DriftTools:Press buttontodisplaythetoolwindowasFigure4-2.Itisthecombination
ofthefunctionsof pencolumnandtoolbar.Youcandragthe windowrandomly.Youcan useit
afterclickingtheicon inthewindow.DriftToolbarcanmeet differentusers’requirements.And
youcanaddordelete toolaccording toneeds (Detailsplease referto “ControlPanel”—”Drift
Toolbar”setting).
- 11 -

5. Zoom: Press buttontodisplay the area that the electronic pen ispointed to as an
enlargedwindow. Dragging theframe ofthe window canchange the sizeof thewindow
andyoucan movethe windowwhen useelectronic pendrags theframe. Thezoom factor
canbe adjusted inthe zoomsettingthat popsup(This functionis provided byOS).
6. Spotlight: Press button, and the spotlight will be displayed on the screen.The
electronicpencanadjustthepositionof spotlight;draggingtheblueframecanadjust thesize
ofthe aperture,control thedisplay scope, andyou canwrite inthe aperture.
7.Reveal screen: Press buttonto starttherevealfunction.Drag thehandleon edgeof
thecurtainwith electronicpen,and youcandraw thecurtainfin romfourdirections. Revealis
usedto developanargument stepby step.
8. Screen Capture: Press buttontodisplay thescreen capturetool.Therethreestyles
of ScreenCapture:
Fullscreencapture:Capturethe wholescreen content.
Areascreen capture: Drawout the selectingframe to selectthe area.
Windowscapture: Selectthis styleand selectthe windowthat youwant tocapture.
Choose the style according to you needs, and the file that is captured will be saved as a
picture,and it can beexported as a pictureformat.
Operation Hints:
1.Face the whiteboardwhenoperating and writingon the projectedimage.Toavoid harm
toyour sight,do notlook straight atthe projector whenyou turnback tofacethe students.
2.Instructstudentsonthe usethe whiteboardbefore theyuseit,warningthe studentsnot to
lookdirectly atthe stronglight fromthe projector.
3.Toavoid harmfrom improper operation,ensure the heightof the whiteboardis
comfortablefor bothteachers andstudents usingtheboard.
4.Please changethebatteryofthe penwhen handwritingis unstable.Normally, thebattery
ofthe pen willlast for one year. Disposeof the old batterysensibly.
5.Please restart thecomputer and tryagain if theboard fails tocontrol computer by
pointingpressing infront of thewhiteboard.
6.If computercontrol can beachieved bypointing and pressingon thewhiteboard, but the
writingfunction fails, pleaseexit the EWBapplication software, andrestart it;. Ifit is still
unableto write, theremay be a problemwith the EWBapplication software ,andwe
recommenddownloading the latestsoftware versionfrom our websitefor re-installation.
- 12 -

Use of the Whiteboard Software:
The Software sits in minimised mode in the lower Right Desktop, and uses the
whiteboard icon. Simply click on the whiteboard icon, and left click “Tools” to maximise
the software. Alternatively, or select “Returnstar Electronic Whiteboard Software” in
Start>Programs>Retrnstar Electronic Whiteboard Software
The Software Control Panel will operate in conjunction with other windows programs,
andwill sitas an“overlay”screen. TheControl Panelcan be movedaround thescreen by
holdingthe leftbutton onthe bluetop frameof theControlPanel, andmoving thePanel to
ntherequired location.Alternatively, thepositioncan belocked by clickingthe padlockicon
(centreof 3 icons)on the topright of thecontrol panel. TheControl Panelcanbe minimised
byclicking the minimise iconto the right ofthe padlock icon.
1.Menu: Clickthe Menubutton onthe topleft ofthe controlpanel. Thisopens theMenu
dialog box as per pic :
New:Creates new file
Open: Opens existing file
Close: Closes file that is open
Mouseright-key: Makes mouseclick act as rightmouse
keyuntil “makeleft key”clicked
Mouseleft-key: Makes leftmouse click actas
left mouse key
Single Click to open item: Makes a single click OK
to open file
Double Click to open item: Makes a double click
necessary to open file
File Protection: Creates password protection to
open file
Save: Save an existing file
Save as: Saves a file to direction/name as typed
Saves as template: Saves a file as a Template file
for this program
Print: Opens default printer to print file
Print Current Page: Opens default printer to print
the current page
Prnit Preview: Previews the page/s to be printed
before printing
Print Setup: Allows the print parameters to be set
before printing
About: Displays the software version be used
Exit: Exits the Whiteboard software program
- 13 -

Page & Resource Manager: Opens Page & Resource Viewer on left of screen. Click
onthe icon toopen theManagerWindow ontheleft ofthe working area:
Thereare 5 tabsonthe Manager Window:Preview, Graph,Template, Source& Local.
a.Preview: Displaysthe pagesinthe currentdocument
andprovides toolsto workon the document,including
arrowsto movearound the documentand arange of
editing tools. See page for an explanation of Page
functions.
b.Graph: Providesanextensive rangeof regular figures
(lines,arrowhead, basicfigure, flowchart andgeometry
figures,etc. ),regular charactersand symbols(English
letters,common numbers,decorativefigures,teaching
figures, etc.These figures can achievevarious teaching
anddemo effects, andcan be integratedinto your
resourcebase.
c.Template:Thisarea is tostore templatesthatyou
havedeveloped forlateruse. TheTemplate file isthe
basisof lesson preparation, and thepost script name
of the file is CDF. It is often used as the basis for
topiclessons and sois convenient in thepreparation of lessonsand lecture material.Edit
thecontent ofthe file(includes character, sound,picture, animation,picture andso on)in
thework area.Afterthat,choose “Save astemplate” in “File”menu.All pageswill thenbe
savedas a template.
2.Windows/Board:Buttonat lowerleftof ControlPanel.Toggles betweena standard
windows screen and a blank whiteboard screen.
3, Control Box Toolbar: The following Toolbar on the left side of the Control Panel. The
Toolbar functions are:
InserttoOffice:
- 14 -

RightMouse Key: Turnstomouse click intoright mouse for1 operation
(Note:go viaMenu commandsto permanentlychange toright mousekey).
Mouse:Turnsthecursor back toleft mousemode afterbeing usedas anothertool
Undo:Undoes thelast operation
Redo:Redoes thelastoperation ifaccidently undone
4.DrawToolbar:The followingToolbaris in thecentre oftheControl Panel.Note that as
youclick on thetop line icon,a new setof relevant sub-bar(lower line) iconsappear. For
thefirst 11icons (priortopaintbucket icon),the sub-bar menuremains similar (although
thedefault settings foreach top lineicon can bevaried). The last3top line iconshave
noticeablydifferent sub-baricon listings.
TheToolbar functionsare:
a. Pen functions (first 5 icons): All peniconshave thesame
sub-baricons: 7x colourdefaults; 3 xline thicknessdefaults, &2 xcolourdensity defaults.
Eachpen can saveits respective defaults.
Pencil:The “Pencil” allowsyou to write,note andpainton thewriting board, orunder
theedit mode ofsome picture andfile editors thathaveobject processing function,
suchas Microsoft OfficeWord, Excel,andPowerPoint, etc.It has thecharacteristic of trim
andsmooth writing,and is writinga letter,figureand commoncharacter.Youcan choose
thethickness, colour, transparencyand arroweffectof strokes.Double clicking the“Pencil”
buttonsets thedefaultsforthepencil.
d.Source: Contains ahuge libraryofclipart, storedby subject
topic,that can beused forlessonpreparation. Itemssuch as
Agriculture,Chemistry, Physics,Maths, etcare includedhere.
Notethat Musicsymbolsare storedin b. Graph(above).All
items are inserted into the working page as an object and can
beedited. Thesystem canautomatically remember thelast
usedfigure (element),template, Favorite andlocal pictureor
file,and displays themin the “Recentlyused” column.
e. Local: Provides access to the PC and LAN from
withinthe whiteboardsoftware forretrieval &placement
ofobjects and filesfor useinworking documents.
- 15 -

Brush Pen: The“Brush Pen”is a writing effectbasedon the characteristics of
traditionalcalligraphy fromsomeAsiancountriessuch as China,Korea, and Japan.It
showsthe writingart ofbrushpenbrilliantly.Youcan choosethe thickness,colour,and
transparencyof strokes.Double clicking the“BrushPen” buttonsets the defaultsfor the
brushpen.
Pen:The“Pen”has thepen-writing characteristicswhich canshowthe artof
pen-writingbrilliantly andis fitforsuperscription, signature,and othercases that need
pen-writingeffect.You canchoose thethickness, colour,and transparency ofstrokes.
Doubleclicking the“Pen” buttonsetsthe defaultsfor thepen.
WashingBrush: The “WashingBrush” is awriting effectbased on thewriting feature
ofArabic.You canchoose the thickness,colour, andtransparency of strokes.Double
clickingthe “Washing Brush”button sets thedefaults forthe washingbrush.
BoardBrush: : The “BroadBrush”isa writing effect ofusing several washingbrushes
indifferent colorsto write together,usually used incases requiringspecial
emphasizingsuch astitle andframe, etc.Youcan choosethe thickness,colour,and
transparencyof strokes.Double clicking the“BroadBrush”buttonsets thedefaultsfor the
broadbrush.
Note: The “Broad Brush” can include up to 7 colours. Select different colours in order,
you will get a combined writing effect of using Washing Brushes in these colours together. In
case you don’t intend to use 7 colours, for instance only 3, then set the last 4 colour icons as
white.
ColourPallettes: 7 pallettesprovided; click onpallette to choosethe colour; doubleclick on
apallette toselect a newcolour.
Afteryou click OK,thetoolbar disappears.
LineWidth: 3 widthpallettes; click onpallette to choosewidth; double click
pallettetochange the linewidth.Afteryouclick OK, thetoolbar disappears.
ColourDensity: 2densitypallettes; clickon pallette tochoose % colourremoved
(ie:0% is fullcolour;30% is 70%colour density, etc; doubleclickon palletteto
selectnew %.Afteryou click OK,the toolbar disappears.
Arrow:Thedefault arroweffectis solidarrow.If youneed otherarroweffect,double-
clickthe arrowbutton andselect other arroweffect inthe extendedtoolbar. Afteryour
selection,the newarrowbutton willreplace the oldone, andthe toolbar willdisappear
automatically. - 16 -

b. Line Functions: (6th & 7th icons). Both lineicons havethesame
sub-baricons: 7x colour defaults;3 xline thicknessdefaults,2 xcolour density& arrow
defaults. Eachline cansaveits respectivedefaults.
Line:You canchoose thethickness, colour, transparencyandarrow effectoflines.
Doubleclicking the “Solid Line”buttonsets the defaultsfor the line.
DashedLine: You canchoose thethickness,colour, transparencyandarrow effectof
dashedlines. Double clickingthe “SolidLine”button setsthe defaults fortheline.
c. Shape Functions: (8th to 10th icons). All shapeiconshave thesame
sub-baricons: 7x colourdefaults; 3xline thicknessdefaults, 2x colourdensity
defaults,and a solidfill colour (usecolour defaults). Eachshapecan saveitsrespective
defaults.
Circle:You canchoose thethickness, colour,transparency andarrow effectofcircles.
Doubleclicking the “Circle” buttonsetsthe defaultsfor the circle.Afterselectingthe
“Circle” button, select a point on screen and drag to create a circle, its size and shape is
changedaccordingly byyour dragging.
Square:You canchoose thethickness, colour, transparencyand arroweffectof
squaresor rectangles.Double clicking the“Square” buttonsets thedefaults for the
circle.Afterselecting the “Square” button,select a point onscreen and dragtocreate a
squareor rectangle, itssize and shapeis changed accordinglyby your dragging.
RubberLine: If youwant to createa geometrical shape ora zigzag line,you can use
“Rubber Line”. Click the “Rubber Line”, select a point on screen as the start point of
thefirst line, andselect anotherpointas theendpoint ofthe first line(which is alsothe start
pointof thesecondline), thenselect the endpoint of thesecond line, andso forth,……
Untilyou have createda geometrical shapeor azigzagline.
d. Table: (4th lasticon)Youcanchoose thethickness, colour,transparencyof the
tableframe,as wellas the columnand rownumber.After selectingthe “Table” button,
selecta point on screenanddrag to create atable, its size andshape (width of column
androw) willchange accordingtothe defaults.To change thedefaults,double clickon the
tableicon, and setthe number ofrows & columns.Click on thetop right propertiestriangle,
thenthe bottom“attributes” tab,to displaythe tablelayout intowhich youcan typethe table
data,orhyperlinktorelevant file.
e. Fill:(3rd last icon)You canfill colour orgridded pattern(such ascross bar, column
bar, slanted bargrid, etc) in anyclosed geometrical shapeand table.
Thefirst 4 iconsare colour icons,thefifth is a“no fill” icon,the next 6aregrid pattern icons,
andthe last isa picturefill(insert picture)icon.To change thedefaultswhere possible,
doubleclick on thelower rowicon. - 17 -

Keyboard:Click on iconto displaywindowssystem keyboardfor on screentext input.
HandWriting Recognition:We offerthe handwritingrecognitionprogram thatcan
support16 languages.It cansupport anyedition modeunderthe Windowssystem.
ActivatesHand WritingRecognition(OCR)software.To use,open theprogramin which
youwant touse/save the writtentext (eg.Notepad,Word). Clickon the OCRicon anda
writingbox willappear. Select theicon representingwhat youare writing (numbers,text or
symbols),and startwriting, usingthetools atthe kleftif necessary.The finishedtext is
automaticallyentered intothe Notepad orWord program).
FontSetting: Click onicon to setthe fontdefaultsfor textinputby PCkeyboard.
ImportText: ClickText mainicon firsttoplace textbox.Then clickImportText iconto
opendialog box tofind therequiredtext in.txt format. PressOpen to placethe text.
g. Text: (Last icon) There are 5 icons in the Text sub-bar.
f. Eraser:(2nd lasticon) We have offeredten erasing optionsincluding the circle&
square fill erase, object erase, circle erase, square erase, and whole area erase, as
follows:
Circlemiddle erase: Choosesmall, medium,large,and cleartheselected fill
of a circle.
Squaremiddle erase: Choosesmall,medium, large, andclear the selected
fillof a square.
Objecterase: Clear the designated object(click on the edge ofcircle, etc).
Circle erase: Clear the selected circle.
Square erase: Clear the selected area
EraseAll:Clear thewholepage
CopyText orImage fromClipboard: Ihave havealready copiedeither textoran image
tothe clipboard,youcan clickon this iconto placeitas anobject on theworking page,
andthen movethe object asrequired. - 18 -

6. Board Software Tools:
Aswith the previoustoolbar group, themain top iconshavea sub-bar displayof icons (on
thebottom line).Working througheachof thetop lineicons:
1. Screen Tool: Click on Screen Tool to display 6 options on bottom line:
a. Spotlight: Thedefaultshapeis round,you can dragthe rim tostretch, zoomand
movethe Spotlight, andclick thered “tick” button inthe topright of screento open the
toolmenu andchange theSpotlightshape,colour, backgroundimage, andbrightness, etc.
Thespotlight area doesnotaffect the mouse operation,and can beusedfor emphasis.
Click outside circle to drag circle position; click on spotlight perimeter colour & drag to
enlarge/reducespotlight size. Click redcross to exitspotlight.
b: Reveal (all directions): Click the “Reveal Screen” button to use the reveal screen
function.You candrag the curtainedge toreveal screenfrom top tobottom, fromleftto
right,and from centreto all directions.Youalso can clickthe red“tick” tool buttonin the top
rightof screento callthe toolmenu andchangethe curtainshape,colour,background
image,and brightness,etc. Throughthe RevealScreen function,you cancover someof the
areaand emphasizetheimportantcontentfor theconvenience ofdemonstration. Inthe
revealed area, youcan use yourmouse that will operate normally. Clickred cross toexit
reveal.
c. Reveal Up/Down: Revealsup & down directionsonlyfrom centre; pull
handleto reveal.Operation asfor Reveal above.
d. Reveal Left/Right: Revealsleft & rightdirections only fromcentre; pull
handleto reveal.Operation asfor Reveal above.
e. ScreenArrow: Places an arrow on the working area. Click on arrow to drag it to
requiredposition. Double clickonarrow to changeits direction. Theparametersof the
arrow(colour, direction&transparency)canbe changedby right mouseclicking onthe
placedarrow.
f. Blank Screen: Click on the icon to place a blank screen, with or without a message,
overthe workingarea.The parametersofthe blankscreen (colour,message, font,
transparency, time, andbackground picture)can bechangedby rightmouse clickingonthe
blankscreen.
- 19 -

2. Maths Tools: Click on Maths Tools on top line to display 6 options on bottom
line:
a. Length orAngle Measurement: Click to display choice option. Length: You can
measurebetween 2pointsand themeasurement is displayedon the screen.
AngleMeasurement:You canmeasure anangle andthe measurementwillbe displayed.
b. Dividers: Provides an interactive set of dividers to use on the work area. After
clickingthe icon, clickonceon the workarea to mark thecentre of therequiredcircle.
Dragyour mouse to measurethe radius oftherequired circle. Clickagainat the correct
distanceto drawthecircle basedon the parametersyou selected.Ifyou movethe mouse
alongthe circlecircumference,you cantrace the circumferenceto thedesired position, to
eithermarkout an arc or the complete circle. Click a final time tolockthe arc or circle.
c. Ruler: Thedefault ruleris10 unitslong.It canbe rotated inany angle orstretched
to100 units.
d. Protractor: Protractor can be rotated about the origin, and can be zoomed in and
out.We also providean origin-coordinateformore accurateangle measurement.
e. Set Square: Click on the set square icon, select either the 450 or 60/300square,
andclick on theworkarea to placethe square. Theposition,size and orientationof
thesquare canthen bechanged using theobject tools.
f. Pi Chart/Column Graph: Clickto display choice option. Pi Chart: Input name and
datato create the PiChart. Colours of segments& background can bechosen.
ColumnGraph: Samesetupas forPi Chart, butdisplay as ColumnGraph.
3. Screen Capture: Click on screen capture on the top line to display 3 options
onthe bottomline:
a. Full Screen Capture: Click to capture the full screen and display in a new
pageor the currentpage.
b. Custom Screen Capture: Clickthe button, use yourmouse to mark outthe
required screen area forcapture, and double clickwithin the marked area tocapture
thescreen and displayin a newpageor the currentpage.
c. Current Screen Capture: Click the button, and a red frame will be displayed to
markthe area ofwindow required forcapture. Pull theline tomark out the required
screenarea for capture,and double click withinthe marked area tocapture the screen
anddisplay in anewpage or thecurrent page.
- 20 -

4. Screen Record and Play: We provide Full Screen Record,Area Record, and
WindowsRecord functions. Ifyou activatetheSound Recordfunction, the soundalso
canbe recorded simultaneously.The recordedfile canbesaved inAVI orWMV format.You
alsocan convertAVIto WMV, SWF(FLASH file),or EXEto playback.Besides manyplayers
such as Windows Media Player, you can also use our own player to play them. During
recording,click this buttonagain toexit.
Whenplaying the playablefile (media file,FLASH file, PPTfile) in fullscreen, all operations
onthescreen(suchaswriting,drawingandotherspecialdemoeffectsandauxiliaryfunctions)
willpausethe playing.Afteryou exitthis operation,the playingwillresume.
Byrecording theconstruction ofa lesson, everysingle strokecan beplayed backinorder to
re-createthe entireprocesson theboard. Click onthe ScreenRecordbutton onthe top line
todisplay the5 Functions Keys:
a. Stop
b. Pause
c. Play
d. Record: Whenyou click thebutton, the variousrecord options aredisplayed.
e. Converter: Convertsthe recorded filetoother formats.
5. Special Tool: Click on the SpecialTool button on the top line to display the
followingFunctionKeys:
a. Generate Random Number: Generate random number or a group of random
numbers.This functionthe canbeused instudent nominationor otherteachingcases
thatneedrandom number.
b. Calculator: Displaysthe system calculator.
c. Screen Zoom: Displays zoomed image where cursor is located on split
screen.Thedefault position ison the rightside of thescreen.Youcandrag andadjust
the Magnifier. Right click on zoomed image to open command box. Options set zoom
parameters;exit closeszoom.
d. Remote Video Meeting: OPerateswith Windows NetMeeting software. Click on
theicon to displayto box tiinput the dataforthe meeting.
User Extended: Clickonthis buttonon topline todisplay windowsprograms that can
beaddedtothetoolbar,andwhichwillappear inthe bottomline.Andsimply byclicking
theseshortcuts, youcan startthese applicationprograms directly.Open theTaskbar Menu/
SystemSetting/User Extended toadd more programs.
- 21 -
Table of contents
Other abi Interactive Whiteboard manuals