ABLE2 Pedal Exerciser User manual

ASSEMBLY INSTRUCTIONS
Aids to daily living
Pedal Exerciser
with electronic display
Fietstrainer met elektronisch display
Pédalier avec afficheur numérique
Fahrradtrainer mit elektronischem Display
Pedalier con pantalla electrónica
Aparelho de pedalar com mostrador eletrónico
NL
FR
DE
ES
PT

Kruk
Stelknop
Elektronisch display
Pedaal
Vergrendelingsknop
Voetband
Pootjes
Crank
Tension knob
Electronic display
Pedal
Push pin
Foot strap
Legs
1. Remove contents from box.
2. Pull legs in opposite direction until locking button “snaps” into locking receiver. (see figure A)
3. Attach electronic display to the pedal exerciser by sliding the loop over the tension knob around
the frame (see figure B)
Attention: Only attach the multi function display to this adhesive label!
4. Insert tension knob on top of pedal exerciser and turn clockwise to tighten. The tension knob will
increase/decrease the amount of tension on the pedal exerciser. Tighten/loosen to a level that
feels comfortable.
5. You can set the width of the foot strap through the 2 adjustment holes. (see figure C)
1. Haal het apparaat uit de verpakking.
2. Klap de pootjes naar buiten open tot deze in de vergrendeling ‚vastklikken‘. (zie afbeelding A)
3. Bevestig het elektronische display met de lus om de stelknop. (zie afbeelding B)
Let op: Klem het multifunctionele display alleen op deze sticker!
4. Om de trapweerstand in te stellen, gebruikt u de stelknop aan de bovenzijde van de fietstrainer
die u langzaam met de wijzers van de klok meedraait. Draai de stelknop strakker aan of losser
totdat u een prettige weerstand hebt ingesteld.
5. U kunt de breedte van de voetband verstellen aan de hand van de 2 afstelgaten.
(zie afbeelding C)
To fold, depress push pin and fold leg inward. Repeat for second
leg. (see figure D). Om de fietstrainer in te klappen, drukt u de vergrendelingsknop
in en klapt u de pootjes naar binnen. Doet dit aan beide zijden
van de fietstrainer. (zie afbeelding D)
If the display does not come on
or reads incorrectly, the battery
requires replacement. To replace
the battery slide the lid on the back
of the display down, replace the
underlying battery and set the
display back on.
Let op: Niet op de
fietstrainer staan.
Vermijd schade: belast
de pedalen niet met
een te hoog gewicht.
Attention: Do not
stand on the pedal
exerciser! Do not put
too much weight on the
pedals, otherwise the
pedal exerciser may be
damaged.
Wanneer het display niet meer goed
werkt of verkeerde gegevens toont, moet
de batterij worden vervangen. Als u de
batterij wilt vervangen, schuift u het klepje
aan de achterkant van het display naar
beneden. Vervang de batterij en zet het
display weer aan.
1. MODE (Red Button): this control allows you to select a particular function.
To Start, press and hold the Red Button for 4 seconds. The LED will display the different
functions. If you do not select a function, the unit will automatically shut off.
2. To select a function, wait until the 4 seconds set up is complete. Push the Red Button and the
arrow will move through the functions. When the desired function is selected, simply use the
pedal exerciser and the unit will analyse the exercise.
3. COUNT (CNT): counts the number of steps.
4. TIME: indicates duration of training.
5. CALORIE (CAL): indicates the amount of calories burned.
6. REPS PER MINUTE (RPM): automatically calculates the number of repetitions per minute.
7. SCAN: automatically reviews the results of all functions.
To reset the display to zero, press the Red Button (RESET) 3 seconds.
1. MODE (rode knop): met deze knop selecteert u een bepaalde functie. Houd de rode knop 4
seconden ingedrukt. Op het LED display verschijnen de verschillende functies. Als u na
activering geen keuze maakt, wordt de eenheid automatisch uitgeschakeld.
2. Wacht 4 seconden tot de set up gereed is en selecteer een functie. Door het indrukken van de
rode knop, loopt de pijl langs de verschillende functies. Nadat u de gewenste functie hebt
geselecteerd, begint u met uw training. De fietstrainer analyseert automatisch de traininig.
3. TELLER (CNT): telt het aantal trapbewegingen.
4. TIJD (TIME): geeft de trainingsduur weer.
5. CALORIEËN (CAL): geeft het totaal aantal verbrande calorieën weer.
6. OMWENTELINGEN PER MINUUT (RPM): berekent automatisch het aantal herhalingen per minuut.
7. SCAN: geeft automatisch de resultaten van alle functies weer.
Om de display weer op nul te zetten, drukt u 3 seconden op de rode knop (RESET).
ASSEMBLY INSTRUCTIONS
FUNCTION AND DISPLAY DESCRIPTION FUNCTIE EN BESCHRIJVING VAN HET DISPLAYBATTERY REPLACEMENT BATTERIJ VERVANGEN
FOLDING INKLAPPEN
MONTAGEHANDLEIDING
NL
Aids to daily living Aids to daily living
figure A afbeelding A
figure B afbeelding B
figure C afbeelding C
figure D afbeelding Dfolded ingeklapt
Attention:
on
not put too much weight
on the pedals, otherwise
the pedal trainer may be
damaged

Axe de rotation
Bouton croisillon
Afficheur numérique
Pédale
Goupille de verrouillage
Courroie de la pédale
Pieds
Drehgelenk
Einstellschraube
Elektronische Display
Fusspedal
Arretierpin
Fußhaltebände
Standbeine
INSTRUCTIONS DE MONTAGE MONTAGEANLEITUNG
FR DE
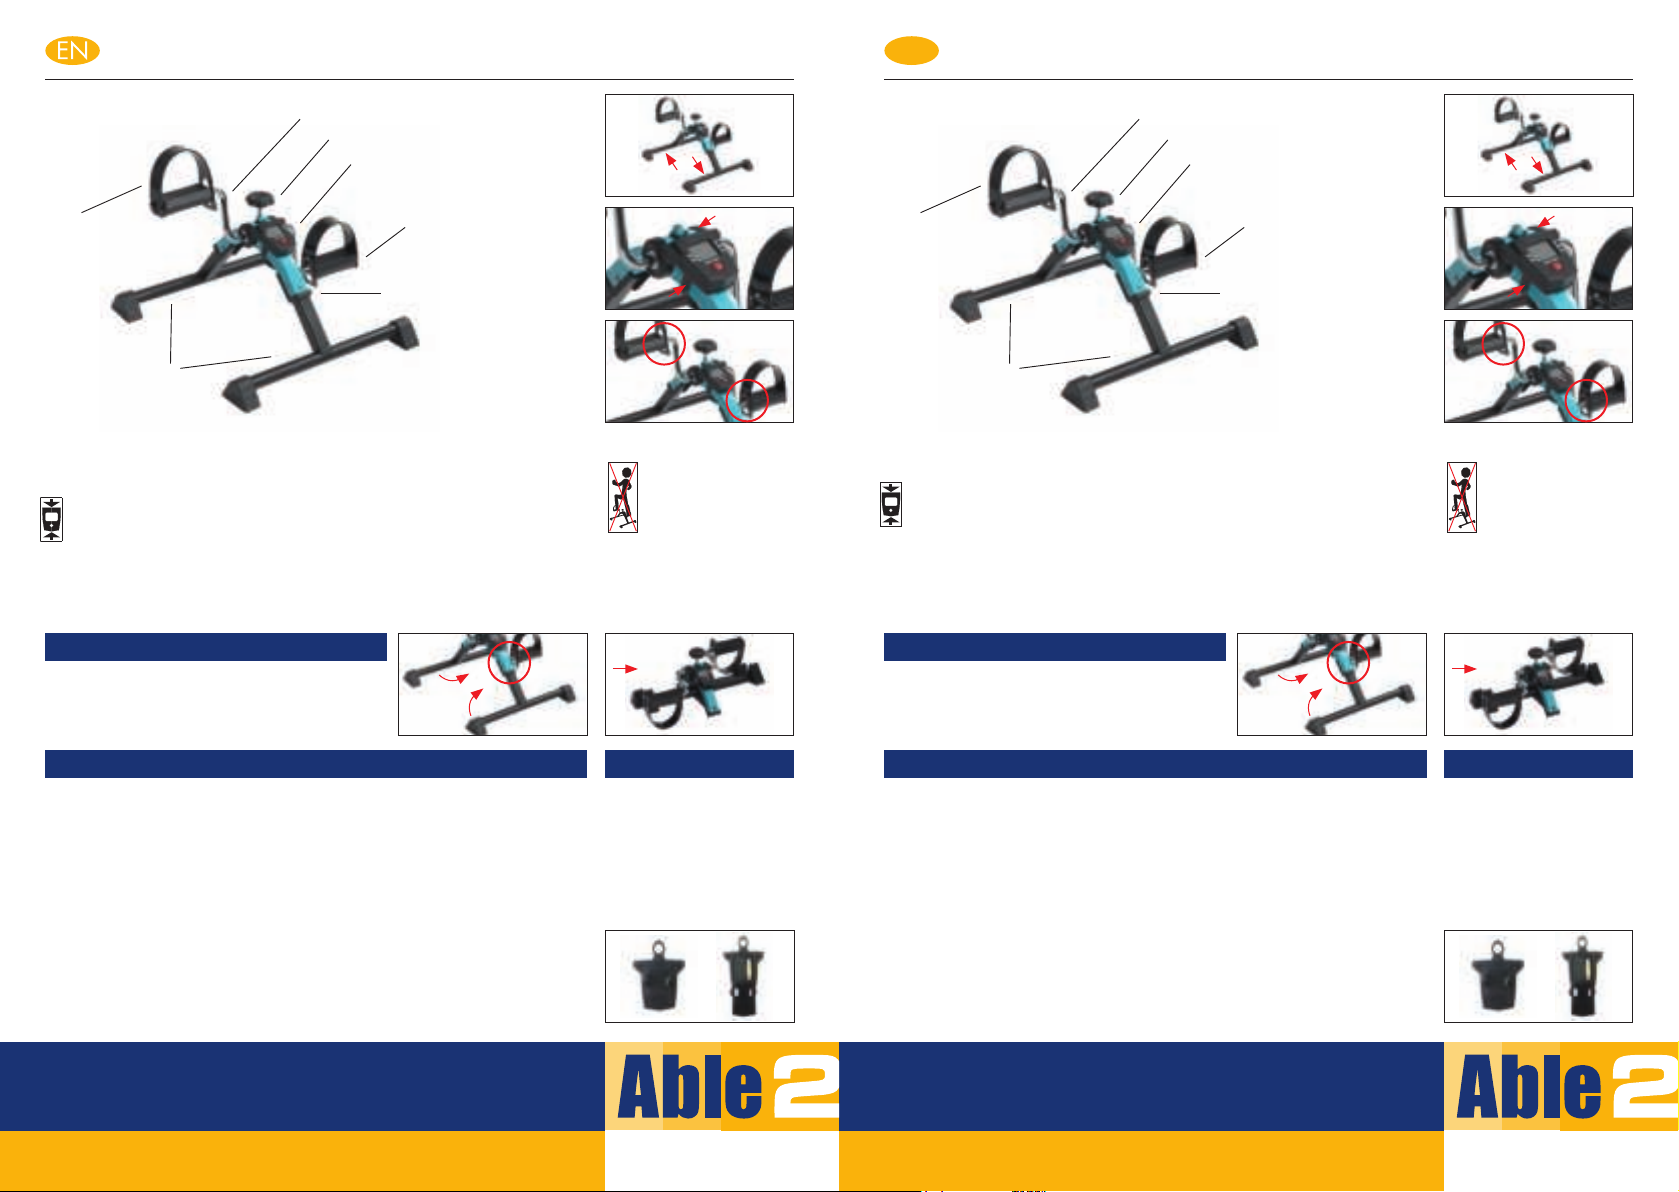
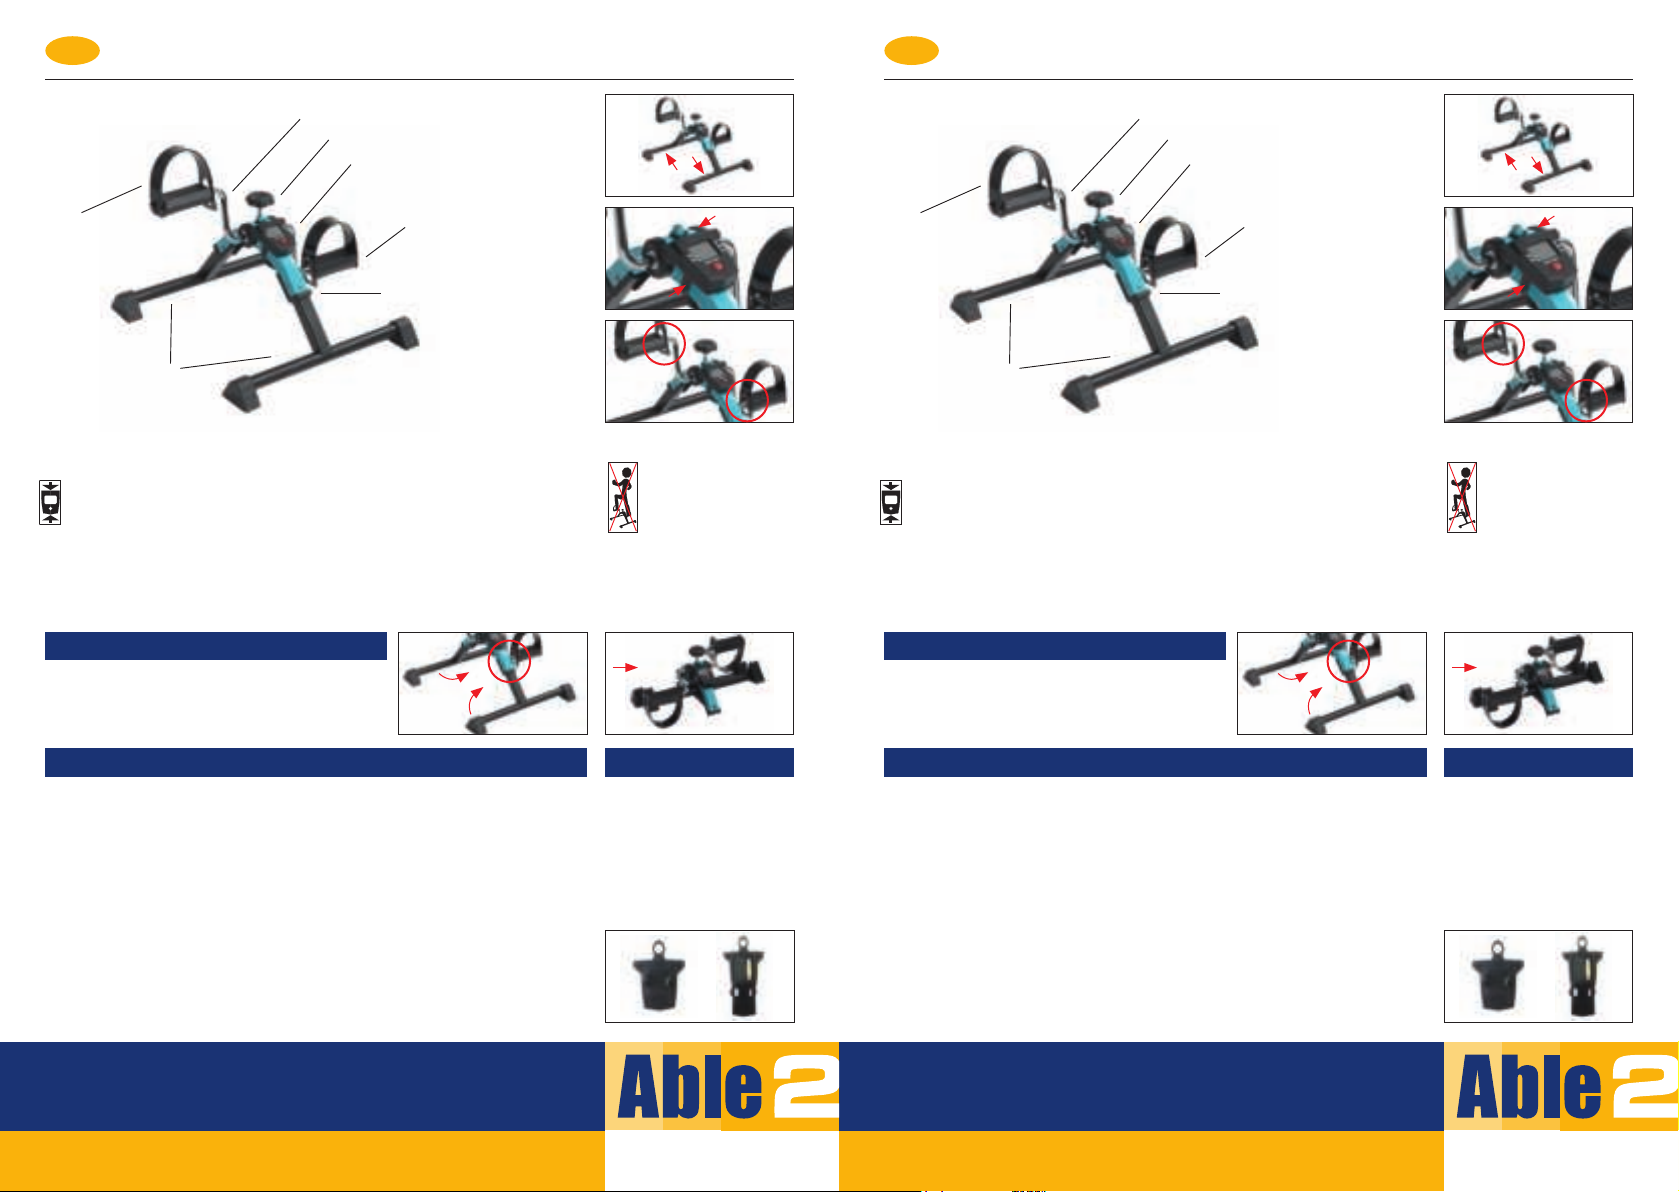
1. Retirez le contenu de la boîte.
2. Tirez les pieds vers l’extérieur jusqu’à ce qu’ils « cliquent » dans les orifices de verrouillage. (voir figure A)
3. Pour fixer l’afficheur numérique au cadre, glissez la boucle pardessus la goupille de verrouillage. (voir figure B)
Fixez l‘afficheur multifonctions uniquement sur cet autocollant !
4. Pour régler la résistance des pédales, utilisez le bouton croisillon sur le dessus du pédalier et
tournez dans le sens horaire pour serrer. Serrez ou desserrez le bouton de manière à régler l’effort
à un niveau confortable.
5. La courroie de la pédale com- porte deux trous qui permettent de l’ajuster confortablement autour
de votre pied. (voir figure C)
Pour ranger le pédalier, enfoncez la goupille de verrouillage
et repliez le pied vers l’intérieur. Répétez pour le second pied.
(voir figure D)
Zum Zusammenfalten drücken Sie den Arretierpin am jeweiligen
Standbein nach innen. Wiederholen Sie diesen Vorgang auch
mit dem zweiten Standbein (siehe Bild D).
1. MODE (bouton rouge) : ce bouton permet de choisir une fonction particulière. Maintenez le
bouton rouge enfoncé pendant 4 secondes. L’afficheur LED affiche les différentes fonctions
(l’afficheur s’éteint automatiquement si vous n’effectuez pas de choix).
2. Pour choisir une fonction, attendez que la mise en route de 4 secondes soit complétée.
Appuyez sur le bouton rouge pour déplacer la flèche d’une fonction à l’autre. Lorsque la
fonction désirée est sélectionnée, commencez à pédaler et l’afficheur analysera
automatiquement votre entraînement.
3. COMPTEUR (CNT) : indique le nombre de rotations du pédalier.
4. DURÉE (TIME) : indique le temps d’entraînement.
5. CALORIES (CAL) : calcule le nombre de calories brûlées.
6. ROTATIONS PAR MINUTE (RPM) : calcule automatiquement le nombre de rotations du
pédalier par minute.
7. SCAN : indique automatiquement les résultats de toutes les fonctions.
Pour remettre l’afficheur à zéro (RESET), appuyez pendant 3 secondes sur le bouton rouge.
1. MODE (Roter Knopf): mit diesem Knopf wählen Sie eine bestimmte Funktion aus. Den roten
Knopf 4 Sekunden eingedrückt halten. Das LED-Display zeigt die verschiedenen Funktionen an.
Wenn nach dem Einschalten keine Wahl erfolgt, schaltet die Einheit automatisch ab.
2. Warten Sie 4 Sekunden bis das Setup fertig ist und wählen Sie dann eine Funktion aus.
Nachdem Sie den roten Knopf gedrückt haben, zeigt der Pfeil die verschiedenen Funktionen an.
Wenn Sie die gewünschte Funktion ausgewählt haben, beginnen Sie mit Ihrem Training.
Der Fahrradtrainer wird das Training automatisch analysieren.
3. ZÄHLER (CNT): zeigt die Anzahl der Trittbewegungen.
4. ZEIT (TIME): zeigt die Trainingsdauer an.
5. KALORIEN (CAL): zeigt die Summe der verbrauchten Kalorien an.
6. UMDREHUNGEN PRO MINUTE (RPM): berechnet automatisch die getätigten
Wiederholungen pro Minute.
7. SCAN: zeigt automatisch die Ergebnisse aller Funktionen.
Pour remettre les affichages à zéro (reset), appuyez sur le bouton rouge 3 secondes.
UTILISATION EN MODE AUTOMATIQUE FUNKTION UND ERKLÄRUNG DISPLAY
REMPLACEMENT DE LA PILE AUSTAUSCH DER BATTERIE
RANGEMENT ZUSAMMENFALTEN
figure A
figure B
figure C
figure D replié
Si l’afficheur ne fonctionne pas ou
affiche des données incorrectes,
vous devez remplacer la pile. Pour
remplacer la pile, poussez vers le
bas le couvercle situé au dos de
l‘afficheur. Remplacez la pile et
allumez à nouveau l’afficheur.
Wenn die Anzeige nicht funktioniert
oder falsch anzeigt, ist ein Austausch
der Batterie nötig. Um die Batterie zu
ersetzen, schieben Sie den Deckel auf
der Rückseite des Displays nach unten,
ersetzen Sie die darunterliegende Batterie
und setzen das Display wieder ein.
1. Entnehmen Sie das Gerät der Verpackung.
2. Klappen Sie die Standbeine nach außen auseinander bis diese in die Arretierung „einschnappen“. (siehe Bild A)
3. Clipsen Sie das Multifunktionsdisplay an der gekennzeichneten Stelle am Rahmen ein. (siehe Bild B)
Achtung: Clipsen Sie das Multifunktionsdisplay nur auf diesen Aufkleber!
4. Um den Tretwiderstand einzustellen setzen Sie die Einstellschraube an der Oberseite des
Fahrradtrainer ein und drehen diese im Uhrzeigersinn. Spannen oder lösen Sie die Einstellschraube
bis Sie eine angenehme Widerstandseinstellung erreicht haben.
5. Die Fußhaltebänder haben innen zwei verschiedene Lochreihen die eine Verstellung der Weite
erlauben. Wählen Sie die für Sie am bequemste! (siehe Bild C)
Bild A
Bild B
Bild C
Bild D gefaltet
Achtung: Stehen Sie
nicht auf den Fahr-
radtrainer! Belasten
Sie die Pedale nicht
mit übermäßigem
Gewicht, da Sie den
Fahrradtrainer
beschädigen könnten.
Attention : Ne vous
mettez pas debout sur
le pédalier !
Ne surchargez pas
les pédales ; vous
risqueriez d‘endom-
mager le pédalier.
Attention:
on
not put too much weight
on the pedals, otherwise
the pedal trainer may be
damaged
Aids to daily living Aids to daily living

INTRUCCIONES DE MONTAJE INSTRUÇÕES DE MONTAGEM
ES PT
Biela
Perilla de ajuste
Pantalla electrónica
Pedal
Botón de bloqueo
Correa de pie
Patas
Eixo de rotação
Manípulo de tensão
Mostrador eletrónico
Pedal
Botão de retenção
Correia para pé
Pernas
1. Retire el dispositivo del embalaje.
2. Abrir las patas hacia afuera hasta que encajen en su lugar en el mecanismo de bloqueo. (ver imagen A)
3. Coloque la pantalla electrónica con el lazo alrededor del botón de bloqueo alrededor del marco. (ver imagen B)
Nota: solo colocar la pantalla multifunción encima de esta pegatina
4. Para establecer la resistencia al pedaleo, use la perilla de ajuste en la parte superior del pedalier,
que gira en el sentido de las agujas del reloj. Apriete o afloje la perilla de ajuste hasta que haya
establecido una resistencia cómoda.
5. Puede ajustar el ancho de la correa del pie. Elija el ancho más cómodo a través de los 2 orificios
de ajuste en la correa. (ver imagen C)
Para plegar el pedalier, presione el botón de bloqueo y doble
las patas hacia adentro. Haga esto en ambos lados del
pedalier. (ver imagen D)
Para rebater a unidade, pressione o botão de retenção e dobre
uma perna para dentro. Repita para a segunda perna.
(ver a figura D)
1. MODO (botón rojo): con este botón puede seleccionar una función. Mantenga presionado el
botón rojo durante 4 segundos. Las diversas funciones aparecen en la pantalla LED.
Si no realiza una selección después de la activación, la unidad se apagará automáticamente.
2
. Espere 4 segundos hasta que la configuración esté lista y seleccione una función. Al presionar el
botón rojo, la flecha pasa a través de las diversas funciones. Después de haber seleccionado la
función deseada, comience su entrenamiento. El pedalier analiza automáticamente el entrenamiento.
3. CONTADOR (CNT): cuenta el número de revoluciones.
4. TIEMPO (TIME): muestra el tiempo de entrenamiento.
5. CALORÍAS (CAL): calcula el número total de calorías quemadas.
6. REVOLUCIONES POR MINUTO (RPM): calcula automáticamente el número de repeticiones
por minuto.
7. ESCANEAR (SCAN): muestra automáticamente los resultados de todas las funciones.
Para restablecer la pantalla a cero, presione el botón rojo (RESET) durante 3 segundos.
1. MODO (botão vermelho): este comando permite-lhe selecionar uma função em particular.
Para começar, mantenha o botão vermelho premido durante 4 segundos. O LED exibirá as
diferentes funções. A unidade desliga-se automaticamente se não houver atividade.
2. Para selecionar uma função, aguarde até terminar o período de configuração de 4 segundos. Prima o
botão vermelho. A seta irá deslocar-se pelas várias funções. Assim que a função desejada for
selecionada, basta usar o aparelho de pedalar e a unidade calculará o exercício.
3. CONTAGEM (CNT): determina o número de passos efetuados durante a operação do aparelho
de pedalar.
4. TEMPO (TIME): determina o período de tempo durante o qual o aparelho de pedalar esteve em operação.
5. CALORIAS (CAL): determina o número de calorias queimadas ao usar o aparelho de pedalar.
6. REPETIÇÕES POR MINUTO (RPM): calcula automaticamente o número de repetições por minuto.
7. ANALISAR (SCAN): revê automaticamente os resultados de todas as funções.
Para reiniciar o mostrador, prima o botão vermelho (RESET) durante 3 segundos.
FUNCIÓN Y DESCRIPCIÓN DE LA PANTALLA FUNÇÕES E DESCRIÇÃO DO MOSTRADORCAMBIAR LA PILA
SUBSTITUIÇÃO DA PILHA
PLEGAR REBATIMENTO
imagen A
imagen B
imagen C
Imagen D Plegado
Si la pantalla ya no funciona correcta-
mente o muestra datos incorrectos, se
debe reemplazar la pila. Para reem-
plazar la pila, deslice la cubierta en
la parte posterior de la pantalla hacia
abajo. Reemplace la pila y encienda
nuevamente la pantalla.
Se o mostrador não ligar ou se exibir
valores incorretos, a pilha requer sub-
stituição. Para substituir a pilha, deslize
para baixo a tampa na parte de trás
do mostrador, substitua a pilha e volte
a ligar.
1. Remova o conteúdo da embalagem.
2. Desloque as pernas em direções opostas até o botão de retenção “clicar” no recetor de
travamento. (ver a figura A)
3. Coloque o mostrador eletrónico ao deslizar o laço por cima do manípulo de tensão e à volta da
armação. (ver a figura B)
Atenção: Coloque o mostrador multifunções apenas sobre esta etiqueta adesiva!
4. Insira o manípulo de tensão na parte de cima do aparelho de pedalar e rode no sentido horário
para apertar. O manípulo de tensão aumenta/diminui a resistência do aparelho de pedalar.
Aperte/solte até se encontrar a um nível que considere confortável.
5. Pode ajustar a largura das correias para pés usando os 2 orifícios de ajuste. (ver a figura C).
figura A
figura B
figura C
figura D dobrado
Atenção: Nunca se
coloque de pé sobre o
aparelho de pedalar.
Não coloque dema-
siado peso sobre os
pedais, caso contrário
o aparelho de pedalar
será danificado.
Atención: No se pone
a pie en el pedalier.
Evite daños: no
sobrecargue los
pedales.
Attention:
on
not put too much weight
on the pedals, otherwise
the pedal trainer may be
damaged
Aids to daily living Aids to daily living

Distributed by:
Able2 Europe B.V.
Koperslagerij 15
4762 AR Zevenbergen
The Netherlands
www.able2.nl
Able2 UK Ltd.
www.able2.eu
Able2 Iberia S.L.
www.able2.es
MADE IN
CHINA
Valentine International Ltd. Taiwan
8th Floor, No. 149, Sec 2, Ta Tung Road
221 Hsichih District, New Taipei City
Taiwan R.O.C
Y. Sung Handelsvertretung
Duesselthaler Str. 24
40211 Duesseldorf Germany
Aids to daily living
Pedal Exerciser
with electronic display
Table of contents
Other ABLE2 Fitness Equipment manuals