KURZANLEITUNG
BIG Step-by-Step™
Sprachgerät
GARANTIE
Für alle von AbleNet hergestellten Produkte gilt eine 2-jährige
beschränkte Garantie. Diese Garantie beschränkt sich auf
Material- und Verarbeitungsfehler und gilt für 2 Jahre ab dem
Kaufdatum. Ausführliche Garantieinformationen finden Sie
auf unserer Website unter www.ablenetinc.com.
AbleNet, Inc.
2625 Patton Road
Roseville, MN 55113
United States of America
(651) 294-3101
ablecare@ablenetinc.com
www.ablenetinc.com
Hergestellt aus recycelten Inhalten
GE June 18, 2021 1:54 PM
1Produktregistrierung
Die Registrierung Ihres Produkts bietet
Ihnen Zugang zu Produkt-Updates und
Ressourcen von ableCARE. Scannen Sie den
nachfolgenden QR-Code, um Ihr Produkt zu
registrieren.
2Allgemeine
Beschreibung
Scannen Sie den untenstehenden QR-Code,
um ein kurzes Video über die ersten Schritte
zu sehen oder folgen Sie den aufgeführten
Anweisungen.
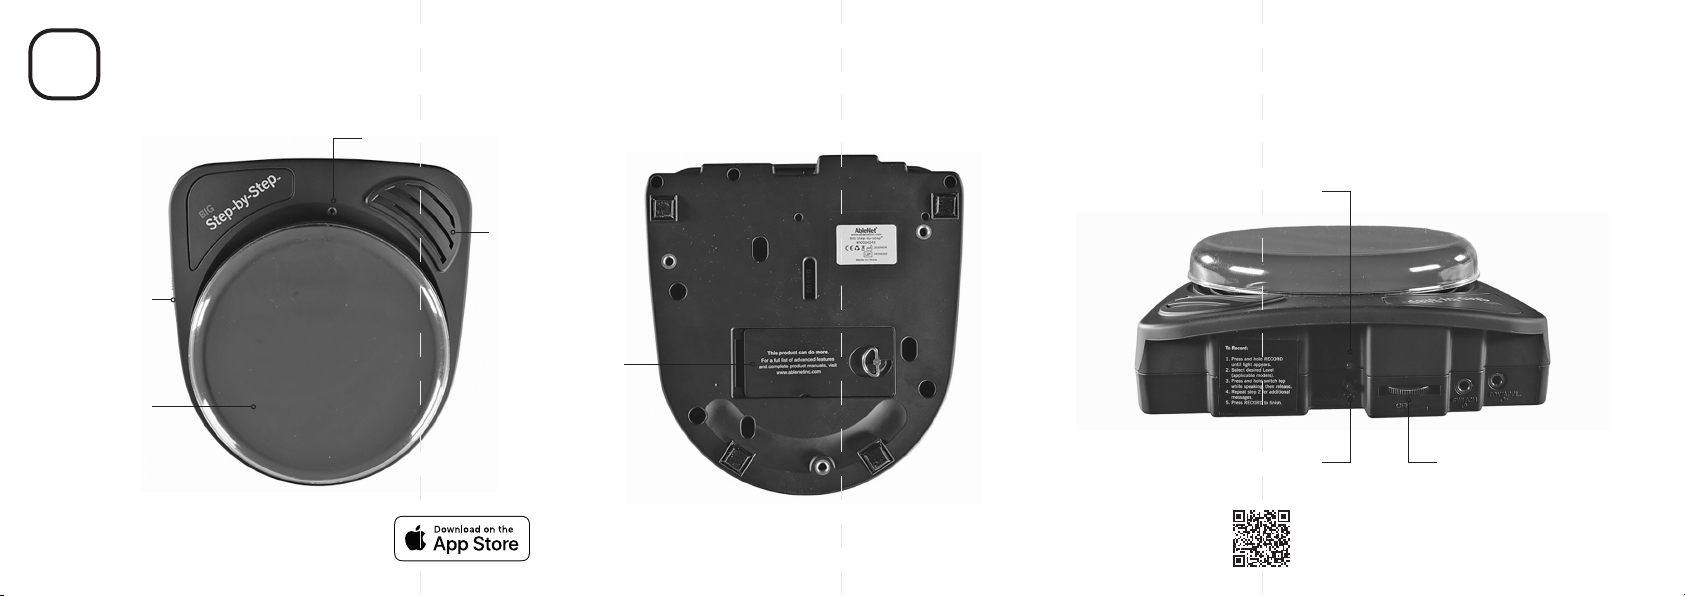
Erste Schrie:
1. Stecken Sie eine 9-Volt-Alkalibatterie (Batterie
nicht enthalten) in das Gerät.
2. Schalten Sie das Gerät an.
3. Wählen Sie das gewünschte Level.
4. Drücken und halten Sie den Record-Knopf, bis
die Aufnahmeanzeige aufleuchtet.
5. Drücken und halten Sie die farbige
Schaltoberfläche. Sprechen Sie in das Mikrofon,
nachdem Sie das Piepen hören.
6. Lassen Sie die farbige Schaltoberfläche los,
wenn sie mit der Aufnahme fertig sind.
7. Wiederholen Sie die Schritte 5 und 6, um
zusätzliche Mitteilungen aufzunehmen.
8. Drücken Sie den Record-Knopf, um die
Aufnahme-Anzeigelampe auszuschalten.
9. Optional: Wählen Sie eine andere
Aufnahmestufe aus, um einen zweiten und
dritten Satz von Nachrichten aufzunehmen.
10. Passen Sie die Lautstärke falls nötig an.
11. Ihr Gerät ist jetzt einsatzbereit.
Dieses Gerät kann noch mehr! Eine ausführliche
Gebrauchsanweisung finden Sie unter
www.ablenetinc.com.
Durch Herunterladen der ableCARE-App
erhalten Sie Zugriff auf den Live-Support
des Produkterfolgsteams von ableCARE, auf
eine Online-Wissensdatenbank mit Videos
und Informationen zu den ersten Schritten
einschließlich weiterer Ressourcen.
Scannen Sie den untenstehenden QR-Code,
um die kostenlose ableCARE-App auf Ihr
Telefon oder Tablet herunterzuladen.